Table of Contents

Related Manuals for HornBlasters ROCKER


Summary of Contents for HornBlasters ROCKER
- Page 1 Page 1 ROCKER AIR HORN INSTALLATION MANUAL 2-Gallon WARNING: To ensure the longevity of your system, reading and following these instructions is necessary. Make sure to follow the recommended maintenance intervals found on page 13.
-
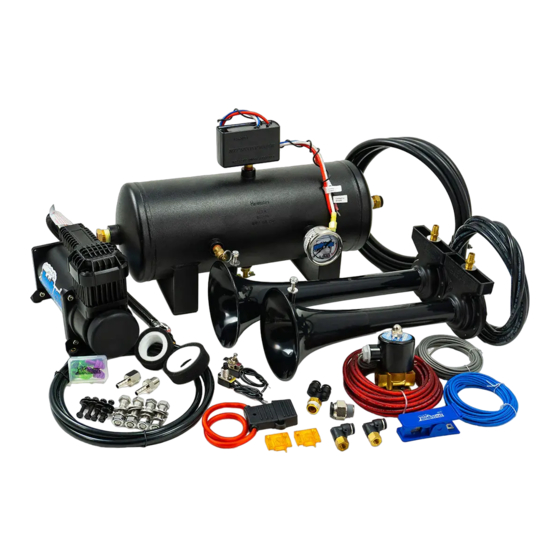
Page 2: Kit Contents
Page 2 HORNBLASTERS ROCKER 2-GALLON INSTALLATION GUIDE KIT CONTENTS: • HornBlasters Air Compressor • Air Filter Relocation Kit (in compressor box) • HornBlasters 2-Gallon Air Tank • 3/8" Electric Solenoid Valve • HornBlasters Rocker Horns • Ear Plugs • 17’ 1/2” Airline •... -
Page 3: Important Safety Instructions
• Use eye protection when operating drills or other power tools during the install. • Ensure the parking brake is engaged before you get underneath the vehicle. • Do not wire the system without the fuse holder. • Do not allow the compressor to run when the vehicle is off. www.hornblasters.com support@hornblasters.com... -
Page 4: Recommended Tools
• Drill (3/16" & 7/16" bits) • 9/16” Wrench (1/4” NPT Fittings) • Wire Cutter / Stripper / Crimper • 5/8” Wrench (2-Way Splitter on Valve) Compatible Add-on Kits (available @ www.HornBlasters.com) Description Part # Name Adds a quick disconnect to your system which allows... - Page 5 Page 5 Preparing For the Install Recommended Install Locations for Your Car (Compressor) • The trunk of your car/sedan/suv is a great spot for this air source kit. The trunk keeps the compressor out of the weather and is one of the best install locations for the compressor/tank. •...
- Page 6 Page 6 Preparing For the Install (continued) Recommended Install Locations for Trucks (Compressor) • The toolbox is a great location for the compressor. Do not use the toolbox as a ground point as it will not be directly connected to the frame of the vehicle. •...
-
Page 7: Filter Placement
If the air filter is not relocated, the compressor will pull in water/dirt and will stop working properly. 9 out of 10 compressors that fail within the first year have pulled in water/debris from the intake. WE DO NOT WARRANTY COMPRESSORS THAT HAVE FAILED DUE TO WATER/DEBRIS BEING PULLED INTO THE INTAKE/FILTER www.hornblasters.com support@hornblasters.com... - Page 8 Page 8 Recommended Tank Assembly * * Always make sure the drain cock is facin DOWN. Regardless of how you decide to assemble the tank, the drain fitting needs to Option 1 point down to allow water to drain. Gravity will pull water to the bottom of the tank.
- Page 9 Take a larger bend further away from the fitting to prevent the line from stretching the fitting out. These fittings can be re-used with the same line multiple times. If you need to remove the line, follow these steps: www.hornblasters.com support@hornblasters.com...
- Page 10 Make sure that: • Both 5/16" lines are equal length • Make sure each horn is mounted properly before you drive the vehicle. • Ensure each line is properly connected into each elbow fitting and each side of the splitter. www.hornblasters.com support@hornblasters.com...
- Page 11 Page 11 Wiring the Compressor Compressor Wiring A = 10 GAUGE TAN RING TERMINAL B = PRESSURE SWITCH C = 18 GAUGE RED MALE SPADE CONNECTOR D = 10 GAUGE YELLOW/GREEN FEMALE SPADE CONNECTOR E = AIR COMPRESSOR An ignition/key power source can be any circuit that is hot when the vehicle is on. Good examples of these are the radio, daytime running lights, power seats,cigarette lighter, or even an accessory fuse.
- Page 12 ROCKER INSTALLATION INSTRUCTIONS Page 12 Option 1 (Steering Wheel) ----------------------------------------------------------------------------------------------------------------------------- Option 2 (Push Button) WIRING YOUR VALVE Once you have grounded one of the valve terminals, please choose one of the next two options for the switch. • Option 1 (Steering Wheel): Wire the other terminal to a toggle switch and then into your factory horn 12 volt power wire under the hood.
- Page 13 You can insert the flat end of white portion of the filter lines up with the plastic the screwdriver into seam, tabs. Replace the cover back over the housing, where the arrow is. lining the tabs up on the sides of the cover. www.hornblasters.com support@hornblasters.com...
-
Page 14: Troubleshooting
Make sure the compressor's check valve wasn't overtightened If the check valve is overtightened, it will leak back to the compressor and the air will escape from the filter. This may also lead to a blown fuse. www.hornblasters.com support@hornblasters.com... - Page 15 Check and ensure each air line is secure in the elbow fittings. If one line is loose or disconnected, the other horns will sound muffled due to the loss of air pressure. Can't find your issue listed above? Give our team a call @ (877)-209-8179 or shoot us an email to sales@hornblasters.com www.hornblasters.com support@hornblasters.com...
- Page 16 Page 17...
Need help?
Do you have a question about the ROCKER and is the answer not in the manual?
Questions and answers