Table of Contents
Advertisement
Quick Links
Advertisement
Table of Contents

Related Manuals for Ocean Sonics Recorder Buoy


Summary of Contents for Ocean Sonics Recorder Buoy
- Page 1 Recorder Buoy User Guide August 8, 2019 April 2020 Version 1.1 Version 2.2...
-
Page 2: Table Of Contents
Features ................................2 Ocean Sonics Buoy Quick Start ........................3 Assemble Buoy Configuration ........................3 Connect to Recorder Buoy ..........................3 Setup Sampling on Recorder Buoy for Deployment ................4 Deployment ................................6 Recovery..................................6 Hard Drive Retrieval .............................. 6 Battery Replacement ............................ -
Page 3: Overview
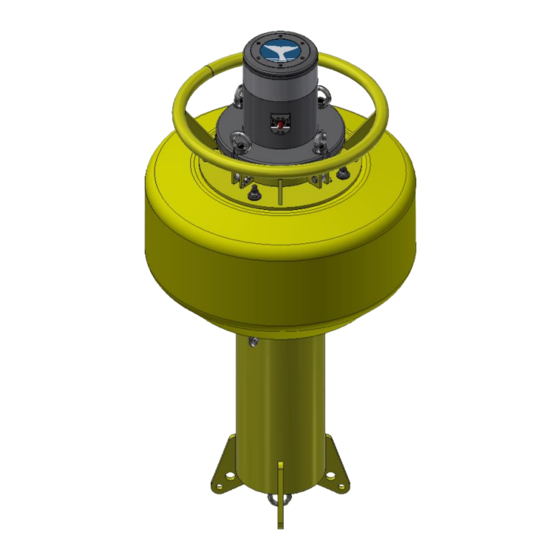
Overview The Ocean Sonics Recorder Buoy is an easy way to deploy one or more icListen Smart Hydrophones while keeping them synchronized. The yellow drifting buoy is small and lightweight, so it can be deployed from a small vessel. This solution combines power, data storage, and time synchronization with a hydrophone array. -
Page 4: Ocean Sonics Buoy Quick Start
2. Attach cables, smart cables and hydrophones in configuration for deployment (See Appendix 3. Turn ON Ocean Sonics Recorder Buoy (ON Position: 1). Connect to Recorder Buoy 4. Attach the serial cable to the top of the buoy in the designated MCBH8 connector. -
Page 5: Setup Sampling On Recorder Buoy For Deployment
Setup Sampling on Recorder Buoy for Deployment 6. Open the Gordon application on your PC. 7. Choose Connect to a Smart Recorder . 8. Choose your device from the list. a. Click on the Battery Pack. b. Click Connect. 9. A page will be displayed with the Battery Pack Status. - Page 6 10 e. The Apply Button will disappear to show that settings have been applied successfully. For more information on Gordon Application and setup see Smart Recorder User Guide on USB stick under Gordon Folder. Recorder Buoy User Guide April 2020...
-
Page 7: Deployment
Thread the cable through the eye nuts and padlock to secure in place. This will ensure the eye nuts will not become loose and it will prevent opening of the top hat until retrieved. 1. Set-up Recorder Buoy for deployment (See Appendix A.). -
Page 8: Battery Replacement
1. Ensure Buoy is OFF (Position: 0). 2. Unscrew eye nuts and remove top hat. 3. Remove batteries. a. Disconnect all cables from the top hat of the buoy. b. Remove batteries carefully from the buoy. Recorder Buoy User Guide April 2020... - Page 9 Recorder Buoy User Guide April 2020...
-
Page 10: Maintenance
The Recorder Buoy should be thoroughly rinsed with fresh water after each deployment to remove saltwater and debris. • The Recorder Buoy should only be opened when it is safe to do so in a clean environment without chance of water entering the inside. •... -
Page 11: Testing The Buoy
3. Plug the power adapter barrel connector into the serial cable. 4. Plug the serial cable USB end into a computer USB port. 5. Connect the serial cable to the MCBH8 connector on the Recorder Buoy. 6. Setup for deployment, record and review data on hard drive. -
Page 12: Buoy Assembly
Buoy assembly and deployment should be performed by an experienced professional, with knowledge on deploying oceanographic equipment. Strain relief on cable connections and securing hydrophones should be done with care. Failure to follow best practices could result in damages in equipment or personnel. Recorder Buoy User Guide April 2020 P.11... -
Page 13: Battery Measurements
This should be done before a deployment and after replacing batteries to ensure the batteries are in good condition. 1. Turn on Recorder Buoy running solely on interior batteries (not plugged into 36 V wall adapter). 2. Place the negative voltmeter lead (black) into pin 1 of the MCBH8F bulkhead connector on the battery pack end cap for the common connection (pinout below). -
Page 14: Technical Drawing
Appendix C Technical Drawing Recorder Buoy User Guide April 2020 P.13...
Need help?
Do you have a question about the Recorder Buoy and is the answer not in the manual?
Questions and answers