Table of Contents
Advertisement
Quick Links
Advertisement
Table of Contents

Related Manuals for Ocean Sonics Coastal Acoustic Drifting Buoy


Summary of Contents for Ocean Sonics Coastal Acoustic Drifting Buoy
- Page 1 Coastal Acoustic Drifting Buoy User Guide April 2020 Version 2.1...
-
Page 2: Table Of Contents
Marco Settings - DHCP ........................... 14 Appendix D ................................15 Confirming Voltages ............................. 15 Appendix E ................................15 Using the Ocean Sonics Buoy with a Smart Phone or Tablet ............15 Appendix F ................................16 Sample Buoy Assembly ..........................16 Appendix G ................................17 Technical Drawing ............................ -
Page 3: Introduction
Introduction The Ocean Sonics Coastal Acoustic Drifting Buoy is an easy way to deploy one or more icListen Smart Hydrophones while keeping them synchronized. Users can create a custom array using the extension cables and Smart Cables as building blocks. The setup and configuration of the hydrophones can be done with the buoy’s internal Wi-Fi access point. -
Page 4: Ocean Sonics Buoy Quick Start
Appendix B. Setup Hydrophone 5. Open Marco on PC [Ocean Sonics’ Software Program found on icListen USB drive]. a. Click Refresh to view the hydrophone(s) connected to the buoy. b. All units on Marco should be set to DHCP (See Appendix C for Marco Help). -
Page 5: Charging The Batteries
4. Mate connector and secure locking sleeve (see below). Figure 2. Power Adapter connecting to Buoy 5. Charging should take approximately 8-10 hours to reach full capacity. 6. To Check Battery Voltage, see Appendix D. Ocean Sonics Buoy User Guide April 2020... - Page 6 2. Select the GPS Tab and click CONFIGURE. 3. Click Enable. 4. Click APPLY. 5. Click OK. Each time Logs are turned on and off (enabled / disabled) a new log file will be created. Ocean Sonics Buoy User Guide April 2020...
-
Page 7: Deployment
Deployment Note: For safe deployment ensure the vessel engine is stopped during deployment. 1. Set-up buoy using Ocean Sonics Guidelines for Deployment and the Quick Start above. 2. Check operation using Wi-Fi to ensure hydrophones are recording and streaming. 3. Start deployment with bottom of array cables. - Page 8 2. Choose a destination folder on your computer and copy over the log files in the log folder following the steps outlined for downloading hydrophone data. Clearing Log Files To delete all logged GPS files. 1. Disable GPS logging in the web browser. 2. Click CLEAR_LOGS. Ocean Sonics Buoy User Guide April 2020...
-
Page 9: Maintenance
The buoy should only be opened when it is safe to do so in a clean environment without chance of water entering the inside. • The buoy should be recharged after each deployment. Contact Ocean Sonics Ltd. To download Ocean Sonics Software please visit: https://sites.google.com/a/oceansonics.com/ocean-sonics-resource-site/ Service To request an RMA or technical support Email: support@oceansonics.com... -
Page 10: Troubleshooting Wi-Fi Connection
2. Right Click on Wi-Fi. 3. Choose Properties. 4. Click on Internet Protocol Version 4 (TCP/IPv4). 5. Click on Properties. 6. Ensure Obtain an IP address automatically and Obtain DNS server address automatically are chosen. Ocean Sonics Buoy User Guide April 2020... -
Page 11: Checking Wi-Fi Network Configuration
5. To delete password protection on Wi-Fi, leave Password field blank and click CONFIGURE & RESTART. Configuring Network Settings To change IP Address Mode to DHCP 1. Open Web Browser with IP address of buoy. 2. Sign In. Ocean Sonics Buoy User Guide April 2020 P.10... - Page 12 Note: The buoy will restart, and communications will be lost. IP address provided will no longer be the static address, the address can be found by viewing the Network Connection Settings for the Wi-Fi. Ocean Sonics Buoy User Guide April 2020 P.11...
-
Page 13: Factory Reset
If there are problems with the Wi-Fi settings a Factory reset can be applied. This will reset to default IP address and password. This is the same function as the Reset Button on the buoy (see Resetting Wi-Fi). Ocean Sonics Buoy User Guide April 2020 P.12... -
Page 14: Resetting Wi-Fi
All Wi-Fi settings will be lost and restored to default. A Reset would be necessary in the following states: • The Wi-Fi network on the Ocean Sonics Buoy was configured and caused the Wi-Fi to stop working and communications were lost. •... -
Page 15: Marco Settings - Dhcp
Click Send to Device and wait for settings to be successfully sent to the unit. e. Continue this for each unit so they are all set to DHCP IP addresses. Units should all show up green indicating they are ready. Ocean Sonics Buoy User Guide April 2020 P.14... -
Page 16: Confirming Voltages
Batteries should not be discharged past 21 V. Appendix E Using the Ocean Sonics Buoy with a Smart Phone or Tablet 1. Download an App on your device that will allow the discovery of IP addresses on your Network. Suggested App: Fing 2. -
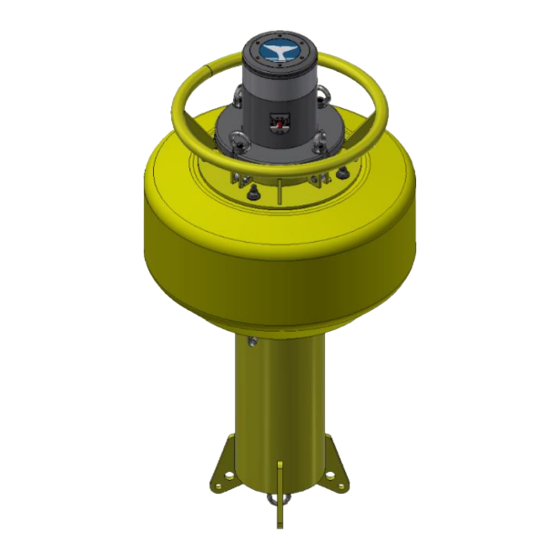
Page 17: Sample Buoy Assembly
Strain relief on cable connections and securing hydrophones should be done with care. Failure to follow best practices could result in damages in equipment or personnel. DRIFTING BUOY Ocean Sonics Buoy User Guide April 2020 P.16... -
Page 18: Technical Drawing
Appendix G Technical Drawing Ocean Sonics Buoy User Guide April 2020 P.17...
Need help?
Do you have a question about the Coastal Acoustic Drifting Buoy and is the answer not in the manual?
Questions and answers