
Related Manuals for Acuity Controls Fresco Touchscreen


Summary of Contents for Acuity Controls Fresco Touchscreen
- Page 1 express yourself through light User Guide Based on FW 103.18 1 of 27 Acuity Brands | One Lithonia Way Conyers, GA 30012 Phone: 800.535.2465 www.acuitycontrols.com © 2014-2015 Acuity Brands Lighting, Inc. All rights reserved. 08/17/15...
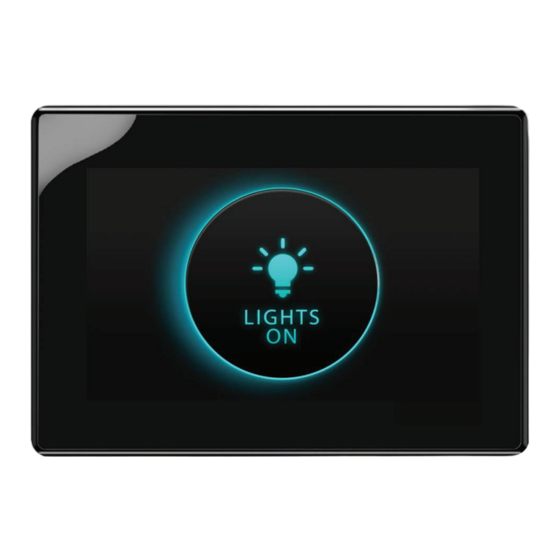
- Page 2 Lights On Overview “Lights On” is what you will see when the room is off and when pressed will activate the first lighting scene. 1. This screen is displayed when the room lighting is OFF, and the screen IR proximity sensor has been activated 2.
-
Page 3: Home Screen
Home Screen Overview Turn room lighting on/off, activate scenes, master raise/lower lighting level, access to lighting zones, menu access for system setup, and current date/time 1. Controller name is unique and modified within MENU settings 2. Scrollable scene bar displays up to 6 programmable scenes per page. - Page 4 Lighting Channels Overview Control up to 36 individual zones of lighting using the sliders or rocker switch. Adjustments such as intensity, color and color temperature are also controllable here 1. Channels control individual areas of lighting. These can control zones or multiple zones (Groups) of lighting.
- Page 5 Scene Creation Overview Each fresco station supports up to 36 lighting scenes. Scenes can made up of multiple lighting channels, 1. Adjust individual channel intensity levels 2. If available adjust color and/or color temperature setting using by pressing the attribute icon 3.
- Page 6 Scene Creation (continued) Overview Each fresco station supports up to 36 lighting scenes. Scenes can made up of multiple lighting channels, 1. Create a new SCENE NAME 2. Set the transition time of the scene with FADE TIME 3. INCLUDED CHANNELS allows specific lighting channels to be included/excluded within the scene 1.
-
Page 7: Home Screen Menu
Home Screen Menu Overview Menu provides access to system settings. Setup user profiles and access control, system configuration, and hardware setup 1. USERS establishes the profiles used for secured system access 2. SCHEDULING is currently not implemented in this firmware version 3. - Page 8 Menu > Users Overview User profiles can be setup to establish secured access to system controls 1. LOG IN to access system control and setup 2. If any buttons within the MENU are “greyed out” it indicates limited system access 1.
- Page 9 Menu > Users (continued) Overview User profiles can be setup to establish secured access to system controls 1. 3 system access profiles are capable for setup Administrator- Full system access to control and Configuration. Allows system profiles to be created Configure- Full system access to control and configuration...
- Page 10 Menu > Scheduling and Diagnostic Overview Scheduling stores system timeclock control and scheduled lighting events. Diagnostic accesses system technical data that is used for troubleshooting system performance 1. Setting up SCHEDULING from the station is not currently supported. All schedules must be imported using the Fresco Studio PC tool 2.
- Page 11 Menu > Setup Overview Setup accesses system configuration 1. SETUP allows access to system configuration for: System firmware Screen adjustments Network IP settings Lighting channels nLight devices DMX fixtures Lighting groups 11 of 27 Acuity Brands | One Lithonia Way Conyers, GA 30012 Phone: 800.535.2465 www.acuitycontrols.com © 2014-2015 Acuity Brands Lighting, Inc. All rights reserved. 08/17/15...
- Page 12 Setup > About Overview System information including device serial number, operating firmware, network settings, and system reset 1. Fresco firmware version 2. Station serial number 3. Network/IP settings 4. nLight firmware version 5. SET TIME sets date and time for station 6.
- Page 13 Setup > Screen Overview Modify screen settings and display behavior 1. The screen behavior can be set to react in 3 steps when the room is active. These settings can be set to a timeframe (hours, minutes, seconds, or never) A.
- Page 14 Setup > Controller Overview Setup station and network settings 1. CONTROLLER NAME gives the station a unique name. Press the text box to access keyboard 2. ROOM defines the single space that accommodates the connected devices. Up to 8 individual rooms can be setup to be stand alone and also joined (room linking) 3.
- Page 15 Setup > Channels Overview Lighting channels are used to control the behavior of lighting devices. A lighting channel corresponds to the control slider. Up to 36 lighting channels can be assigned to a single fresco station 1. Create a new lighting channel by pressing (+) next to the channel location 1.
- Page 16 Setup > Channels (continued) Overview Lighting channels are used to control the behavior of lighting devices. A lighting channel corresponds to the control slider. Up to 36 lighting channels can be assigned and displayed on a single fresco station 1. Choose the ZONE that the channel will control.
- Page 17 Setup > nLight® Overview Add up to 128 supported nLight devices to each fresco station for control 1. If you have nLight devices already connected to the station they will appear here 2. If you need to manually add devices press <Tap to add nLight>...
- Page 18 Setup > nLight® (continued) Overview Add up to 128 supported nLight devices to each fresco station for control 1. If the nLight device was auto identified or you manually entered it you now need to set it up* 2. Press the (+) next to the device to expand the device settings 3.
- Page 19 Setup > nLight ® (continued) Overview Add up to 128 supported nLight devices to each fresco station for control 1. Depending on the device it now needs to be configured for control. Press the (+) to setup the control for the device 2.
- Page 20 Setup > DMX Overview One universe (512 channels) of DMX allows control of DMX/RDM fixtures 1. If you have RDM capable DMX devices already connected to the station they will appear here 2. If you need to manually add DMX devices press <Tap to add DMX>...
- Page 21 Setup > DMX (continued) Overview One universe (512 channels) of DMX for control of DMX/RDM fixtures 1. If the DMX fixture was auto identified or you manually entered it you now need to set it up 2. Press the (+) next to the device to expand the device settings 3.
- Page 22 DMX RGB CONTROL Overview Control color intensity, hue, and saturation for DMX controlled RGB fixtures 1. Raise or lower overall intensity for the lighting zone 2. RGB values are displayed as colors change. Input specific values be pressing any of the RGB value fields 3.
- Page 23 DMX Tunable White Control Overview Control intensity, color temperature and hue for DMX controlled tunable white fixtures 1. Raise or lower overall intensity for the lighting zone 2. Adjust color temperature by sliding the handle (range is specific to fixture) 3.
- Page 24 Setup > Groups Overview Multiple lighting zones can be linked together in groups for joint control 1. Press (+) to expand the group settings 2. Change the group NAME to make it easier to manage by pressing NAME=GROUP # 3. Press (+) to expand the ZONES that need to be added to the group 1.
- Page 25 Setup > Groups (continued) Overview Multiple lighting zones can be linked together in groups for joint control 1. Create a new group by pressing <Tap to add Group> 1. Set a new group ID, start at 1 to keep it simple and easy to manage 2.
- Page 26 Setup > Network Overview Network allows the setup and configuration for future fresco system devices 1. There is no current product supported for this system feature at this time 26 of 27 Acuity Brands | One Lithonia Way Conyers, GA 30012 Phone: 800.535.2465 www.acuitycontrols.com © 2014-2015 Acuity Brands Lighting, Inc. All rights reserved. 08/17/15...
- Page 27 www.acuitycontrols.com 800.535.2465 27 of 27 Acuity Brands | One Lithonia Way Conyers, GA 30012 Phone: 800.535.2465 www.acuitycontrols.com © 2014-2015 Acuity Brands Lighting, Inc. All rights reserved. 08/17/15...
Need help?
Do you have a question about the Fresco Touchscreen and is the answer not in the manual?
Questions and answers
Panel is frozen
To fix a frozen Acuity Controls Fresco Touchscreen panel, you can perform a system reboot using the RESET function. This can be accessed in the Setup > About section of the system menu.
This answer is automatically generated
How do we separate ballroom 1 and 2 on the Touchscreen?