Advertisement
USER MANUAL
AmberGlo
Electric Fire
with LED Effect Lights
AGL035 / AGL036 / AGL037 / AGL053 / AGL054 /
AGL055 / AGL056 / AGL057
Thank you for choosing this AmberGlo electric flame effect heater.
Please read this guide aims to improve your understanding and appreciation of
your new heater, and please retain it for future reference.
Advertisement
Table of Contents

Related Manuals for furniture123 AmberGlo AGL035


Summary of Contents for furniture123 AmberGlo AGL035
- Page 1 USER MANUAL AmberGlo Electric Fire with LED Effect Lights AGL035 / AGL036 / AGL037 / AGL053 / AGL054 / AGL055 / AGL056 / AGL057 Thank you for choosing this AmberGlo electric flame effect heater. Please read this guide aims to improve your understanding and appreciation of your new heater, and please retain it for future reference.
-
Page 2: Table Of Contents
CONTENTS SAFETY PARTS SUPPLIED PRODUCT DIAGRAM INSTALLATION OPERATION APP CONNECTION CARE AND MAINTENANCE BATTERY INFORMATION TECHNICAL SPECIFICATION TROUBLESHOOTING SUPPORT PRODUCT FICHE... -
Page 3: Safety
SAFETY INFORMATION When using electrical appliances, basic safety precautions should always be followed, including the following: • IMPORTANT: Read all instructions and warnings carefully before starting installation. Failure to follow these instructions may result in a possible electric shock or fire hazard and will void the warranty •... - Page 4 • This appliance is designed for indoor use only and is not intended for use in bathrooms, laundry areas and similar indoor locations. Never locate this appliance where it may become exposed to water. • Do not place this fire directly onto a carpeted surface to avoid discolouration due to the heat.
- Page 5 ELECTRICAL SAFETY The heater must not be located under an electrical socket; the socket must always be accessible in order to disconnect the heater from the electrical supply for maintenance and cleaning. Important! This heater must be earthed. The mains supply must be safely routed from the heater to an electrical socket.
-
Page 6: Parts Supplied
PARTS SUPPLIED Screw x 6 Please note: Models AGL035 and AGL056 do not come with the log accessory. Wall Plug x 6 Washer x 6 Pebbles 0.9Kg Crystals 0.5Kg Fireplace Logs x 4 Remote Upper Wall Bracket (For AGL035/AGL036/AGL056/AGL057) Please Note: Some parts are packaged within the cavity of the surround on the rear of the fire. BEFORE USE! Before using the appliance for the first time, ensure that it has been fully unpacked, and that all packaging has been disposed of properly to ensure it does not present a... -
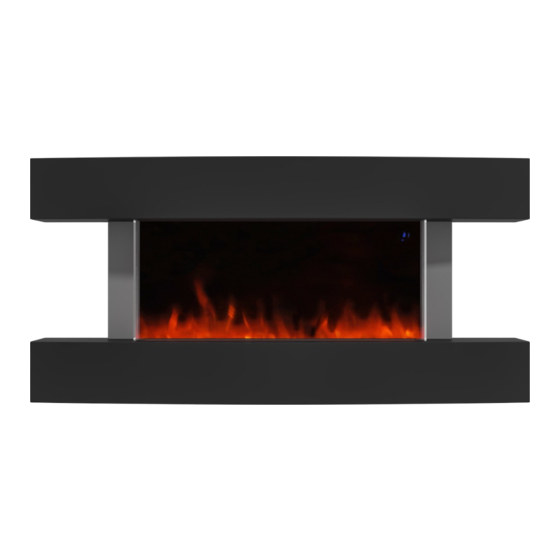
Page 7: Product Diagram
PRODUCT DIAGRAMS... -
Page 8: Installation
INSTALLATION INSTRUCTIONS (For AGL035/ AGL037/AGL053/AGL054/AGL055) This product is designed to be mounted flat to the wall. Before installation please ensure that the floor and wall are flat, and there is nothing that would prevent the fire fitting flush. 1. The fire is designed to be permanently fixed to a wall with a minimum distance of 300mm between the base of the fire and the floor. - Page 9 STEPS TO REPLACE DECORATION (FOR AGL035/AGL036/AGL037) 1. Remove the two screws with a phillips screwdriver 2. Take off the glass, the put decoration well (small pebble/crystal/log set supplied) Install the glass carefully. Two holes are provided for the screws for extra security. INSTALLATION INSTRUCTIONS (For AGL035/AGL036/AGL056/AGL057) IMPORTANT! Two people are...
-
Page 10: Operation
OPERATION Press the power button to turn the unit On or Off. In standby mode, press and hold the power button for 3 seconds to set the wireless network (see Wi-Fi ON/OFF connection). Press and hold the power button for 5 seconds in standby mode to toggle between Celsius and Fahrenheit. - Page 11 REMOTE CONTROL Power Press to turn the appliance On and Off. Button To adjust the flame brightness: Press this button once and then adjust the flame brightness using the arrow buttons. To Flame Button adjust the flame colour, press the flame button twice, then use the Arrow buttons to switch between flame colours (C1-C7).
-
Page 12: App Connection
APP CONNECTION improvement. Some images may differ from the current app due to continuous product NOTE: 1. Press on the register button Read the Privacy policy and 3. Enter your email address or at the bottom of the screen. press the Agree Button. phone number and press continue to register. - Page 13 SETTING UP YOUR HOME WITHIN THE APP TUYA is designed so it can work with a large number of compatible smart devices within your home. It can also be set up to work with multiple devices within different houses as such during the setup process, the app requires that different areas are created and named to allow easy management of all your devices.
- Page 14 CONNECTING USING THE QUICK CONNECTION METHOD Before initiating the connection, make sure the WiFi indicator is flashing twice per second. If not follow the instructions for changing the connection mode. Also ensure your phone is connected to the WiFi network. (We advise turning mobile data off during setup) 1.
- Page 15 CONNECTING USING AP MODE (ALTERNATIVE METHOD) Before initiating the connection, make sure the unit is in standby mode, with the WiFi Indicator flashing once per second. If not follow the instructions for changing the WiFi connection mode. Also ensure your phone is connected to the WiFi network. (We advise turning mobile data off during setup) 1.
- Page 16 CONTROLLING YOUR APPLIANCE THROUGH THE APP THE HOME SCREEN NOTE: Due to continuous development of the app, the layout and available features may be subject to change. Each device has its own entry on the home screen to allow the user to either quickly turn the unit on or off, or to enter the device screen to make other changes.
- Page 17 DEVICE SCREEN The device screen is the main control screen for the heater, providing access to the controls to amend the functions and settings. Device Name Edit Name: Use to Back: Returns to the change the name of the Home Screen heater.
- Page 18 PROFILE TAB The profile tab gives you the option to edit both your detail, and use the added features of the unit. HOME MANAGEMENT Home Management proves options for managing your TUYA account, giving options such as adding a home, adding and removing rooms, and sharing devices with family.
-
Page 19: Care And Maintenance
CARE AND MAINTENANCE Before cleaning the appliance, the power supply should be disconnected and the unit should be allowed to cool. Dust can be removed by lightly wiping the glass surface with clean, lint free cloth or paper towel. To remove fingerprints or other marks, use a damp cloth with a good quality household glass cleaner. -
Page 20: Troubleshooting
TROUBLESHOOTING Most problems are simple to resolve - please refer to the following table before calling a service engineer: Problem Possible Cause Check Fire has stopped The fire has overheated and the Check there is power to working thermal safety device the socket where the fire activated or a circuit breaker... -
Page 21: Support
SUPPORT Please, for your own convenience, make these simple checks before calling the service line. If the unit still fails to operate call: 0330 390 3062 or complete the online form 1. Is the unit plugged into the mains? 2. Is the fuse OK? 3. -
Page 22: Product Fiche
Model Identifier: AGL035/AGL036 /AGL037 /AGL53 /AGL54 /AGL55 /AGL56 /AGL57 Item Symbol Value Unit Item Unit Heat Output Type of heat input, for electric storage local space heaters only (select one) Nominal heat manual heat charge control, with integrated output thermostat Minimal heat manual heat charge control with room and/or output...
Need help?
Do you have a question about the AmberGlo AGL035 and is the answer not in the manual?
Questions and answers