Table of Contents
Advertisement
Quick Links
092619 RevD
ColorLogic Bubbler
®
Owner's Manual
\
Contents
Before You Begin.....................................2
Installation..............................................5
Operation..............................................13
Winterization.........................................14
Spare Parts...........................................15
Warranty................................................18
WFBCUS1100
WFB100
Hayward Pool Products
620 Division Street, Elizabeth NJ 07207
Phone (908)-355-7995
www.hayward.com
USE ONLY HAYWARD GENUINE REPLACEMENT PARTS
Advertisement
Table of Contents

Subscribe to Our Youtube Channel
Related Manuals for Hayward ColorLogic Bubbler


Summary of Contents for Hayward ColorLogic Bubbler
- Page 1 092619 RevD ColorLogic Bubbler ® Owner’s Manual Contents Before You Begin........2 Installation..........5 Operation..........13 Winterization.........14 Spare Parts...........15 Warranty..........18 WFBCUS1100 WFB100 Hayward Pool Products 620 Division Street, Elizabeth NJ 07207 Phone (908)-355-7995 www.hayward.com USE ONLY HAYWARD GENUINE REPLACEMENT PARTS...
-
Page 2: Important Safety Instructions
WARNING – Electrical shock hazard. Damage to wiring can cause severe injury or death. To reduce the risk of electric shock replace damaged wiring immediately. Locate conduit to prevent abuse from lawn mowers, hedge trimmers and other equipment. SAVE THESE INSTRUCTIONS USE ONLY HAYWARD GENUINE REPLACEMENT PARTS... -
Page 3: Before You Begin
It is recommended to keep the unit in its original packaging until the site is prepared for installation. Compatibility The Hayward WFB100 ColorLogic Bubbler is compatible with the following Hayward ColorLogic 320 and 160 Accent Light models: LACUS11xxx... - Page 4 ColorLogic Bubbler Nozzle Threaded Plug SP0710XZ5 Plaster Shield O-Ring (For Winterization Only) O-Ring For Nozzle and Plug SP1022CNP G1-046401 ColorLogic Bubbler Tool *Comes in plastic bag Alternate colors available (see page 15 or visit hayward.com for details) USE ONLY HAYWARD GENUINE REPLACEMENT PARTS...
-
Page 5: Exploded View
3/4”) Accent Light (included with 6. Plaster Ring** WFBCUS1100) 2. Housing 1. Pipe Guide 1.5” SCHED 1.5” SCHED 40 40 Electrical PVC Pipe (Not Conduit (Not Included) Included) **Plaster Ring only adjustable during Installation. USE ONLY HAYWARD GENUINE REPLACEMENT PARTS... -
Page 6: Installation
Junction Box optional in-line flow control valve **Hayward recommends mounting the ColorLogic Bubbler no more than 12” below the surface of the water when installed as a bubbler/fountain for the best combination of water and light. Determine the location for the ColorLogic Bubbler. Rough-in plumbing pipe and electrical conduit by plumbing the water line to the desired pumping system and the electrical line to the Accent Light junction box as shown above. -
Page 7: Installation Steps
From Pool or Spa Water Supply Installation Steps Follow the steps below to ensure proper installation of the ColorLogic Bubbler. Cut the two pieces of 1.5” pipe to no less than 2” and no more than 2.125” beneath the sur- face level to ensure proper final installation height. - Page 8 Verify that the pipe guide is on the 2 pipes to ensure proper distance between them (as seen below). If the guide is not on the pipes, put it on now to make the next step easier. 2.5” Pipe Guide Electrical Line Plumbing Line USE ONLY HAYWARD GENUINE REPLACEMENT PARTS...
- Page 9 Apply gunite and fill behind the housing up to the level shown in the System Overview diagram on page 5 and below. After Gunite applied Housing Assembly glued to pipes Gunite up to this line USE ONLY HAYWARD GENUINE REPLACEMENT PARTS...
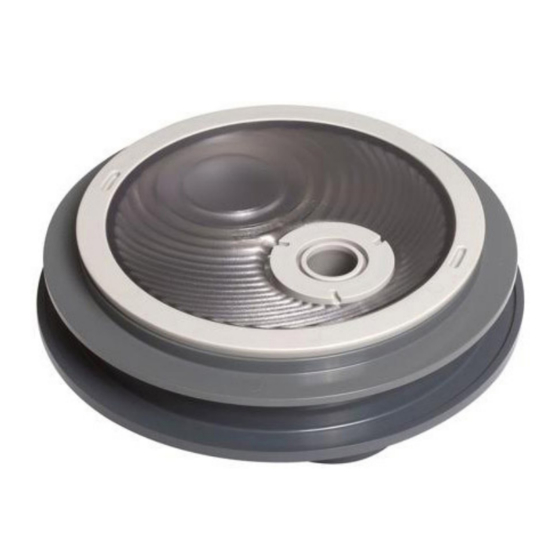
- Page 10 Remove the plaster ring and plaster shield from the box. These parts come assembled together as shown below. DO NOT DISASSEMBLE. IMPORTANT: No O-ring is to be installed with the plaster shield; this is for winteriza- tion purposes only (See page 14 for winterization instructions). USE ONLY HAYWARD GENUINE REPLACEMENT PARTS...
Need help?
Do you have a question about the ColorLogic Bubbler and is the answer not in the manual?
Questions and answers