
Related Manuals for BlueStar BSDF36


Summary of Contents for BlueStar BSDF36
- Page 1 Dual Fuel Range User Manual Installation and Use and Care Information Part # 200005 — revision 0 © Prizer-Painter Stove Works, Blandon, PA 19510...
- Page 2 (800) 449-8691...
- Page 3 Thank you for your purchase and welcome to the BlueStar family! BlueStar appliances are designed for discerning home chefs who demand restaurant-quality results in their own kitchens. As the owner of a new BlueStar appliance, you can look forward to years of precise and even cooking in your home kitchen.
-
Page 4: Table Of Contents
Installation Date ___________________________________ Dealer’s Name _____________________________________ Dealer’s Phone Number ____________________________ If service is required under warranty, it must be performed by an authorized BlueStar service company. To locate an authorized BlueStar service company in your area, go to www.bluestarcooking.com/support/find -a-service-center. (800) 449-8691... -
Page 5: Safety Information
BlueStar is not responsible for service required to Recreational Park Trailers ANSI A119.5. correct a faulty installation. The owner is responsible to make sure this appliance is properly installed. - Page 6 Safety Information (continued) WARNING To reduce the risk of fire, electric shock, serious injury, or • Do not use the oven for storage. death when using your appliance, follow basic safety precautions, including the following: • Do not store combustible, flammable, or explosive materials in the oven or in adjacent cabinets.
- Page 7 ANSI/NCSBCS A225.1 ou avec codes locaux, le cas afin qu'il sache où et comment couper échéant. l'alimentation électrique de l'appareil. BlueStar n'est L'installation d'appareils conçus pour les remorques de pas responsable du service requis pour corriger une parc de loisirs doit être conforme aux codes nationaux installation défectueuse.
- Page 8 Informations de sécurité (suite) AVERTISSEMENT Pour réduire les risques d'incendie, d'électrocution, de • Lorsque vous utilisez le four, ne touchez pas les blessures graves ou de mort lors de l'utilisation de votre éléments chauffants ou les surfaces intérieures du appareil, suivez les précautions de sécurité de base, four ou la zone extérieure entourant immédiatement notamment les suivantes: la porte.
- Page 9 Informations de sécurité (suite) AVERTISSEMENT Pour réduire les risques d'incendie, d'électrocution, de blessures graves ou de mort lors de l'utilisation de votre appareil, suivez les précautions de sécurité de base, notamment les suivantes: • Les grilles du four doivent être positionnées lorsque le four est froid pour éviter les brûlures.
-
Page 10: Site Preparation
6” (152.4 mm) in a vertical plane below the top horizontal plane of the • BSDF36 — 240/208 VAC, 60Hz, 30 amp appliance and 6” (152.4 mm) above the top horizontal • BSDF48 — 240/208 VAC, 60Hz, 50 amp plane of the appliance from combustible materials at the rear. - Page 11 Site Preparation — BSDF36 Product Dimensions Front View 35 7/8” (911.2 mm) Duct 20 7/8” 8” (530.2 mm) (203.2 mm) bluestarcooking.com...
- Page 12 Site Preparation — BSDF36 Product Dimensions (continued) Back View A—6 1/4” (158.8 mm) Electrical Access Gas Inlet 17 1/8” (435.0 mm ) 11 5/16” 13 5/8” (287.3 mm) (346.1 mm) Anti-Tip Foot 11 7/16” (290.5 mm) (800) 449-8691...
- Page 13 Site Preparation — BSDF36 Product Dimensions (continued) Side View 28 3/8” (720.7 mm) 27 7/8” (708.0 mm) 24” (609.6 mm) 1 3/8” (34.9 mm) 2 3/4” 36 3/4 to 35 3/4” (69.8 mm) (933.45 to 908.mm) 29 1/8” 1” (25.4 mm) (739.7 mm)
- Page 14 Site Preparation — BSDF48 Product Dimensions Front View 47 7/8” (1216 mm) Duct 17 7/8” 18 1/4” (454 mm) (463.5 mm) (800) 449-8691...
- Page 15 Site Preparation — BSDF48 Product Dimensions (continued) Back View A—3 5/16” (84.1 mm) Electrical Access Gas Inlet 17 1/8” (435.0 mm ) 13 5/8” (346.1 mm) 8 3/8” (213.7 mm) Anti-Tip Foot 8 7/16” (214.3 mm) bluestarcooking.com...
- Page 16 Site Preparation — BSDF48 Product Dimensions (continued) Side View 28 3/8” (720.7 mm) 27 7/8” (708.0 mm) 24” (609.6 mm) 1 3/8” (34.9 mm) 2 3/4” 36 3/4 to 35 3/4” (69.8 mm) (933.45 to 908.mm) 29 1/8” 1” (25.4 mm) (739.7 mm) Adjustable Legs Opened...
- Page 17 Site Preparation — BSDF36 and BSDF48 Cabinet Dimensions Front View 40” (1016 mm) min Clearance to Combustible Upper Cabinet 18” (457.2 mm) 6” (152.4 mm) min from Combustible Wall BSDF36—36” (914.4 mm) BSDF48—48” (1219.2 mm) 36” (914.4mm) Counter Top Height 17 1/4”...
- Page 18 Site Preparation — BSDF36 and BSDF48 Cabinet Dimensions (continued) Side View 13” (330.2 mm) 2” max (50.8 mm) Gas and Electric Connection Area 2 3/8” (60.3 mm) 24” (609.6 mm) Cabinet Depth (800) 449-8691...
-
Page 19: Installation Instructions
From the left side of the edge of the solides qui peuvent se refermer en cas de choc, ce qui range BSDF36—11 1/2” (292.1 mm) peut causer des blessures. BSDF48—8 1/2” (215.9 mm) 4. Lean the door against a wall or cabinet with the... - Page 20 Installation Instructions (continued) Step 5 — Move the Range into Position • Incoming line pressure upstream of the appliance should be 1.0” WC greater than the operating Remove the wood base with a 1/2” socket or open end manifold pressure. Service pressure may fluctuate wrench and discard the shipping bolts and brackets.
- Page 21 Installation Instructions (continued) Step 7 — Connect Electrical Supply Step 8 — Slide the Range into Position 1. Slide the range into place so the anti-tip foot slides Observe all local and other codes regarding electrical into the bracket. connections. WARNING 2.
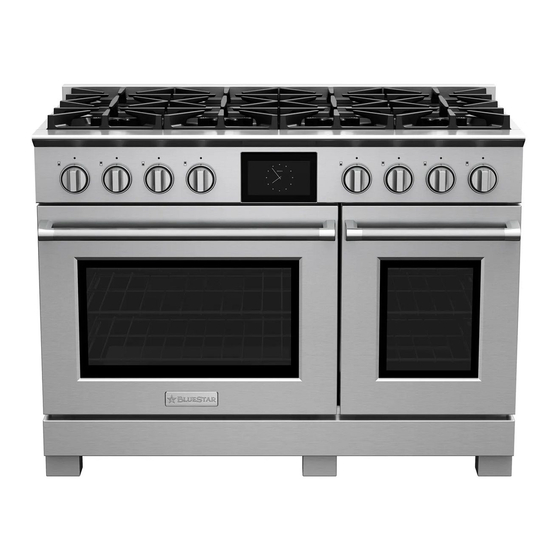
- Page 22 BSDF36 Legs Door Handle Control Knobs Grates Touch Screen Control Oven Lights Rack Guide (both sides) Oven Racks Temperature Probe (800) 449-8691...
- Page 23 BSDF48 Legs Doors Handles Control Knobs Grates Touch Screen Control Oven Lights Rack Guide (both sides) Oven Racks Temperature Probe bluestarcooking.com...
-
Page 24: Before Your First Use
Before Your First Use Oven Burn-Off Procedure Griddle Season Procedure (select models) Important: You must season your griddle before your Important: Before you use the range, it is essential that first use. The seasoning process prevents food from you complete the oven burn-off procedure. This sticking and the surface from rusting. -
Page 25: Touch Screen Control
Touch Screen Control Note: For documentation purposes, touch screen control illustrations are for the BSDF48 range. Instructions apply to all ranges unless otherwise noted. Left Oven Right Oven Left Oven Light Right Oven Light Previous Clock Split Settings Main Screen Screen bluestarcooking.com... - Page 26 2. On the Set Kitchen Timer screen, use the keypad to Tap the screen to start any oven operation. Tap the enter the hours, minutes, and seconds, then tap BlueStar logo in the bottom right corner to return to the Start. The timer countdown will appear in the main screen.
-
Page 27: Touch Screen Control-Modes
Touch Screen Control—Modes Your oven has the following operating modes: Note: For documentation purposes, touch screen control illustrations are for the BSDF48 range. BSDF36 Instructions apply to all ranges unless otherwise noted. • Bake • Convection 1. Tap the mode on the Select Mode screen. - Page 28 Touch Screen Control—Modes (continued) Timed Probe Use the keypad on the Set Cook Time screen to set the Note: The probe is not available with the Broil, Proof, or cooking time in hours and minutes, then tap Set. Dehydrate modes. Use the keypad on the Set Probe Temp screen to set the temperature or use the options on the Select Meat screen and the corresponding Type or Preferences on...
-
Page 29: Touch Screen Control-Settings
Touch Screen Control—Settings F°/C° (Temperature Scale) Tap the Settings icon. 1. Tap °F/°C. 2. Tap °F (Fahrenheit) or °C (Celsius). Set Time 1. Tap Set Time. Sabbath 2. On the Enter Current Time screen, use the keypad to enter the hours and minutes, tap 12 or 24 for, tap In Sabbath mode, the oven maintains a set cooking AM or PM, then tap Set to confirm your selections. - Page 30 3. Press and hold the Screen Lock for three seconds to necessary should be calibrated by an authorized unlock the screen. BlueStar service company. To locate an authorized BlueStar service company in your area, go to www.bluestarcooking.com/support/find-a-service- center. (800) 449-8691...
-
Page 31: Operation
Operation Surface Burners Standard Racks • Push in and turn the burner knob counterclockwise Remove towards HIGH to start the ignition process. The 1. Grasp both sides of the front of the rack. ignitor will spark and make a clicking sound. The 2. - Page 32 Operation (continued) Extension Racks Replace Remove 1. To make sure the extension rack is fully closed, firmly hold the front ends of the rack at your waist, then 1. Push the extension rack all the way into the oven. touch the back of the extension rack to the floor. 2.
- Page 33 Operation (continued) 3. Select cooking mode. Temperature Probe The internal temperature probe monitors the core 4. Select options. temperature of meat and poultry. In a BSDF48 range, 5. Select Probe. the probe is only available in the large oven. 6. Use the keypad on the Set Probe Temp screen to Important: Remove the temperature probe from the set the temperature or use the options on the Select oven when not using it to avoid damage.
-
Page 34: Cooking Guide And Tips
Cooking Guide and Tips General Surface Burners • Always use the timer on the oven display so you • Never leave the range unattended during use. don’t lose track of time and overcook your food. Boil-overs may occur, causing spills which may ignite. - Page 35 Cooking Guide and Tips (continued) Oven Oven Rack Positions Selecting the proper rack position is important and • Important: Wait for pre-heat cycle to be completed depending on where you place your food, it could make before placing food in the oven. All of the elements or your recipe.
- Page 36 Cooking Guide and Tips (continued) You may find that your new oven cooks differently than the old one. Take a few weeks to get comfortable and familiar with your new oven. Do not use thermostats such as those found in grocery stores to check your oven temperatures. These thermostats may vary by 40°...
- Page 37 Cooking Guide and Tips (continued) Convection True convection cooking uses a fan inside the oven, along with a heating element around the fan, to increase air circulation throughout the oven cavity. This results in even heat distribution and a more consistent temperature, which cooks food more efficiently.
- Page 38 Cooking Guide and Tips (continued) Roast and Convection Roast Broil Roast and convection roast are best used for Broiling is a method of cooking that exposes food to caramelization of vegetables, crispy skin on poultry, or a direct radiant heat. Unlike baking and roasting, which crust on a tenderloin or roast.
- Page 39 Cooking Guide and Tips (continued) Broil Guide Food Item Doneness Qty and/or Rack First Side Second Side Tips/Tricks Thickness Position Time Time (minutes) (minutes) Ground Beef Well Done 1 lb (4 patties) Space evenly. Up to eight patties can be 1/2-3/4 thick done at a time.
- Page 40 Cooking Guide and Tips (continued) Dehydrate Proof Dehydrating is an excellent way to preserve food and It is often difficult to maintain a consistent temperature in make healthy snacks with fruits, vegetables and herbs your home to proof doughs for baking breads, right from your garden.
- Page 41 Cooking Guide and Tips Food Safety Tips Safe steps in food handling, cooking, and storage are essential in preventing food-borne illness. You can't see, smell, or taste harmful bacteria that may cause illness. In every step of food preparation, follow these four guidelines to keep food safe: •...
-
Page 42: Common Baking Problems And Solutions
Common Baking Problems and Solutions Problem Causes Corrections Cookies and • • Cookies and biscuits are put into oven before the Allow oven to preheat to the selected temperature biscuits burn on preheating time is completed. before placing food in the oven the bottom •... -
Page 43: Care And Cleaning
Care and Cleaning Important: Make sure the appliance is cool before you clean. Material Cleaning Need to Know Cast Iron • • Wash in hot, soapy water, rinse well and dry Do not allow a commercial oven cleaner to touch thoroughly. - Page 44 Care and Cleaning (continued) Material Cleaning Need to Know Plated Finishes • • The parts were treated with a protective clear coat Do not use a metal knife, spatula, or something (Brass, Copper, to prevent aging or discoloration. This clear coat similar or any metal tool to scrape these Chrome, Oil-Rubbed will last the life of the appliance unless the coating...
-
Page 45: Troubleshooting
Troubleshooting Check these helpful tips for any problems with your oven. If additional help or service is needed, please call customer service at (800) 449-8691. You will need to have the model and serial numbers for your appliance ready before you contact them. See Product Information on page 4 for information on finding these numbers. Problem Possible Cause Solution... - Page 46 Troubleshooting (continued) Problem Possible Cause Solution Touchscreen displays the following: • • • Control Error F20 Control board or wiring issue Call 800-449-8691 for service • • • Control Error F40 Oven temperature sensor issue Call 800-449-8691 for service • •...
-
Page 47: Warranty
Prizer- in areas beyond 50 miles one way from an Painter’s control. authorized BlueStar retailer or service provider. The • Damage or repairs caused by alteration for outdoor owner will be responsible for any and all costs use. - Page 48 (800) 449-8691...
Need help?
Do you have a question about the BSDF36 and is the answer not in the manual?
Questions and answers