Table of Contents
Advertisement
Available languages
Available languages
Quick Links
Advertisement
Table of Contents

Related Manuals for BorMann PRO BBS1210


Summary of Contents for BorMann PRO BBS1210
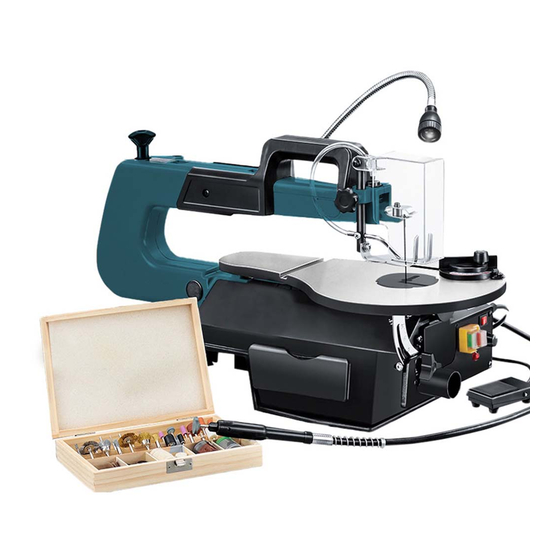
- Page 1 BBS1210 034353 v2.1 Art Nr: WWW.BORMANNTOOLS.COM...
- Page 2 * The manufacturer reserves the right to make minor changes to product design and technical specifications without prior notice unless these changes significantly affect the performance and safety of the products. The parts described / illustrated in the pages of the manual that you hold in your hands may also concern other models of the manufacturer's product line with similar features and may not be included in the product you just acquired.
-
Page 3: Safety Instructions
Safety Instructions WARNING: Do not attempt to operate the machine until you have read thoroughly and understood completely all instructions, rules, etc. contained in this manual. Failure to comply may result in accidents involving fire, electric shock, or serious personal injury. Keep this owner's manual and review frequently for continuous safe operation. - Page 4 Assembly instructions Attach the air pipe to the top of the bellows. Attach the air pipe to the metal tube. Fix the metal tube in place, with the nozzle pointing down to the middle, using the phillips screw. CAUTION! DO NOT OVER-TIGHTEN AS THIS CAN CRUSH THE PIPE Attach the hold down foot using the screw making sure it is parallel to the table.
- Page 5 Attach the transparent guard using the screw, washer and nut. Undo the three small screws on the light cover and put in a safe place. Fit the two batteries provided ensuring they are the correct way around. Replace the cover and refit the screws. Put your spare blades in the storage box on the left hand side of the scroll saw.
- Page 6 ONLY ATTACH THE FLEXIBLE SHAFT WHEN YOU INTEND TO USE IT. WHEN NOT IN USE LEAVE THE PLASTIC THREADED COVER IN PLACE. To use the flexible drive, firstly remove the cover. Locate the power take off. Insert the drive shaft into the hole and then screw the outer cap onto the outlet by hand.
- Page 7 It is normal for scroll saws to create a lot of vibration. Fixing the saw down to a heavy duty work bench is recommended. Some people also find using a vibration absorbing mat helps. There are three bench mounting point provided. There are two types of blade that can be used with this scroll saw.
- Page 8 Turn the blade tension knob counterclockwise to decrease it. Hook the lower pin over the lower blade holder. Press down lightly on the upper blade holder and hook the upper pin over the upper blade holder. Replace the table insert and lower the blade tension lever. To remove the blade, follow these instructions in reverse.
- Page 9 Take off the blade tension. Hook the blade clamp onto the lower blade holder (may be easier using a hand under the table). Once the lower clamp is in place, press down the top arm so that you can hook the top holder into place. Refit the table insert plate.
- Page 10 To start the saw, press down on the foot switch. The blade will move at the set speed. Using the foot switch allows both hands to be used to guide the work piece and the convenience of stopping and starting without taking your hands off.
-
Page 11: Mitre Cutting
Regular Cutting Lower the hold down foot so that it is just above the height of the wood to be cut. It prevents the work piece lifting off the table dur- ing the upstroke of the blade. Adjust the air blower so that it is pointing down at the cutting area. This enables a clearer view of the cut, particularly useful when fol- lowing pencil lines. - Page 12 The mitre guide can be set up to a 45 degree angle for performing mitre cuts. With the Pin type blade set in the sideways position the mitre guide can be used in the rear table slot. Using the Flexible Shaft When using the Flexible shaft ensure the blade guard on the scroll saw is fully down –...
-
Page 13: Cleaning, Maintenance And Storage
Cleaning, maintenance and Storage Warning! Prior to any adjustment, maintenance or service work disconnect the mains power plug! Wipe chips and dust off the machine from time to time using a cloth. When cleaning the plastic do not use corrosive products. Cleaning •... -
Page 14: Οδηγίες Ασφαλείας
Οδηγίες ασφαλείας ΠΡΟΕΙΔΟΠΟΙΗΣΗ: Μην επιχειρήσετε να χειριστείτε το εργαλείο προτού διαβάσετε προσεκτικά και κατανοήσετε πλήρως όλες τις οδηγίες, τους κανόνες ασφαλείας κ.λπ. που περιέχονται σε αυτό το εγχειρίδιο. Η μη συμμόρφωση μπορεί να οδηγήσει σε ατυχήματα που περιλαμβάνουν πυρκαγιά, ηλεκτροπληξία ή σοβαρό προσωπικό τραυματισμό. Φυλάξτε το παρόν εγχειρίδιο σε ασφαλές σημείο και πραγματοποιήστε τακτικούς ελέγχους... - Page 15 Αρχικές ρυθμίσεις και συναρμολόγηση Συνδέστε το διαφανές σωληνάκι του φυσητήρα στην υποδοχή που βρίσκεται στο πάνω μέρος του εργαλείου. Συνδέστε το άλλο άκρο στο μεταλλικό ακροφύσιο. Σταθεροποιήστε το μεταλλικό ακροφύσιο στην θέση του και στρέψτε το στόμιό του με κατεύθυνση προς το κέντρο της βάσης, χρησιμοποιώντας...
- Page 16 Συνδέστε τον διάφανο προφυλακτήρα την βίδα την ροδέλα και το παξιμάδι σύσφιξης. Ξεβιδώστε και αφαιρέστε τις τρεις μικρές βίδες που βρίσκονται στο κάλυμμα της θήκης των μπαταριών και αφήστε το σε ένα ασφαλές σημείο. Τοποθετήστε τις δύο μπαταρίες και βεβαιωθείτε πως είναι σωστά τοποθετημένες...
- Page 17 Ο εύκαμπτος άξονας πρέπει να τοποθετείται στο εργαλείο μόνο όταν πρόκειται να χρησιμοποιηθεί. Όταν δεν χρησιμοποιείτε τον εύκαμπτο άξονα τοποθετήστε το πλα- στικό προστατευτικό καπάκι του σπειρώματος. Για να συνδέσετε τον εύκαμπτο άξονα στην υποδοχή θα πρέπει πρώτα να αφαιρέσετε , το πλαστικό καπάκι προστασίας του σπει- ρώματος.
- Page 18 Οι επιτραπέζιες σέγες δημιουργούν κραδασμούς, κάτι που αποτε- λεί μέρος της φυσιολογικής τους λειτουργίας. Συνιστάται η πάκτωση του εργαλείου σε πάγκο ή τραπέζι εργασίας και η χρήση αποσβεστήρων για την αντιμετώπιση των κραδασμών. Το εργαλείο διαθέτει τρεις οπές για εγκατάσταση σε πάγκο εργα- σίας.
- Page 19 Γυρίστε αριστερόστροφα τον ρυθμιστή τάνυσης της λεπίδας μέχρι να μειωθεί αρκετά η τάση. Συνδέστε το κάτω μέρος της λεπίδας στην κάτω υποδοχή σύνδεσης. Πιέστε ελαφρά προς τα κάτω την πάνω υποδοχή σύνδεσης και περά- στε το πάνω μέρος της λεπίδας στην υποδοχή. Επανατοποθετήστε...
-
Page 20: Οδηγίες Λειτουργίας
Μειώστε την τάση του μηχανισμού τάνυσης. Αγκιστρώστε τον σφιγκτήρα της λεπίδας στην κάτω υποδοχή (μπο- ρεί να σας διευκολύνει να τοποθετήσετε το ένα χέρι κάτω από το τραπέζι). Μόλις τοποθετήσετε τον κάτω σφιγκτήρα στη θέση του, πιέστε προς τα κάτω τον επάνω βραχίονα έτσι ώστε να μπορείτε να συν- δέσετε... - Page 21 Για να ενεργοποιήσετε το εργαλείο, πατήστε με το πόδι σας προς τα κάτω τον ποδοδιακόπτη. Η λεπίδα θα κινηθεί με την προρυθμι- σμένη ταχύτητα. Η χρήση του ποδοδιακόπτη σας επιτρέπει να χρησιμοποιήσετε και τα δύο σας χέρια για να καθοδηγήσετε το τεμάχιο εργασίας κατά την...
- Page 22 Λειτουργία κοπής χωρίς κλίση Ρυθμίστε το εξάρτημα σταθεροποίησης έτσι ώστε να βρίσκεται ακριβώς πάνω από την επιφάνεια του τεμαχίου εργασίας. Απο- τρέπει την ανύψωση του τεμαχίου εργασίας από το τραπέζι κατά την επαναφορά της λεπίδας. Ρυθμίστε το ακροφύσιο του φυσητήρα έτσι ώστε να είναι στραμ- μένο...
- Page 23 Ο οδηγός κοπής μπορεί να ρυθμιστεί σε γωνία 45 μοιρών για την εκτέλεση κοπής με φάλτσο. Αν χρησιμοποιείτε λεπίδα κοπής με ακίδες μπορείτε να ρυθμίσετε το ερ- γαλείο για κοπή σε πλάγια θέση και να χρησιμοποιήσετε τον οδηγό συνδέ- οντας τον στην πίσω ράγα οδηγό. Οδηγίες...
- Page 24 Συντήρηση, καθαρισμός και αποθήκευση Προειδοποίηση! Πριν από οποιαδήποτε εργασία ρύθμισης, συντήρησης ή επισκευής θα πρέπει να αποσυνδέσετε το βύσμα τροφοδοσίας από την πρίζα! Καθαρίστε το εργαλείο από την σκόνη και τα πριονίδια ανά τακτά χρονικά διαστήματα. Κατά τον καθαρισμό των πλαστικών επιφανειών μην χρησιμοποιείτε διαβρωτικά προϊόντα. Καθαρισμός...
Need help?
Do you have a question about the PRO BBS1210 and is the answer not in the manual?
Questions and answers