Table of Contents
Advertisement
Quick Links
Advertisement
Table of Contents

Subscribe to Our Youtube Channel
Related Manuals for PST Michell Instruments Pura Advanced Online 2


Summary of Contents for PST Michell Instruments Pura Advanced Online 2
- Page 1 Pura Advanced Online 2 Hygrometer User Manual 97628 Issue 1 January 2023...
- Page 2 Please fill out the form(s) below for each instrument that has been purchased. Use this information when contacting Michell Instruments for service purposes. Product Name Order Code Serial Number Invoice Date Installation Location Tag Number Product Name Order Code Serial Number Invoice Date Installation Location Tag Number...
- Page 3 Pura Advanced Online 2 Hygrometer For Michell Instruments' contact information please go to www.ProcessSensing.com © 2023 Michell Instruments This document is the property of Michell Instruments Ltd and may not be copied or otherwise reproduced, communicated in any way to third parties, nor stored in any Data Processing System without the express written authorization of Michell Instruments Ltd.
-
Page 4: Table Of Contents
Pura Advanced Online 2 Hygrometer Manual Contents Safety ..........................vi Electrical Safety ......................vii Pressure Safety ......................vii Hazardous Materials (WEEE, RoHS3 & REACH) ..............vii Repair and Maintenance ....................vii Calibration ........................vii Safety Conformity .......................vii Abbreviations ........................viii INTRODUCTION ....................1 Features ......................1 INSTALLATION ....................2 Unpacking the Instrument ................... - Page 5 Pura Advanced Online 2 Hygrometer Manual MAINTENANCE ....................31 Maintenance and Calibration ................31 Fault Conditions ....................31 MEASUREMENT GUIDE ..................32 Sampling Considerations ................... 32 Sampling Hints ....................35 Figures Figure 1 Unpacking – Monitor and Pura SEN, no block version ........2 Figure 2 Unpacking –...
-
Page 6: Safety
Pura Advanced Online 2 Hygrometer Manual Safety The instrument is designed to be completely safe when installed and operated correctly in accordance with the information provided in this manual. This manual contains all the required information to install, operate and maintain this product. Prior to installation and use of this product, this entire manual should be read and understood. -
Page 7: Electrical Safety
Pura Advanced Online 2 Hygrometer Manual Electrical Safety Ensure electrical safety is complied with by following the directions provided here and observing all local operation & installation requirements at the intended location of use. This product is completely safe when using any options and accessories supplied by the manufacturer of this product for use with it. -
Page 8: Abbreviations
Pura Advanced Online 2 Hygrometer Manual Abbreviations The following abbreviations are used in this manual: alternating current pressure unit (atmosphere) barg pressure unit (=100 kP or 0.987 atm) ºC degrees Celsius ºF degrees Fahrenheit direct current dew point foot (feet) gram(s) Hertz “... -
Page 9: Introduction
Pura Advanced Online 2 Hygrometer Manual INTRODUCTION INTRODUCTION The Pura Advanced Online 2 Hygrometer is easy to install and configure; this versatile touch screen hygrometer can measure and display dew point and moisture content and indicate pressure. This display provides analog, digital and 4 programmable relay alarm outputs with front screen or software app display configuration. -
Page 10: Installation
Pura Advanced Online 2 Hygrometer Manual INSTALLATION INSTALLATION It is essential that the connection of electrical and gas supplies to this instrument be undertaken by competent personnel. Unpacking the Instrument 2.1.1 Unpacking Pura Advanced Online 2 Hygrometer The Pura instruments and accessories are packed into a box and the method of unpacking is shown as follows: Figure 1 Unpacking –... -
Page 11: Unpacking Pura Sen (Transmitter, No Block Version)
Pura Advanced Online 2 Hygrometer Manual INSTALLATION Unpacking – Monitor and Pura OEM / PRM Figure 2 2.1.2 Unpacking Pura SEN (transmitter, no block version) Unpack the dew-point transmitter from the rectangular cardboard box. NOTE: The transmitter sensing element is protected while in transit by a red cover containing a small desiccant capsule. -
Page 12: Unpacking Pura Oem-Single Bag, Prm-Double Bag Versions
Pura Advanced Online 2 Hygrometer Manual INSTALLATION 2.1.3 Unpacking Pura OEM-single bag, PRM-double bag versions Unpacking – Pura OEM & PRM – Single / Double Bag Figure 3 2.1.4 Unpacking the Process Monitor The Process Monitor is packed in a cardboard box, together with its fixing clamps. 97628 Issue 1, January 2023... -
Page 13: Pura Advanced Online 2 Components
Pura Advanced Online 2 Hygrometer Manual INSTALLATION Pura Advanced Online 2 Components On delivery please check that all the following standard components are present in the packing box. Report any shortages to Michell Instruments, immediately. Figure 4 Pura Advanced Online 2 Components PURA Monitor Clamps Sensor cable assembly... -
Page 14: Process Monitor Display
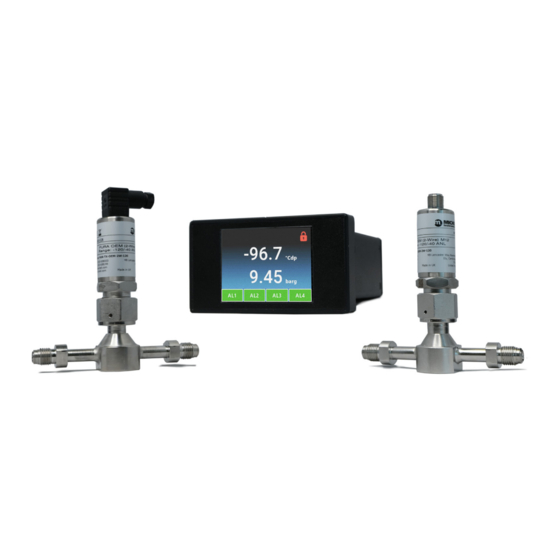
Pura Advanced Online 2 Hygrometer Manual INSTALLATION Process Monitor Display The display within the Process Monitor is an LCD 320 x 240 pixel software driven, touch screen color display. 2.3.1 Process Monitor Display Layout In normal operation, the display screen will appear as below. The display shows a moisture or pressure value, the status of four alarms and a display locked/unlocked symbol, which is all explained in detail in Figure 5 below. -
Page 15: Electrical Connections
Pura Advanced Online 2 Hygrometer Manual INSTALLATION 2.3.2 Electrical Connections Electrical connections to the Pura Advanced Online 2 system are as follows: • AC power supply input, 85...265 V AC (7.5 VA) • Alternative low-voltage DC input is also available: 18...28 V DC (170 mA @ 24 V DC) •... -
Page 16: 2.3.2.1 High-Voltage Power Supply Input
Pura Advanced Online 2 Hygrometer Manual INSTALLATION 2.3.2.1 High-Voltage Power Supply Input Figure 6 Electrical Wiring Schematic For high-voltage powered display • 85...265 V AC 50/60 Hz It is essential that the connection of electrical supplies to this instrument is undertaken by competent personnel. Connect the power supply to the monitor as shown in Figure 6 above. -
Page 17: Dew-Point Sensor Modbus Rtu Over Rs485 Digital Input (Required)
Pura Advanced Online 2 Hygrometer Manual INSTALLATION 2.3.2.3 Dew-Point Sensor Modbus RTU over RS485 Digital Input (Required) For AC or DC voltage powered display version Connect the Dew-Point Sensor to the Process Monitor as shown in Figure 6 . PIN 1 – +24 V DC Power PIN 2 –... -
Page 18: 2.3.2.7 Relay Outputs
Pura Advanced Online 2 Hygrometer Manual INSTALLATION 2.3.2.7 Relay Outputs For AC or DC voltage powered display versions, the relay outputs are as shown in Figure 6 . Alarms 1/2 PIN 17 – AL2 normally open PIN 18 – Common PIN 19 –... -
Page 19: Mounting The Process Monitor
Pura Advanced Online 2 Hygrometer Manual INSTALLATION Mounting the Process Monitor The Process Monitor is designed for panel mounting and requires a panel cut-out of 44 x 92 mm (1.73 x 3.62”). The recommended panel thickness is 2...5 mm (0.08...0.2”). To mount the unit, proceed as follows: Pass the Process Monitor through the front of the panel. -
Page 20: Pura Oem, Prm
Pura Advanced Online 2 Hygrometer Manual INSTALLATION Pura OEM, PRM NOTE: For environmental and operating conditions, refer to Appendix A: Technical Specifications. NOTE: The OEM and PRM transmitters are protected in transit by putting in a plastic bag filled with nitrogen. The Pura OEM has single-bag protection and the Pura PRM has double-bag protection. -
Page 21: 2.6.1.1 Electrical Connections
Pura Advanced Online 2 Hygrometer Manual INSTALLATION 2.6.1.1 Electrical Connections Sensor Michell Function Process Connector Standard Monitor Conductor Connection Color Pin No. Brown Modbus A White Modbus B Blue 4...20 mA Signal Return (Power Supply -ve) (not used – see note) Black Power Supply +ve Grey... -
Page 22: 2.6.1.2 Pura M12 Cables
Pura Advanced Online 2 Hygrometer Manual INSTALLATION 2.6.1.2 Pura M12 Cables The cable connector should be installed by aligning the locating pin on the transmitter with the slot on the cable. The connector can then be pushed into place and rotated until finger tight. -
Page 23: Figure 10 Sensor Block Connection
Pura Advanced Online 2 Hygrometer Manual INSTALLATION Screw the transmitter (1) into the sensor block (4) and, holding the Pura transmitter stationary with a spanner/wrench, tighten the gas line nut 1/8 of a turn using a second spanner/wrench. NOTE: Use the flats of the hexagonal nut and not the transmitter body. -
Page 24: Pura Oem & Prm Connection
Pura Advanced Online 2 Hygrometer Manual INSTALLATION 2.7.2 Pura OEM & PRM Connection The Pura OEM and PRM have been assembled and packaged within a Class 100 clean- room environment. To maintain this level of cleanliness the packaging should only be opened within the same, or cleaner, environment. -
Page 25: Pura Sen - Direct Pipeline Connection
Pura Advanced Online 2 Hygrometer Manual INSTALLATION 2.7.3 Pura SEN - Direct Pipeline Connection The transmitter may be directly mounted into a pipe or duct . CAUTION: Do not mount the transmitter too close to the bottom of a bend where any condensate in the pipeline might collect and saturate the probe. -
Page 26: Operation
Pura Advanced Online 2 Hygrometer Manual OPERATION OPERATION Process Monitor Configuration When you receive your Pura Advanced Online 2 Hygrometer system it will be configured to match your ordered dew-point range, with all other settings at a factory default. You will then need to configure the Process Monitor to meet your own requirements. - Page 27 Pura Advanced Online 2 Hygrometer Manual OPERATION Enter the fixed security code 5618 to access the configuration menu. Menu Click on the icon on the top left-hand side of the display. Michell Instruments...
-
Page 28: Configuration Menu Explained
Pura Advanced Online 2 Hygrometer Manual OPERATION Configuration Menu Explained Clicking on the Menu icon will give you access to the Process Monitor configuration menu. For most customers, you will only have to set this up once and your configuration will be saved and will not then need to be reconfigured. -
Page 29: Setting Up The Process Monitor Configuration
Pura Advanced Online 2 Hygrometer Manual OPERATION Setting Up the Process Monitor Configuration This section looks at each menu configuration and explains, simply, how to set them up. Please note, if there are multiple identical set-ups within one menu (e.g. 4 programmable relay outputs), these are explained using one example. - Page 30 Pura Advanced Online 2 Hygrometer Manual OPERATION Each set point (e.g. Hi S/P Lo S/P ) has a built-in fixed % hysteresis value to create a small dead band below the set-point value, to ensure the relay does not constantly energize and de-energize when the measured or calculated value oscillates around the set-point value.
- Page 31 Pura Advanced Online 2 Hygrometer Manual OPERATION Click on Lo S/P , then enter your required relay switch set point and press Click on the Save icon and the programmed value will be stored. You are now back on the Alarm 1 screen, which confirms your entered configuration.
-
Page 32: Analog Outputs Configuration
Pura Advanced Online 2 Hygrometer Manual OPERATION 3.4.2 Analog Outputs Configuration There are three analog 4...20 mA outputs that can be configured to any measured or calculated parameter within the Process Monitor. Outputs button will take you to the screen shown below in Figure 15 . Selecting the The following explains how to set up Analog Output Channel 1. - Page 33 Pura Advanced Online 2 Hygrometer Manual OPERATION Click on the Save icon and the programmed value will be stored. Click on the 4 mA box and the Enter box will appear. Enter your required zero value, then press Click on the Save icon and the programmed value will be stored.
-
Page 34: Display Configuration
Pura Advanced Online 2 Hygrometer Manual OPERATION 3.4.3 Display Configuration This is a simple menu screen that allows you to configure basic monitor settings and scalings as shown in Figure 16 below. Selects the required temperature scale for the dew-point parameter Sets the Modbus address for the Process Monitor RS485 digital communications Selects the required pressure scale for the indicated pressure parameter... -
Page 35: Input Configuration
Pura Advanced Online 2 Hygrometer Manual OPERATION 3.4.4 Input Configuration This is a simple menu screen displaying the measured or fixed inputs to the Process Monitor, as shown below in Figure 17 . Displays the highest measurement value of the dew-point sensor input Displays the lowest measurement range of the dew-point sensor input Displays the highest indicated or fixed input of pressure Displays the lowest indicated or fixed input of pressure... - Page 36 Pura Advanced Online 2 Hygrometer Manual OPERATION If you go back to the Input Configuration screen you will see the Hi S/P Lo S/P display below, with the Pressure boxes greyed out, confirming that no live pressure signal is being inputted to the Process Monitor.
-
Page 37: Pressure Configuration
Pura Advanced Online 2 Hygrometer Manual OPERATION 3.4.5 Pressure Configuration Pressure indication can be inputted into the Process Monitor either with a live pressure signal from an external 4...20 mA pressure sensor or through a fixed pressure value entry on the Process Monitor. To calculate moisture content from dew point, it is necessary to know the system pressure and this pressure indication input is then used for that purpose. -
Page 38: About Menu
Pura Advanced Online 2 Hygrometer Manual OPERATION Go back to the Input Configuration screen, then enter the Hi S/P Lo S/P value equating to 20 mA and the value equating to 4 mA value of the external pressure sensor. Save this input. In the example below, a 0...10 bar (4...20 mA) pressure sensor is being used to input a live pressure signal into the Process Monitor. -
Page 39: Maintenance
Pura Advanced Online 2 Hygrometer Manual MAINTENANCE MAINTENANCE Maintenance and Calibration Routine maintenance of the Pura M12 Transmitter is confined to regular re-calibration. For most applications, annual re-calibration ensures that the stated accuracy of the Pura M12 Transmitter is maintained. Specialist calibration instrumentation is required to calibrate the transmitter and a true calibration can only be performed by exposure of the dew-point sensor to a reference gas of known dew point. -
Page 40: Measurement Guide
Pura Advanced Online 2 Hygrometer Manual MEASUREMENT GUIDE MEASUREMENT GUIDE Sampling Considerations There are two basic methods of measuring a sample with the Pura M12 Transmitter: • In-situ measurements are made by placing the transmitter inside the environment to be measured. •... -
Page 41: Figure 17 Installation Location
Pura Advanced Online 2 Hygrometer Manual MEASUREMENT GUIDE In-Situ Dew-Point Sensor Position – will the sensor see an area of the environment that is representative of what you want to measure? For example, if the sensor is to be mounted into a glove box, there are three different positions in which it could be installed –... - Page 42 Pura Advanced Online 2 Hygrometer Manual MEASUREMENT GUIDE Gas speed – if you are planning on installing the sensor in a duct, consider how fast the sample gas is moving through it. If the gas speed is very low, or occasionally static, then the moisture content through the length (and width, if it is more than a few cm across) of the duct is unlikely to be uniform.
-
Page 43: Sampling Hints
Pura Advanced Online 2 Hygrometer Manual MEASUREMENT GUIDE Sampling Hints Measurement of moisture content is a complex subject, but does not need to be difficult. This section aims to explain the common mistakes made in measurement situations, the causes of the problem, and how to avoid them. Mistakes and bad practices can cause the measurement to vary from the expectation;... -
Page 44: Figure 20 Dead Volume
Pura Advanced Online 2 Hygrometer Manual MEASUREMENT GUIDE In practical terms, as the temperature of the environment fluctuates, water molecules are adsorbed and desorbed from the internal surfaces of the sample tubing, causing small fluctuations in the measured dew point. Sample Tubing Length The sample point should always be as close to the critical measurement point as possible, in order to obtain a truly representative measurement. - Page 45 Pura Advanced Online 2 Hygrometer Manual MEASUREMENT GUIDE The integrity of all connections is also an important consideration, especially when sampling low dew points at an elevated pressure. If a small leak occurs in a high pressure line, gas will leak out but vortices at the leak point and a negative vapor pressure differential will also allow water vapor to contaminate the flow.
- Page 46 Pura Advanced Online 2 Hygrometer Manual APPENDIX A Appendix A Technical Specifications 97628 Issue 1, January 2023...
-
Page 47: Appendix A Technical Specifications
Pura Advanced Online 2 Hygrometer Manual APPENDIX A Appendix A Technical Specifications Transmitters Pura 2-wire, 3-wire & Digital Product Pura I.S. Transmitter Transmitters Performance Specifications Measurement Range -120...-40 °Cdp (-184...-40 °Fdp); non-standard ranges available on request ±1 °C from -40 to -60 °Cdp (±1.8 °F from -40 to -76 °Fdp) ±2 °C from -60 to -100 °Cdp (±3.6 °C from -76 to -148 °Fdp) Accuracy ±4 °C from -100 to -120 °Cdp (±7.2 °C from -148 to -184 °Fdp... - Page 48 Pura Advanced Online 2 Hygrometer Manual APPENDIX A Pura Premium: Double bagged and sealed in UHP inert gas Pura OEM and Pura Sensor: Single bagged in 1000 gauge polythene Packaging All options: shipped individually in a profiled cardboard carton Sensor version supplied with protective guard over sensor technology for transportation and handling Pura Premium (PRM): 2 x 1/4”...
-
Page 49: Monitors
Pura Advanced Online 2 Hygrometer Manual APPENDIX A Monitors Product Pura Advanced Online 2 Pura Online Online Range -120...-40 °Cdp (-184...-40 °Fdp) Online Resolution 51/2 digit 4 digit Maximum 24 MPa (240 barg/ Auxiliary Pressure Input Not available 3481 psig) Live 4 ...20 mA pressure transmitter Not available Pressure Compensation... - Page 50 Pura Advanced Online 2 Hygrometer Manual APPENDIX A 100.8 100.8 107.7 107.7 24.4 15.6 15.6 90.0 90.0 Pura Advanced Online 2 Process Monitor THIS DOCUMENT IS THE PROPERTY OF MICHELL MATERIAL: See BoM FINISH: See Notes INSTRUMENTS LTD. AND MUST NOT BE COPIED TOLERANCES &...
- Page 51 Pura Advanced Online 2 Hygrometer Manual APPENDIX B Appendix B Process Monitor Register Map Michell Instruments...
-
Page 52: Appendix B Process Monitor Register Map
Pura Advanced Online 2 Hygrometer Manual APPENDIX B Appendix B Process Monitor Register Map This is a register map for all firmware versions of the Process Monitor. Some registers are not applicable to the Pura Advanced Online 2 Hygrometer. Serial Port Settings: 9600 Baud Rate, 8 Data Bits, 1 Stop Bit, No Parity Bit, No Flow Control Read/ Default Register... - Page 53 Pura Advanced Online 2 Hygrometer Manual APPENDIX B Read/ Default Register Address Function Description Notes Write Value Configuration Fixed pressure input value lo word FLOAT32 (n/a for O only) Liquid Selection Liquid Mix Ratio (% of Mixed Liquid 1) User Cs Table 1, Cs Value at -20 °C User Cs Table 1, Cs Value at -10 °C User Cs Table 1, Cs Value at 0 °C User Cs Table 1, Cs Value at 10 °C...
- Page 54 Pura Advanced Online 2 Hygrometer Manual Read/ Default Register Address Function Description Notes Write Value Configuration Analog Output 1 – DAC 4 mA Value 0...65535 Analog Output 1 – DAC 20 mA 0...65535 Value Analog Output 2 – DAC 4 mA Value 0...65535 Analog Output 2 –...
- Page 55 Pura Advanced Online 2 Hygrometer Manual Read/ Default Register Address Function Description Notes Write Value Configuration Moisture – ppm – Lo Word FLOAT32 Moisture – ppm (Ideal) – Hi Word FLOAT32 Moisture – ppm (Ideal) – Lo Word FLOAT32 Moisture – ppm (Nat Gas) –...
- Page 56 Pura Advanced Online 2 Hygrometer Manual APPENDIX B Register Configuration A A1: Unsigned Short. Range = 0...65535 A2: Unsigned Short /10. Range = 0...6553.5 A3: Unsigned Short /100. Range = 0...655.35 Conversion: float*x = unsigned integer Unsigned integer/x = float Or cast: float value to read= ((float) (value))/x;...
- Page 57 Pura Advanced Online 2 Hygrometer Manual APPENDIX B Register Configuration C – System Configuration Generic table – Pura monitor settings as identified. Pressure Units (PU) Temperature Unit (TU) 00 = Bar.G (def) 0 = C (def) 01 = Psi.G 1 = F 10 = Mpag 11 = Spare Main Unit...
- Page 58 Pura Advanced Online 2 Hygrometer Manual APPENDIX B Register Configuration E – mA Output Config Ouput1 Parameter (O1) Output2 Parameter (O2) 0000 = Dewpoint (O2) 0000 = Dewpoint (O2) 0001 = Pressure/Temperature 0001 = Pressure/Temperature 0010 = ppm 0010 = ppm 0011 = ppm (Ideal) 0011 = ppm...
- Page 59 Pura Advanced Online 2 Hygrometer Manual APPENDIX B Register Configuration G – Liquid Selection Liquid Selection (LQ) Mixed Liquid 1 (M1) 0 = n-Butane 0 = n-Butane 1 = n-Propane 1 = n-Propane 2 = n-Hexane 2 = n-Hexane 3 = Cumene 3 = Cumene 4 = Benzene 4 = Benzene...
- Page 60 Pura Advanced Online 2 Hygrometer Manual APPENDIX B Register Configuration H – Instrument Setup and Command Register (Reg 30) 2 = Set Dewpoint Channel 4 mA ADC Value 3 = Set Dewpoint Channel 20 mA ADC Value 4 = Set Pressure/Temperature Channel 4 mA ADC Value 5 = Set Pressure/Temperature Channel 20 mA ADC Value 10 = Force Analog Output 1...4 mA 11 = Force Analog Output 1...20 mA...
- Page 61 Pura Advanced Online 2 Hygrometer Manual APPENDIX C Appendix C Quality, Recycling & Warranty Information Michell Instruments...
-
Page 62: Appendix C Quality, Recycling & Warranty Information
Pura Advanced Online 2 Hygrometer Manual APPENDIX C Appendix C Quality, Recycling & Warranty Information Michell Instruments is dedicated to complying to all relevant legislation and directives. Full information can be found on our website at: www.ProcessSensing.com/en-us/compliance This page contains information on the following directives: •... - Page 63 Pura Advanced Online 2 Hygrometer Manual APPENDIX D Appendix D Return Document & Decontamination Declaration Michell Instruments...
-
Page 64: Appendix D Return Document & Decontamination Declaration
Pura Advanced Online 2 Hygrometer Manual APPENDIX D Appendix D Return Document & Decontamination Declaration Decontamination Certificate IMPORTANT NOTE: Please complete this form prior to this instrument, or any components, leaving your site and being returned to us, or, where applicable, prior to any work being carried out by a Michell engineer at your site. - Page 65 Pura Advanced Online 2 Hygrometer Manual NOTES Michell Instruments...
- Page 66 www.ProcessSensing.com...
Need help?
Do you have a question about the Michell Instruments Pura Advanced Online 2 and is the answer not in the manual?
Questions and answers