Table of Contents
Advertisement
Quick Links
Advertisement
Table of Contents

Related Manuals for Accuris SmartDrop L NS1000


Summary of Contents for Accuris SmartDrop L NS1000
- Page 1 Operation Manual V1.0 NS1000...
- Page 3 Please inspect the instrument as well as all included accessories when you first open the packaging. If you find anything damaged or missing, please contact Benchmark Scientific or your local distributor immediately. BENCHMARK SCIENTIFIC / ACCURIS INSTRUMENTS PO Box 709 Edison, NJ 08818 Phone: 908-769-5555 Website: www.benchmarkscientific.com / www.accuris-usa.com...
- Page 4 To prevent injury or voiding the warranty, the operator should not attempt to repair the instrument without explicit guidance from Accuris Instruments. If service is required, please contact Accuris Instruments or your local distributor for repair. Before powering on, confirm that the voltage used meets the electrical requirements of the instrument as stated on the rating plate.
- Page 5 Always power off the instrument when you are finished using it. Unplug the power cord and cover the instrument with a cloth or plastic sheet to prevent excessive dust from entering the housing. Pull the connector plug from the electrical outlet immediately and contact the vendor in the event of: •...
-
Page 6: Table Of Contents
Table of Contents Chapter 1 Introduction ..................1 1.Key Features ....................1 Chapter 2 Specifications ..................2 1.Required Installation Environment ............... 2 2.Specifications....................2 Chapter 3 Instrument Overview ................. 3 1.Structure ...................... 3 2.Sample Size Requirements ................. 4 3.Dispensing Samples onto The Lower Pedestal ........... 4 4.OD600 Measurement .................. -
Page 7: Chapter 1 Introduction
Chapter 1 Introduction The SmartDrop™ L nano spectrophotometer measures 1.0µL – 2.0µL samples with high accuracy and reproducibility and employs surface tension to position the sample for measurement. The system includes a cuvette slot for OD600 readings & a built-in printer for printing results. -
Page 8: Chapter 2 Specifications
Chapter 2 Specifications 1. Required Installation Environment Environmental Temperature: 5°C~35°C Relative Humidity: ≤ 70% Input Voltage: DC 24V, 2A ( Adapter CSA, UL, CE marked) 2. Specifications Model SmartDrop™ L (NS1000) Minimum Sample Size 1.0μL – 2.0μL Path Length 0.5mm Light Source / Life UV LED / 8000h Detector Type... -
Page 9: Chapter 3 Instrument Overview
Chapter 3 Instrument Overview 1. Structure Front Upper pedestal Built-in printer Cuvette slot Lower pedestal Display Fig. 1 Front Back Switch Power Socket USB ports Fig. 2 Back... -
Page 10: Sample Size Requirements
2. Sample Size Requirements Surface tension is a critical factor in the formation of the sample column for measurement. The hydrophobic interactions between water molecules in a sample solution is key in creating & maintaining surface tension. The presence of solutes (proteins, DNA, RNA, salt ions, detergent molecules) significantly reduces surface tension and hinders the formation of the sample column. -
Page 11: Od600 Measurement
To prevent sample carryover, use a soft laboratory wipe and deionized water to clean both pedestals in between sample measurements (Fig. 6). Fig. 6 Clean & Wipe Pedestal 4. OD600 Measurement The SmartDrop L includes a cuvette slot for OD600 measurements. Lift the upper pedestal to expose the cuvette slot. -
Page 12: Chapter 4 Programming & Operation
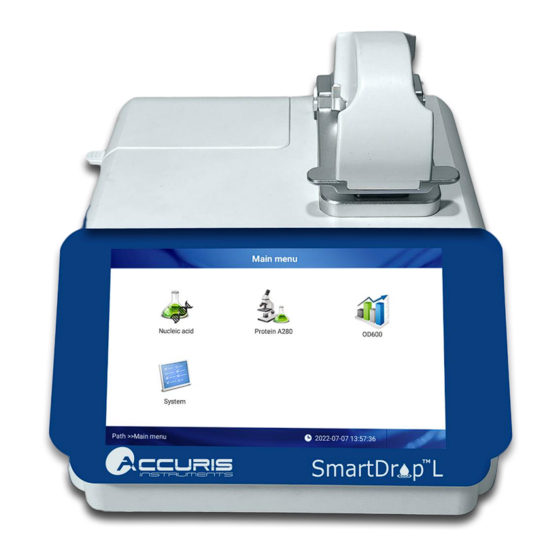
Chapter 4 Programming & Operation 1. Start-up Interface Upon powering on the instrument, it will perform a self-check, and the start-up screen will be displayed (Fig. 8) Fig. 8 Start-up Interface 2. Main Menu Interface Fig. 9 Main Menu Interface After start-up, the main menu interface will be displayed. -
Page 13: Nucleic Acids Interface
3. Nucleic Acids Interface Beer-Lambert’s Law for DNA/RNA quantitation The following “Beer-Lambert” equation is used to calculate the concentration of nucleic acids: �� ∗ �� �� = �� C=Sample DNA concentration, unit : ng/μL A=Sample absorbance, unit : A ε=extinction coefficient, unit: ng-cm/μL b=Path Length, unit: cm Standard DNA/RNA extinction coefficients : dsDNA:50ng-cm/μL... - Page 14 • The icon appears in the upper right corner to indicate an error in reading blank/sample volumes. Please clean and wipe the pedestal and perform another blank reading. If the problem persists, contact Accuris Instruments. Operation: 1. Set the Sample ID.
- Page 15 Fig. 11 Nucleic Acid Sample Results The sample concentration and absorbance ratios will display on the left side of the interface (Fig. 12). Fig. 12 Sample Concentration & Absorbance Ratios Conc.:Calculated nucleic acid concentration. A260: The sample absorbance at 260nm (10mm pathlength equivalent). A280: The sample absorbance at 280nm (10mm pathlength equivalent).
- Page 16 Nucleic Acid Report Interface Fig. 13 Nucleic Acid Report Interface Select the “Report” tab at the top of the Nucleic Acid Interface (Fig. 13). Users can select previously saved results by the file name. : Print the selected data from the built-in printer. : Export the result to a USB flash drive.
-
Page 17: Protein A280 Interface
4. Protein A280 Interface Introduction The Protein A280 interface can be used to quantify purified proteins that contain amino acids such as tryptophan, tyrosine, or cys-cys disulfide bonds. These amino acids exhibit peak absorbance at 280nm. The following sample types can be selected: “A280”, “BSA”, “IgG”, “Lysozyme”, &... - Page 18 • The icon appears in the upper right corner to indicate an error in reading blank/sample volumes. Please clean and wipe the pedestal and perform another blank reading. If the problem persists, contact Accuris Instruments. Operation: 6. Set the Sample ID.
-
Page 19: Od600 Interface
nucleic acid purity. An A260/A280 ratio within the range of ~1.8 – 2.2 as pure for nucleic acids. Lower ratio values indicate the presence of contaminants that absorb strongly at or near 280nm. Protein A280 Report Interface Fig. 17 Protein Report Interface Note: This interface is similar to the Nucleic Acids detection interface (see section 3). - Page 20 OD600 Measurement Fig. 18 OD600 Detection Interface Operation 1. Set the Sample ID. 2. Clean the upper and lower pedestals; add 2μL buffer solution to perform a blank reading. 3. Clean the buffer solution on the pedestals. 4. Measure a 2μL sample volume and click “Measure” to detect the sample. Note: A blank reading must be performed prior to sample measurements.
-
Page 21: System Settings Interface
6. System Settings Interface Click “System” on the main interface to enter the System Settings Interface (Fig. 20). Fig. 20 System Settings Interface Date & Time Settings Interface Click the “Time” icon to enter the date and time settings interface (Fig. 21). Fig. - Page 22 Print Click the “Print” icon to set the print mode. Fig. 24 Print Settings Interface Brightness Click the “Brightness” icon to enter the Brightness Settings Interface. Use the slider to adjust the brightness of the display. Fig. 25 Brightness Settings Interface...
-
Page 23: Chapter 5 Troubleshooting
No power supply, Check the power supply, Switch defective, Instrument does not Replace the switch, power on. Power adapter defective. Contact Accuris Instruments. Sample column Add sample again, unformed, make sure the liquid column formed well, Measurement results Clean the pedestals,...
Need help?
Do you have a question about the SmartDrop L NS1000 and is the answer not in the manual?
Questions and answers