
Related Manuals for baxter iLED 7


Summary of Contents for baxter iLED 7
- Page 1 Instructions for use iLED 7 Surgical light Read the instructions for use carefully before using AMERICAN ENGLISH the product and keep it safe for future reference. en-US...
- Page 2 This page is intentionally left blank.
- Page 3 +49 3671 586–0 Fax: +49 3671 586–41165 surgical@hillrom.com hillrom.com Baxter Medical Systems GmbH + Co. KG is a Baxter International Inc. company. The manufacturer is hereinafter referred to as Baxter. Technical Customer Service The contact details for the current Technical Customer Service hubs in the individual countries are listed on the Internet at www.hillrom.com.
- Page 4 7 This page is intentionally left blank. 7990087_030_03 – 2080492 – 2023-01-19...
- Page 5 © Baxter Medical Systems GmbH + Co. KG Reprinting, copying, or translating this document, in whole or in part, is forbidden without the express written permission of Baxter. All rights under copyright law are expressly reserved by Baxter. 7990087_030_03 – 2080492 – 2023-01-19...
- Page 6 7 This page is intentionally left blank. 7990087_030_03 – 2080492 – 2023-01-19...
-
Page 7: Table Of Contents
Combination with other products from Baxter ........ - Page 8 Contents 4.8.3 Page configuration of control screen of surgical light....... 36 4.8.4 One-Click page structure .
- Page 9 Contents Cleaning and disinfection ............68 Wipe-down disinfection .
- Page 10 Contents This page is intentionally left blank. 7990087_030_03 – 2080492 – 2023-01-19...
-
Page 11: Usage Specifications
Usage specifications Usage specifications Normal use The surgical light system can have up to four support arms with up to three lamp heads. In addition to the lamp heads, other products can also be attached using a spring arm (e.g. VidiaPort spring arm with monitor holder and monitor). -
Page 12: Improper Use
Usage specifications Improper use – The light suspension unit must not be exposed to additional loads. – The surgical light may not be exposed to strong vibrations. – The surgical light system must not be used for investigatory and diagnostic purposes. User definition The users must be authorized for the use and service of the product. -
Page 13: Service Life
Usage specifications 1.10 Service life The service life with normal use is: Product Service life Lamp head (without cover panel) 10 years Support arm system 10 years Wall Control Panel 5 years Mobile Control 7,9 (third-party component) 2 years 7990087_030_03 – 2080492 – 2023-01-19... -
Page 14: Safety
Safety Safety Configuration The configuration of a surgical light with the listed products was tested by Baxter and subjected to a compliance assessment. – Various canopies – Various central axes with booms Spring arm Product designation Part number L21, 3P Springarm... -
Page 15: Combination With Other Products From Baxter
Safety Combination with other products from Baxter Baxter offers a wide variety of products for further equipping of the surgical light. Not all products are available in all countries. Detailed information can be obtained from the relevant representative offices of Baxter, which are represented worldwide. -
Page 16: Combination With Products From Other Manufacturers
Baxter accepts no responsibility for the combination of the surgical light with third-party products. The guarantee/warranty for products from Baxter may become void in the event of their combination with third-party products. Operator's responsibility... -
Page 17: Malfunction Caused By Other Devices
Safety Instructions regarding the proper handling of the medical device must be provided. However, training is not required when the medical device is self-explanatory or instructions for a product with the same design have already been provided. Interconnected medical products, as well as those combined with accessories, including software or other objects, may be operated and used only if they are suitable for use in this combination, taking into account their intended purpose and the safety of... -
Page 18: Position And Meaning
Safety 2.7.2 Position and meaning Information Meaning notice Pull the mains power plug out of the socket before opening the housing. Manufacturer’s logo Follow the instructions for use Laser identification CLASS 1 LASER PRODUCT Class of the installed laser product for distance measurement Complies with IEC 60825-1(2007) and EN 60825-1 (2007) Complies with FDA performance standards for laser products except according to IEC 60825-1, Edition 2.0 (2007-03) and... - Page 19 – Data Matrix Code – (01) Global Trade Item Number (GTIN) – (11) Date of manufacture (Year Month Day) – (21) Serial number – (240) Part number Baxter part number Serial number Medical product The device conforms to Regulation 2017/745/EU concerning medical devices.
-
Page 20: Overview
Overview Overview The surgical light can be individually combined from various Baxter products. The approved products are listed in Chapter 2.2. The surgical light system is a modular system. Different variants are available: iLED7 Ceiling Single/Duo/Trio/Quad – mounted on a ceiling mount –... -
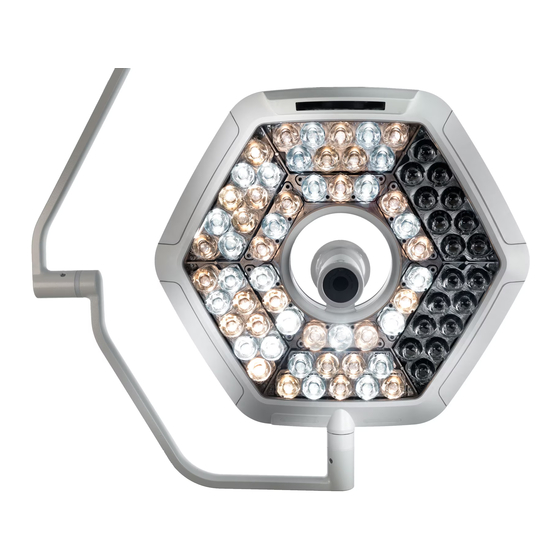
Page 21: Description
– the canopy [1] – the ceiling conduit [2] (part of the Pre-Install Set iLED 7) and the central axis [3] – a horizontally rotating upper C boom [4] on the central axis with... - Page 22 Description – two horizontally rotating and vertically adjustable light heads [14] In the example, the iLED 7 Ceiling Trio surgical light system is equipped with the following additional accessories of Baxter and the following third-party products: – an SLC handle adapter [17] or handle adapter [16] –...
-
Page 23: Iled 7 Ceiling Quad Surgical Light System
– the canopy [1] – the ceiling conduit [2] (part of the Pre-Install Set iLED 7) and the central axis [3] – a horizontally rotating upper C boom [4] on the central axis with... - Page 24 Description In the example, the iLED 7 Ceiling Quad surgical light system is equipped with the following additional accessories of Baxter and the following third-party products: – an SLC handle adapter [17] or handle adapter [16] – a TruVidia Wireless camera [18] or a handle adapter [16] –...
-
Page 25: Iled 7 Pendant Surgical Light System
LCH19 spring arm [9] – a rotating and vertically adjustable light head [14] In the example, the iLED 7 Pendant surgical light system is equipped with the following additional accessories of Baxter and the following third-party products: –... - Page 26 Canopy Central axis Low room height spring arm (LCH19) [11] Flat screen [13] 1/4 bracket iLED 7 [14] Lamp head [15] Control element The functions available on the control are limited. [16] Handle adapter (Adaption Standard handle/Adaption disposable handle)
-
Page 27: Iled 7 Mobile
The Mobile Control 7,9 is available as a separate control module for the mobile surgical light. Low room height spring arm (AC 2000 NRH mobil) [13] 1/4 bracket iLED 7 [14] Lamp head [15] Control element The functions available on the control are limited. -
Page 28: Overview Of Control Modules
Description [32] Wheel [33] Stand foot [34] Disposable handle adapters (Handle sleeve flange type short/Handle sleeve flange type middle/Handle sleeve flange type long/Handle sleeve ring type short/Handle sleeve ring type long) Overview of control modules The control modules are used to set various functions of the surgical light. -
Page 29: Slc Handle Adapter( Sterile Light Control)
The Mobile Control 7,9 will start automatically after charging for some minutes. The Mobile Control 7,9 control unit is only intended for operating the TruRemote software installed by Baxter and may not be equipped with additional software or apps from third-party manufacturers. Updates of the existing software are not permitted. -
Page 30: Wall Control Panel
The Wall Control Panel control unit is intended exclusively for the use of the TruRemote software installed by Baxter and may not be equipped with additional software or apps from third -party manufacturers. Updates of the existing software are not permitted. -
Page 31: Bulbs
Description replaced by the Adaption disposable handle [A] handle adapter. Other handles need to be converted by a qualified service technician. The Handle sleeve flange [D] or Handle sleeve ring [E] handle adapter is placed on the Adaption disposable handle [A] handle adapter or the handle converted by the service technician and is used to attach a sterile handle (disposable handle or disposable sleeve). -
Page 32: Lighting Intensity
Description 4.6.2 Lighting intensity Lighting intensity concerns brightness and is measured in lux. Lighting intensity can be adjusted within a range of 30% to 100%. In addition, Endo lighting intensity can be selected. The Endo lighting intensity is a fixed-setting lighting intensity (< 10%) primarily intended for endoscopic surgery. -
Page 33: Safe Mode
– Switching on and off The selection of the function to be synchronized can be adjusted by personnel trained in this work by Baxter. Adjustment of the selection must take place individually for every Mobile Control 7,9 and each Wall Control Panel in the operating room. -
Page 34: Visual Indicators And Displays
TruRemote software and have a graphic user interface. The Mobile Control 7,9 and Wall Control Panel can be used to operate up to 3 iLED 7 surgical lights in a single light system. 7990087_030_03 – 2080492 – 2023-01-19... -
Page 35: Page Types
– The one-click page for rapid control of a surgical light on one side Only personnel trained in this work by Baxter may activate or deactivate the one-click page. – The password-protected settings page for adjustment of the... -
Page 36: Page Configuration Of Control Screen Of Surgical Light
Description Icon signal strength An icon for the signal strength of the camera connection is only displayed when a TruVidia Wireless Camera has been connected to the light system. Icon Meaning Signal strength 0 There is no connection between the TruRemote software and the receiver. -
Page 37: One-Click
Description Diagram of the The surgical light diagram gives an immediate visual overview of surgical light the changes made to the settings of the surgical light. Functions of the The function area is used to select the functions of the surgical surgical light light (lighting intensity, color temperature, light field and ALC Plus). -
Page 38: Use
The surgical light has a multitude of functions that can be ergonomically controlled using the control unit. The SLC Handle Adapter can be operated in a sterile manner by using the sterilizable handle. All other control units are used in a non-sterile manner. - Page 39 Observe the instructions for use with the document number 7990089. • Only components and accessories authorized by Baxter may be used on the support arm system. Danger due to uncontrolled movement on the support arm system •...
-
Page 40: Inspections During Operation
Cleaning and disinfecting may be performed only by trained staff and using cleaning and disinfecting agents approved by Baxter. • The sterile handle, handle adapter or the camera must not be removed during operation. -
Page 41: Selection Of Functions
Following any damage reported by a user, a functional check and a visual inspection must be carried out by personnel trained to perform these tasks by Baxter. Weekly inspection At least once a week, a functional check and a visual inspection must be carried out by personnel trained to perform these tasks by Baxter. -
Page 42: Attaching The Handle Adapter
Mobile Control 7,9 Wall Control Panel Simultaneous activation of keys on various control units leads to execution of functions in order of priority. Any setting of the surgical light, irrespective of whether it is performed with the Mobile Control 7,9, the Wall Control Panel, the SLC handle adapter or directly at the control unit, will be simultaneously shown on the other control units and the corresponding control screen of the Mobile Control 7,9 and... -
Page 43: Handle Sleeve Flange/Handle Sleeve Ring
5.4.2 Handle sleeve flange/Handle sleeve ring Attach the Adaption disposable handle handle adapter to the mount (see Chapter 5.4.1). Push the Handle sleeve flange or Handle sleeve ring [34] handle adapter onto the Adaption disposable handle [16] handle adapter. Ensure that the plastic catch [A] of the Adaption disposable handle [16] handle adapter is correctly engaged in the locking hole [B] on the Handle sleeve [34] handle adapter. -
Page 44: Connecting The Power Supply
Connecting the power supply 5.6.1 Ceiling-mounted version The power supply must be connected by specialized personnel with the necessary access authorization, knowledge and documentation to set up internal power supplies. When there is no separate main switch in the room, the surgical light is in standby mode when the power supply is switched on. -
Page 45: Disconnecting The Power Supply
Disconnecting the power supply 5.7.1 Ceiling-mounted version Only personnel trained in this work by Baxter may disconnect the surgical light from the power supply. Switch off the surgical light on a control unit. Switch off all products connected to the surgical light, such as the Mobile Control 7,9 or the TruVidia Wireless Camera. - Page 46 – Depending on the variant, the swivel range and the vertical travel is limited by the internal end stops of the boom, the spring arm and the adaption. – Remove any possible collision hazards before swiveling or height adjustment. However, if there is still a collision with other devices, wall or ceiling, the product may be damaged and fail.
-
Page 47: Moving The Mobile Surgical Light
Moving the mobile surgical light Do not exert excessive force onto the spring arm or the lamp head in the braked state, as this may cause the surgical light to tilt. Do not attach any additional loads to the spring arm. Switch off the surgical light at a control module and disconnect it from the mains power (see Chapter 5.7). -
Page 48: Activating/Deactivating Safe Mode
5.10.3 Activating/deactivating safe mode The function is set on the controls of the surgical light. Activation: Set the working distance between the surgical light system and the patient’s wound area to 100 cm/39.37 inch. 3 sec. Press the [i4] key for 3 seconds. The indicator next to the [i4] key goes off. -
Page 49: Setting The Color Temperature
Wide light field: – Move a finger across the sterilizable handle from left to right until the desired light field size has been set via the touch sensor [A]. 5.10.6 Setting the color temperature The function is set using the SLC handle adapter. Reduce color temperature: –... -
Page 50: Unlocking The Mobile Control 7,9 / Wall Control Panel
5.11.2 Unlocking the Mobile Control 7,9 / Wall Control Panel Unlocking: Briefly press the Home button [A]. The Unlocking screen [B] is displayed. Slide the slider [C] to the right. The control screen for the surgical light [D] is shown. 5.11.3 Switching the surgical light on/off Switching individual surgical lights on:... -
Page 51: Operating The Surgical Light
Switching individual surgical lights off: In the action bar [A] of the TruRemote software, slide the slide control [B] to the left, from I to 0. The operating range shows the surgical light and its functions in gray. The settings areas are hidden. The information area is empty. Switching all surgical lights off: On the action bar [A], touch the icon [D] to switch all surgical lights in the lighting system off. -
Page 52: Adjusting The Braking Force At The Boom And Spring Arm
5.12 Adjusting the braking force at the boom and spring arm The braking force should only be set by personnel who have been trained by Baxter in this work. 5.12.1 C boom There are 2 opposing brake screws on each boom. -
Page 53: S Boom
Install the right rear cover [E] on the boom [4]. a) Position the right rear cover on the boom so that the upper cover [H] is inside the rear cover. b) Attach the right rear cover at the top and bottom to the boom with a PT screw [F] (Torx T10 screwdriver). - Page 54 Remove the right rear cover [A] from the boom [4]. a) Using a Torx T10 screwdriver, remove the upper and lower PT screw [G] on the right rear cover. b) Remove the right rear cover from the boom. To adjust the brake force, alternately turn both opposite brake screws [H] by the same number of rotations with a Size 5 Allen key.
-
Page 55: Spring Arm
5.12.3 Spring arm There are 2 opposing brake screws on each boom. Switch off the surgical light at a control module and disconnect it from the mains power (see Chapter 5.7). Remove the decor caps [A] of the socket cover [B]. a) Lightly press in the right and left decor caps near the lugs [C] and pull the decor caps out of the openings [D]. -
Page 56: Setting The Spring Force Of The Spring Arm
Setting the spring force of the spring arm The spring force should only be set by personnel who have been trained by Baxter in this work. During adjustment work, make sure that any electrical cables in the spring arm remain routed in the center of the spring arm and do not slip underneath other components. -
Page 57: Ac 2000 Nrh Mobil Spring Arm
Adjusting the swivel range of the spring arm upwards and downwards The swivel range should only be set by personnel who have been trained by Baxter for this work. Set the swivel range in such a way that collision with the ceiling or adjacent objects is not possible. -
Page 58: Spring Arm Lch19
Mount the front cover [A] on the spring arm [7]. a) Rotate the recess of the segment lock [G] over the optional brake screw or the brake screw opening [H]. b) Position the right and left front spring arm covers on the spring arm so that, at the joint between the two front cover panels, all catches slide into one another and engage. -
Page 59: Ac 2000 Nrh Mobil Spring Arm
Mount the front cover on the spring arm [9]. a) Position the right front cover [D] on the spring arm so that there is a gap [I] between the connecting pin of the adaptation [H] and the cover. b) Attach the right front cover to the spring arm with 3 PT screws [E] (Torx T10 screwdriver). -
Page 60: Adjusting The Optional Brakes On The Spring Arm
5.15 Adjusting the optional brakes on the spring arm The braking force should only be set by personnel who have been trained by Baxter in this work. 5.15.1 Spring arm L21 Switch off the surgical light at a control module and disconnect it from the mains power (see Chapter 5.7). -
Page 61: Spring Arm Lch19
Move the spring arm upwards and downwards. Check the secure fit of the upper and lower faceplate while doing so. – The locking hooks must engage with the front spring arm cover. – The plates must slide easily in the lateral guides. 5.15.2 Spring arm LCH19 Switch off the surgical light at a control module and... -
Page 62: Ac 2000 Nrh Mobil Spring Arm
Adjusting the brake force on the surgical light The braking force should only be set by personnel who have been trained by Baxter in this work. Switch off the surgical light at a control module and disconnect it from the mains power (see Chapter 5.7). -
Page 63: Adapting The Truremote Software
The login window is displayed. Enter the six-digit number code provided to you when the surgical light was handed over or when training by the Baxter personnel took place. When entering each individual digit of the number code, a point in the code display [C] will fill up. -
Page 64: Changing The Name Of The Room
If the password-protected settings page does not unlock, the number code entered was incorrect. Enter the six-digit number code again or abort the process. To do this, touch the Cancel button [D]. The operating page will be shown again. 5.17.2 Changing the name of the room Open the password-protected settings page. -
Page 65: Defining The Scope Of Synchronization
5.17.3 Defining the scope of synchronization When this function is activated, the current settings of the selected surgical light are automatically transferred to all other surgical lights in the lighting system. The following functions can be defined during synchronization: – Light field size –... - Page 66 Pull the slide controller [B] in the One-Click Settings area [A] to the right, from 0 to I. Touch the Main button [C]. The change is saved. When leaving the Settings page, a warning message appears that the settings must be adjusted separately for each control unit when several control units are used.
-
Page 67: Decommissioning
5.18 Decommissioning WARNING Risk of infection The product may be contaminated with infectious substances. • The product must always be disinfected before temporarily or permanently taking it out of service. Disconnect the surgical light from all mains power supply terminals (see Chapter 5.7), and secure it against being switched on again when temporarily or permanently taking the surgical light out of service. -
Page 68: Cleaning And Disinfection
Cleaning and disinfection Cleaning and disinfection WARNING Risk of infection for the patient • No cleaning work may be carried out during operation. WARNING Danger of electric shock Contact with live parts may result in electric shock. • Decommission the surgical light before cleaning and disinfecting it. - Page 69 Only agents or chemicals compatibility-tested and approved by Baxter may be used for cleaning and disinfecting. When using alternative cleaning agents and disinfectants, Baxter cannot confirm any material compatibility. Do not use agents that are not listed, as otherwise functional components may be altered or damaged.
-
Page 70: Wipe-Down Disinfection
Cleaning and disinfection Wipe-down disinfection WARNING Switching off the power supply Contact with live parts may result in electric shock. • Before cleaning and disinfection, the permanently connected ME device must be disconnected from all phases of the power supply grid. The ground conductor connection (PE) must remain intact. -
Page 71: Recommended Disinfecting Agents
Moisten a cloth with cleaning agent or disinfectant. Clean the surgical light system with the damp but not wet cloth. Recommended disinfecting agents Baxter recommends the following disinfecting agents for manual use: Manufacturer Product designation B. Braun Melsungen AG... -
Page 72: Troubleshooting
Terralin protect Quaternary compounds, glycol derivative Troubleshooting If an error recurs or cannot be resolved, take the device out of service and inform the Technical Customer Service of Baxter. Error Possible cause Correction Support arm The lamp head moves down or rises. The spring force in the spring Adjust the spring force. -
Page 73: Maintenance
The contact details of service technicians can be obtained from the Technical Customer Service at Baxter. Baxter recommends concluding a maintenance agreement, so that maintenance can be carried out promptly and reliably. 7990087_030_03 – 2080492 – 2023-01-19... -
Page 74: Repair
SP-ValiaS, braking screws M10 1946894 Service parts on the spring arm SP-VALiA, basic spring arms, M10 brake screws 1946909 Brake screw M12x1-21 mm 1378866 Wear parts on the iLED 7 1/4 bracket Brake screw M10x1-11 mm 4025239 7990087_030_03 – 2080492 – 2023-01-19... -
Page 75: Disposal
If you have any questions about proper disposal, please contact the Technical Customer Service at Baxter, your local dealer, or the appropriate national authority. In addition to regional disposal, faulty or obsolete products can be returned to Baxter. -
Page 76: Technical Data
Technical data Technical data 12.1 Surgical light accessories Product designation Equipment Sterile Light Control (SLC) Optional Adaptive Light Control Plus (ALC Plus) Present Automatic shade management (available for a maximum of Present 2 surgical lights on a single ceiling pipe) 12.2 Device data Dimensions... - Page 77 Technical data Electrical data Voltage at the fixed point on the ceiling 48 V Classification according to the Act on Medical Devices (MPG) Operating mode Surgical light system Continuous operation Lighting data All light technology values maximum +/- 10% tolerance Central lighting intensity at a distance 160,000 lux of 0.8 m/1.0 m/1.3 m...
- Page 78 Technical data Lighting data All light technology values maximum +/- 10% tolerance Radiation strength (W/m ) at a distance Approx. 623 of 1.3 m / 51.18 inch Radiant flux density/lighting intensity Approx. 3.84 (mW/m Mechanical Data Diameter of the lamp head 710 mm/ 27.95 inch Illuminated area of the lamp head 3300 cm...
-
Page 79: Support Arm System Swivel Ranges
Vertical: +45° to -70° Spring arm L21 – iLED 7 comfort bracket Horizontal: > 360° (without stop) iLED 7 comfort bracket – 1/4 bracket iLED 7 Vertical: > 360° (without stop) 1/4 bracket iLED 7 – Lamp head Vertical: > 360° (without stop) Ceiling-mounted version with LCH19 spring arm (Version: Low room height) Ceiling conduit –... - Page 80 Vertical: +20° to -40° Spring arm AC 2000 NRH mobil – Vertical: > 360° (without stop) 1/4 bracket iLED 7 1/4 bracket iLED 7 – Lamp head Vertical: > 360° (without stop) Handle sleeve flange type short handle adapter Diameter [A] 101.6 mm / 4.00 inch...
-
Page 81: Electromagnetic Compatibility
Key performance features The key feature of the iLED 7 surgical light system is the provision of illumination and limitation of the energy over the operating area. Components such as the Wall Control Panel, Mobile Control 7,9 and interface converter do not feature any key performance characteristics as per this standard. - Page 82 Technical data NOTICE Do not stack the iLED 7 surgical light/Mobile Control 7,9/Wall Control Panel on top of or next to other devices. • The iLED 7 surgical light system/Mobile Control 7,9/Wall Control Panel may not be stacked immediately next to or on top of other devices.
- Page 83 Guidelines and manufacturer's declaration - electromagnetic immunity/portable and mobile radio units Portable and mobile RF communications equipment should not be used in the vicinity of the iLED 7 surgical light system/Mobile Control 7,9/Wall Control Panel, including cables, nor closer than the recommended separation distance calculated from the equation applicable to the frequency of the transmitter.
- Page 84 Technical data NOTICE The iLED 7 surgical light system/Mobile Control 7,9/Wall Control Panel is not designed for use close to HF surgical equipment. It has been tested in regard to interference immunity exclusively against radiated fields in the electromagnetic environment set out below, which corresponds to a professional health care facility.
- Page 85 • Do not use portable RF communication equipment (including peripherals such as antenna cables and external antennae) at a distance of less than 30 cm (11.81 inch) to the iLED 7 surgical light system/ Mobile Control 7,9/Wall Control Panel including its cables as specified by the manufacturer.
-
Page 86: Svhc (Substance Of Very High Concern)
1907/2006, the following products may contain components with reportable substances in concentrations exceeding 0.1 mass percent. A list of affected components will be provided by Baxter on request. The list can also be seen on the Internet at ois.hillrom.com/ois. Product certification 13.1... -
Page 87: Ukraine
Radio license 13.3 Ukraine УкрСЕПРО: Це маркування підтверджує, що вироби, промарковані знаком відповідності, пройшли всі необхідні процедури підтвердження відповідності та підкоряються визначеним технічним керівництвам України. Відповідність: Технічний регламент щодо медичних виробів, затверджений Постановою Кабінету міністрів України від 02 жовтня 2013 р. № 753 13.4 Serbia Certificate / registration number: 515-02-03704-16-001... - Page 88 Radio license This page is intentionally left blank. 7990087_030_03 – 2080492 – 2023-01-19...
- Page 89 This page is intentionally left blank.
- Page 90 7990087_030_03 – 2080492 – 2023-01-19...
Need help?
Do you have a question about the iLED 7 and is the answer not in the manual?
Questions and answers