
Related Manuals for Sony XCI-NPR


Summary of Contents for Sony XCI-NPR
- Page 1 ® XCI-NPR Camera Technical Manual Firmware version 2.5 © 2008 Sony Corporation http://www.sonybiz.net/vision...
- Page 2 WARNING TO REDUCE THE RISK OF FIRE OR ELECTRIC SHOCK, DO NOT EXPOSE THIS PRODUCT TO RAIN OR MOISTURE. TO AVOID ELECTRICAL SHOCK, DO NOT OPEN ANY INTERNAL DEVICE AND CABINET INSIDE THE HOUSING OF THE CAMERA. REFER SERVICICE TO QUALIFIED PERSONNEL ONLY. CAUTION: CHANGES OR MODIFICATIONS NOT EXPRESSLY APPROVED BY THE PARTY RESPONSIBLE FOR COMPLIANCE COULD VOID THE USERS‘S AUTHORITY TO OPERATE THE EQUIPMENT.
-
Page 3: Table Of Contents
Table of Contents Overview ...............................5 Features........................5 ANPR camera......................5 High image quality ..................... 5 Access Control design....................5 Web management ..................... 5 Outdoor and Indoor installation.................. 5 CCTV integration features ..................5 Scheduler ........................5 Country selection....................... 5 System components ....................6 Connection Diagram ....................6 Location and function of parts and control ............7 General view...................... - Page 4 Relay 2 ........................32 Minimum Luminosity Index ..................32 Maximum Luminosity Index ..................32 Maximum vehicle presence (seconds) ..............33 Timer schedule ......................33 Firmware Update ..................... 33 Error messages: .....................33 RESTART SOFTWARE button................33 RESTART CAMERA button..................34 Typical installation ..........................35 Installation Minimum Requirements..............35 Example: top view ....................
-
Page 5: Overview
The XCI-NPR camera embeds Software which recognizes Alarm control automatically licences plates. The technology used by the Gate control Sony camera is a strongly reliable and has proven its Light control efficiency over many years. … • Image of the licence plate •... -
Page 6: System Components
System components ANPR Camera Wiegand cable XCI-NPR (Category 5) Power Supply LAN cable 115-230 VAC (UTP, category 5) Connection Diagram Access Control Wiegand / Serial Unit TCP/IP Serial CCTV Camera Dry-Contact ANPR Camera Alarm XCI-NPR Light … Page 6 / 42... -
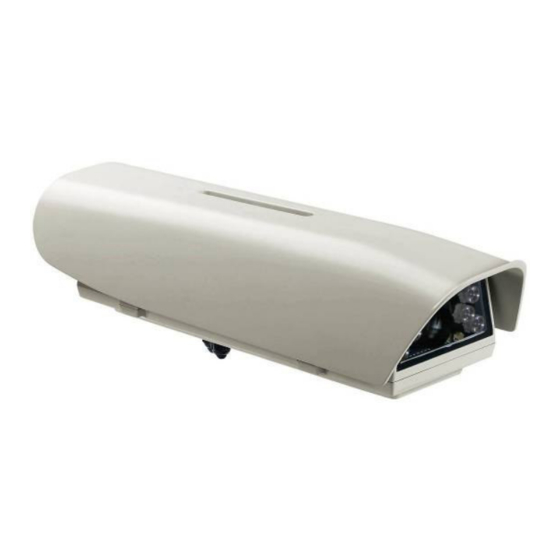
Page 7: Location And Function Of Parts And Control
Location and function of parts and control General view Housing (IP 66) Electronic Board 2: Wiegand Converter (see below: Wiegand Connector Side View) Power Supply Unit Electronic Bridge Holes for Cable Glands and cables SmartCamera (see below: SmartCamera Rear View) Heater (automatically controlled by the Electronic Bridge) Infrared Lens (C-mount) Infrared Illuminator (850nm wavelength) -
Page 8: Smartcamera Rear View
SmartCamera Rear View MODE switches POWER LED STATUS LED RESET switch LAN connector MODE switches For service use. Both switches are set to the left side as the factory setting. Note. If either of these switches is set to the right side, the camera doesn’t start normally. POWER LED Lights in green when power is input. -
Page 9: Wiegand Connector Side View
Wiegand Connector Side View (TX) DATA 0 (RX) DATA 1 GROUND - ALARM OUT 1 + ALARM OUT 1 - ALARM OUT 2 + ALARM OUT 2 The position of the channel determines if the camera is working in Wiegand output of with an RS232 output. (TX) DATA 0 If WIEG channel is selected it correspond to the DATA 0 pin. -
Page 10: Channel Selection
Channel Selection Warning. Operate the channel selection procedure with the power supply OFF. Select the WIEG channel with the two jumpers to select a Wiegand output. Select the RS232 channel with the two jumpers to select a Serial output. Wiegand channel RS232 channel Plug jumpers as above Plug jumpers as above... -
Page 11: Warnings
Warnings Sony would like to point out to installers that if the indications contained in this guide are not respected, there may be a significant impact on the system performance. Sony would also like to point out to installers that a well-performing system can only be achieved on number plates which are: Clean and in good condition. -
Page 12: Requirements
Requirements headlights, while avoiding excessive angles at the same • Sony recommends that the installer visit the site in order to time. determine the work to do for the placement of the camera. • If it is not possible to have a suitable angle, and the camera •... -
Page 13: Functions
Moreover, the string of the licence plate is also available RS-232 output within the same structure. The XCI-NPR has an RS-232 output sending a raw string of the licence plate. General Functions Score function for installation purpose Scheduler For installation purpose, a score function is available using a command prompt. -
Page 14: Camera Location
Camera location The choice of location should respect the certain restrictions. XCI-NPR Distance restrictions Plate cameras must be placed between 4 and 16 meters from 20° the spot where the plates are filmed. Zone of illumination Focus 4 to 16 meters... -
Page 15: Specialization Restrictions
The most frequent problem comes from the plate being hidden by another vehicle too close from the vehicle to be controlled. To avoid this risk, Sony recommends filming the vehicle from the front and placing the camera at a height... -
Page 16: Natural Illumination Restrictions
Nevertheless, the same principle applies: any permanent or temporary concealment of the plate should To avoid risk of over exposure by the car’s headlights, Sony be avoided (other vehicles, pedestrians, vegetation etc…). recommends either placing the plate cameras at a height... - Page 17 Plate viewed with a significant lateral angle. Plate viewed with a significant vertical angle. Plate viewed with significant lateral and vertical angles. Appropriate lateral angle: Sony strongly recommends not exceed 25° for vertical angle. Distance between Maximum height camera and plates...
- Page 18 When controlling a two-way road, each camera should be installed on the side which it will film to avoid excessive lateral angle and to avoid concealment of cars driving one way by cars driving the other way. Putting the cameras on the outside of the bend is particularly important on a two-way road and when public works constraints mean that the cameras cannot be placed on both sides of the road.
-
Page 19: Adjustment Of The Camera
To carry out the adjustment correctly, Sony recommends Indoor installation: set the shutter speed value to 1/1000 the use of the Web User Interface provided by the Camera. -
Page 20: Adjustment Of Horizontality
200px for a standard 50cm licence plate Adjustment of framing Adjustment of horizontality The Sony camera is always looking for a licence plate everywhere in the image. The software can automatically correct oblique plates. The Nevertheless, the entire plate should be present in the aim of this functionality is to correct horizontality-related image as long as possible. -
Page 21: Setting Of The Parameters Of The Camera
Suitable framing: Setting of the parameters of the camera The XCI-NPR camera parameters can be modified using the Web User Interface, described in the next chapter. Generally the camera settings are generic and non modifiable, as Sony selected the best settings possible for any situation. -
Page 22: Web User Interface
Web User Interface Connection to the camera Introduction • Requirements: Windows XP or Vista Internet Explorer 6.0 or later Framework .NET 2.0 or later • Launch Internet Explorer • In the address bar enter the IP address of the Camera in order to connect to its Web Interface: http://192.168.0.1 •... -
Page 23: First Connexion: Activex Plugin Installation Procedure
First connexion: ActiveX Plugin installation procedure • On first connexion, the following window will appear: • No ActiveX plugin is installed as meant by the red cross on the top left hand corner of the main empty box • Follow the below instruction while displayed •... - Page 24 • Wait for the file to be downloaded from the camera to the computer • Execute the software • Click “Next” • Click “Next” without changing the folder directory Page 24 / 42...
- Page 25 • Click “Install” • Wait until the installation procedure is complete Note: Administrator rights are required • Click “Finish” to end the installation process • Restart Internet Explorer and reconnect to the address http://192.168.0.1/ • The following Information Bar may appear regarding your Internet Explorer security levels settings Page 25 / 42...
- Page 26 • Follow the instructions of the Information Bar in order to accept the ActiveX plugin. You may need to lower your security levels in order to activate the ActiveX plugin. The following webpage will appear with the live video stream when the security barriers are passed (if concerned), Page 26 / 42...
-
Page 27: Limitations
Select language. Current language is border-lined in light blue. Live video stream. Note: delay can occur. Quality of the recognised licence plate. 3 colour flags: • Red : between 60% and 70% • Orange: between 70% and 80% • Green: between 80% and 100% Last licence plate result. -
Page 28: General Tab
Note: This value is used for outdoors installations (as long General tab as light condition is changing) and must not be used for indoor installations. Place a Licence Plate in the view of the camera if possible for this operation. •... -
Page 29: Download
The ANPR Video Plugin ActiveX enables viewing the video stream into Internet Explorer and grabbing the string of the recognised licence plate. Click on the link to save/run the plugin from the XCI-NPR camera. Refer to part First connexion: ActiveX Plugin installation procedure for more information regarding the installation of the ANPR Video Plugin. -
Page 30: Network Tab
Network tab Mac address and IP address In these fields are displayed the currents Mac and IP • DHCP Mode: enabling this function (auto) will put the addresses of the camera. camera into a DHCP network mode. If the camera is not connected to a DHCP server, then a fixe IP address value of the camera is set. -
Page 31: Ntp
event. A network management system (NMS) is needed to get information from SNMP capable devices. • SNMP Mode: enabling this function (on) will put SNMP agent on. SNMP is used to send maintenance requests to the camera. • Trap destination, community, Location, Contact: these fields enables user to configure the SNMP settings of the camera. -
Page 32: Advanced Tab
Advanced tab • BOTH: enabling this function (default value) will allow recognition of vehicles going forward and backward of the lane. • FRONT: enabling this function will allow recognition of vehicles coming from the front. • REAR: enabling this function will allow recognition of vehicles coming from the rear. -
Page 33: Maximum Vehicle Presence (Seconds)
Default value is index 21. 3. If everithing is OK. The message “Uploaded successfully“ This value should be changed accordingly to the darkest will be displayed on the top left-hand side of the situation: night environment usually. Depending on the range confirmation screen. -
Page 34: Restart Camera Button
of the shutter speed (if Automatic Shutter Speed value is selected – refer to chapter “General tab”). The restart procedure last approximately 15 seconds. RESTART CAMERA button Pressing the RESTART CAMERA button will shut down the camera and then restart it. The restart procedure last approximately 2 minutes. -
Page 35: Typical Installation
Typical installation 17° 23° = 40° 17° < 20° 23° < 25° 17° 23° 1,5 m Remarks: This typical installation example should not be used as a 100% working reference because of: Unknown plate position. Unknown barrier position. Unknown vehicle position. Unknown background reference. -
Page 36: Example: Top View
Example: top view Background reference / field of view IR illuminated zone XCI-NPR Barrier Badge Reader & Interphone Height of the camera must be around 2 meters. Adjust the height accordingly with: Height of the barrier objective is to avoid having the licence plate hidden by the barrier. -
Page 37: Verification Of The Installation
Verification of the installation In order to verify that the overall installation has been correctly carried out, the plate recognition performance should be evaluated with the invite command tool “telnet 192.168.0.1 8050”. This can be done by connecting the camera to a laptop. Procedure •... -
Page 38: Camera Maintenance
Camera maintenance The maintenance of the camera is the same for any installation of video surveillance. However, in the case where the images supplied are subject to complex software operations, this maintenance is of particular importance. The issues which require particular attention are: •... -
Page 39: Specifications
Specifications Specifications Technical Features Camera Features Image device 1/3-type progressive scan IT monochrome CCD Effective resolution (H x V) 640 x 480 (VGA) Cell size (H x V) 7.4 x 7.4 µm Frame rate 60 fps (VGA) Electronic shutter 1/60 s to 1/10000 s Processor X86, AMD Geode GX533, 400MHz Operating System... -
Page 40: Country Coverage To Date (May 2010)
Country coverage to date (May 2010) Countries supported: Belgium • Croatia • Denmark • France • Germany • Ireland • Italy • Luxembourg • Netherland • Portugal • Spain • Switzerland (Beware, only on the front plates) • • United Kingdom Page 40 / 42... -
Page 41: Spectral Sensitivity Characteristics (Typical Values)
Spectral sensitivity characteristics (typical values) Page 41 / 42... -
Page 42: Dimensions
Dimensions Page 42 / 42...
Need help?
Do you have a question about the XCI-NPR and is the answer not in the manual?
Questions and answers