Table of Contents
Advertisement
Quick Links
Advertisement
Table of Contents

Related Manuals for B. Braun H.E.L.P. Plasmat Futura


Summary of Contents for B. Braun H.E.L.P. Plasmat Futura
- Page 1 H.E.L.P. Plasmat® Futura Operating Manual Software Version 2.6 Status November 2011 (2.6_CA-EN_03) B|BRAUN SHARING EXPERTISE Manufacturer: B. Braun Avitum AG 34209 Melsungen Germany +49 (56 61) 71-0 +49 (56 61) 71-35 10 Order No. 38910289...
-
Page 2: Table Of Contents
TABLE OF CONTENTS SAFE HANDLING PRIMING AND RINSING About These Instructions for Use Automatic Priming and Rinsing 1.1.1 Validity Parameter Setting 4.2.1 1.1.2 Target Group 4.2.2 Parameter Setting in the <Parameter 1.1.3 Warnings, Notices and Symbols in These Overview> Screen Instructions for Use 4.2.3 Parameter Setting in the <Flow Scheme>... - Page 3 8.3.5 Changing the H.E.L.P. Precipitate Filter 8.3.6 Changing the H.E.L.P. Heparin Adsorber 8.3.7 Changing the H.E.L.P Ultrafilter TECHNICAL INFORMATION Transportation 9.1.1 Wheeling 9.1.2 Carrying Operating Conditions 9.2.1 Place of Installation 9.2.2 Initial Start-Up 9.2.3 Service and Maintenance 9.2.4 Disposables, Consumables and Accessories/ Replacement Parts 9.2.5 Cleaning and Disinfection Technical Data...
-
Page 4: Safe Handling
SAFE HANDLING Operating Manual Software-Version 2.6 SAFE HANDLING ABOUT THESE INSTRUCTIONS FOR USE 1.1.1 Validity 1.1.2 Target Group for the Instructions for Use 1.1.3 Warnings, Notices and Symbols in These Instructions for Use 1.1.4 Abbreviations INTENDED USE AND INDICATIONS CONTRAINDICATIONS SIDE EFFECTS SPECIAL HAZARDS AND PRECAUTIONS 1.5.1... - Page 5 SAFE HANDLING Operating Manual Software-Version 2.6 1.1 ABOUT THESE INSTRUCTIONS FOR USE These instructions for use form an integral part of the H.E.L.P. Plasmat® Futura machine. They describe the appropriate and safe use of the H.E.L.P. Plasmat® Futura machine at all stages of operation. The H.E.L.P.
- Page 6 SAFE HANDLING Operating Manual Software-Version 2.6 Warning Meaning term Imminent danger that can lead to death or serious DANGER injury if not avoided Potentially imminent danger that can lead to death or WARNING serious injury if not avoided Potentially imminent danger that can lead to minor CAUTION injuries or damage to equipment if not avoided The warning notices are highlighted in the following...
- Page 7 SAFE HANDLING Operating Manual Software-Version 2.6 Precipitate filter pressure Plasma pressure Reinfusion pump Venous pressure Safety air detector Safety air clamp Transmembrane pressure B|BRAUN Chapter 1 Page 4 of 10 2.6_CA-EN_03 SHARING EXPERTISE...
- Page 8 H.E.L.P. Plasmat® Futura machine may only be used in combination with the H.E.L.P. apheresis treatment system from B. Braun Avitum AG. The H.E.L.P. Futura apheresis system is indicated for use in performing low density lipoprotein cholesterol...
- Page 9 SAFE HANDLING Operating Manual Software-Version 2.6 1.3 CONTRAINDICATIONS The H.E.L.P. apheresis treatment must not be applied in the case of - Hemorrhagic diathesis - Ulcers in the gastrointestinal area - Haemorrhage - Coagulation disorder and neoplasm - Liver diseases - Severe heart failure and valvular defect - Condition following apoplexia - Dementia - During pregnancy and lactation...
-
Page 10: 1.5.1 Special Patient Conditions
SAFE HANDLING Operating Manual Software-Version 2.6 In isolated cases there is - Iron deficiency anaemia - Hypertonia and oedema formation in the case of patients with renal function impairment In rare instances benzyl alcohol can cause hypersensitivity reactions in patients. 1.5 SPECIAL HAZARDS AND PRECAUTIONS 1.5.1 Special Patient Conditions A particularly careful benefit-risk evaluation must be... - Page 11 SAFE HANDLING Operating Manual Software-Version 2.6 damaged in any way. A damaged H.E.L.P. Plasmat® Futura machine must be submitted for repairs or disposed of. 1.6 INTERACTION WITH OTHER DEVICES It is recommend that the machine be connected to a dedicated circuit. When using the H.E.L.P. Plasmat® Futura machine in combination with other therapeutic devices, it is recommended to use a , since the...
-
Page 12: 1.7.3 Conformity
SAFE HANDLING Operating Manual Software-Version 2.6 1.7.2 Requirements on the User H.E.L.P. Plasmat® Futura machine may be operated only by skilled personnel who are duly trained and instructed on its use according to the contents of this Operating Manual. The operator must ensure that the instructions for use are read and understood by all operators of the H.E.L.P. -
Page 13: 1.7.4 Manufacturer's Responsibility
Instructions for use, enclosed information and maintenance information. 1.7.5 Technical Changes B. Braun Avitum AG reserves the right to change the products in line with further technical developments. 1.8 DISPOSAL H.E.L.P. Plasmat® Futura machines may be returned to the manufacturer for disposal in accordance with the applicable disposal guidelines. -
Page 14: Product Description
PRODUCT DESCRIPTION Operating Manual Software 2.6 PRODUCT DESCRIPTION PRINCIPLE FUNCTION MACHINE 2.3.1 Front View 2.3.2 Upper Module 2.3.3 Central Module 2.3.4 Controls on the Central Module 2.3.5 Rear of the Machine 2.3.6 Symbols on the Machine MONITOR 2.4.1 Monitor Controls 2.4.2 Monitor Layout and Functions CONSUMABLES... - Page 15 PRODUCT DESCRIPTION Operating Manual Software 2.6 2.1 PRINCIPLE H.E.L.P. Plasmat® Futura is a plasma therapy unit that, together with the H.E.L.P. apheresis treatment unit, performs H.E.L.P. apheresis therapy. H.E.L.P stands for Heparin-induced Extracorporeal LDL Precipitation. The first step of the procedure is plasma separation. The cellular blood components are directly reinfused to the patient along with the treated plasma.
- Page 16 PRODUCT DESCRIPTION Operating Manual Software 2.6 2.2 FUNCTION The blood pump (BP) delivers the blood from the patient’s venous access to the plasma filter. The blood flow is controlled via an arterial pressure transducer (PA). The heparin pump (HP) controls the heparin output for anticoagulation in the arterial line.
- Page 17 PRODUCT DESCRIPTION Operating Manual Software 2.6 After the dialysis, the plasma is delivered via the reinfusion pump (PRP) to the venous air chamber and together with the blood from the plasma separation reinfused to the patient via the venous line. Pumps Sensors Actuators...
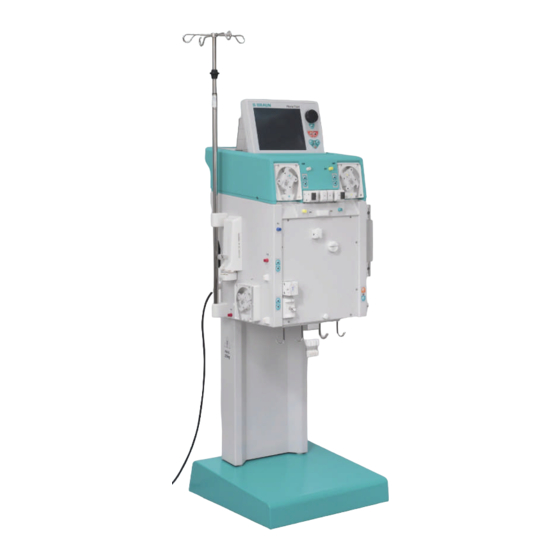
- Page 18 PRODUCT DESCRIPTION Operating Manual Software 2.6 2.3 MACHINE 2.3.1 Front View 1. IV-pole (height-adjustable) 2. Upper module 3. Heparin syringe pump 4. Central module 5. Base column 6. Base with brake 7. LCD graphic monitor 8. Plate warmer 9. Front panel with attachment for the H.E.L.P. Futura 10.
- Page 19 PRODUCT DESCRIPTION Operating Manual Software 2.6 2.3.3 Central Module Plasma pressure (PPL) transducer Venous pressure (PV) transducer Heparin syringe pump (calibrated for 30 ml Omnifix® Prefilter pressure (PBE) transducer Manual level regulator for venous air chamber Blood pump Manual level regulator for arterial air chamber Arterial pressure (PA) transducer Holder for arterial chamber 10.
- Page 20 PRODUCT DESCRIPTION Operating Manual Software 2.6 If the machine is switched on, with the red brake locking button, the brake can be applied. The brake can then be released with the green brake release button. 2.3.5 Rear of the Machine 1.
- Page 21 PRODUCT DESCRIPTION Operating Manual Software 2.6 2.3.6 Symbols on the Machine Observe Instructions for use Observe safety information Application device type B Classification acc. to IEC 60601-1 Electrical ground H.E.L.P. Plasmat® Futura OFF H.E.L.P. Plasmat® Futura ON Alternating current Schematic illustration on safety air detector (SAD) showing the correct way of installing the tube Trend Viewer connector (optional) B|BRAUN...
- Page 22 PRODUCT DESCRIPTION Operating Manual Software 2.6 2.4 MONITOR 2.4.1 Monitor Controls The rotary knob moves the cursor on the screen. Display in lines: Clockwise rotation - the cursor moves from left to right Counterclockwise rotation - the cursor moves from Rotary knob right to left Display in columns:...
- Page 23 PRODUCT DESCRIPTION Operating Manual Software 2.6 has stopped and must be started manually with the Start Stop key. The running blood pump can also be stopped with this key. 2.4.2 Monitor Layout and Functions 1 Status bar: The status bar indicates the activity of the blood pump, the current time and date, therapy phase (priming, therapy, reinfusion) and current status of the phase (stand by, running).
- Page 24 PRODUCT DESCRIPTION Operating Manual Software 2.6 Flow Scheme The Help screen can be selected from any screen with the key. The symbols and abbreviations used for the different pressures in the display areas are explained on the Help screen. To return to the previous screen select <Back Selection>...
- Page 25 PRODUCT DESCRIPTION Operating Manual Software 2.6 2.5 CONSUMABLES The treatment unit for the Plasmat® H.E.L.P. Futura comprises the following: 2.5.1 H.E.L.P. Futura Set The H.E.L.P. Futura set includes all line systems and filters required for performing H.E.L.P. treatment: H.E.L.P. Futura kit with H.E.L.P.
- Page 26 PRODUCT DESCRIPTION Operating Manual Software 2.6 Arterial line Dialysate line 1 x 5 l empty bag for rinse solution (1) 3 x 7 l drain bags (2) B|BRAUN Chapter 2 Page 13 of 15 2.6_CA-EN_03 SHARING EXPERTISE...
- Page 27 PRODUCT DESCRIPTION Operating Manual Software 2.6 2.5.2 Solutions The H.E.L.P. treatment unit includes, in addition to the H.E.L.P. Futura set, all solutions required for performance of a treatment: 2 x 3000 ml H.E.L.P. 0.9 % NaCl sodium chloride solution ...
- Page 28 PRODUCT DESCRIPTION Operating Manual Software 2.6 1 x 1500 ml and 1 x 500 ml H.E.L.P. 0.9% NaCl sodium chloride solution non PVC for reinfusion B|BRAUN Chapter 2 Page 15 of 15 2.6_CA-EN_03 SHARING EXPERTISE...
-
Page 29: Preparation
PREPARATION Operating Manual Software 2.6 PREPARATION SWITCHING ON AND SELF-TEST PREPARING THE SOLUTIONS SETTING UP THE BAGS SETTING UP THE H.E.L.P. FUTURA SET B|BRAUN Chapter 3 Page 1 of 9 2.6_CA-EN_03 SHARING EXPERTISE... - Page 30 PREPARATION Operating Manual Software 2.6 3.1 SWITCHING ON AND SELF-TEST Switching on Switch on the H.E.L.P. Plasmat® Futura with the On/Off switch on the rear of the machine. Make sure that the machine brake is locked during the treatment. Hardware Self-Tests After the machine has been switched on, the system performs a series of hardware self-tests.
- Page 31 PREPARATION Operating Manual Software 2.6 During the self-test, make sure that the load cell is not equipped with solutions and the pressure transducers are not screwed to the respective connections! Preparations for therapy may start only when all self-tests are performed successfully.
- Page 32 PREPARATION Operating Manual Software 2.6 3.2 PREPARING THE SOLUTIONS H.E.L.P. 0.9% Nacl, physiological saline solution Remove the outer packaging of the saline bag. Fill a syringe with 1.5 ml heparin (5.000 IU / ml). Remove the cannula from the syringe. ...
- Page 33 PREPARATION Operating Manual Software 2.6 3.3 SETTING UP THE BAGS Physiological Saline Solution Bag/Empty Bag Hang the following on the IV-pole of the machine: One 5L-empty bag with the connectors upturned. One prepared bag with physiological saline solution. ...
- Page 34 PREPARATION Operating Manual Software 2.6 3.4 SETTING UP THE H.E.L.P. FUTURA SET (1) Place the plastic plate of the H.E.L.P. Futura kit on to the lower support on the machine. Press the plate against the front of the machine. (2) Secure the plate with the upper rotary attachment knob (2).
- Page 35 PREPARATION Operating Manual Software 2.6 (1) Mount the plasma filter in its holder. (2) Connect the plasma line including the reinfusion line to the top right of the plasmafilter. (3) Connect the venous line to the top left of the plasma filter.
- Page 36 PREPARATION Operating Manual Software 2.6 (1) Connect the buffer line to the prepared saline bag on the load cell. (2) Connect the ultrafiltrate lines to the three drain bags. (3) Insert the buffer line into the holder provided on the load cell. Setting Up the Arterial Line (1) Place the arterial air chamber into the holder.
- Page 37 PREPARATION Operating Manual Software 2.6 Setting Up the Dialysate Line (1) Insert the heating bag into the plate warmer. (2) Connect the blue inflow line to the dialyzer. Make sure that the Hansen connector is firmly seated. Note: Connect red with red and blue with blue! (3) Place the blue inflow line into the dialysate air detector (DAD).
-
Page 38: Priming And Rinsing
PRIMING AND RINSING Operating Manual Software-Version 2.6 PRIMING AUTOMATIC PRIMING AND RINSING PARAMETER SETTING 4.2.1 Parameter Setting in the <Main Parameter> Screen 4.2.2 Parameter Setting in the <Parameter Overview> Screen 4.2.3 Parameter Setting in the <Flow Scheme> Screen 4.2.4 Additional Functions B|BRAUN Chapter 4 Page 1 of 19... - Page 39 PRIMING AND RINSING Operating Manual Software-Version 2.6 4.1 AUTOMATIC PRIMING AND RINSING On the Start screen, the following message is displayed blinking and in red: Press enter key to start! If the machine has been prepared as described in the previous chapter, press the key to begin priming and rinsing the system.
- Page 40 PRIMING AND RINSING Operating Manual Software-Version 2.6 Display area Blood flow in ml/min Heparin flow in ml/h Heparin bolus in ml Autostop heparin in min Plasma flow in ml/min Rinsing time [Actual/Rest] in min Rinsing volume [Actual/Rest] in ml Plasma volume [Actual/Rest] in ml Balance in g Arterial pressure in mmHg Venous pressure in mmHg...
- Page 41 PRIMING AND RINSING Operating Manual Software-Version 2.6 When <Parameter Overview> is selected in the menu bar, the screen display changes to Parameter Overview. By selecting the <Flow Scheme> menu item in the menu bar, the display changes to the Flow Scheme. When in the <Flow Scheme>...
- Page 42 PRIMING AND RINSING Operating Manual Software-Version 2.6 The prompt <W18: Break seals and open all clamps!> appears in the Warning window. Press the key to continue. Warning W18: Break seals and open all clamps ! The <Start Priming> command in the menu bar blinks (the label changes between black and gray).
- Page 43 PRIMING AND RINSING Operating Manual Software-Version 2.6 Step 4 The plasma/buffer pump starts and the precipitate filter is filled. This step is completed when the level monitoring of the precipitate filter air chamber (PCLD) detects fluid and the balance test 1 has been completed.
- Page 44 PRIMING AND RINSING Operating Manual Software-Version 2.6 Step 11 This step is completed when the minimum rinsing volume of 2400 ml is reached. The following message is displayed in the Warning window: <W14: Rinsing completed. Set new value to continue rinsing Continue with 'OK!>...
- Page 45 PRIMING AND RINSING Operating Manual Software-Version 2.6 Additional Manual Rinsing of Blood Side If you wish to increase the rinsing volume in the blood circuit: Start Start the blood pump with the key. When you have sufficiently rinsed the blood Stop side, press again the key to finish...
- Page 46 PRIMING AND RINSING Operating Manual Software-Version 2.6 4.2 PARAMETER SETTING 4.2.1 Parameter Setting in the <Main Parameter> Screen To set the parameters, select the <Parameter Setting> menu item with the cursor in the <Main Parameter> screen and activate it with the key.
- Page 47 PRIMING AND RINSING Operating Manual Software-Version 2.6 Setting Plasma flow Press the key to select the parameter to be W16: Press 'OK' to return to menu selection! [ 10 : 40 ] changed. The field is shown with a red background and white labeling.
- Page 48 Risk to patient due to insufficient or too high heparinisation. Use only 30 ml Omnifix® Luer Lock syringes CAUTION from B. Braun Melsungen AG. Calibration of the heparin syringe pump is ensured only with use of the Omnifix© Luer Lock syringe. B|BRAUN...
- Page 49 PRIMING AND RINSING Operating Manual Software-Version 2.6 Autostop Heparin Default setting: 0 min Range: 0 ÷ 60 min Step size: 5 min Autostop heparin indicates how long before the end of the therapy the heparin administration is stopped. If the therapy time is increased after the heparin pump is switched off, the heparin pump starts again automatically.
- Page 50 PRIMING AND RINSING Operating Manual Software-Version 2.6 4.2.2 Parameter Setting in the <Parameter Overview> Screen Using the rotary knob and the key, change to the <Parameter Overview> screen. To set the parameters, select the <Parameter Setting> menu item with the cursor in the <Parameter Overview>...
- Page 51 PRIMING AND RINSING Operating Manual Software-Version 2.6 All parameters which can be changed are displayed in Setting Plasma flow red. The currently selected parameter has a gray W16: Press 'OK' to return to menu selection ! background. The Setting window displays the [ 10 : 40 ] allowable range.
- Page 52 PRIMING AND RINSING Operating Manual Software-Version 2.6 Setting Plasma flow Press the key to activate the parameter to be W16: Press 'OK' to return to menu selection ! [ 10 : 40 ] changed. The field is shown with a red background and white labeling.
- Page 53 PRIMING AND RINSING Operating Manual Software-Version 2.6 In addition to the parameters listed in chapter 4.2.1., the following parameters can be entered: Temperature Default setting: Range: 34 ÷ 40 Step size: PA min Default setting: -150 mmHg Range: -250 ÷ 80 mmHg Step size: 10 mmHg PA max...
- Page 54 PRIMING AND RINSING Operating Manual Software-Version 2.6 Ratio Dialysate/Plasma Default setting: Range: 4 ÷ 12 Step size: B|BRAUN Chapter 4 Page 17 of 19 2.6_CA-EN_03 SHARING EXPERTISE...
- Page 55 PRIMING AND RINSING Operating Manual Software-Version 2.6 4.2.3 Parameter Setting in the <Flow Scheme> Screen Using the rotary knob and the key, change to the <Flow Scheme> screen. To set the parameters, select the <Parameter Setting> menu item with the cursor in the <Flow Scheme>...
- Page 56 PRIMING AND RINSING Operating Manual Software-Version 2.6 4.2.4 Additional Functions During Priming and Rinsing in the <Main Parameter>, <Parameter Overview>, and <Flow Scheme> screens, the <Additional Functions> menu item is not active. New Therapy: To cancel the priming and rinsing phase and return to the Start screen, switch off the machine and switch it on again while pressing the key.
-
Page 57: Parameter Setting In The
THERAPY Operating Manual Software 2.6 THERAPY STARTING THE THERAPY TERMINATING THE THERAPY PARAMETER SETTING 5.3.1 Parameter Setting in the <Main Parameter> Screen 5.3.2 Parameter Setting in the <Parameter Overview> Screen 5.3.3 Parameter Setting in the <Flow Scheme> Screen 5.3.4 Additional Functions B|BRAUN Chapter 5 Page 1 of 14...Screen - Page 58 Warning THERAPY Operating Manual Software 2.6 5.1 Starting the Therapy After the completion of the priming and rinsing phase, select the <Therapy> menu item in the menu bar and confirm with the Warning W32: Activate therapy mode ? The following message is displayed in the warning window <W32: Activate therapy mode ?>...
- Page 59 THERAPY Operating Manual Software 2.6 Balance in g Arterial pressure in mmHg Venous pressure in mmHg Prefilter pressure in mmHg Plasma pressure in mmHg Select <Start Therapy> in the menu bar. The following message is displayed in the Warning window: <W15: Connect buffer –...
- Page 60 THERAPY Operating Manual Software 2.6 key. The default setting of the blood flow is 40 ml/min. If desired, adapt the blood flow with the key or the key to the existing pressure situation. When the first traces of blood reach the saline bag on the IV-pole, stop the blood pump with the Start Stop...
- Page 61 THERAPY Operating Manual Software 2.6 Risk to patient due to haemolysis because of a high shear stress. Gradually increase first the blood flow rate to CAUTION reach the desired target value after 5 minutes. Subsequently, gradually increase the plasma flow rate to achieve the appropriate value after another 10 minutes.
- Page 62 THERAPY Operating Manual Software 2.6 5.2 Terminating the Therapy When the treated plasma volume is achieved, the machine switches to the stand-by mode. The blood circuit continues to circulate with the most recent blood flow rate selected. The cursor automatically points to the <End of Therapy>...
- Page 63 THERAPY Operating Manual Software 2.6 5.3 PARAMETER SETTING 5.3.1 Parameter Setting in the <Main Parameter> Screen To set the parameters, select the <Parameter Setting> menu item with the cursor in the <Main Parameter> screen and activate it with the key. All parameters which can be changed are displayed in Setting Plasma flow...
- Page 64 THERAPY Operating Manual Software 2.6 Setting Plasma flow Press the key to select the parameter to be W16: Press 'OK' to return to menu selection [ 10 : 40 ] changed. The field is shown with a red background and white labeling. Perform the desired change using the rotary knob and confirm with the key.
- Page 65 THERAPY Operating Manual Software 2.6 To set parameters, select the <Parameter Setting> menu item and activate it with the key. All parameters which can be changed are displayed in Setting Plasma flow red. The currently selected parameter has a gray W16: Press 'OK' to return to menu selection [ 10 : 40 ] background.
- Page 66 THERAPY Operating Manual Software 2.6 Setting Plasma flow Press the key to select the parameter to be W16: Press 'OK' to return to menu selection [ 10 : 40 ] changed. The field is shown with a red background and white labeling. Perform the desired change using the rotary knob and confirm it with the key.
-
Page 67: Parameter Setting In The
THERAPY Operating Manual Software 2.6 5.3.3 Parameter Setting in the <Flow Scheme> Screen Using the rotary knob and the key, change to the <Flow Scheme> screen. To set the parameters, select the <Parameter Setting> menu item with the cursor in the <Flow Scheme>...Screen - Page 68 THERAPY Operating Manual Software 2.6 5.3.4 Additional Functions Premature Termination of Therapy The therapy can be terminated prematurely at any time by selecting <End of Therapy> in the menu bar and activated by pressing the key. If the therapy is prematurely terminated, the Warning window with the following message is first displayed <W35: Activate reinfusion ?>...
- Page 69 THERAPY Operating Manual Software 2.6 When <Additional Functions> is selected, a submenu with the following selections is opened: Stop bolus – active only while the heparin bolus is administered Heparin bolus – active during the therapy Balance reset – active only for improper balancing >...
- Page 70 THERAPY Operating Manual Software 2.6 While the heparin bolus is administered, the <Stop Bolus> menu item in the submenu is active. The heparin bolus can be interrupted at any time by pressing the key. During heparin administration, the symbol of heparin bolus (drop) alternates between a large red drop and a small blue drop.
-
Page 71: Reinfusion
REINFUSION Operating Manual Software 2.6 REINFUSION PLASMA REINFUSION BLOOD REINFUSION TERMINATING THE TREATMENT PARAMETER SETTING 6.4.1 Parameter Setting in the <Main Parameter> Screen 6.4.2 Parameter Setting in the <Parameter Overview> Screen 6.4.3 Parameter Setting in the <Flow Scheme> Screen 6.4.4 Additional Functions B|BRAUN Chapter 6... - Page 72 REINFUSION Operating Manual Software 2.6 6.1 PLASMA REINFUSION After terminating the therapy as described in chapter 5.2, the screen display changes to the Reinfusion screen. Display Area of the Reinfusion Screen Blood flow in ml/min Blood reinfusion time in min Blood reinfusion volume in ml Reinfusion flow in ml/min Reinfusion time in min...
- Page 73 REINFUSION Operating Manual Software 2.6 The next steps for preparing the reinfusion are summarized in the Warning window. Check that the double-chamber bag with the physiological saline solution is hanging on the IV- Warning pole. Check whether the reinfusion line is connected to W11: 1) Connect reinfusion and buffer lines to saline the 1500 ml compartment of the saline bag and...
- Page 74 REINFUSION Operating Manual Software 2.6 When the reinfusion volume is reached, all pumps except the blood pump stop. The blood flow is maintained. The default setting of the plasma reinfusion volume is 400 ml. Warning W12: Plasma reinfusion completed ! The Warning window on the display explains the next For blood reinfusion stop Blood Pump procedure choices:...
- Page 75 REINFUSION Operating Manual Software 2.6 6.2 BLOOD REINFUSION Start Stop Stop the blood pump with the key. As long as the blood pump is running, the blood reinfusion will not start ! The next steps are summarized in a Warning window. ...
- Page 76 REINFUSION Operating Manual Software 2.6 When a blood reinfusion volume of 150 ml has been reached warning W41 appears: W41: Open plasma clamp and close venous clamp open the clamp of the plasma line after the plasma filter. close the clamp on the venous line to the venous chamber.
- Page 77 REINFUSION Operating Manual Software 2.6 6.3 TERMINATING THE TREATMENT Make a note of all necessary treatment data of the patient. W17: Blood reinfusion completed ! Select the <Additional Functions> menu item in the menu bar and open the submenu by pressing key.
-
Page 78: Parameter Setting In The
REINFUSION Operating Manual Software 2.6 6.4 PARAMETER SETTING 6.4.1 Parameter Setting in the <Main Parameter> Screen To set the parameters, select the <Parameter Setting> menu item with the cursor in the <Main Parameter> screen and activate it with the key. All parameters which can be changed are displayed in Setting red. -
Page 79: 6.4.2 Parameter Setting In The
REINFUSION Operating Manual Software 2.6 Setting Return flow Press the key to select the parameter to be ml/min W16: Press 'OK' to return to menu selection! changed. The field is shown with a red background and [ 10 : 50 ] white labeling. - Page 80 REINFUSION Operating Manual Software 2.6 To set the parameters, select the <Parameter Setting> menu item with the cursor in the <Parameter Overview> screen and activate it with key. All parameters which can be changed are displayed in Setting red. The currently selected parameter has a gray Return flow W16: Press 'OK' to return to menu selection! ml/min...
-
Page 81: Parameter Setting In The
REINFUSION Operating Manual Software 2.6 Setting Press the key to select the parameter to be Return flow W16: Press 'OK' to return to menu selection ! ml/min changed. The field is shown with a red background and [ 10 : 50 ] white labeling.Screen - Page 82 REINFUSION Operating Manual Software 2.6 To set the parameters, select the <Parameter Setting> menu item with the cursor in the <Flow Scheme> screen and activate it with the key. The screen changes to the Setting screen of the Setting Return flow Parameter Overview and you can perform here all ml/min W16: Press 'OK' to return to menu selection !
-
Page 83: 6.4.4 Additional Functions
REINFUSION Operating Manual Software 2.6 6.4.4 Additional Functions At any time during Plasma Reinfusion, you can prematurely terminate the Plasma Reinfusion by selecting <Stop Plasma> in the menu bar and activating it with the key. To move on to Blood Reinfusion, stop the blood pump Start Stop key. - Page 84 REINFUSION Operating Manual Software 2.6 Under the <Additional Functions> menu item you can select more functions. The <New Therapy> menu item is active only during blood reinfusion. It allows for complete termination of the treatment and a return to the Start screen (see chapter 6.3).
-
Page 85: Basic And Default Settings
BASIC SETTINGS Operating Manual Software 2.6 BASIC AND DEFAULT SETTINGS B|BRAUN Chapter 7 Page 1 of 4 2.6_CA-EN_03 SHARING EXPERTISE... - Page 86 BASIC SETTINGS Operating Manual Software 2.6 7. BASIC AND DEFAULT SETTINGS By simultaneously pressing the key and the key you can go to the Service screen from any screen after the self-test. Technical information is displayed on the left side of the screen (1).
- Page 87 BASIC SETTINGS Operating Manual Software 2.6 Def. Ratio Plasma/Blood This parameter sets the percentage share of plasma flow to blood flow during the separation of plasma. The setting is performed in steps of 1% in the range from 10% to 40%. The default setting is 20 %.
- Page 88 BASIC SETTINGS Operating Manual Software 2.6 If a parameter is relevant to patient safety, the Setting currently set value is shown in the Setting window Def. Ratio Plasma/Blood [ 10 : 40 ] above the setting range. In addition, the LEDs above key blink.
-
Page 89: Alarms And Problem Correction
ALARMS AND PROBLEM CORRECTION Operating Manual Software 2.6 ALARMS AND PROBLEM CORRECTION ALARMS 8.1.1 Alarm Concept 8.1.2 List of Alarms WARNINGS 8.2.1 Warning Concept 8.2.2 List of Warnings 8.3. PROBLEM CORRECTION 8.3.1 Balance Reset 8.3.2 Deaeration of the Heparin Adsorber 8.3.3 Changing the Solution Bags 8.3.4... - Page 90 ALARMS AND PROBLEM CORRECTION Operating Manual Software 2.6 8. 1 ALARMS 8.1.1 Alarm Concept An alarm situation always requires special attention and immediate processing by the user. A 27: Weight test 2 error Alarms are displayed in the alarm/note line and accompanied by an acoustic alarm tone.
- Page 91 ALARMS AND PROBLEM CORRECTION Operating Manual Software 2.6 8.1.2 List of Alarms If an alarm cannot be corrected with the measures described, if it occurs frequently and you cannot determine its cause or if a machine defect exists, please inform technical service. Code Alarm Text Alarm Cause...
- Page 92 ALARMS AND PROBLEM CORRECTION Operating Manual Software 2.6 Code Alarm Text Alarm Cause Corrective Action A 08 Safety air detector Hardware problem Acknowledge the alarm (twice). If the alarm (SAD) test failed is repeated switch the machine off and on again.
- Page 93 ALARMS AND PROBLEM CORRECTION Operating Manual Software 2.6 Code Alarm Text Alarm Cause Corrective Action A 26 Weight test 1 error - Is It was determined with Ensure that: PCLD chamber full ? weight test 1 that the The seal on the saline bag is open. plasma/buffer pump does ...
- Page 94 ALARMS AND PROBLEM CORRECTION Operating Manual Software 2.6 Code Alarm Text Alarm Cause Corrective Action Venous pressure test An error occurred during Ensure that: failed the calibration of the The pressure transducer for the PV is venous pressure (PV) and correctly screwed on.
- Page 95 ALARMS AND PROBLEM CORRECTION Operating Manual Software 2.6 Code Alarm Text Alarm Cause Corrective Action A 39 Maximum arterial Arterial pressure too high Ensure that: pressure (PA) The arterial access is free and properly connected. If necessary, increase the blood flow. A 40 Minimum prefilter Prefilter pressure too low...
- Page 96 ALARMS AND PROBLEM CORRECTION Operating Manual Software 2.6 Code Alarm Text Alarm Cause Corrective Action A 48 Minimum dialysis filter Dialyzer pressure too low Ensure that: pressure (PDF) (< -50 mmHg) There is no dialyzer leakage. If this is the Plasma flow too low case, replace the dialyzer (see 8.3.7).
- Page 97 ALARMS AND PROBLEM CORRECTION Operating Manual Software 2.6 Code Alarm Text Alarm Cause Corrective Action A 57 Air in dialysate line DAD detects air Ensure that: The dialysate bags are full. The clamps of the dialysate lines are open. ...
- Page 98 ALARMS AND PROBLEM CORRECTION Operating Manual Software 2.6 Code Alarm Text Alarm Cause Corrective Action A 69 Balance error Balance error > 200 g Ensure that: Defect of plasma/buffer The seals of the saline bags and of the pump, of reinfusion pump dialysate bags are open.
- Page 99 ALARMS AND PROBLEM CORRECTION Operating Manual Software 2.6 Code Alarm Text Alarm Cause Corrective Action A 85 Heparin pump problem. Syringe empty or Ensure that: Check pump or syringe. Current position of The syringe is not empty. heparin pump wrong ...
- Page 100 ALARMS AND PROBLEM CORRECTION Operating Manual Software 2.6 Code Alarm Text Alarm Cause Corrective Action A 95 (S) Line in SAD not Consumables already or Remove all consumables from the machine. empty or SAD error still mounted A 96 (S) Load cell not empty Consumables already or ...
- Page 101 ALARMS AND PROBLEM CORRECTION Operating Manual Software 2.6 8. 2 WARNINGS 8.2.1 Warning Concept Warnings are given when: The user should perform a certain action. A certain state must be pointed out to the user. W 28: Balance error Warnings are always accompanied by acoustic warning tones.
- Page 102 ALARMS AND PROBLEM CORRECTION Operating Manual Software 2.6 8.2.2 List of Warnings M = display in the Message box, T = display in the Alarm/Note line Code Warning Text Reason for Warning Corrective Action W 01 Plasma pump starts after Indication that the pressurization blood side arterial line is filled...
- Page 103 ALARMS AND PROBLEM CORRECTION Operating Manual Software 2.6 Code Warning Text Reason for Warning Corrective Action W 12 Plasma reinfusion Plasma reinfusion Follow the instructions on the monitor to completed ! completed, change to the blood reinfusion or press For Blood Reinfusion Stop information Blood Pump...
- Page 104 ALARMS AND PROBLEM CORRECTION Operating Manual Software 2.6 Code Warning Text Reason for Warning Corrective Action W 22 Arterial pressure (PA) does The machine does not Ensure that: not change by blood flow register a change of The arterial pressure transducer (PA) is the PA while the blood correctly connected and dry.
- Page 105 ALARMS AND PROBLEM CORRECTION Operating Manual Software 2.6 Code Warning Text Reason for Warning Corrective Action W 33 Heparin bolus … ml. Safety query before administering the set Press the key to administer the heparin bolus heparin bolus. If you do not wish to administer the heparin bolus, wait 5 s for the Warning window to disappear.
- Page 106 ALARMS AND PROBLEM CORRECTION Operating Manual Software 2.6 Code Warning Text Reason for Warning Corrective Action W 45 W45: Dialysate bags nearly The dialysate bags are Remove the full drain bags and the empty empty. Change bags if nearly empty since the dialysate bags and replace them with necessary.
- Page 107 ALARMS AND PROBLEM CORRECTION Operating Manual Software 2.6 8. 3 PROBLEM CORRECTION 8.3.1 Balance Reset Balance error > 200 g For a balance error > 200 g, the alarm <A69: Balance error!> and the warning <W28: Balance error> are displayed. Check whether: ...
- Page 108 ALARMS AND PROBLEM CORRECTION Operating Manual Software 2.6 Risk to patient due to impact on the patient’s fluid balance. Perform the balance reset only when you are CAUTION sure that the balancing error does not concern the patient! Balance Reset Starting with a balance error >...
- Page 109 ALARMS AND PROBLEM CORRECTION Operating Manual Software 2.6 8.3.2 Deaeration of the Heparin Adsorber If the fluid level in the heparin adsorber drops during the therapy, it can refilled. During the treatment, remove the feed line to the heparin adsorber from the heparin adsorber clamp (HAK).
- Page 110 ALARMS AND PROBLEM CORRECTION Operating Manual Software 2.6 8.3.3 Changing the Solution Bags Change as a result of a defective bag Select the <Stop Therapy> function to go to the bypass mode (blood pump is turning, plasma-side pumps stand still). ...
- Page 111 ALARMS AND PROBLEM CORRECTION Operating Manual Software 2.6 necessary. Remove the full drain bags and replace them. Confirm the subsequent message box < W 09: Check lines and bags !> by pressing key. b) The remaining amount of dialysate is sufficient for termination of the treatment: ...
- Page 112 ALARMS AND PROBLEM CORRECTION Operating Manual Software 2.6 8.3.4 Changing the Plasma Filter Material Article number Haemoselect L 0.5 7061007C 2 x collection bags 7210929 0.9% NaCl 3 l H.E.L.P. 0.9% NaCl solution 4107 3 connection lines 7210934 3 anti-contamination caps 2 venting filters 7500 IU heparin ...
- Page 113 ALARMS AND PROBLEM CORRECTION Operating Manual Software 2.6 8.3.5 Changing the H.E.L.P. Precipitate Filter Material Article number H.E.L.P. precipitate filter 7210931 2 x collection bags 7210929 0.9% NaCl 3 l H.E.L.P. 0.9% NaCl solution 4107 3 connection lines 7210934 3 anti-contamination caps ...
- Page 114 ALARMS AND PROBLEM CORRECTION Operating Manual Software 2.6 8.3.6 Changing the H.E.L.P. Heparin Adsorber Material Article number H.E.L.P. heparin adsorber 7210933 1 x collection bags 7210929 0.9% NaCl 3 l H.E.L.P. 0.9% NaCl solution 4107 2 connection lines 7210934 Attach a connection line with the NaCl solution, fill the line and connect it to the inlet side of the heparin adsorber.
- Page 115 ALARMS AND PROBLEM CORRECTION Operating Manual Software 2.6 8.3.7 Changing the H.E.L.P. Ultrafilter Accessories Article number H.E.L.P. Ultrafilter SMC 1,8 7210932 1 x collection bags 7210929 0.9% NaCl 3 l H.E.L.P. 0.9% NaCl solution 4107 2 connection lines 7210934 Attach a connection line with the NaCl solution, fill the line and connect it with the red, plasma-side filter opening.
- Page 116 Installation and Technical Data Operating Manual Software 2.6 TECHNICAL INFORMATION TRANSPORTATION 9.1.1 Wheeling 9.1.2 Carrying OPERATING CONDITIONS 9.2.1 Place of Installation 9.2.2 Initial Start-up 9.2.3 Service and Maintenance 9.2.4 Disposables, Consumables and Accessories / Replacement Parts 9.2.5 Cleaning and Disinfection TECHNICAL DATA 9.3.1 Technical Data - General...
- Page 117 Installation and Technical Data Operating Manual Software 2.6 9.1 TRANSPORTATION 9.1.1 Wheeling Risk of damage if H.E.L.P. Plasmat® Futura is tilted by > 5°! Have 2 or more persons at hand for transporting CAUTION the machine on stairs and inclined areas. Do not tilt the H.E.L.P.
- Page 118 Installation and Technical Data Operating Manual Software 2.6 9.1.2 Carrying For carrying, the H.E.L.P. Plasmat® Futura can be held at the base, at the handles at the rear panel and at the protrusion at the front of the machine, as shown in the illustration below.
- Page 119 Installation and Technical Data Operating Manual Software 2.6 9.2 OPERATING CONDITIONS The H.E.L.P. Plasmat® Futura may be operated only by trained specialist personnel. The instructions in the Operating Manuals for the machine, the disposables and consumables and the intended use must be followed.
- Page 120 Installation and Technical Data Operating Manual Software 2.6 9.2.2 Initial Start-up Installation and initial start-up of the H.E.L.P. Plasmat® Futura are performed by service personnel who has been authorized by the manufacturer. Before the initial start-up of the machine, check whether it is complete and undamaged.
- Page 121 Installation and Technical Data Operating Manual Software 2.6 9.2.3 Service and Maintenance Repairs and maintenance may be performed only by personnel authorized and trained by the manufacturer. No special maintenance by the user is required. The Technical Safety Inspection is to be performed every twelve months based on the Service Manual and the Operating Manual, subject to technical changes, and to be documented.
- Page 122 Installation and Technical Data Operating Manual Software 2.6 9.3 TECHNICAL DATA 9.3.1 Technical Data - General Machine dimensions Height: 1330 Width: Weight: Weight Electrical connection Rated voltage 110 – 240 V AC Rated frequency 50/60 FI circuit-breaker Class of protection 1, type B, IP 21 The rated voltage must be identical with the voltage specified on the type plate (e.g.
- Page 123 Installation and Technical Data Operating Manual Software 2.6 9.3.2 Recommended Safe Distances; Acc. to EN 60601-1-2 - Table 206 Recommended safe distances between portable or mobile HF telecommunication devices Plasmat ® Futura H.E.L.P. The H.E.L.P. Plasmat® Futura is for the use in ambient conditions with controlled High Frequency disturbance variables. The user can avoid electromagnetic disturbances by keeping the distance between H.E.L.P.
- Page 124 Installation and Technical Data Operating Manual Software 2.6 9.3.4 Extracorporeal Blood Circuit Peristaltic roller pump with motor switch-off when the pump Blood pump (BP) cover is open Delivery rate: 10 ÷ 150 ml/min Delivery rate tolerance: < ± 10 Working pressure range: -140 ÷...
- Page 125 Installation and Technical Data Operating Manual Software 2.6 Venous pressure (PV) Electronically measured by a pressure sensor and digitally displayed Measurement range: - 500 ÷ +500 mmHg Allowed tolerance ± 10 mmHg Working range: +20 ÷ +50 mmHg During Therapy: Alarm limits: -10 ÷...
- Page 126 Installation and Technical Data Operating Manual Software 2.6 Heparin pump (HP) Syringe pump (calibrated to Perfusor syringe 30 ml Omnifix®) Delivery rate: 0 ÷ 10.0 ml/h Delivery rate variation: < ±10% Working pressure range: 0 ÷ +250 mmHg Protection system: Pump status and rate is monitored via a rotation detector.
- Page 127 Installation and Technical Data Operating Manual Software 2.6 9.3.5 Plasma Circuit Plasma/buffer pump (PBP) Peristaltic roller pump with motor switch-off when the pump cover is open (marked yellow) Delivery rate: 2 ÷ 50 ml/min Delivery rate variation: < 10 Working pressure range: -100 ÷...
- Page 128 Installation and Technical Data Operating Manual Software 2.6 Precipitate filter pressure (PPF) Electronically measured by a pressure sensor and digitally displayed Measurement range: - 500 ÷ +500 mmHg Allowed tolerance ± 10 mmHg Working range: +150 ÷ +300 mmHg During Therapy: Default alarm limits: -20 ÷...
- Page 129 Installation and Technical Data Operating Manual Software 2.6 9.3.6 Dialysing Circuit Dialysate pump (DP) Peristaltic roller pump with motor switch-off when the pump cover is open Delivery rate: 10 ÷ 200 ml/min Delivery rate tolerance: < ± 10 Working pressure range: -140 ÷...
- Page 130 Installation and Technical Data Operating Manual Software 2.6 Plate warmer (H) Fluid warming system with temperature sensors based on heat transfer between temperature controlled metal plate and plastic dialysate bag Temperature range: 34.0 ÷ 40.0 °C Default in therapy: 39.0 °C Allowed variation: °C...
- Page 131 Installation and Technical Data Operating Manual Software 2.6 Patient balance Patient balance feedback control system based on weight measurement by the load cell controlling the reinfusion pump (marked green). Patient balance range: - 600 ÷ 0 Allowed tolerance ± 50 Working range: - 600 ÷...
- Page 132 Operating Manual. 9.4.2 Liability and Warranty For the H.E.L.P. Plasmat® Futura, B. Braun Avitum AG grants 12 months guarantee as from the initial installation. The guarantee comprises the repair or the replacement of defective parts, providing they have design, production or material defects.
- Page 133 ANNEX 1 - CONSUMABLES Operating Manual Software 2.6 ANNEX 1 - CONSUMABLES B|BRAUN Annex 1 Page 1 of 2 2.6_CA-EN_03 SHARING EXPERTISE...
- Page 134 ANNEX 1 - CONSUMABLES Operating Manual Software 2.6 List of Articles Article Number Article 7210925 H.E.L.P. Futura set Single parts of the H.E.L.P. Futura set art. no. 7210925 7210980 Venous line 7210981 Plasma/buffer line 7210982 Filtrate line 7210983 Connection line 7210984 Dialysate drainage line 7210985...
- Page 135 ANNEX 2 – EXPLANATION OF PRESSURES Operating Manual Software 2.6 ANNEX 2 – EXPLANATION OF PRESSURES B|BRAUN Annex 2 Page 1 of 4 2.6_CA-EN_03 SHARING EXPERTISE...
- Page 136 ANNEX 2 – EXPLANATION OF PRESSURES Operating Manual Software 2.6 Relevant Pressures Arterial pressure PA Arterial prefilter pressure After the blood pump is started and adapted and the automatic level adjustment of the arterial air chamber is activated, the lower and upper PBE limits are set within ten seconds in the therapy and reinfusion phase.
- Page 137 ANNEX 2 – EXPLANATION OF PRESSURES Operating Manual Software 2.6 Dialyzer pressure Dialysate inlet pressure Venous pressure During therapy and reinfusion phase, 10 sec after start of blood pump or plasma pump, and after change of the blood flow, or after the manual level regulation of the venous or PBE chamber, respectively, the lower and upper PV limits are automatically adjusted.
- Page 138 ANNEX 2 – EXPLANATION OF PRESSURES Operating Manual Software 2.6 Pressure Limits The following table shows the limiting value ranges of the pressures depending on the current phase of the system. Pressure Priming Therapy BP RUN Therapy BP STOP Reinfusion BP RUN Reinfusion BP STOP (mmHg) Def /...
- Page 139 Operating Manual ANNEX 3 - LIMIT VALUES Software 2.6 ANNEX 3 - LIMITS B|BRAUN Annex 3 Page 1 of 2 2.6_CA-EN_03 SHARING EXPERTISE...
- Page 140 Operating Manual ANNEX 3 - LIMIT VALUES Software 2.6 Limits of Adjustable Parameters Parameter Default Step Unit Sequence ml/min Blood flow Plasma flow % blood flow 1000 Plasma reinfusion volume Blood reinfusion volume ml/min Return flow Ratio Dialysate/Plasma 2400 2400 20000 Rinsing volume Plasma volume...
- Page 141 ANNEX 4 – SELF-TESTS Operating Manual Software 2.6 ANNEX 4 - SELF-TESTS B|BRAUN Annex 4 Page 1 of 7 2.6_CA-EN_03 SHARING EXPERTISE...
- Page 142 ANNEX 4 – SELF-TESTS Operating Manual Software 2.6 After the machine is switched on, the system initiates a series of hardware self-tests. For these tests, no disposable material (solution bags, lines) must be installed on the machine. Numeric Test This test displays the numeric strings (0 1 2 3 4 5 6 7 8 9) in the three different fonts which the machine has available.
- Page 143 ANNEX 4 – SELF-TESTS Operating Manual Software 2.6 Various self-tests are performed during the entire therapy in periodic intervals for the safety of the patient. The following parameters are monitored: Fluid weight on the load cell Blood leak detector (BLD) ...
- Page 144 ANNEX 4 – SELF-TESTS Operating Manual Software 2.6 SAD self-test 1.5 s The first test verifies whether the sensor detects an air signal. The second test performs a comparison between the voltage threshold and the calibration value. This test is performed every 1.5 s (=time required by an air bubble at maximum blood flow to reach the venous cannula) during priming and rinsing as well as during the therapy and reinfusion phases.
- Page 145 ANNEX 4 – SELF-TESTS Operating Manual Software 2.6 Supervisor 24 V relay Self-test The controller checks whether the supervisor can stop all pumps by means of the 24 V relay. Controller activates the blood pump with a flow rate of 100 ml/min for 5 s. ...
- Page 146 ANNEX 4 – SELF-TESTS Operating Manual Software 2.6 Supervisor alarm tone buzzer Self-test The test includes the successive activation of all four alarm tones. Supervisor alarm buzzer Continuous alarm tone The supervisor system activates the buzzer for 2 s. The user is responsible for checking whether the buzzers function correctly.
- Page 147 ANNEX 4 – SELF-TESTS Operating Manual Software 2.6 Blood-side pressure build-up test Step 9 Filling and rinsing Blood-side pressure holding test Venous pressure holding test Safety Air Clamp (SAK) test The following leakage tests are performed in step 9 of the filling and rinsing phase: ...
Need help?
Do you have a question about the H.E.L.P. Plasmat Futura and is the answer not in the manual?
Questions and answers