Table of Contents
Advertisement
Quick Links
A1207 PenGauge
Thickness Gauge
Revision 1.1.0
Acoustic Control Systems – ACS Group
Saarbrücken, Germany 2022
This instruction manual contains essential information on how to use this ACS product safely and effectively.
Before using this product, thoroughly review this instruction manual. Use the product as instructed.
Advertisement
Table of Contents

Related Manuals for ACS A1207 PenGauge


Summary of Contents for ACS A1207 PenGauge
- Page 1 Revision 1.1.0 Acoustic Control Systems – ACS Group Saarbrücken, Germany 2022 This instruction manual contains essential information on how to use this ACS product safely and effectively. Before using this product, thoroughly review this instruction manual. Use the product as instructed.
-
Page 2: Table Of Contents
Storage .......................... 15 Transportation ......................15 Appendix A ........................15 2. Firmware installation 3. Application software Introduction ......................... 19 Application tabs ......................19 Connection to a Bluetooth device ................19 A1207 PenGauge © 2022 Acoustic Control Systems – ACS Group... - Page 3 Thickness measurement ....................22 3.4.1 Display mode ......................23 3.4.2 A-Scan mode ......................28 3.4.3 B-Scan mode ......................31 Settings ......................... 36 Service address ......................41 Index A1207 PenGauge © 2022 Acoustic Control Systems – ACS Group...
-
Page 4: Operation Manual
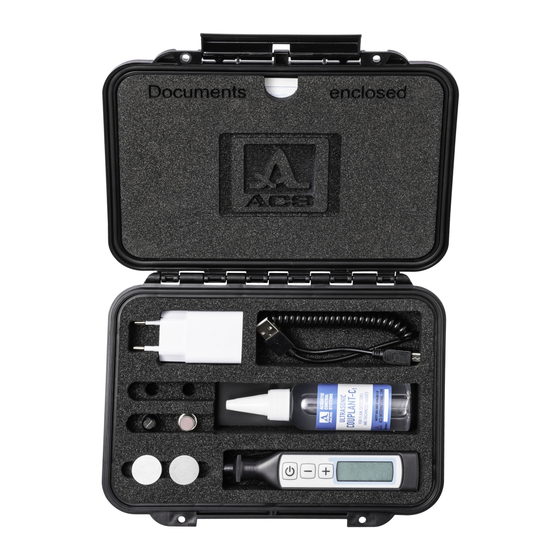
Operation manual Operation manual Operation manual Scope of delivery The following section describes the scope of delivery for A1207 PenGauge. A1207 PenGauge Scope of delivery Part Amount Location Electronic unit A1207 PenGauge with one build-in transducer A1207 PenGauge © 2022 Acoustic Control Systems – ACS Group... -
Page 5: Description And Operation Of The Instrument
One can use the instrument under laboratory, field, and workshop conditions in various industries. Please be sure to perform the surface pre-treatment using couplant. Contact lubricants can be as follows: multiple oils, water, glycerin, special contact liquids, and ultrasonic testing gels, etc. A1207 PenGauge © 2022 Acoustic Control Systems – ACS Group... -
Page 6: Operation Conditions
Overall dimensions, max. 125 × 25 × 15 mm Maximum weight, g Average time between failures, 18 000 h min. Average service life, min. 5 years 1.2.3 Instrument design and operation principle A1207 PenGauge © 2022 Acoustic Control Systems – ACS Group... -
Page 7: Instrument Design
(see figure below) are displayed on the screen. The USB connector is used to connect the power adaptor 220 V – USB to charge the built-in accumulator battery. A1207 PenGauge © 2022 Acoustic Control Systems – ACS Group... -
Page 8: Operation Principle
If there is a thick layer of paint on the surface or the paint starts to pill off, then remove it since the thick paint layer reduces the signal and can produce a false echo, thus resulting in false measurement results. The measurements can be executed through the thin paint A1207 PenGauge © 2022 Acoustic Control Systems – ACS Group... -
Page 9: Putting The Piezoelectric Transducer Onto The Surface
Sound velocity can vary essentially when the sound goes from one point to another in some materials. This effect in some types of cast stainless steel and copper is caused A1207 PenGauge © 2022 Acoustic Control Systems – ACS Group... -
Page 10: Making The Instrument Ready For Operation
To select the measurement units, while switching on the instrument, press and hold the key until the screen changes the displayed measurement values from "mm" (metric system) to "in" (imperial system) or vice-versa. A1207 PenGauge © 2022 Acoustic Control Systems – ACS Group... -
Page 11: Adjustment Of The Instrument
· take the instrument from the sample, the measured resulting velocity value will be blinking on the screen; A1207 PenGauge © 2022 Acoustic Control Systems – ACS Group... -
Page 12: Calibration Mode
For a single-crystal transducer, calibration is performed on one step of the calibration sample - 5 mm. For a double-crystal transducer, calibration is performed on two steps of the calibration sample - 25 mm and immediately 5 mm. A1207 PenGauge © 2022 Acoustic Control Systems – ACS Group... -
Page 13: Maintenance
One can use the instrument during charging. In this case, the charging time will be 2-3 times longer. Don't store the instrument with discharged battery to prevent its functional loss! A1207 PenGauge © 2022 Acoustic Control Systems – ACS Group... -
Page 14: Replacement Of The Transducer Capsule
Disconnect the capsule from the instrument (see figure below). · Reinsert a new capsule; · Screw in the tip After the capsule is replaced, calibrate the device using the calibration sample (see Calibration mode A1207 PenGauge © 2022 Acoustic Control Systems – ACS Group... -
Page 15: Common Troubleshouting And Remedies
The table below presents the propagation speeds of the longitudinal ultrasonic waves in some materials. Table 2: Sound velocities in some materials Material Velocity, m/s Aluminium 6260 Aluminium alloy D16 6320 A1207 PenGauge © 2022 Acoustic Control Systems – ACS Group... - Page 16 Copper 4700 Molybdenum 6290 Nickel 5630 Stannum 3320 Osmium 5478 Lead 2160 Limestone 86 4640 Capron 2640 Quartz glass 5930 Labradorite 44 5450 3980 Marble 6150 Plexiglass 2670 Polystyrol 2350 A1207 PenGauge © 2022 Acoustic Control Systems – ACS Group...
- Page 17 Tantalum 4235 Chromium 6845 Zinc 4170 Silicate glass 5500 Steel H15N15GS 5400 Steel St3 5930 Thermazote 2920 Teflon 1350 Porcelain 5340 Ebonite 2400 Circonium 4900 Cast iron 3500 - 5600 A1207 PenGauge © 2022 Acoustic Control Systems – ACS Group...
-
Page 18: Firmware Installation
5. A new DRIVE appears (for example here - G:). 6. Copy newest (A1207_v3_43.bin) or desired firmware file to the new drive (here - >G:). 7. Disconnect the USB2.0 cable. A1207 PenGauge © 2022 Acoustic Control Systems – ACS Group... -
Page 19: Application Software
PCs connected via Bluetooth with the same-named thickness gauge instrument by ACS. The main purpose of the software is to extend the regular functionality of the A1207 PenGauge to include additional data processing and reporting features for better usability. - Page 20 Only paired devices (Android) online devices (iPhone) will be listed. To pair a new device with Android see the section Pairing devices. Click on the desired device name to connect (see Figure 2). You can connect only to one device simultaneously. A1207 PenGauge © 2022 Acoustic Control Systems – ACS Group...
- Page 21 If the device is switched on, the connection will succeed. As long as the Bluetooth connection is active, you will see the serial number of the connected device and the battery level at the top of the application (see Figure 3). A1207 PenGauge © 2022 Acoustic Control Systems – ACS Group...
- Page 22 If the Bluetooth connection is lost, the application will switch to the Connectivity tab again. Thickness measurement There are three modes of the thickness measurement provided by the A1207 PenGauge in combination with the application software: Display: The measurement proceeds only in auto mode; you will see the results in digital form.
- Page 23 The top part of the view contains the digital result of the thickness measurement in corresponding units (mm or inch). Clicking and holding on the unit symbol switches between metric and the imperial system of measurement. This panel also contains some informational pictograms: A1207 PenGauge © 2022 Acoustic Control Systems – ACS Group...
- Page 24 Both groups and cells have a three-dot menu, which will give you further configuration options (see Figures 5, 6). The value of each cell is converted to the corresponding units (mm or inch) after switching the measurement units. A1207 PenGauge © 2022 Acoustic Control Systems – ACS Group...
- Page 25 Application software Application software Figure 5: Menu for groups (left - Android, right - iPhone) A1207 PenGauge © 2022 Acoustic Control Systems – ACS Group...
- Page 26 By clicking on the Add button, the new group is appended at the bottom to the list with groups. Measurement cells For the value cells, you have the following options: A1207 PenGauge © 2022 Acoustic Control Systems – ACS Group...
- Page 27 (see Figure 7). Press the Edit button again to exit the editing mode (a pencil on the top of the cells will disappear). Figure 7: Edit mode (left - Android, right - iPhone) A1207 PenGauge © 2022 Acoustic Control Systems – ACS Group...
- Page 28 , the app goes to the A-Scan tab. A standard view of the A-Scan tab is shown in Figure 8. Figure 8: A-Scan tab (left - Android, right - iPhone) A1207 PenGauge © 2022 Acoustic Control Systems – ACS Group...
- Page 29 Under this panel, you can see the plot where the ultrasonic pulse-echo signal is shown. Measurement control In the lower part of the view, there are several buttons to control the measurement. A1207 PenGauge © 2022 Acoustic Control Systems – ACS Group...
- Page 30 The “Show A-Scans” command allows you to see the signal image connected to the corresponding result (see Figure 9). A1207 PenGauge © 2022 Acoustic Control Systems – ACS Group...
- Page 31 Figure 9: Saved results viewer (left - Android, right - iPhone) 3.4.3 B-Scan mode By clicking on the pictogram , the app goes to the B-Scan tab. A common view of the B-Scan tab is shown in Figure 10. A1207 PenGauge © 2022 Acoustic Control Systems – ACS Group...
- Page 32 The top part of the view contains the digital result of measurement currently selected by cursor the position in corresponding units. Clicking and holding on the unit label switches between metric and the imperial system of measurement. The panel also contains some informational pictograms: A1207 PenGauge © 2022 Acoustic Control Systems – ACS Group...
- Page 33 B-Scan image (thickness profile). Under the plot, you can see the information about minimal and maximal values in the measurement. Measurement control In the lower part of the view, there are several buttons to control the measurement. A1207 PenGauge © 2022 Acoustic Control Systems – ACS Group...
- Page 34 1. Delete – delete current B-Scan shown on the plot. 2. List – list all saved B-Scans. Selecting the option to show saved B-Scans switches to the table containing all saved B- Scans (see Figure 11). A1207 PenGauge © 2022 Acoustic Control Systems – ACS Group...
- Page 35 By clicking on the desired item, you can see the image connected to this item and the minimum/maximum information as well. The table has a three-dot menu (see Figure 12) with the following options: A1207 PenGauge © 2022 Acoustic Control Systems – ACS Group...
- Page 36 1. Delete – Delete files connected to the currently selected B-Scan item. 2. Delete all – Delete all B-Scans. You can also pause data acquisition from the A1207 PenGauge instrument. This could be done by clicking and holding on the result value in all three measurement tabs: Display, A-Scan, or B-Scan.
- Page 37 Application software Application software Figure 13: Settings tab (left - Android, right - iPhone) A1207 PenGauge © 2022 Acoustic Control Systems – ACS Group...
- Page 38 4. App language – Used language in the application: English or Russian (Android only). Velocity The ultrasound velocity can be changed directly on the A1207 device or in the application. For that purpose, the material editor is used (Figure 15). A1207 PenGauge © 2022 Acoustic Control Systems – ACS Group...
- Page 39 The material list can be extended or changed with the velocity values for individual materials. The table has a three-dot menu (see Figure 16) with the following options: A1207 PenGauge © 2022 Acoustic Control Systems – ACS Group...
- Page 40 2. Plot view – Representational view of the A-Scan (empty or filled). 3. Mode – Measurement mode (auto or manual). Manual mode is currently unavailable. 4. Rectified signal – Switch on/off the signal rectification. A1207 PenGauge © 2022 Acoustic Control Systems – ACS Group...
- Page 41 The resolution of the B-Scan plot is constant and represents one measurement result per millimeter. Service address Acoustic Control Systems is always available at info@acs-international.com for support if you have any questions regarding the installation or usage of the A1207 PenGauge mobile application. A1207 PenGauge © 2022 Acoustic Control Systems – ACS Group...
Need help?
Do you have a question about the A1207 PenGauge and is the answer not in the manual?
Questions and answers