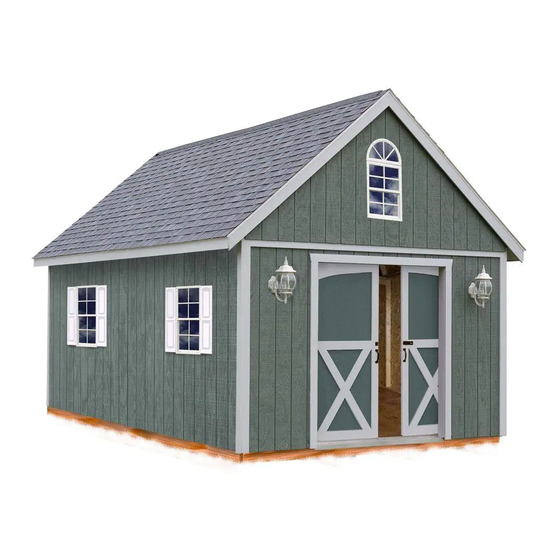
Best Barns Belmont II Assembly Book
Hide thumbs
Also See for Belmont II:
- Assembly book (26 pages) ,
- Assembly book (24 pages) ,
- Assembly book (24 pages)
Advertisement
Quick Links
Best Barns USA
Assembly Book
Revised September 6, 2022
!"#$%#&'()#*+
the Belmont II
,-.(/(,0.
Manufactured by RBS Holdings, LLC
205 Arlington Drive
Greenville, PA 16125
12#3(45&"5$(#3(6789:#'2;+%<(=&%+:(;2+(6789:#'2;($5>3?(;2#3(45&"5$
459(&7;(@+(678#+%?(#&(>27$+(7:(#&(85:;?(>#;27";(67&3+&;(A:74
((((((B!)(C7$%#&'3?(DDE (((((F((E789:#'2;(-G--
Advertisement

Related Manuals for Best Barns Belmont II


Summary of Contents for Best Barns Belmont II
- Page 1 Best Barns USA Assembly Book Revised September 6, 2022 !"#$%#&'()#*+ the Belmont II ,-.(/(,0. Manufactured by RBS Holdings, LLC 205 Arlington Drive Greenville, PA 16125 12#3(45&"5$(#3(6789:#'2;+%<(=&%+:(;2+(6789:#'2;($5>3?(;2#3(45&"5$ 459(&7;(@+(678#+%?(#&(>27$+(7:(#&(85:;?(>#;27";(67&3+&;(A:74 ((((((B!)(C7$%#&'3?(DDE (((((F((E789:#'2;(-G--...
- Page 2 MPORTANT NFORMATION BOUT 125&P 97" A7: 8":6253#&' 7": P#;< N$+53+ :+5% ;2+ A7$$7>#&' #&A7:45;#7& @+A7:+ @+'#&&#&' 67&3;:"6;#7&< L$>593(62+6P(>#;2(97":($765$(CSL(7:(@"#$%#&'(67%+(7AA#6+(A7:(5&9(:+Q"#:+4+&;3(7:(:+3;:#6;#7&3< J$77:T \77%(A$77:#&'(#3(37$%(78;#7&5$$9<(]7"(459(62773+(;7(@"#$%(97":(7>&(7:(87":(5(6+4+&;(85%< Always wear safety glasses when cutting or nailing! 177$3(B+Q"#:+%T C5&%(7:(E#:6"$5:()5> D+V+$ )5A+;9(Y$533+3 E7:%$+33(U:#$$ I+53":#&'(158+ U"3;(I53P C544+: 0.HK.(D5%%+:W3X N2#$$#83()6:+>%:#V+: N+&6#$ J:54#&'()Q"5:+ L%%#;#7&5$ I5;+:#5$3 H Not included in kit: B+Q"#:+%T )2#&'$+3(7:(4+;5$(:77A#&'?(U:#8(O%'+?(B77A#&'(Z5#$3(7:()6:+>3?(N5#&;...
- Page 3 Constructing Details for Deluxe Floor System J7"&%5;#7&(3#*+(#3(,-.HGe(/(,0.HGe<((E2+6P($765$(@"#$%#&'(67%+3(#&(97":(5:+5?(;2+(67&3;:"6;#7&(459 25V+(;7(625&'+<((J7:(5(67&6:+;+(3$5@?(#&3;5$$(3#$$(3+5$+:(53(5(47#3;":+(@5::#+:(@+;>++&(;2+(67&6:+;+ 5&%(;2+(>5$$(8$5;+3<((J754(3#$$(3+5$+:(65&(@+(8":6253+%(5;(274+(6+&;+:3(#&(:7$$3(fH,d-e(7:(>#%+:< ,< E";(W-X(;>7(-/_HK.(@75:%3(#&;7(-.($7&'(@$76P3<((!";;(;2+(_/_HK.(;#4@+:3(;7'+;2+:(;7(45P+(,0. :"&&+:3<(()+6":+(;2+(_/_3(;7'+;2+:(>#;2(;2+(-.($7&'(-/_(@$76P3(5&%(,0%('5$V5&#*+%(&5#$3< -< E"; W-X ;>7 -/_ a7#3; 2+5%+:3 ;7 ,0. H Ge< D597"; A7: ,0e 7& 6+&;+: a7#3; 3856#&'< .h. 45:P3 >2+:+(A$77:(a7#3;(>#$$(@+(8$56+%< 2x4 Joist Header 15-1/4" 16" 16" f< E";(-/_H,-.(A$77:(a7#3;(;7(,,.H^e<((Treated lumber may be thicker than 1-1/2". Take this into account when cutting the length of floor joists.
- Page 4 Step 1 Assemble 12' Back Wall Wall Plate ,__e ,< E"; W-X ;>7 -/_H,-. ;7 5 $+&';2 7A ,__e< N73#;#7& ;2+ @75:%3 ;7'+;2+: 5&% #&%#65;+ >#;2 .h. 45:P3 >2+:+ ;2+ 24" >5$$(3;"%3(>#$$(@+($765;+%< 23-1/4" 24" 144" Wall Plate Pre-Cut Wall Studs Depending on your location pre-cut wall studs vary in length from 92-1/4"...
- Page 5 Step 2 Assemble Sidewalls Wall Plates ,< E"; W-X ;>7 -/_H,0. ;7 5 $+&';2 7A ,KMe< (,KMe N73#;#7& ;2+ @75:%3 ;7'+;2+: 5&% #&%#65;+ >#;2(.h.((45:P3(>2+:+(;2+(>5$$(3;"%3 >#$$(@+($765;+%< 24" 19-3/4" 24" -< b&3;5$$(W^X(&#&+(8:+H6";(>5$$(3;"%3 @+;>++&(;2+(;78(`(@7;;74(8$5;+3 >#;2(,G%(3#&P+:3< Pre-Cut Wall Studs 185" Wall Plate f< B+8+5;(;7(533+4@$+(5&7;2+:(,KMe($7&'(>5$$(A:54+< Step 3 Assemble Door Header ,<...
- Page 6 Step 4 Assemble Front Wall Frame ,< E"; W-X ;>7 -/_H,-. @75:%3 ;7 5 $+&';2 7A ,__e A7: >5$$ 8$5;+3< N73#;#7& ;2+ @75:%3 ;7'+;2+: 5&% #&%#65;+(>#;2(.h.(I5:P3(>2+:+(;2+(>5$$(3;"%3(>#$$(@+($765;+%< Install these Studs Centered 33" 33" -< b&3;5$$(W0X(3#/(8:+H6";(>5$$(3;"%3(@+;>++&(;2+(>5$$(8$5;+3(>2+:+(327>&< f< E";(W-X(8:+H6";(3;"%3(;7(5 2x4 Blocks $+&';2(7A(iKH,d-e(5&%(#&3;5$$ nail nail 2x8 Door Header 53(2+5%+:(3"887:;3(>2+:+...
- Page 7 Step 5 Set Walls ,< O:+6;(@56P(>5$$(5&%(3#%+(>5$$3<()+6":+(>5$$3(;7'+;2+:(5;(;2+(67:&+:3<(=3+(W_X(A7":(,G%(3#&P+:3 8+:(67:&+:<(!:56+(3#%+(>5$$3(>#;2(8:+H6";(>5$$(3;"%3(;7(27$%(>5$$3(3+6":+(5&%(8$"4@< -< );5:;#&' 5; @56P 67:&+: #&3;5$$ 5 A"$$ >#%;2 3#%#&' 85&+$ >#;2 ;2+ .DLN. +%'+ A$"32 >#;2 ;2+ 3#%#&' 7&(@56P(>5$$<()#%#&'(327"$%(+/;+&%(fd_e(@+$7>(@7;;74(8$5;+<(Z5#$(3#%#&'(;7(@56P(>5$$(5&%(5$$ -/_3("3#&'(0%('5$V<(&5#$3(3856+%(Ke(585:;< Tip: If you are erecting building on a wood floor insert nails between the 3/4" floor sheathing and the 2x4 floor frame.
- Page 8 Step 6 Install 2x4 Tie Plates ,< b&3;5$$(5(-/_H,0.(@75:%(7&(5(3#%+(>5$$?(A$"32(>#;2(;2+(-/_3(7&(;2+(A:7&;(5&%(@56P(>5$$3<(E"; $+&';2(;7(A#;<(=3+(,G%(3#&P+:3(;7(3+6":+(;2#3(;#+(8$5;+(;7(A:7&;(5&%(@56P(>5$$3(5&%(5$7&'($+&';2< -< B+8+5;(;7(#&3;5$$(-/_(7&(;2+(78873#;+(3#%+(>5$$< f< E"; W-X ;>7 ,-. $7&' -/_3 ;7 A#; @+;>++& 3#%+ >5$$ ;#+ 8$5;+3 5&% #&3;5$$ 7& A:7&; 5&% @56P >5$$3< Flush to Cut 2x4-12' to Fit back wall 2x4 2x4-16' Tie Plate 2x4-16' Tie Plate Step 7...
- Page 9 Step 8 Install Loft Floor Important: Before securing the 2x4 floor joists make sure the side walls are plumb. The building width should be 12'-0" measuring from the outside of the 2x4 tie plates. E";(WiX(3+V+&(-/_H,-.(@75:%3(;7(5($+&';2(7A(,fie(5&%(#&3;5$$(#& ;2+(4+;5$(25&'+:3<(=3+(,H,d-e(25&'+:(&5#$3< Step 9A Install Loft Floor Sheathing Before installing floor sheathing consider where to locate the 2' x 4' access opening.
- Page 10 Step 9B Install Loft Floor Sheathing continued ,< D765;+(W_X(A7":(fH,d-e(/(-_e(S)!(A#$$+:3<(b&3;5$$(5;(A:7&;(5&%(@56P(67:&+:3(7&(;78(7A(-/_(;#+ 8$5;+3<(=3+(W_X(A7":(0%(67447&(&5#$3(+562<(b&3":+(;2+(3856+(@+;>++&(A#$$+:3(#3(^0e< -< b&3;5$$ $7A; A$77:#&' @+;>++& S)! A#$$+:3< O%'+ 7A 32+5;2#&' 327"$% @+ A$"32 >#;2 A:7&; 5&% @56P >5$$ ;#+ 8$5;+3< B+A+: ;7 ;2+ 3"''+3;+% $597"; 7& 8:+V#7"3 85'+< b&3;5$$ A$77:#&' "3#&' 0% 67447& &5#$3(3856+%(,-e(585:;<...
- Page 11 Step 11A Assemble Gables ,< Y5;2+:(8:+H@"#$;('5@$+(+&%(A:54+3?(W,X(7&+($+A;(5&%(W,X(:#'2;?(W,X(7&+(_^H,d-e($7&'(-/_(5&%(W-X ;>7(f-H,d-e($7&'(-/_3(>#;2(5&'$+%(+&%3< -< N73#;#7&(;2+3+(67487&+&;3(;7'+;2+:(53(327>&(@+$7><(\2+&(5$#'&+%(67::+6;$9(;2+(@7;;74(-/_3 >#$$(@+(3;:5#'2;(5&%(4+53":+(,-.HGe(A:74(+&%(;7(+&%<(Pre-built gable ends highlighted in gray. f< 1+487:5:#$9(;56P(,/_(@$76P3(;7($7A;(A$77:#&'(5:7"&%(;2+(A:54+(4+4@+:3<(12+3+(@$76P3(>#$$(@+ KeH,-e $7&' 5&% 459 25V+ 5&'$+% +&%3< I5P+ 3":+ W-X ;>7 7A ;2+3+ @$76P3 5:+ 873#;#7&+% #&3#%+ +562(8:+H@"#$;('5@$+(+&%(A:54+(53(327>&<(N73#;#7&(;2+(:+3;(7A(;2+(@$76P3(588:78:#5;+$9(3856+% ;7(27$%(-/_3(#&(8$56+<(12+3+(>#$$(#&3":+(;25;(5$$(;:"33+3(5&%('5@$+3(5:+(@"#$;(+/56;$9(;2+(354+< US(ZS1(&5#$(@$76P3(;7('5@$+< _< )+6":+(;2+(@7;;74(-/_(;7(;2+('5@$+(3;"%("3#&'(W-X(;>7(-H,d-e(36:+>3< M< D765;+ W-X ;>7 MHfd_e/,_e S)! '"33+;3< L;;562 ;2+3+ ;7 ;78 7A +562 '5@$+ 3;"% ;7 3+6":+ A:54+ ;7(f-H,d-e(-/_3<(=3+(0%(67447&(&5#$3<()++(U+;5#$(.L.<...
- Page 12 Step 11B Assemble Gables Continued M< D765;+ W-X ;>7 MGHfd_e $7&' -/_3<b&3;5$$ ;2+3+ +Q"5$$9 3856+% A:74 6+&;+: 7A ;2+ '5@$+< )+6":+ ;2+ @7;;74 -/_ ;7(;2+('5@$+(3;"%3("3#&'(W-X(;>7(-H,d-e(36:+>3(+562< 5-1/2"x27-3/4" Gusset 0< b&3;5$$ 5 >77% '"33+; 5; 8+5P< Z5#$ "3#&'(W,_X(A7":;++&(0%(67447& &5#$3< i< D765;+(W-X(;>7(MH,d-e/-iHfd_e '"33+;3< L;;562 ;2+3+ ;7 ;78 7A +562 '5@$+ 3;"% ;7 3+6":+ ;7 ;2+ f-H,d-e -/_3<(=3+(0%(67447&(&5#$3<...
- Page 13 Step 12B Install Gable Siding continued f< b&3;5$$(6+&;+:(3#%#&'<(bA(97"(8":6253+%(5(3"&@":3;(>#&%7>(97"(459(6";(;2+(78+&#&'(#&(;2+ 3#%#&'(5;(;2#3(;#4+<(b&3;:"6;#7&3(5:+(856P+%(#&(;2+(>#&%7>(@7/<(b;(#3(5%V#35@$+(;7(#&3;5$$(;2+ >#&%7>(5A;+:(;2+('5@$+(#3(3+; _< b&3;5$$($53;(3#%#&'(85&+$< Step 13 Install Gable Overhang ,< D765;+(W-X(;>7(iiHfdKe($7&'(-/_(:5A;+:3(7&('5@$+<(b&3;5$$(-/_3(A$"32(>#;2(;2+(;78(7A('5@$+ A:54+<(=3+(,G%(3#&P+:3< -< D765;+(W-X(;>7(fGH,d_e($7&'(-/_(:5A;+:3(5&%(#&3;5$$(;7(A# <(-/_3(>#$$(+/;+&%(@+97&%(+&%(7A '5@$+< Do not remove the temporary 1x4 blocks until the roof trusses and back gable are assembled. 77-3/8" Long 2x4 30-3/4"...
- Page 14 Step 14 Set Gables Important: Temporarily brace the gables with 2x4s to secure gables until the roof sheathing is installed! ,< b&3;5$$('5@$+(7&(;2+(A:7&;(>5$$<()+6":+(@7;;74(7A '5@$+ ;7 $7A; A$77: 5&% S)! A#$$+:3 "3#&' ,G% 3#&P+:3< -< Z5#$ ;2+ @7;;74 +%'+ 7A ;2+ 3#%#&' #&;7 ;2+ ,/_ ;:#4< =3+(0%('5$V<(&5#$3<...
- Page 15 Step 17 Set Trusses ,< );5:;#&' 5; @56P '5@$+ 3+; 5 ;:"33 @9 3$#%#&' +&%3 7V+: -/_ A$77: a7#3;< 1:"33 +&%3 327"$% 3+; A$5; 5;78(A$77:(a7#3;<()+6":+(>#;2(W,GX(;+&(0%(67447&(&5#$3(7&(@7;2(3#%+3< -< E7&;#&"+ 3;5&%#&' ;:"33+3 ;7 A:7&; 7A @"#$%#&'< I5P+(3":+(;:"33+3(5&%('5@$+3(5:+(8$"4@<(bA &+6+335:9(385&(5(-/_(56:733(;783(5&%(;56P(;7 P++8(8$"4@("&;#$(:77A(32+5;2#&'(#3(#&3;5$$+%< Step 18 Install Sidewall Trim It's easier to install the soffit if the corner and sidewall trim are installed first.
- Page 16 Step 19 Install Soffit ,< D765;+(W_X(A7":((^Hfd_e(/(_Ke(37AA#;(85&+$3<(S&(;2+(A:7&;('5@$+(&5#$(A#:3;(37AA#;(>#;2(;2+(.DLN. +%'+ 873#;#7&+% ^Hfd_e A:74 ;2+ @7;;74 +&% 7A ;2+ -/_ ;7 5$$7> A7: ;2+ >#%;2 7A ;2+ 37AA#; 85&+$3 7&(;2+(3#%+(>5$$3<(=3+(0%('5$V<(&5#$3< -< E"; ;7 A#; &+/; 37AA#; ;7 67V+: -/_ 5; ;2+ 8+5P< b&3;5$$ W-X ;>7 37AA#; 85&+$3 7&(7;2+:(3#%+<...
- Page 17 Step 20 Install 1x6 Fascia on Side Walls ,< );5:;#&'(5;(;2+(@56P('5@$+?(#&3;5$$(5(iMe($7&'(,/0(;:#4(@75:%(A$"32(>#;2(;2+(A56+(7A(;2+(-/_(7& '5@$+<(b&3;5$$(;2+(,/0(@75:%(37(;2+(;78(7A(;2+(@75:%(#3(5$#'&+%(>#;2(;2+(;78(7A(;2+(;:"33+3<(12+ :77A(32+5;2#&'?(installed later?(327"$%(:+3;(7&(;2+(A536#5<(=3+(5(3;:5#'2;(+%'+(53(327>&(@+$7>< =3+(0%('5$V<(&5#$3< -< b&3;5$$(W-X(;>7(,/0H0.(;:#4(@75:%3(&+/;<(E";(;2+ $53; ;:#4 @75:% A$"32 >#;2 ;2+ A:7&; 37AA#; 7V+:25&'< f< B+8+5; 7& 78873#;+ 3#%+ >5$$< Flush with 2x4 Straight Edge Soffit Step 21A Install Roof Sheathing ,<...
- Page 18 Step 21B Install Roof Sheathing continued 48"x35-1/4" _< I5P+ 3":+ ;2+ ;:"33+3 5&% '5@$+3 5:+ 8$"4@< M< B+A+:(;7(;2+(:77A(32+5;2#&'($597";<(b&3;5$$ 5(_Ke/M^H,d_e(32++;(5;($7>+:(A:7&;(67:&+:< )2+5;2#&'(327"$%(@+(A$"32(>#;2(37AA#;(5&% :+3;(7&(,/0(A536#5<()+6":+(32+5;2#&'(>#;2 48"x59-1/4" 0%(67447&(&5#$3<()856+(&5#$3(,-e(585:;< E7&;#&"+(#&3;5$$#&'(;7(@56P('5@$+< 0< 12+(;78(:7>(7A(32+5;2#&'(>#$$(5$$7>(5('58 5;(;2+(;78(A7:(V+&;#$5;#7&(#A(:#%'+(V+&;(#3 588$#+%<(b&3+:;(W-X(;>7(8$9H6$#83(#&;7(;2+ :77A(32+5;2#&'(@+;>++&(+562(;:"33(5;(;2+ ;78(:7>?(3++(%:5>#&'(7&(8:+V#7"3(85'+< )856+ Step 22 Install 2x4s in Front Overhang ,< );5:;#&'(5;(;2+(8+5P(#&3;5$$(5(iiHfdKe($7&'(-/_(@+;>++&(;2+(:77A(32+5;2#&'(5&%(;2+(37AA#; 85&+$3<...
- Page 19 Step 23 Install Door Flashing 3-1/2"x5" Flashing ,< D765;+ #& 876P+; %77: @7/ W-X ;>7 fH,d-e / Me 4+;5$ A$532#&' 5&% @+&% 5$7&' >#%;2 ;7 ^G %+':++3< b&3;5$$ 5; +562 67:&+: 7A ;2+ %77:(78+&#&'<(12+3+(>#$$(@+(67V+:+%(#& ;2+(&+/;(3;+83< -< b&3;5$$ ;2+ '5$V< %77: 3#$$ 7V+: A$532#&' #& ;2+ 6+&;+: 7A ;2+ %77: 78+&#&'<...
- Page 20 Step 25 Install Pocket Doors Track ,< b&3;5$$(5(0KH,d-e($7&'(1:56P()"887:;(L33+4@$9(K-Hfd_e(A:74(;2+(A$77:<(ImportantT(4+53":+ A:74(;2+(@7;;74(7A(;2+(-/f(7&(;2+(3"887:;(533+4@$9(;7(;2+(A$77:<(b&3":+(;2+(&7;62+%(+&%(7A ;:56P(#3(6+&;+:(7A(%77:(78+&#&'<(=3+(-H,d-e(36:+>3< 2x3 Track Support Assembly 2x8 Door Header Notch 82-3/4" View From Inside to Floor -< b&3;5$$(;2+(7;2+:(;:56P(3"887:;(533+4@$9< Galv. Sill View From Inside M< b&3;5$$ ;2+ ;:+5;+% %77: 3#$$ @+2#&% ;2+ %77: 78+&#&'<...
-
Page 21: Install Doors
Step 26A Install Doors ,< )+$+6; ;2+ %77: >#;2 ;2+ 3#%#&' 5&% ;:#4 @75:% +/;+&%#&' 853; ;2+ -/_ A:54+? see detail below< );5&%#&'(7&(;2+(#&3#%+(7A(@"#$%#&'(3$#%+(;2+(:7$$+:3(7&(;2+($+A;(3#%+(;:56P(53(327>&(@+$7>< bA(#;(#3(&+6+335:9(;7(5%a"3;(;2+(%77:(2+#'2;(7&+(7:(@7;2(%77:(65::#+:3(65&(@+(5%a"3;+%<(D773+& 36:+>3(;25;(3+6":+(65::#+:W3X(;7(;2+(%77:<(L%a"3;(%77:(37(;2+(5$"4#&"4(5&'$+?(7&(;2+(@7;;74 7A(;2+(%77:?(%7+3(&7;(:"@(7&(;2+(;:+5;+%(;2:+327$%<(1#'2;+&(;2+(36:+>3< 1#8T(b&3+:;#&'(5(36:+>?(shown below?(>#$$(8:+V+&;(;2+(%77:3(A:74(A5$$#&'(;2:7"'2(;2+(78+&#&' @+;>++&(;2+(;:56P?(#A(;2+(%77:(#3(78+&+%(;77(A5:< U77:(1:56P IMPORTANT: O&%([#+> US ZS1 #&3;5$$ ;:56P :7$$+:3 #& ;2+ 3856+ @+;>++& ;2+ 1:56P D+'3< )856+ b&3;5$$(;2+(;:56P(:7$$+:3(7&(;2+(#&3#%+(;:56P($+'<... - Page 22 Step 26B Install Doors continued -< C5&'(;2+(7;2+:(%77:<(J:74(;2+(#&3#%+(7A(@"#$%#&'(6$73+(@7;2(%77:3<(S&(;2+(:#'2;(%77:?(#&3;5$$ 5(3$#%#&'(%77:($5;62(5;(;2+(@7;;74(7A(-/_(A:54+<(]7"(>#$$(&++%(;7(%:#$$(5(27$+(#&(;2+(A$77:(A7: ;2+(:7"&%(325A;(;7(%:78(#&;7< f< b&3;5$$(5(4+;5$(8$5;+(;7(;2+($7>+:(@56P(7A(7;2+:(%77:<(12+(5&'$+%(+&%(>#$$(P++8(@7;2(%77:3 5$#'&+%(>2+&(6$73+%< _< J:74(;2+(7";3#%+(#&3;5$$(;2+(%77:(25&%$+3(5&%($76P#&'(%77:(2538(7&(;2+(7";3#%+(7A(;2+(%77:3< Angled Metal Plate Fold Hasp to Cover Screws Drill Hole Install Roofing — Not Supplied in Kit Metal Roof Edge Roof Sheathing ,< b&3;5$$(4+;5$(:77A(.%:#8.(+%'#&'(5$7&'(;2+(8+:#4+;+:(7A(;2+(:77A< -< b&3;5$$(A+$;(858+:(5&%(32#&'$+3(5667:%#&'(;7(45&"A56;":+.3(#&3;:"6;#7&3< Optional Roof Covering @%$<...
- Page 23 I5;+:#5$(D#3;(A7:(\77%(N76P+;(U77:3 Material Supplied by Local Supplier f0e / i^e \77% U77:3 >d N:#4+% )#%#&' f0(863< N:+H6";(\5$$();"%3 !75:%3(>d(L$"4<(1:56P(L;;562+% ,f(863< -/_(H(,-.( \5$$(`(1#+(N$5;+3 1:+5;+%(\77%(12:+327$% Y5$V5&#*+%(U77:()#$$ 0(863< -/_(H(,0.( \5$$(`(1#+(N$5;+3 U77:(1:#4 K,Hfd_e -(863< -/K(H(K.( U77:(C+5%+: U77:(1:#4 ,f 863< O/;+:#7:()#%#&' U77:(c54@ fHidKe(/(i-e ^ 863< S)!()2+5;2#&' U77:(c54@ fHidKe(/(i^(H(,d_e 1:56P(B7$$+:3(>#;2(!:56P+;3 )>#V+$(U77:(D5;62...
- Page 24 j;9< Material Packaged on Pallet j;9< Material Packaged on Pallet 1:"33(B5A;+:3 iiHfdKe id,0e _Ke(/(-_e(S)!()2+5;2#&' B#%'+(!$76P ,KH,d-e id,0e _Ke(/(M,e(S)!()2+5;2#&' Y5@$+(SV+:25&' fGHfd_e id,0e _Ke(/(_Ke(S)!()2+5;2#&' Y5@$+(B5A;+:3 f-HfdKe id,0e _Ke(/(iMe(S)!()2+5;2#&' Y5@$+(N$5;+3 _^H,d-e id,0e ^Hfd_e(/(_Ke(S)!()2+5;2#&' Y5@$+();"%3 MGHfd_e id,0e ^Hfd_e(/(M,e(S)!()2+5;2#&' 1:#4 id,0e ^Hfd_e / M^H,d_e S)! )2+5;2#&' 1:#4 id,0e fH,d-e(/(-_e(S)!()2+5;2#&'...
Need help?
Do you have a question about the Belmont II and is the answer not in the manual?
Questions and answers