Advertisement
Quick Links
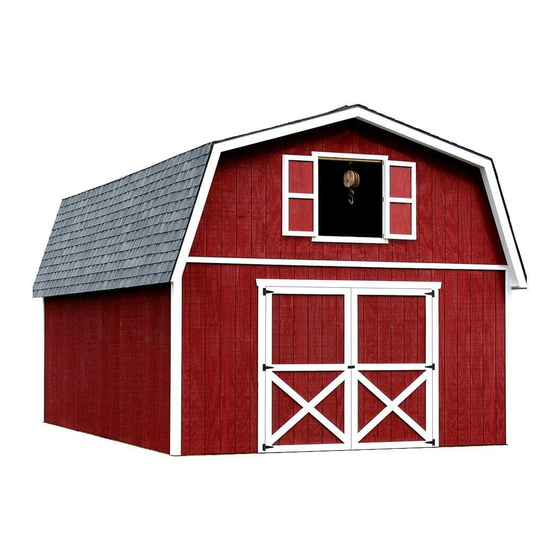
Best Barns USA
Assembly Book
Revised February 6, 2015
16'x32' Building
the Roanoke
w/ full loft
Manufactured by Reynolds Building Systems, Inc.
205 Arlington Drive
Greenville, PA 16125
724-646-3775
This manual is copyrighted. Under the copyright laws, this manual
may not be copied, in whole or in part, without consent from Reynolds
Building Systems, Inc.
© Copyright 2012
Advertisement

Related Manuals for Best Barns Roanoke


Summary of Contents for Best Barns Roanoke
- Page 1 Best Barns USA Assembly Book Revised February 6, 2015 16'x32' Building the Roanoke w/ full loft Manufactured by Reynolds Building Systems, Inc. 205 Arlington Drive Greenville, PA 16125 724-646-3775 This manual is copyrighted. Under the copyright laws, this manual may not be copied, in whole or in part, without consent from Reynolds Building Systems, Inc.
- Page 2 NFORMATION BOUT Thank you for purchasing our Roanoke shed kit. The material supplied is listed on the back page. If you have received duplicate books, use the one with the latest revision date. The material may be delivered in two shipments. Our shipment will contain the roof gables and truss components.
- Page 3 Step 1 Assemble Rear Wall 1. Note: When building the lower walls, use treated 2x4s for the bottom wall plate. Cut (2) two 2x4-8' boards (one will be treated) to a length of 8' - 0". Position the boards together and indicate with 'X' marks, where the wall studs will be located. 8' - 0"...
- Page 4 Step 2 Assemble Front Door Wall 1. Locate (2) two 2x8 boards that are 10' long. If you are installing the optional barn doors, cut these boards to a length of 99". 2x8 Board 2. Cut (2) two 7-1/2" x 48" long fillers from OSB Filler OSB sheathing that was used to wrap the pallet.
- Page 5 Step 2 Assemble Front Door Wall Continued 8. Square Wall Frame. Install a 4x8 panel with the 'LAP' edge flush with the left wall stud. Edge Install Siding Flush Siding Flush w/ Opening Siding Extends 3/4" Below Plate 9. Install the pre-cut 12" high siding panels above the door opening. Install the siding extending 3/4"...
- Page 6 Optional Door & Window Openings Frame Door Opening 1. Cut (2) two header supports form pre-cut wall studs. 2. Cut a 2x4-8' and build a 37-1/2" long 2x4 door 2x4 Header header. Cut an OSB filler from the long edge of a 4x8 piece of sheathing.
- Page 7 Step 4 Build 12' Sidewalls with Beam Support 1. Cut a 2x4-12' treated board to a length of 140-1/2". 2. Cut a 2x4-12' board to a length of 137". This will be the top plate. 16" 16" Beam Support 11-3/4" 3.
- Page 8 Step 5 Build 8' Center Sidewalls 1. Cut (2) two 2x4-8' boards (one will be treated) to 8' - 0". Position the boards together and indicate where the wall studs will be located. 8' - 0" Wall Plate Top Wall Plate Treated Bottom Wall Plate 16"...
- Page 9 Step 7 Set Wall Panels 1. Set the left sidewall, with the beam support, panel and the 96" long back wall panel. Secure the corner together with 16d sinkers. 2. See the other back wall panel and the right sidewall panel. 3.
- Page 10 Step 8 Install 2nd Floor Loft Beam 1. Cut (2) two 1-3/4" x 11-7/8" LVL micro-lam beams to a length of 16'-0". Glue and nail them together with 16d sinkers. 2. Cut (2) two 2x8-16' boards to 15' - 5". Position a 2x8 against the 16' beam as shown below. 3.
- Page 11 Step 9 Install Loft Floor 2x4 Tie Plate 1. Install 10' long 2x4 tie plates on sidewalls. Use 16d sinkers to secure tie plates. Beam If you are installing the optional stair kit, install joist header and floor joist at the front of the building. Refer to the stair instructions to install the floor joist at the rear of the building.
- Page 12 Step 10 Install Front & Back Wall Trim 1. Cut 1x4-10' trim boards to length for the front corners. Install trim flush with the bottom edge of the siding and the top of the loft floor. Install the boards flush with the siding on the sidewalls.
- Page 13 Step 11 Assemble Rear Roof Gable Continued 4. Position rear gable walls, numbers 6 and 7, on the floor with the siding facing up. 5. Install the center wall frame against the panels. Cut a 4x8 siding panel to the shape of the center gable and apply to center wall frame.
- Page 14 Step 12 Install Rear 2x4 Gable Overhangs 1. Nail the siding where the siding panels overlap. Use 8d galv. nails. 2. Move the gable panel to the back loft area. Install 82-1/4" long 2x4s at the top of the gable. The 2x4s have a blue mark on one end.
- Page 15 Step 14 Assemble Front Roof Gables 1. Position gable walls, numbers 1 and 2, on the floor with the siding facing up. 2. Install the center wall frame against the panels. Cut a 25-1/2" long siding panel from a 4x8 panel and install at the bottom of the gable frame.
- Page 16 Step 16 Assemble Trusses 1. Lay 2x6 truss parts inside the 2x4 blocks. One end of the 81-3/4" long 2x6 boards have a blue mark. Place these ends together at the ridge. Add a 2x4 block at the bottom of the truss leg to keep this 2x6 from moving.
- Page 17 Step 17 Set Gables and 2x6 Truss Plate 1. Install front and rear gables. The gable siding will extend over the 1x4 trim on the lower wall panel. The bottom gable plate should overhang the loft floor the same distance on both ends. Nail gable plate to floor with 16d coated nails.
- Page 18 Step 18 Install Soffit Overhang on Sidewalls 1. Extend the lines on the face of the 2x6 to the edge of the 2x6. 2. Install 1x3-8' boards on the sidewall. Use a 2x6 soffit block as a gauge to install the 1x3 at the correct height. Nail the 1x3 boards to each wall stud with one 10d nail.
- Page 19 Step 20 Install Roof Sheathing Install 7/16" OSB roof sheathing according to the layout below. Install roof sheathing flush with the 2x4 on the rear gable. Install the lower sheathing first. Use a straight edge to align the top of the sheathing with the top of the truss. See Detail 'B'. If you are installing ridge vent, cut the roof sheathing at the top of the building to be 1"...
- Page 20 Step 21 Install 1x6 Eave Soffit 1. Install 1x6 white pine boards under the 2x6 eave overhang. You can install soffit vents for added ventilation. 2. Cut and Install 1x4 corner trim under 1x6 soffit board. Cut to length. 3. Cut 3" wide primed siding panels to length and install under the gable overhang.
- Page 21 Step 23 Install Door Trim 1. Install 85" long 1x4 white pine boards as door trim on each side of the door opening, flush with the bottom of the siding. Use 8d galv. nails. 2. Install 48-1/2" long 1x4 door trim and a 1x6 keystone trim board across the top of the door opening.
- Page 22 Step 24 Install Optional Barn Doors 1. Lay the left door with the trim facing up. The 2x4 frame on the left door extends past the door trim. See detail below. 2. Install 6" hinges to the left side of the door frame. To position the hinge properly, hold the rectangular plate against the frame.
-
Page 23: Packing List
Packing List Roanoke 16' Wide x 32' Qty. Material Shipped by Others Qty. Material Shipped by Best Barns 4 x 8 3/8" LP Exterior Siding 12" Soffit Blocks 4 x 8 7/16" OSB Sheathing 12" Soffit Blocks w/siding 4 x 8 3/4"...
Need help?
Do you have a question about the Roanoke and is the answer not in the manual?
Questions and answers