Advertisement
Quick Links
1
Soundchief CV5 Professional Sound Cart
(CT-SDCF-CV5)
A s s e m b l y M a n u a l
What's In The Box
Please inspect the contents of your shipped package to ensure you have received everything that is listed
below.
2 x Wheels (Size: 3")
Sliding Tray
Bottom Section
Top Section
2 x Handles
Wheel Excal
Rod
2 x Wheels (Size: 16")
2 x mounting Channels
4 x Rod Clamps
All rights reserved.
No part of this document may be reproduced, stored in a retrieval system, or transmitted by any form or by any means,
electronic, mechanical, photo-copying, recording, or otherwise, except as may be expressly permitted by the applicable copyright
statutes or in writing by the Publisher.
Advertisement

Related Manuals for PROAIM Soundchief CV5


Summary of Contents for PROAIM Soundchief CV5
- Page 1 Soundchief CV5 Professional Sound Cart (CT-SDCF-CV5) A s s e m b l y M a n u a l What’s In The Box Please inspect the contents of your shipped package to ensure you have received everything that is listed below.
- Page 2 Soundchief CV5 Sound Cart Setup Assembling of wheels Insert the two inserts at the bottom section of the Soundchief CV5, as shown in the image. Insert the wheel (Size:3”) and properly match the inserts with the threads of the wheel and then insert the bolt.
- Page 3 To insert the second wheel, repeat the same process. NOTE: The Cart rolls incredibly smooth and silent with reliable and lightweight two front swivel castor wheels and two rear pneumatic wheels . Push the brake wheel downwards and then properly lock it.
- Page 4 Properly tighten all the bolts using the 4mm Allen key, as shown in the image. To insert the second mounting channel, repeat the same process. Assembling of Wheel Excel Insert the wheel excel to the bottom of the mounting channel.
- Page 5 To insert the second wheel, repeat the same process. NOTE: These wheels ensure that the entire setup remains light, smooth, and robust . Sliding Tray Setup Properly insert the sliding tray in the mounting channel. Properly tighten the bolts and stopper using the Allen key, as shown in the image.
- Page 6 Top Section Setup Properly insert the top section. Properly tighten the top and bottom bolts using the Allen key. Now insert the handle in the middle section and properly tighten it using the Allen key. NOTE: The whole Cart is designed in the channel version so that you can fix the shelves wherever you want.
- Page 7 Properly tighten the bolt of the clamp using the Allen key and then close the clamp. To insert the other clamps, repeat the same process. Rod Support Setup Insert the three inserts into one side of the mounting channels. ...
- Page 8 Mount the end plate on the mounting channel and insert the bolt. Properly tighten both bolts using the Allen key. To insert the second-rod support, repeat the same process. NOTE: You can effortlessly roll the Cart to any SUV hatchback or truck and even tilt it back to roll into place safely for transportation.
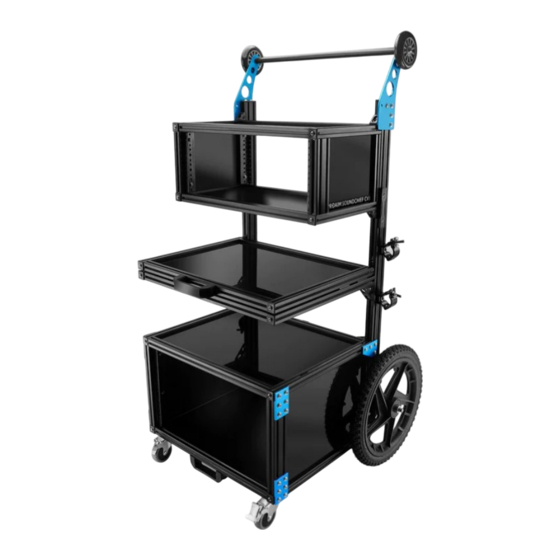
- Page 9 2.You can effortlessly roll the Cart to any SUV hatchback or truck and even tilt it back to roll into place safely for transportation. YOUR PROAIM SOUNDCHIEF CV5 PROFESSIONAL SOUND CART ALL DRESSED UP AND READY TO GO! (SHOWN WITH OPTIONAL ACCESSORIES) Warranty: We offer one year warranty for our products from date of purchase.
Need help?
Do you have a question about the Soundchief CV5 and is the answer not in the manual?
Questions and answers