
Related Manuals for ICP DAS USA WP-2641M-CE7


Summary of Contents for ICP DAS USA WP-2641M-CE7
- Page 1 WP-2641M-CE7 User Manual v1.0.1, February 2020 Service and usage information for Written by Tunglu Yu Edited by Anna Huang...
- Page 2 The names used for identification only may be registered trademarks of their respective companies. Contact US If you have any problem, please feel free to contact us. You can count on us for quick response. Email: service@icpdas.com WP-2641M-CE7 (WinCE7 Based) User Manual v 1.0.1 Page: 2...
-
Page 3: Table Of Contents
Property Tab – Auto Execution ..................48 3.1.9. Property Tab – Rotary Execution ................. 49 3.2. DCON Utility Pro ........................50 3.3. TaskMgr ..........................51 3.4. VCEP ............................. 52 3.5. Remote_Display ........................53 3.6. SendToCOM ......................... 54 WP-2641M-CE7 (WinCE7 Based) User Manual v 1.0.1 Page: 3... - Page 4 3.9. INotepad ..........................57 Your First WinPAC Program ........................58 4.1. Preparing the Development Tools ..................59 4.2. Installing WP-2641M-CE7 SDK ..................... 60 4.3. First WinPAC Program in VB.NET ..................63 4.3.1. Create a New Project ....................64 4.3.2. Specify the Path of PAC Reference ................67 4.3.3.
- Page 5 7.2.2. SDK Updates for C++ ....................130 Appendix. A. Tips – How to ........................131 A.1. How to Online Debug the WP-2641M-CE7 Program ..............132 A.2. How to Automatically Synchronize WinPAC Clock ..............137 A.3. How to use User Account Control in WinPAC ................139 A.3.1.
-
Page 6: Introduction
1. Introduction This chapter provides an overview of the WP-2641M-CE7 and its components, and introduces the fundamental concepts for user familiar. The WP-2641M-CE7 are equipped a Quad-core Cortex-A9, 1GHz/Core and running a windows CE.NET 7.0 operating system. The optional I/O expansion board, XV-board, provides high-protection I/O. Using the built-in Flash and microSD, the WP-2641M-CE7 can save application program, image file and data. -
Page 7: Features
Web server, FTP server, Telnet server Local I/O and Communication Expansion Board WP-2641M-CE7 is equipped with an I/O expansion bus to support one optional expansion board, called XV-board. It can be used to implement various I/O functions such as DI, DO, A/D, D/A, Timer/Counter For more information about these available expansion boards, please refer to http://www.icpdas.com/root/product/solutions/hmi_touch_monitor/touchpad/xv-board_selection... - Page 8 A unique 64-bit serial number is assigned to each hardware device to protect your software against piracy. Remote I/O Module and Expansion Unit With the built-in RS-485 and Ethernet port, the WP-2641M-CE7 can connect RS-485/Ethernet remote I/O units (RU-87Pn/ET-87Pn) or modules (I-7000/M-7000/ET-7000). Ethernet I-8KE4...
- Page 9 The WP-2641M-CE7 comes with the metal casing. Highly Reliable Under Harsh Environment Our WP-2641M-CE7 operates in a wide range of temperature and humidity. Operating Temperature: -25 ~ +75 °C Storage Temperature: -40 ~ +80 °C Humidity: 10% ~ 90% RH, non-condensing WP-2641M-CE7 (WinCE7 Based) User Manual v 1.0.1...
-
Page 10: Specifications
1.2. Specifications The table below summarizes the specifications of the WP-2641M-CE7. System Software Windows CE 7.0 Professional Framework Support .Net Compact Framework 3.5 Embedded Service FTP Server, Web Server SDK Provided Dll for Visual Studio.Net 2008 English, German, French, Spanish, Russian, Italian, Korean, Simplified... - Page 11 -40 °C to + 80 °C Ambient Relative Humidity 10 % to 90 % RH (non-condensing) Power Input Range +12 V to +48 V Consumption 4.8 W (0.2 A @ 24 V WP-2641M-CE7 (WinCE7 Based) User Manual v 1.0.1 Page: 11...
-
Page 12: Overview
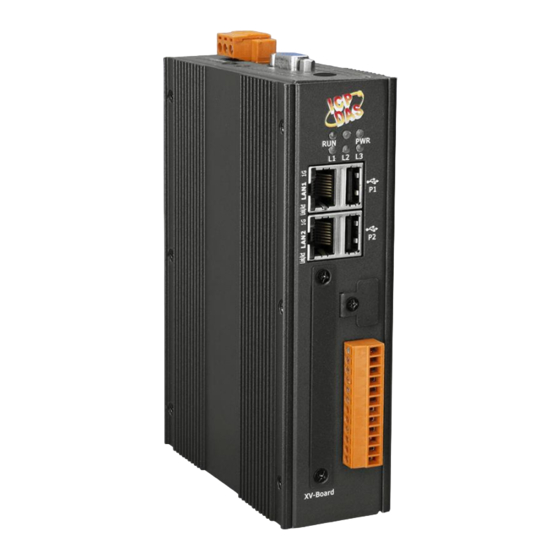
1.3. Overview WP-2641M-CE7 is equipped with several interfaces and peripherals that can be integrated with external systems. Here is an overview of the components and its descriptions. Front View LED Indicators Ethernet Port x 2 USB Port x 2 microSD Card Socket... - Page 13 The WP-2641M-CE7 has two USB 2.0 port that allows support for the USB devices such as mouse, keyboard or an external USB hard drive. microSD Card The microSD socketcan be used to restore the WP-2641M-CE7 system and Socket expand the memory up to 32 GB. XV-Board Slot The XV-board slot can be used to support up to one XV-board service.
- Page 14 Rotary Switch is an operating mode selector switch which provides seven functions related to the selection of the operating mode. Power Input and The WP-2641M-CE7 has a terminal with 3pins, there are 2 pins for power Frame Ground input and a pin for frame ground as follows:...
-
Page 15: Dimensions
1.4. Dimensions The diagrams below provide the dimensions of the WP-2641M-CE7 to use in defining your enclosure specifications. Remember to leave room for potential expansion if you are using other components in your system. All dimensions are in millimeters. Left Side View... -
Page 16: Getting Started
2. Getting Started This chapter provides a guided tour of the WP-2641M-CE7 installation and configuration that describes the steps needed to download, install, configure, and run the basic procedures for user working with the WP-2641M-CE7 for the first time. Before starting any task, please check the package contents. If any of the following package contents are missing or damaged, contact your dealer, distributor. -
Page 17: Mounting The Hardware
2.1. Mounting the Hardware The WP-2641M-CE7 has simple rail clips for mounting reliably on a standard 44 mm DIN rail. Step 1: Mounting WP-2641M-CE7 onto a 44 mm DIN rail WP-2641M-CE7 (WinCE7 Based) User Manual v 1.0.1 Page: 17... - Page 18 Connect PC to the Ethernet port through an Ethernet switch. iii. Connect the power supply (+12 to +48 V ) to PWR and P.GND terminals. Connect the monitor to the VGA port. WP-2641M-CE7 (WinCE7 Based) User Manual v 1.0.1 Page: 18...
-
Page 19: Mounting The Expansion Components/Accessories
2.2. Mounting the Expansion Components/Accessories 2.2.1. Mounting the XV-Board WP-2641M-CE7 has one expansion I/O slots to expand the functions. For more detailed information about the XV-board specifications, please refer to Appendix B. XV-Board Modules. Step 1: Remove stripped screws and then remove the cover WP-2641M-CE7 (WinCE7 Based) User Manual v 1.0.1... - Page 20 Step 2: Hold the XV-board vertically and align the socket, and then carefully press the XV-board onto the I/O expansion bus Step 3: Fasten the XV-board using the screws supplied WP-2641M-CE7 (WinCE7 Based) User Manual v 1.0.1 Page: 20...
- Page 21 Step 4: Close the cover and then fasten the screws Step 5: Insert the I/O terminal WP-2641M-CE7 (WinCE7 Based) User Manual v 1.0.1 Page: 21...
-
Page 22: Inserting The Sim Card
Step 1: Remove stripped screws and then remove the cover Step 2: Insert the SIM card into the Socket Tips & Warnings Make sure to turn the WP-2641M-CE7 off before inserting or removing the SIM card. Do not bend or scratch the SIM card. WP-2641M-CE7 (WinCE7 Based) User Manual v 1.0.1... -
Page 23: Installing The Antenna
The Mobile network expansion card has an antenna connector that can be used to connect the 3G/4G antenna. To install the antenna, just screw the antenna tightly into the connector, and put the antenna in the purpose place. WP-2641M-CE7 (WinCE7 Based) User Manual v 1.0.1 Page: 23... -
Page 24: Configuring The Boot Mode
2.3. Configuring the Boot Mode The WP-2641M-CE7 has several operating modes, which can be selected by a rotary switch. The table below lists the operation modes available with the WP-2641M-CE7. Position Operating Mode Normal mode (Default) Safe mode Debug mode... - Page 25 Debug mode is unsupported. OS Update Mode OS update mode is a way used to update OS. For more information on updating the WP-2641M-CE7 OS image, please refer to section 6.1. OS updates Reserve → OS Development Mode The positions 4, 6, of rotary switch are reserved for OS development.
-
Page 26: Using Pac Utility To Manage Winpac
For more detailed information on PAC Utility applications, please refer to “3.1. PAC Utility” Step 1: Double-click the PAC Utility on the desktop Step 2: Configure IP address (DHCP), FTP Server, Auto Execution files…, etc Step 3: Reboot the WP-2641M-CE7 WP-2641M-CE7 (WinCE7 Based) User Manual v 1.0.1... -
Page 27: Changing The User Interface Language
2.5. Changing the User Interface Language The Windows CE operating system on the WP-2641M-CE7 comes with several built-in functions. Step 1: Click Start menu, point to Settings, click Control Panel, and then click Regional Settings Options WP-2641M-CE7 (WinCE7 Based) User Manual v 1.0.1... - Page 28 Step 2: Click User Interface Language tab, choose to your local language, and then click OK Step 3: Run the PAC Utility, and then reboot the WinPAC for changes to take effect WP-2641M-CE7 (WinCE7 Based) User Manual v 1.0.1 Page: 28...
-
Page 29: Using Dcon Utility Pro To Configure I/O Modules
DCON Utility Pro enables users easily to configure and manage the I/O modules via Ethernet or serial ports (RS-232/RS-485). Step 1: Double-click the DCON_Utility_Pro on the desktop Step 2: Click the button WP-2641M-CE7 (WinCE7 Based) User Manual v 1.0.1 Page: 29... - Page 30 The COM port settings for expansion I/O modules are listed below. COM0[Backplane] COM1/2/3/4 For more information on these COM port selections, please refer to the specification of the pin assignments in section 1.3. Overview WP-2641M-CE7 (WinCE7 Based) User Manual v 1.0.1 Page: 30...
- Page 31 Step 4: Click the button Step 5: Click the module name to configure the I/O module WP-2641M-CE7 (WinCE7 Based) User Manual v 1.0.1 Page: 31...
-
Page 32: Using Dial-Up Networking To Make A Gprs Connection
(for Mobile network expansion card had installed) The Windows CE dial-up networking component driver can be efficiently used to include support for transferring data over GPRS modems in WP-2641M-CE7 Step 1: Click Start menu, point to Settings, click Network and Dial up Connections, and then... - Page 33 The modem dialing settings depends on each of the telecom company. For example, the settings provided by Telecom Company in Taiwan is +CGDCONT=1,”IP”,”INTERNET” and a Telecom Company in China is +CGDCONT=1,”IP”,”CMNET” WP-2641M-CE7 (WinCE7 Based) User Manual v 1.0.1 Page: 33...
- Page 34 Telecom Company in Taiwan. *99***1# Step 7: Double-click the new connection that you have created, and enter the User name and Password, and then Click Connect button WP-2641M-CE7 (WinCE7 Based) User Manual v 1.0.1 Page: 34...
- Page 35 Step 8: Wait for the connection to be established Tips & Warnings If the connection fails, as shown below, please repeat the instructions to view the settings. WP-2641M-CE7 (WinCE7 Based) User Manual v 1.0.1 Page: 35...
-
Page 36: Tools And Tasks
This chapter provides a brief introduction of the WP-2641M-CE7 service tools and its benefits. There are several tools and utilities built-in and designed for use with WP-2641M-CE7. Some of these are pre-installed on WP-2641M-CE7 and can work directly on WP-2641M-CE7, and some of these are supporting tools and can help you to manage the WP-2641M-CE7 remotely on a PC. - Page 37 The following tools are supporting tools for remote managing the WP-2641M-CE7 used on PC that can be found by downloading the latest version from ICP DAS web site. http://ftp.icpdas.com/pub/cd/winpac_imx6/wp-2641/pc_tools/ Eshell Remote_display_application TI Tools Vcep WP-2641M-CE7 (WinCE7 Based) User Manual v 1.0.1...
-
Page 38: Pac Utility
The PAC Utility includes the following menu bars and property tabs. All of these functions will be explained later. Menu bar Property Tab File General Help Display IP Config Network Device Information Auto Execution Rotary Execution WP-2641M-CE7 (WinCE7 Based) User Manual v 1.0.1 Page: 38... -
Page 39: Menu Bar - File
3.1.1. Menu Bar – File The menus use to How to use Reboot Restarts the WinPAC Restore Default Settings Restore the settings of WinPAC to its default. Exit Exits the PAC Utility. WP-2641M-CE7 (WinCE7 Based) User Manual v 1.0.1 Page: 39... -
Page 40: Menu Bar - Help
3.1.2. Menu Bar – Help The menus use to How to use About Displays a dialog box with information about PAC Utility, including the current version and copyright information. WP-2641M-CE7 (WinCE7 Based) User Manual v 1.0.1 Page: 40... -
Page 41: Property Tab - General
By default, these options are unavailable. Auto save to flash: This option is checked by default. Any changes made to the WP-2641M-CE7 will be saved and only take effect after the WP-2641M-CE7 reboots. Manual save to flash: This option is useless. -
Page 42: Property Tab - Display
Apply button. Change the screen Select the desired refresh rate from the Screen refresh rate drop-down refresh rate list, and then click the Apply button. WP-2641M-CE7 (WinCE7 Based) User Manual v 1.0.1 Page: 42... -
Page 43: Property Tab - Ip Config
Select the Use DHCP to get IP address option, and then click the Apply Set the network button. settings Assign an IP address: Select the Assign IP address option, and then click the Apply button. WP-2641M-CE7 (WinCE7 Based) User Manual v 1.0.1 Page: 43... -
Page 44: Property Tab - Network
Select the Enable check box in the Allow Anonymous field, and then click the Enable or disable Apply button. anonymous FTP Disable: access Select the Disable check box in the Allow Anonymous field, and then click the Apply button. WP-2641M-CE7 (WinCE7 Based) User Manual v 1.0.1 Page: 44... - Page 45 The Login tab provides functions to maintain the FTP accounts. The tab use to How to use Maintain the FTP Refer to the Appendix C.1 How to add a user account to remote login the accounts WinPAC from PC. WP-2641M-CE7 (WinCE7 Based) User Manual v 1.0.1 Page: 45...
- Page 46 The File Server Settings tab provides functions to set the SMB server. The tab use to How to use Set the SMB server Click the Settings button to set the SMB server path. WP-2641M-CE7 (WinCE7 Based) User Manual v 1.0.1 Page: 46...
-
Page 47: Property Tab - Device Information
3.1.7. Property Tab – Device Information The Device Information tab provides functions to monitor necessary system information of the WinPAC. The information is the most important note of version control for upgrading system. WP-2641M-CE7 (WinCE7 Based) User Manual v 1.0.1 Page: 47... -
Page 48: Property Tab - Auto Execution
2, etc. The tab use to How to use Configure programs Click the Browse button to select the execute file which you want, and running at startup then click the Apply button. WP-2641M-CE7 (WinCE7 Based) User Manual v 1.0.1 Page: 48... -
Page 49: Property Tab - Rotary Execution
How to use Configure programs running at startup Click the Browse button to select the execute file which you in one of the user defined mode want, and then click the Apply button. WP-2641M-CE7 (WinCE7 Based) User Manual v 1.0.1 Page: 49... -
Page 50: Dcon Utility Pro
DCON Utility Pro enables users easily to configure and manage the I/O modules via Ethernet or serial ports (RS-232/RS-485). For more detailed information on how to use DCON Utility Pro to configure I/O modules, please refer to “2.4. Using DCON Utility Pro to Configure I/O Modules” WP-2641M-CE7 (WinCE7 Based) User Manual v 1.0.1 Page: 50... -
Page 51: Taskmgr
3.3. TaskMgr The TaskMgr is a Windows CE application, which provides real time info on all processes and threads including System threads, similar in appearance to the Windows Task Manager. WP-2641M-CE7 (WinCE7 Based) User Manual v 1.0.1 Page: 51... -
Page 52: Vcep
Each video frame is inter-compressed against the previous frame and then intra-compressed with a modified LZW scheme to minimize the amount of data transmitted from server to client. For more detailed information on VCEP application, please refer to http://ftp.icpdas.com.tw/pub/cd/winpac/napdos/wp-8x4x_ce50/pc_tools/vcep_5.0.0.0/ WP-2641M-CE7 (WinCE7 Based) User Manual v 1.0.1 Page: 52... -
Page 53: Remote_Display
The server is a program named cerdisp.exe running on WinPAC. The client is a PC-based program named cerhost.exe running on the PC. WP-2641M-CE7 (WinCE7 Based) User Manual v 1.0.1 Page: 53... -
Page 54: Sendtocom
For more information about these commands for communicating with expansion module, please refer http://www.icpdas.com/root/product/solutions/remote_io/rs-485/i-8k_i-87k/i-8k_i-87k_selection.html# WP-2641M-CE7 (WinCE7 Based) User Manual v 1.0.1 Page: 54... -
Page 55: Regedit
Values can be changed for existing keys, or added for new keys, and default keys can be specified. For more information, see Registry Settings Management in Deployment. WP-2641M-CE7 (WinCE7 Based) User Manual v 1.0.1 Page: 55... -
Page 56: Isqlw35
3.8. ISQLW35 The "ISQLW35" is a Windows Embedded Compact 7 functionality that implements SQL Server Compact 3.5 Query. WP-2641M-CE7 (WinCE7 Based) User Manual v 1.0.1 Page: 56... -
Page 57: Inotepad
3.9. INotepad The INotepad is a common text-only editor. The resulting files have no format tags or styles. WP-2641M-CE7 (WinCE7 Based) User Manual v 1.0.1 Page: 57... -
Page 58: Your First Winpac Program
WinPAC SDKs are installed on your system. Development Tools WP-2641M-CE7 are Windows CE-based units. Windows CE is a mature embedded operating system which supports rapid development. The table below lists the supported development tools and development languages to develop WP-2641M-CE7 applications. -
Page 59: Preparing The Development Tools
4.1. Preparing the Development Tools WP-2641M-CE7 is a Windows CE-based unit. Windows CE is a mature embedded operating system which supports rapid development. The standard development tool is list as follows which is highly integrated, with comprehensive support for developing applications of Windows CE-based WP-2641M-CE7. -
Page 60: Installing Wp-2641M-Ce7 Sdk
File name: File name: GuruCE_imx6_SDK_CE7_yyyymmdd.msi yyyymmdd: platform sdk released date Step 2: Follow the prompts until the installation is complete Step 3: Execute the “VisualStudioDeviceWindowsEmbeddedCompact7.msi” The VisualStudioDeviceWindowsEmbeddedCompact7.msi can be obtained from: http://ftp.icpdas.com/pub/cd/winpac_imx6/wp-2641/sdk/platformsdk/ WP-2641M-CE7 (WinCE7 Based) User Manual v 1.0.1 Page: 60... - Page 61 Step 4: Execute any VS2008 C++ project include the GuruCE_imx6_SDK (ARMv4I) platform and the click the “Tools”->”Options…” WP-2641M-CE7 (WinCE7 Based) User Manual v 1.0.1 Page: 61...
- Page 62 Step 6: Add the path “$(VCInstallDir)ce7\include” and “$(VCInstallDir)ce7\atlmfc\include” and then click the OK button. Tips & Warnings The path “$(VCInstallDir)ce7\include” and “$(VCInstallDir)ce7\atlmfc\include” must be on the top of box. WP-2641M-CE7 (WinCE7 Based) User Manual v 1.0.1 Page: 62...
-
Page 63: First Winpac Program In Vb.net
6. Execute the application on WinPAC All main steps will be described in the following subsection. In this tutorial, we will assume that you have installed WP-2641M-CE7 SDK on PC and used the Visual Studio 2008 for application development. WP-2641M-CE7 (WinCE7 Based) User Manual v 1.0.1... -
Page 64: Create A New Project
The Visual VB.net project template is a composite control that you use in this example creates a new project with this user control. Step 1: Run the Visual Studio 2008 Visual Studio 2008 Step 2: On the File menu, point to New, and then click Project WP-2641M-CE7 (WinCE7 Based) User Manual v 1.0.1 Page: 64... - Page 65 Tips & Warnings The WCE7 only support .NET Compact Framework Version 3.5, if your application uses .NET Compact Framework Version 2.0 there is no guarantee that the program will function correctly. WP-2641M-CE7 (WinCE7 Based) User Manual v 1.0.1 Page: 65...
- Page 66 Step 6: In the Target platform item, choose Windows CE Step 7: in the .NET Compact Formwork version item, choose .NET Compact Framework Version 3.5 Step 8: in the Templates pane, choose Device Application, and then click Next WP-2641M-CE7 (WinCE7 Based) User Manual v 1.0.1 Page: 66...
-
Page 67: Specify The Path Of Pac Reference
4.3.2. Specify the Path of PAC Reference The PAC SDK provides a complete solution to integrate with WP-2641M-CE7 and it’s compatible with Visual C#, Visual Basic .net and C++. In order to use a component in your application, you must first add a reference to it. - Page 68 Step 2: In Solution Explorer, right-click the References node, and then click Add Reference… WP-2641M-CE7 (WinCE7 Based) User Manual v 1.0.1 Page: 68...
- Page 69 Step 3: Select Browse tab and add the PACNET.dll WP-2641M-CE7 (WinCE7 Based) User Manual v 1.0.1 Page: 69...
-
Page 70: Add The Control To The Form
The values that you specify in the Properties window are the initial values that will be assigned to that property when the control is created at run time. Step 1: From the Toolbox, drag a Button control onto the form WP-2641M-CE7 (WinCE7 Based) User Manual v 1.0.1 Page: 70... - Page 71 Step 2: Right-click the Button control, and then click Properties Step 3: In the Properties window, type Check the SDK version, and press ENTER to set the Text property WP-2641M-CE7 (WinCE7 Based) User Manual v 1.0.1 Page: 71...
-
Page 72: Add The Event Handling For The Control
Step 1: Double-click the button on the form Step 2: Inserting the following code Dim data(30) As Byte PACNET.Sys.GetSDKVersion(data) MessageBox.Show(PACNET.MISC.WideString(data)) Tips & Warnings The “PACNET” of “using PACNET” is case- sensitive. WP-2641M-CE7 (WinCE7 Based) User Manual v 1.0.1 Page: 72... -
Page 73: Upload The Application To Winpac
WinPAC supports FTP server service. You can upload files to WinPAC or download files from a public FTP server. ……… ……… …..Step 1: On the Build menu, click Build SDKInformation WP-2641M-CE7 (WinCE7 Based) User Manual v 1.0.1 Page: 73... - Page 74 For applications programming in C# and VB.net with .net compact framework, when executing these application on WinPAC, the corresponding PACSDK.dll and PACNET.dll must be in the same directory as the .exe file. WP-2641M-CE7 (WinCE7 Based) User Manual v 1.0.1 Page: 74...
-
Page 75: Execute The Application On Winpac
4.3.6. Execute the Application on WinPAC After uploading the application to WinPAC, you can just double-click it on WinPAC to execute it. WP-2641M-CE7 (WinCE7 Based) User Manual v 1.0.1 Page: 75... -
Page 76: First Winpac Program In Visual C
3. Add the control to the form 4. Add the event handling for the control 5. Upload the application to WinPAC 6. Execute the application on WinPAC All main steps will be described in the following subsection. WP-2641M-CE7 (WinCE7 Based) User Manual v 1.0.1 Page: 76... -
Page 77: Create A New Project
The C# project template is a composite control that you use in this example creates a new project with this user control. Step 1: Run the Visual Studio 2008 Visual Studio 2008 Step 2: On the File menu, point to New, and then click Project WP-2641M-CE7 (WinCE7 Based) User Manual v 1.0.1 Page: 77... - Page 78 Step 4: In the Templates pane, click Smart Device Step 5: Type a name in the Name field, and then click OK Here we will enter the name “SDKInformation” and a different location for the project if you wish. WP-2641M-CE7 (WinCE7 Based) User Manual v 1.0.1 Page: 78...
- Page 79 Tips & Warnings The WCE7 only support .NET Compact Framework Version 3.5, if your application uses .NET Compact Framework Version 2.0 there is no guarantee that the program will function correctly. WP-2641M-CE7 (WinCE7 Based) User Manual v 1.0.1 Page: 79...
-
Page 80: Specify The Path Of Pac Reference
4.4.2. Specify the Path of PAC Reference The PAC SDK provides a complete solution to integrate with WP-2641M-CE7 and it’s compatible with Visual C#, Visual Basic .net and C++. In order to use a component in your application, you must first add a reference to it. - Page 81 Step 2: In Solution Explorer, right-click the References node, and then click Add Reference… WP-2641M-CE7 (WinCE7 Based) User Manual v 1.0.1 Page: 81...
- Page 82 Step 3: Select Browse tab and add the PACNET.dll WP-2641M-CE7 (WinCE7 Based) User Manual v 1.0.1 Page: 82...
-
Page 83: Add The Control To The Form
The values that you specify in the Properties window are the initial values that will be assigned to that property when the control is created at run time. Step 1: From the Toolbox, drag a Button control onto the form WP-2641M-CE7 (WinCE7 Based) User Manual v 1.0.1 Page: 83... - Page 84 Step 2: Right-click the Button control, and then click Properties Step 3: In the Properties window, type Check the SDK version, and press ENTER to set the Text property WP-2641M-CE7 (WinCE7 Based) User Manual v 1.0.1 Page: 84...
-
Page 85: Add The Event Handling For The Control
You have finished the design stage of your application and are at the point when you can start adding some code to provide the program's functionality. Step 1: Double-click the button on the form Step 2: Inserting the following code byte []data = new byte[30]; PACNET.Sys.GetSDKVersion(data); MessageBox.Show(PACNET.MISC.WideString(data)); WP-2641M-CE7 (WinCE7 Based) User Manual v 1.0.1 Page: 85... -
Page 86: Upload The Application To Winpac
WinPAC supports FTP server service. You can upload files to WinPAC or download files from a public FTP server. ……… ……… …..Step 1: On the Build menu, click Build SDKInformation WP-2641M-CE7 (WinCE7 Based) User Manual v 1.0.1 Page: 86... - Page 87 For applications programming in C# and VB.net with .net compact framework, when executing these application on WinPAC, the corresponding PACSDK.dll and PACNET.dll must be in the same directory as the .exe file. WP-2641M-CE7 (WinCE7 Based) User Manual v 1.0.1 Page: 87...
-
Page 88: Execute The Application On Winpac
4.4.6. Execute the Application on WinPAC After uploading the application to WinPAC, you can just double-click it on WinPAC to execute it. WP-2641M-CE7 (WinCE7 Based) User Manual v 1.0.1 Page: 88... -
Page 89: First Winpac Program In Visual C
If this update is not installed, the error message “atlconv.h error C2039: lstrlenW" will be displayed after the program is compiled. The update can be found by downloading the latest version from Microsoft. http://download.microsoft.com/download/9/D/D/9DDBD3EC-A43C-4BCE-A7A9-AEE9B1007 BCE/VisualStudioDeviceWindowsEmbeddedCompact7.msi WP-2641M-CE7 (WinCE7 Based) User Manual v 1.0.1 Page: 89... -
Page 90: Create A New Project
The Visual C++ project template is a composite control that you use in this example creates a new project with this user control. Step 1: Run the Visual Studio 2008 Visual Studio 2008 Step 2: On the File menu, point to New, and then click Project WP-2641M-CE7 (WinCE7 Based) User Manual v 1.0.1 Page: 90... - Page 91 Step 4: In the Templates pane, click MFC Smart Device Application Step 5: Type a name in the Name field, and then click OK Here we will enter the name “SDKInformation” and a different location for the project if you wish WP-2641M-CE7 (WinCE7 Based) User Manual v 1.0.1 Page: 91...
- Page 92 Step 6: On the first page of the wizard, click Next Step 7: On the next page of the wizard, select GuruCE_imx6_SDK to be added to the project, and then click Next WP-2641M-CE7 (WinCE7 Based) User Manual v 1.0.1 Page: 92...
- Page 93 Step 8: On the next page of the wizard, select Dialog based, and then click next Step 9: On the next page of the wizard, click next WP-2641M-CE7 (WinCE7 Based) User Manual v 1.0.1 Page: 93...
- Page 94 Step 10: On the next page of the wizard, click next Step 11: On the next page of the wizard, click Finish WP-2641M-CE7 (WinCE7 Based) User Manual v 1.0.1 Page: 94...
-
Page 95: Configure The Platform
Before you deploy your project, check the platform. On the Debug configuration toolbar, select Release, and then on the Pocket PC 2003 (ARMV4) configuration toolbar, select GuruCE_imx6_SDK(ARMv4I), as shown in the following illustration. WP-2641M-CE7 (WinCE7 Based) User Manual v 1.0.1 Page: 95... -
Page 96: Specify The Path Of Pacsdk Library And Header Files
4.5.3. Specify the Path of PACSDK library and header files The PAC SDK provides the PACSDK library and header files with WP-2641M-CE7. It’s compatible with C++. In order to use a component in your application, you must first add a reference to it. - Page 97 Step 2: In left pane, expand Configuration Properties, and then click Link Step 3: In the right pane, choose the PACSDK_CE.lib in the Additional Dependencies item WP-2641M-CE7 (WinCE7 Based) User Manual v 1.0.1 Page: 97...
- Page 98 Step 4: In the right pane, choose the following path in the “Additional Include Directories” item C:\Program Files\Windows CE Tools\SDKs\GuruCE imx6 SDK\Include\Armv4i C:\Program Files\Microsoft Visual Studio 9.0\VC\ce7\atlmfc\include WP-2641M-CE7 (WinCE7 Based) User Manual v 1.0.1 Page: 98...
-
Page 99: Add The Control To The Form
Step 1: In Resource View, expand the resources tree by opening the top level folder Step 2: Open the Dialog folder and then double-click the dialog resource name IDD_SDKINFORMATION_DIALOG The resource editor appears in the right pane. WP-2641M-CE7 (WinCE7 Based) User Manual v 1.0.1 Page: 99... - Page 100 Step 3: From the Toolbox, drag a Button control onto the form Step 4: Right-click the Button control, and then click Properties WP-2641M-CE7 (WinCE7 Based) User Manual v 1.0.1 Page: 100...
- Page 101 Step 5: In the Properties window, type Check the SDK version, and press ENTER to set the Text property WP-2641M-CE7 (WinCE7 Based) User Manual v 1.0.1 Page: 101...
-
Page 102: Add The Event Handling For The Control
You have finished the design stage of your application and are at the point when you can start adding some code to provide the program's functionality. Step 1: Double-click the button on the form Step 2: Inserting the following code char sdk_version[32]; TCHAR buf[32]; pac_GetSDKVersion(sdk_version); pac_AnsiToWideString(sdk_version, buf); MessageBox(buf,0,MB_OK); WP-2641M-CE7 (WinCE7 Based) User Manual v 1.0.1 Page: 102... - Page 103 Step 3: Inserting the following code into the header area #include “PACSDK.h” WP-2641M-CE7 (WinCE7 Based) User Manual v 1.0.1 Page: 103...
-
Page 104: Upload The Application To Winpac
WinPAC supports FTP server service. You can upload files to WinPAC or download files from a public FTP server. ……… ……… …..Step 1: On the Build menu, click Build SDKInformation WP-2641M-CE7 (WinCE7 Based) User Manual v 1.0.1 Page: 104... - Page 105 Step 2: Open the browser and type the IP address of WinPAC Step 3: Upload the SDKInformation.exe application to WinPAC WP-2641M-CE7 (WinCE7 Based) User Manual v 1.0.1 Page: 105...
-
Page 106: Execute The Application On Winpac
4.5.7. Execute the Application on WinPAC After uploading the application to WinPAC, you can just double-click it on WinPAC to execute it. WP-2641M-CE7 (WinCE7 Based) User Manual v 1.0.1 Page: 106... -
Page 107: Apis And Demo Programs
For full usage information regarding the description, prototype and the arguments of the functions, please refer to the “PAC Standard API Manual” WP-2641M-CE7 (WinCE7 Based) User Manual v 1.0.1 Page: 107... -
Page 108: Pac Standard Apis
The diagram below shows the set of each system operation API provided in the PACSDK. System Information Watchdog Backplane Access UART Backlight Registry Interrupt Buzzer Memory Access LED System Operation WP-2641M-CE7 (WinCE7 Based) User Manual v 1.0.1 Page: 108... -
Page 109: Vb.net Demo Programs For Pac Standard Apis
Registry values from/to the registry Shows how to read the name of a UART UART local I/O modules via a UART Displays information about how to WatchDog WatchDog operate the watchdog WP-2641M-CE7 (WinCE7 Based) User Manual v 1.0.1 Page: 109... -
Page 110: C# Demo Programs For Pac Standard Apis
Registry values from/to the registry Shows how to read the name of a UART UART local I/O modules via a UART Displays information about how to WatchDog WatchDog operate the watchdog WP-2641M-CE7 (WinCE7 Based) User Manual v 1.0.1 Page: 110... -
Page 111: Visual C++ Demo Programs For Pac Standard Apis
Registry values from/to the registry Shows how to read the name of a UART UART local I/O modules via a UART Displays information about how to WatchDog WatchDog operate the watchdog WP-2641M-CE7 (WinCE7 Based) User Manual v 1.0.1 Page: 111... -
Page 112: Pac Io Apis
5.2. PAC IO APIs PAC_IO WP-2641M-CE7 (WinCE7 Based) User Manual v 1.0.1 Page: 112... -
Page 113: Vb.net Demo Programs For Pac Standard Apis
Shows how to use the XV107 module of XVBoard/XV107 VB_demo the XV-board For full details regarding the remote I/O modules and its demos, please Remote refer to: (I-7000 or I-87K modules http://ftp.icpdas.com/pub/cd/winpac_imx6/WP-2641/demo/pac/applica in RU-87Pn I/O unit) bled_demo_for_7k_module.pdf WP-2641M-CE7 (WinCE7 Based) User Manual v 1.0.1 Page: 113... -
Page 114: C# Demo Programs For Pac Standard Apis
Shows how to use the XV107 module of _demo the XV-board For full details regarding the remote I/O modules and its demos, please Remote refer to: (I-7000 or I-87K modules in http://ftp.icpdas.com/pub/cd/winpac_imx6/WP-2641/demo/pac/applic RU-87Pn I/O unit) abled_demo_for_7k_module.pdf WP-2641M-CE7 (WinCE7 Based) User Manual v 1.0.1 Page: 114... -
Page 115: Visual C++ Demo Programs For Pac Standard Apis
For Visual C++ applications, these demo programs can be obtained from: http://ftp.icpdas.com/pub/cd/winpac_imx6/WP-2641/demo/pac/vc2008/io/ Folder Demo Explanation For full details regarding the remote I/O modules and its demos, please Remote refer to: (I-7000 or I-87K modules http://ftp.icpdas.com/pub/cd/winpac_imx6/WP-2641/demo/pac/applica in RU-87Pn I/O unit) bled_demo_for_7k_module.pdf WP-2641M-CE7 (WinCE7 Based) User Manual v 1.0.1 Page: 115... -
Page 116: I/O Modules And Sdk Selection
RU-87Pn M-7000 Local I/O Module (XV-Board) There are more than 8 XV-Board available for expanding the function of the WP-2641M-CE7 The following table shows the appropriate SDK library to be used for I/O modules. Module Native SDK .NET CF SDK... - Page 117 RS-485 (I-7000 series and M-7000 series) I-7000, M-7000, RU-87Pn and high profile I-87K series modules connect to WP-2641M-CE7 via a twisted-pair, multi-drop, 2-wire RS-485 network. I-7000 series I/O modules Module Native SDK .NET CF SDK I-7000 series PACSDK.dll PACNET.dll...
- Page 118 .NET CF SDK Modbus Demo Modbus Demo ET-7000 Modbus Demo Modbus Demo I-8KE4/8-MTCP For more detailed information about ET-7000 and I-8KE4/8-MTCP series modules using Modbus protocol and its demos, please refer to: http://ftp.icpdas.com/pub/cd/winpac_imx6/WP-2641/demo/nmodbus/ WP-2641M-CE7 (WinCE7 Based) User Manual v 1.0.1 Page: 118...
-
Page 119: Wp-2641M-Ce7 Updates
Both the files of OS updates and SDK updates can be found by downloading the latest version from ICP DAS web site. http://ftp.icpdas.com/pub/cd/winpac_imx6/wp-2641/ OS_Image update_from_Micro_SD update_from_file Modbus nModbus PACNET PACSDK PlatformSDK WP-2641M-CE7 (WinCE7 Based) User Manual v 1.0.1 Page: 119... -
Page 120: Os Updates
7.1. OS Updates OS updates are part of the WP-2641M-CE7 updates services to provide additional and more efficient features and functionality for WP-2641M-CE7 operating system. The updates files of OS image can be found by downloading the latest version from ICP DAS web site. -
Page 121: Os Updates Using Eshell
Step 2: Run the registry clear.exe The registry.exe can be found by downloading the latest version from ICP DAS web site. http://ftp.icpdas.com/pub/cd/winpac_imx6/WP-2641/pc_tools/eshell/ Step 3: Place the rotary switch in position 3, OS update mode WP-2641M-CE7 (WinCE7 Based) User Manual v 1.0.1 Page: 121... - Page 122 Step 4: Run the ESHELL.exe, and then restart the WP-2641M-CE7 The ESHELL.exe can be found by downloading the latest version from ICP DAS web site. http://ftp.icpdas.com/pub/cd/winpac_imx6/WP-2641/pc_tools/eshell/ Step 5: Select the device which you want to update the OS image, and then click OK Select the device name which you want to update the OS image from the list.
- Page 123 0, normal mode Step 8: Click the OK button Step 9: Check the OS version Start the PAC Utility, and then select the “Device Information” tab to check the current OS version. WP-2641M-CE7 (WinCE7 Based) User Manual v 1.0.1 Page: 123...
-
Page 124: Os Updates Using Micro_Sd
7.1.2. OS Updates using micro_SD The microSD card can be used to reinstall the WP-2641M-CE7 OS image to factory default settings in the event of the WP-2641M-CE7 failure. Step 1: Get the latest version of the installation package file and then unzip it http://ftp.icpdas.com/pub/cd/winpac_imx6/WP-2641/os_image/update_from_eshell_or_... - Page 125 The “Erase boot splash” button erases an existing boot splash screen image from the Micro_SD card. The “Erase boot config” button erases the boot configuration, so the next time you boot using this Micro_SD card, the bootloader will revert to factory defaults. WP-2641M-CE7 (WinCE7 Based) User Manual v 1.0.1 Page: 125...
- Page 126 Step 4: Plug the microSD card into microSD slot Step 5: Turn the rotary switch in position 5, OS update mode Step 6: Reboot the WP-2641M-CE7 Step 7: Wait a few minutes for the following desktop to be displayed WP-2641M-CE7 (WinCE7 Based) User Manual v 1.0.1...
- Page 127 Step 8: Turn the rotary switch in position 0, normal mode Step 9: Reboot the WP-2641M-CE7 Step 10: Check the OS version Start the PAC Utility, and then select the “Device Information” tab to check the current OS version. WP-2641M-CE7 (WinCE7 Based) User Manual v 1.0.1...
-
Page 128: Sdk Updates
7.2. SDK Updates SDK updates are part of the WP-2641M-CE7 update services to provide additional and more efficient features and functionality for WP-2641M-CE7 operating system. The updates files of SDK files can be found by downloading the latest version from ICP DAS web site. -
Page 129: Sdk Updates For Vb.net Or C
Step 2: Copy the PACNET.dll file to PC and WP-2641M-CE7 The DLL files on PC are located at anywhere only the solution can reference it. The DLL files on WP-2641M-CE7 are located at the same directory as the .exe file. WP-2641M-CE7 (WinCE7 Based) User Manual v 1.0.1... -
Page 130: Sdk Updates For C
C:\Program Files\Windows CE Tools\SDKs\GuruCE imx6 SDK\Include\Armv4i The libraries are located at: C:\Program Files\Windows CE Tools\SDKs\GuruCE imx6 SDK\lib\ARMv4I Step 3: Copy the latest version of DLL files to WinPAC The DLL files are located at: \System_Disk\ICPDAS\System WP-2641M-CE7 (WinCE7 Based) User Manual v 1.0.1 Page: 130... -
Page 131: Appendix. A. Tips - How To
Appendix. A. Tips – How to WP-2641M-CE7 (WinCE7 Based) User Manual v 1.0.1 Page: 131... -
Page 132: How To Online Debug The Wp-2641M-Ce7 Program
A.1. How to Online Debug the WP-2641M-CE7 Program Here are step by step instructions on how to online debug the WP-2641M-CE7 program. Tips & Warnings Before starting online debug the WP-2641M-CE7 program, make sure that the WP-2641M-CE7 SDK has been installed correctly. - Page 133 Step 3: On the Tools menu, click the Options… Step 4: In the left pane, expand Device Tools node and select Devices Step 5: In the Show devices for platform:, select GuruCE_imx6_SDK and then click Properties WP-2641M-CE7 (WinCE7 Based) User Manual v 1.0.1 Page: 133...
- Page 134 Step 6: Click the Configure… Step 7: Select the Use specific IP address:, and then type the IP address of WP-2641M-CE7 WP-2641M-CE7 (WinCE7 Based) User Manual v 1.0.1 Page: 134...
- Page 135 Step 8: Click the OK, and then click OK to end the dialog WP-2641M-CE7 (WinCE7 Based) User Manual v 1.0.1 Page: 135...
- Page 136 Step 10: Wait for the connection to be established Tips & Warnings If the connection fails, as shown below, please repeat the step 2 to step 9 to try it again. WP-2641M-CE7 (WinCE7 Based) User Manual v 1.0.1 Page: 136...
-
Page 137: How To Automatically Synchronize Winpac Clock
If synchronization is enabled, the WinPAC clock is synchronized with an Internet time server. Step 1: Double-click the PAC Utility on the desktop Step 2: On the General tab, press Configure button WP-2641M-CE7 (WinCE7 Based) User Manual v 1.0.1 Page: 137... - Page 138 Step 5: On the File menu, click Save and Reboot Step 6: The WinPAC will automatically synchronize with an internet time server regularly Step 7: Click the Update Now button to synchronize WinPAC clock immediately WP-2641M-CE7 (WinCE7 Based) User Manual v 1.0.1 Page: 138...
-
Page 139: How To Use User Account Control In Winpac
A.3. How to use User Account Control in WinPAC WP-2641M-CE7 (WinCE7 Based) User Manual v 1.0.1 Page: 139... -
Page 140: How To Create An User Account
Step 1: Double-click the PAC Utility on the desktop Step 2: On the Login tab of the Network tab, click Login tab, type the User Name and Password, and then click Add button WP-2641M-CE7 (WinCE7 Based) User Manual v 1.0.1 Page: 140... - Page 141 Step 3: The user has been added to the allowed under the remote login and included in the following list Step 4: On the File menu, click Save and Reboot for changes to take effect WP-2641M-CE7 (WinCE7 Based) User Manual v 1.0.1 Page: 141...
-
Page 142: How To Use Telnet To Remote Login The Winpac From Pc
Here are step by step instructions on how to use telnet to remote login the WinPAC from PC. Step 1: On the PC, open a MS-DOS command prompt 2. Type “cmd” Step 2: At the command prompt, type “telnet (IP address)” WP-2641M-CE7 (WinCE7 Based) User Manual v 1.0.1 Page: 142... - Page 143 Step 3: The connection has been set up, and then type the name and password Step 4: The remote login has been completed WP-2641M-CE7 (WinCE7 Based) User Manual v 1.0.1 Page: 143...
-
Page 144: How To Remove A User Account From The Login List
Step 1: Click a user from the list which you want to remove, and the user will display in the field, and then press Delete to delete the user from the login list Step 2: On the File menu, click Save and Reboot for changes to take effect WP-2641M-CE7 (WinCE7 Based) User Manual v 1.0.1 Page: 144... -
Page 145: How To Change The Battery
When programming this, call the pac_GetBatteryLevel() API function in the PACSDK.dll to check whether the battery power is low. When the power of the battery is low, it’s recommended that the battery is replaced immediately, otherwise the RTC time will be reset. WP-2641M-CE7 (WinCE7 Based) User Manual v 1.0.1 Page: 145... - Page 146 Insert a new battery. Set the RTC time. Ordering information Battery type: BR1632 (Part number is 2LB010 for ICP DAS) For more detailed information, contact your local sales office or distributor. WP-2641M-CE7 (WinCE7 Based) User Manual v 1.0.1 Page: 146...
-
Page 147: How To Using The Practical Functions Of The 3G/4G I/O Module
A.5. How to Using the Practical Functions of the 3G/4G I/O Module The Mobile network module of WinPAC series (Except for WP-2641M-CE7) that use the 3G/4G network to implement SMS and GPRS connection to send and receive functions. WP-2641M-CE7 (WinCE7 Based) User Manual v 1.0.1... -
Page 148: How To Auto Dial 3G/4G Gprs Network And Redial When The Network Disconnected
The demos can be found by downloading the latest version from ICP DAS web site. http://ftp.icpdas.com/pub/cd/winpac_imx6/wp-2641/demo/3g_modem/autodialer/ The description of the demo can be found by downloading the latest version from ICP DAS web site. http://ftp.icpdas.com/pub/cd/winpac_imx6/wp-2641/document/faq/development/ W5-13_How_to_use_Auto_dial_GPRS_network_and_redial_when_the_network_disconnected_en WP-2641M-CE7 (WinCE7 Based) User Manual v 1.0.1 Page: 148... -
Page 149: How To Use The Sms Function And Get The Gps Data
The demos can be found by downloading the latest version from ICP DAS web site. http://ftp.icpdas.com/pub/cd/winpac_imx6/wp-2641/demo/3g_modem/3g_modem_sms_demo The description of the demo can be found by downloading the latest version from ICP DAS web site. http://ftp.icpdas.com/pub/cd/winpac_imx6/wp-2641/document/faq/development/ W5-14_How_to_use_the_SMS_function_and_get_the_GPS_data_en WP-2641M-CE7 (WinCE7 Based) User Manual v 1.0.1 Page: 149... -
Page 150: How To Synchronize The System Time By Gps Data
The demos can be found by downloading the latest version from ICP DAS web site. http://ftp.icpdas.com/pub/cd/winpac_imx6/wp-2641/demo/3g_modem/gpstimesynchronization The description of the demo can be found by downloading the latest version from ICP DAS web site. http://ftp.icpdas.com/pub/cd/winpac_imx6/wp-2641/document/faq/development/ W5-15_How_to_Synchronize_the_system_time_by_GPS_data_en WP-2641M-CE7 (WinCE7 Based) User Manual v 1.0.1 Page: 150... -
Page 151: Appendix. B. Xv-Board Modules
Appendix. B. XV-Board Modules The XV-board series are for LP-2641M, WP-2641M-CE7. One PAC can only plug only one XV-board. The XV-board series have following common specification: DI channel is dry contact, sink type. DO channel is open collector, sink type. -
Page 152: Appendix. C. Revision History
Appendix. C. Revision History This chapter provides revision history information to this document. The table below shows the revision history. Revision Date Description 1.0.1 February 2020 Initial issue WP-2641M-CE7 (WinCE7 Based) User Manual v 1.0.1 Page: 152...
Need help?
Do you have a question about the WP-2641M-CE7 and is the answer not in the manual?
Questions and answers