Microtek ScanMaker i700 Supplementary Manual
Microtek scanmaker i700: supplementary guide
Hide thumbs
Also See for ScanMaker i700:
- User manual (127 pages) ,
- Quick reference (24 pages) ,
- Quick start (2 pages)
Table of Contents
Advertisement
Quick Links
Download this manual
See also:
User Manual
Supplement
The ScanMaker i700 is a high-performance scanner that offers the exclusive
PictuRescue
reconstruction and color restoration of photos and film. It features 9600 x 4800 dpi,
48-bit color, a legal size scan bed (8.5" x 14"), and 7 Smart-Touch buttons on the front
panel to automate scanner functions (plus a convenient Power button). In addition,
the ScanMaker i700 offers robust film handling capabilities, including exclusive
EZ-Lock
Contents
Getting to Know Your ScanMaker i700 ........................................................... 1
Features of the ScanMaker i700 ...................................................................... 2
Taking a Closer Look ........................................................................................ 3
Connecting to the FireWire Port ..................................................................... 4
How the Smart-Touch Scanner Buttons Work .............................................. 6
DIGITAL ICE Technology .................................................................................. 7
Scanning Scenarios ......................................................................................... 8
Scanning Regular, Non-Damaged Photos (1) ............................................... 9
Scanning Regular, Non-Damaged Photos (2) ............................................. 10
Copyright © 2004
Microtek International, Inc.
I49-003885 A, September 2004
ScanMaker i700 features, scenarios, and information
Getting to Know Your ScanMaker i700
TM
system with DIGITAL ICE
TM
Film Holders for more consistent film scans.
http://www.microtek.com
TM
Technology and ColoRescue
Scanning Damaged Photos .......................................................................... 12
A. Using the DIGITAL ICE button ..................................................... 13
B. Scanning with Automatic Reconstruction ................................. 14
C. Scanning with Manual Reconstruction ....................................... 16
Scanning Regular, Non-Damaged Film ....................................................... 18
A. Scanning 35mm Filmstrips .......................................................... 19
B. Scanning 35mm Slides ................................................................. 21
C. Scanning 6 x 17 cm (120) Panoramic Film ................................... 22
D. Scanning 4 " x 5" / 6 x 9 cm (120) Film .......................................... 23
Scanning Damaged Film ............................................................................... 24
Specifications / System Requirements ........................................................ 26
TM
for
Advertisement
Table of Contents

Subscribe to Our Youtube Channel
Related Manuals for Microtek ScanMaker i700


Summary of Contents for Microtek ScanMaker i700
-
Page 1: Table Of Contents
Supplement ScanMaker i700 features, scenarios, and information Getting to Know Your ScanMaker i700 The ScanMaker i700 is a high-performance scanner that offers the exclusive PictuRescue reconstruction and color restoration of photos and film. It features 9600 x 4800 dpi, 48-bit color, a legal size scan bed (8.5" x 14"), and 7 Smart-Touch buttons on the front panel to automate scanner functions (plus a convenient Power button). -
Page 2: Features Of The Scanmaker I700
– With ColoRescue, the ScanMaker i700 restores faded colors in photos and film, bringing hues back to their original luster and brilliance for more vibrant images. ColoRescue's one-click, automatic color recovery process is simple and straightforward, involving no learning curve or hassle. -
Page 3: Taking A Closer Look
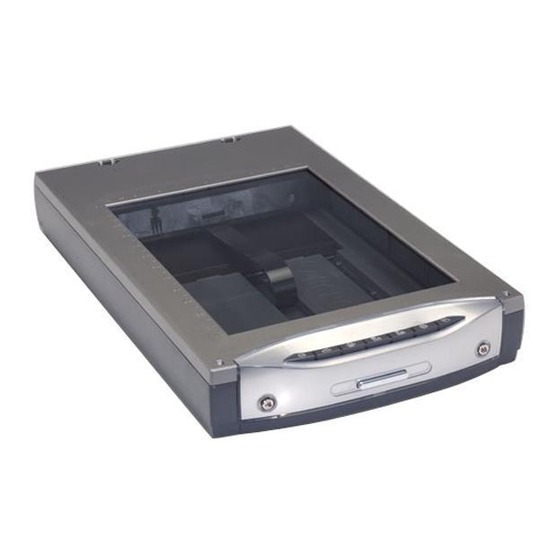
Glass surface Power button E-mail button Copy button Scan button DIGITAL ICE button Power connector Accessory port, with connector of built-in transparency adapter securely connected Hi-Speed USB port (1) FireWire port (1) ScanMaker i700 Supplement Custom button Scan-to-Web button OCR button... -
Page 4: Connecting To The Firewire Port
Connecting to the FireWire Port The printed Start Here guide showed you how to connect your computer to the USB port of the ScanMaker i700. Here, the Supplement shows you how to connect the computer to the scanner's alternate FireWire port. - Page 5 2. Press the Power button on the front panel of the scanner, and wait for the lights to stop blinking and stay on steady. The scanner will be detected by your system automatically. Power button ScanMaker i700 Supplement...
-
Page 6: How The Smart-Touch Scanner Buttons Work
To launch the MSC, double-click the MSC icon on your desktop. Please note that you need to exit ScanWizard 5 before accessing the MSC utility. The ScanMaker i700 is equipped with 7 Smart-Touch buttons for easy access to frequently used scanner functions. To carry out a specific task, simply press the corresponding button on the scanner. -
Page 7: Digital Ice Technology
Using Applicable Scan Materials DIGITAL ICE is used in the ScanMaker i700 to reconstruct damaged photos and film. It is not designed to be used for printed materials from newspapers and magazines, or printouts from inkjet/laser printers. -
Page 8: Scanning Scenarios
• Scanning damaged photos: This scenario utilizes DIGITAL ICE for reconstructing damaged photos. Three methods are available for launching this function: through the DIGITAL ICE button on the front panel of the scanner; through the Automatic Reconstruction option; and through the Manual Reconstruction option. -
Page 9: Scanning Regular, Non-Damaged Photos (1)
When ScanWizard 5 launches, it automatically performs a fast preview of the material on your scanner glass surface and displays it in the preview area. 3. In the preview window, you can resize the scan frame (floating dotted line) around the image by dragging on the edge or corner of the scan frame to determine the final size of the actual scan. -
Page 10: Scanning Regular, Non-Damaged Photos (2)
This scenario makes use of the Advanced Control Panel. 1. Raise the scanner lid, and place the photo to be scanned face down on the scanner glass surface. Position the top end of the photo towards the back of the scanner. - Page 11 ScanMaker i700 Supplement...
-
Page 12: A. Using The Digital Ice Button
Automatic Reconstruction option; and through the Manual Reconstruction option. A. Using the DIGITAL ICE button 1. Raise the scanner lid, then place the damaged photo to be scanned face down on the scanner glass surface. Center the top of the photo along the horizontal ruler towards the back of the scanner. -
Page 13: Using The Digital Ice Button
Pressing the DIGITAL ICE button after customizing will invoke these settings repeatedly until you change your preferences. To customize the DIGITAL ICE button: 1. Double-click the Microtek Scanner Configuration icon ( ) on your desktop to launch the MSC utility. -
Page 14: Scanning With Automatic Reconstruction
1. Raise the scanner lid, then place the damaged photo to be scanned face down on the scanner glass surface. Center the top of the photo along the horizontal ruler towards the back of the scanner. - Page 15 Depending on your selection, the scanned and processed image can be saved to a file, opened in an image-editing program, sent to a printer, attached in an e-mail, or uploaded to a website. ScanMaker i700 Supplement...
-
Page 16: Scanning With Manual Reconstruction
At this point, scanning of the damaged photo begins and a defect map is created in the process. This may take a few minutes. A “Manual Reconstruction with DIGITAL ICE” window then appears, with a preview of the scanned image and corresponding function tools. ScanMaker i700 Supplement... - Page 17 Select from Normal or Strong. 6. If necessary, use the Brush tool to add defects which cannot be detected by the scanner after the scan but are otherwise visible in the damaged print and which you want to remove from the image.
-
Page 18: Scanning Regular, Non-Damaged Film
Scanning Regular, Non-Damaged Film To scan film, use the EZ-Lock Film Holders included with your ScanMaker i700. The EZ-Lock Film Holders for the ScanMaker i700 include holders for 35mm slides, 35mm filmstrips, 6 x 17 cm (120) panoramic film, and 4" x 5" / 6 x 9 cm film. The film holders not only ensure precise alignment of film and consistent scans, but also perform automatic cropping when they scan various sizes of film. -
Page 19: Scanning 35Mm Filmstrips
1. Load the filmstrip face down inside the holder. Slide the filmstrip along the slots of the holder until the filmstrip is fully loaded. 2. Raise the scanner lid, then place the holder with the loaded film on the scan bed. To make sure the auto... - Page 20 9. Click the Scan to button in the Preview window to scan all the checked jobs. 10. After the scan, the scanned and processed images can be saved as several files, opened in an image-editing program, sent to a printer, attached in an e-mail, or uploaded to a website. ScanMaker i700 Supplement...
-
Page 21: Scanning 35Mm Slides
8 mounted 35mm slides at a time. 1. Flip the 35mm slides face down and place them into the holder. 2. Raise the scanner lid, then place the holder with the loaded film on the scan bed. To make sure the auto multiframe cropping... -
Page 22: Scanning 6 X 17 Cm (120) Panoramic Film
Place the film face down into the holder. c) Pull down the side to close the lid. 2. Raise the scanner lid, then place the holder with the loaded film on the scan bed. To make sure the auto... -
Page 23: Scanning 4" X 5" / 6 X 9 Cm (120) Film
Slide the film along the slots of the holder until the film is fully loaded. 2. Raise the scanner lid, then place the holder with the loaded film on the scan bed. 3. Follow the procedures (steps 3 through 10) for scanning 35mm filmstrips to carry out scanning. -
Page 24: Scanning Damaged Film
Select a desired resolution in the Resolution pull-down menu for your image output resolution. The recommended resolution for DIGITAL ICE is 1200 dpi, and take note that using DIGITAL ICE will require more time than regular scanning. c) Adjust the scan frame settings if necessary. ScanMaker i700 Supplement... - Page 25 Depending on your selection, the scanned and processed image can be saved to a file, opened in an image-editing program, sent to a printer, attached in an e-mail, or uploaded to a website. Before After ScanMaker i700 Supplement...
-
Page 26: Specifications
• Mac OS 9.x, Mac OS X 10.2, 10.3 or later Important Specifications, bundles, and accessories are subject to change without notice. ScanMaker i700 Supplement Color, grayscale, and black-and-white in a single scanning pass True 48-bit color (approx. 281 x 10 16-bit grayscale (approx. -
Page 27: Fcc Compliance Statement
• Consult the dealer or an experienced radio/TV technician for help. Note: A shielded Hi-Speed USB interface cable with ferrite core installed on the scanner connector and must be used with this equipment. Caution: Changes or modifications not expressly approved by the manufacturer responsible for compliance could void the user's authority to operate the equipment.
Need help?
Do you have a question about the ScanMaker i700 and is the answer not in the manual?
Questions and answers