Microtek ScanMaker i700 Quick Reference
Microtek scanmaker i700: quick reference
Hide thumbs
Also See for ScanMaker i700:
- User manual (127 pages) ,
- Supplementary manual (27 pages) ,
- Quick start (2 pages)
Table of Contents
Advertisement
Quick Links
Download this manual
See also:
User Manual
Important: Do not
remove the yellow
stickers from your
Open your scanner package and check the components. If any component is missing,
scanner until you are
told to do so. You
call Microtek Customer Service.
must install software
before connecting
your scanner.
1. ScanMaker i700 scanner
2. FireWire cable
3. Hi-Speed USB cable (backward
4. Power adapter
5. Power cord
6. EZ-Lock 35mm Filmstrip Holder
Contents
STEP 1: Unpack Contents ............................................................................ 1
STEP 2: Install Software .............................................................................. 2
STEP 3: Unlock Scanner .............................................................................. 3
STEP 4: Connect Scanner ............................................................................ 3
A. Power Connections ....................................................................... 3
B. Computer Connections ................................................................. 4
Scanning Scenarios ....................................................................................... 6
Scanning Regular, Non-Damaged Photos ................................................... 7
Scanning Damaged Photos .......................................................................... 8
Scanning Regular, Non-Damaged Film ...................................................... 10
Removing the Black Mat .................................................................. 10
Copyright©2004 Microtek International, Inc. http://www.microtek.com
I49-003656 B, June 2004
Installing your Microtek ScanMaker i700
1
2
3
compatible with USB 1.1)
4
8
5
9
7. EZ-Lock 35mm Slide Holder
8. EZ-Lock 6 x 17 cm (120) Panoramic
Film Holder
9. EZ-Lock 4" x 5" / 6 x 9 cm (120) Film Holder
10.Software CD-ROMs (Microtek & Adobe)
11. Documentation: Includes Start Here
Guide, ScanWizard 5 Quick Reference
Guide, and other inserts
Using the FilmView .......................................................................... 10
A. Using the EZ-Lock 35mm Filmstrip Holder ............................... 11
B. Using the EZ-Lock 35mm Slide Holder ..................................... 13
D. Using the EZ-Lock 4" x 5" / 6 x 9 cm (120) Film Holder ........... 15
Scanning Damaged Film ............................................................................. 16
Getting to Know Your ScanMaker i700 ...................................................... 18
Taking a Closer Look ..................................................................................... 19
How the Scanner Buttons Work .................................................................. 20
System Requirements ................................................................................. 21
Specifications ............................................................................................... 21
6
7
11
10
Advertisement
Table of Contents

Related Manuals for Microtek ScanMaker i700


Summary of Contents for Microtek ScanMaker i700
-
Page 1: Table Of Contents
D. Using the EZ-Lock 4" x 5" / 6 x 9 cm (120) Film Holder ... 15 Scanning Damaged Film ... 16 Getting to Know Your ScanMaker i700 ... 18 Taking a Closer Look ... 19 How the Scanner Buttons Work ... 20 System Requirements ... -
Page 2: For Pc Users
Do not turn off your computer during software installation. 4. Click EXIT on the Microtek Software Installer screen when all the software has been installed. 5. Place the Adobe CD-ROM into your CD-ROM drive, and install the software. -
Page 3: Step 3: Unlock Scanner
15-pin accessory port. 3. Connect the power adapter and the power cord. Plug one end of the power adapter assembly into the back of the scanner, and plug the other end into a wall outlet or other power source. -
Page 4: Computer Connections
B. Computer connections The ScanMaker i700 comes with FireWire (IEEE 1394) and Hi-Speed USB interfaces built-in. You may choose either FireWire or Hi-Speed USB as the interface for connection between the scanner and computer. (You can use only one interface at a time.) Using the FireWire Cable Check first to see if your computer system has a FireWire port. - Page 5 2. Press the Power button on the front panel of the scanner, and wait for the lights to stop blinking and stay on steady. The scanner will be detected by your system automatically. ScanMaker i700 Installing and Getting Started Power button...
-
Page 6: Scanning Scenarios
• Scanning damaged film. This scenario makes use of the Advanced Control Panel in ScanWizard 5, and utilizes DIGITAL ICE for correcting flaws that may be present in your negative and positive film and transparencies. ScanMaker i700 Installing and Getting Started... -
Page 7: Scanning Regular, Non-Damaged Photos
ScanWizard 5 Standard Control Panel. When ScanWizard 5 launches, it automatically performs a fast preview of the material on your scanner glass surface and displays it in the preview area. 3. In the preview window, you can resize the scan frame (floating dotted line) around the image by dragging on the edge or corner of the scan frame to determine the final size of the actual scan. -
Page 8: Scanning Damaged Photos
Scanning Damaged Photos 1. Raise the scanner lid, then place the damaged photo to be scanned face down on the scanner glass surface. Center the top of the photo along the horizontal ruler towards the back of the scanner. Make sure the Black Mat is attached to the scanner lid. - Page 9 Depending on your selection, the scanned and processed image can be saved to a file, opened in an image-editing program, sent to a printer, attached in an e- mail, or uploaded to a website. Before After ScanMaker i700 Installing and Getting Started...
-
Page 10: Scanning Regular, Non-Damaged Film
Scanning Regular, Non-Damaged Film The ScanMaker i700 allows you to perform auto-crop scanning on film such as 35mm slides, 35mm filmstrips, 6 x 9 cm (120) film, 6 x 17 cm (120) panoramic film, and 4" x 5" film. To scan various film sizes, you will need to use the holder that correctly matches the film type to be scanned. -
Page 11: Using The Ez-Lock 35Mm Filmstrip Holder
1. Load the filmstrip face down inside the holder. Slide the filmstrip along the slots of the holder until the filmstrip is fully loaded. 2. Raise the scanner lid, then place the holder with the loaded film on the scanner glass surface, as shown in the illustration. - Page 12 9. Click the Scan to button to scan all the checked jobs. 10. After the scan, the scanned and processed images can be saved as several files, opened in an image-editing program, sent to a printer, attached in an e-mail, or uploaded to a website. ScanMaker i700 Installing and Getting Started...
-
Page 13: Using The Ez-Lock 35Mm Slide Holder
1. Flip the 35mm slides face down and place them into the holder. 2. Raise the scanner lid, then place the holder with the loaded film on the scanner glass surface as shown in the illustration. To make sure the auto... -
Page 14: Using The Ez-Lock 6 X 17 Cm (120) Panoramic Film Holder
Place the film face down into the holder. c) Pull down the side to close the lid. 2. Raise the scanner lid, then place the holder with the loaded film on the scanner glass surface as shown in the illustration. -
Page 15: Using The Ez-Lock 4" X 5" / 6 X 9 Cm (120) Film Holder
Slide the film along the slots of the holder until the film is fully loaded. 2. Raise the scanner lid, then place the holder with the loaded film on the scanner glass surface as shown in the illustration. To make sure the auto... -
Page 16: Scanning Damaged Film
Select a desired resolution in the Resolution pull-down menu for your image output resolution. The recommended resolution for DIGITAL ICE is 1200 dpi, and take note that using DIGITAL ICE will require more time than regular scanning. c) Adjust the scan frame settings if necessary. ScanMaker i700 Installing and Getting Started... - Page 17 Depending on your selection, the scanned and processed image can be saved to a file, opened in an image-editing program, sent to a printer, attached in an e-mail, or uploaded to a website. Before After ScanMaker i700 Installing and Getting Started...
-
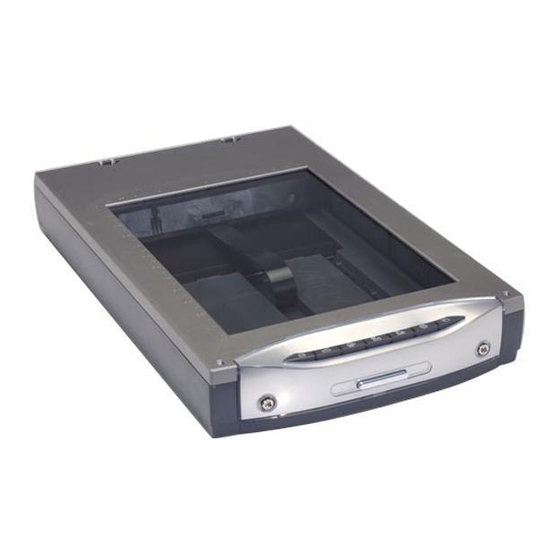
Page 18: Getting To Know Your Scanmaker I700
Getting to Know Your ScanMaker i700 The ScanMaker i700 is a high-performance scanner that features robust film handling capabilities and cutting-edge DIGITAL ICE technology for both photos and film. It features 48-bit color, 9600 x 4800-dpi optical resolution, legal size scan bed (8.5"... -
Page 19: Taking A Closer Look
Scanner lid (Light Plate) Black mat Glass surface Power button E-mail Copy Scan DIGITAL ICE Power connector Accessory port with Light Plate's connector securely connected Hi-Speed USB port (1) FireWire port (1) ScanMaker i700 Installing and Getting Started Custom Scan-to-Web... -
Page 20: How The Scanner Buttons Work
"Copy" button. To launch the MSC, double-click the MSC icon on your desktop. Please note that you need to exit ScanWizard 5 before accessing the MSC utility. The ScanMaker i700 is equipped with 7 Smart-Touch buttons for easy access to frequently used scanner functions. The Smart-Touch buttons are DIGITAL ICE, Scan, Copy, E-mail, OCR, Scan-to-Web, and Custom. -
Page 21: System Requirements
1.2A Max; 47-63 Hz (Input) 15V/2.5A (Output) Environment Operating Temperature: 50° F to 104° F (10° C to 40° C ) Power supply Manufacturer (AC/DC adapter) FAIRWAY colors) Model No. Voltage VE50-150A 100V to 240V ScanMaker i700 Installing and Getting Started... - Page 22 ScanMaker i700 Installing and Getting Started...
-
Page 23: Federal Communications Commission Interference Statement
Microtek bears no responsibility for the unauthorized use of copyrighted materials. Loi Han Microtek Lab, Inc. 16941 Keegan Avenue Carson, CA 90746 Phone: 310-687-5800 Fax: 310-687-5950 ScanMaker i700 Installing and Getting Started... - Page 24 ScanMaker i700 Installing and Getting Started...
Need help?
Do you have a question about the ScanMaker i700 and is the answer not in the manual?
Questions and answers