Table of Contents
Advertisement
Quick Links
INSTRUCTION MANUAL
EN 40V Cordless Snow Thrower
FR Souffleuse à neige sans fil 40V
ES Lanzador de nieve inalámbrico de 40 V
Model # DB2418
Have product questions or need technical support? Please feel free to contact us!
Website:
Toll free: 1-800-791-9458 Mon-Fri 9-5
EST Email: support@amerisuninc.com
www.PowerSmartUSA.com
Website
Advertisement
Table of Contents

Related Manuals for Powersmart DB2418


Summary of Contents for Powersmart DB2418
- Page 1 INSTRUCTION MANUAL EN 40V Cordless Snow Thrower FR Souffleuse à neige sans fil 40V ES Lanzador de nieve inalámbrico de 40 V Model # DB2418 Have product questions or need technical support? Please feel free to contact us! Website: www.PowerSmartUSA.com Toll free: 1-800-791-9458 Mon-Fri 9-5 EST Email: support@amerisuninc.com...
-
Page 3: Table Of Contents
20.7 x 19.3 x 20.3 inch Weight: 34.8 lbs Thank you for purchasing PowerSmart products. It is crucial and highly recommended that you read this instruction manual in its’ entirety, as this is an invaluable tool and reference point in understanding the operation of your unit. -
Page 4: Introduction
INTRODUCTION ® Thank You for Purchasing a PowerSmart Product. This manual provides information regarding the safe operation and maintenance of this product. Every effort has been made to ensure the accuracy of the ® information in this manual. PowerSmart reserves the right to change this product and specifications at any time without prior notice. - Page 5 • Maintain the snow thrower with care. Follow the instructions for lubricating and changing C AUTION ® USE ONLY APPROVED REPLACEMENT BATTERIES, OTHER BATTERIES PowerSmart MAY CAUSE INJURY OR DAMAGE TO THE SNOW THROWER. USE ONLY WITH ® 40V BATTERIES and CHARGER . PowerSmart...
- Page 6 Wear hearing protection. Wear Safety Alert. Caution. eye protection. WARNING! To reduce the risk of The rotating part will injury, user must read instruction continuously run for several manual. seconds after you turn off the machine. Do not expose to rain. Keep dry. DANGER! Keep hands and feet away from openings while the machine is running.
-
Page 7: Knowing Your Snow Thrower
To avoid serious personal injury, do not attempt to use this product until you have read this Owner's Manual thoroughly and understand it completely. If you do not understand the warnings and instructions in this Owner's Manual, do not use this product. Call the Toll-free Helpline ( ) for assistance. -
Page 8: Assembly And Adjustments
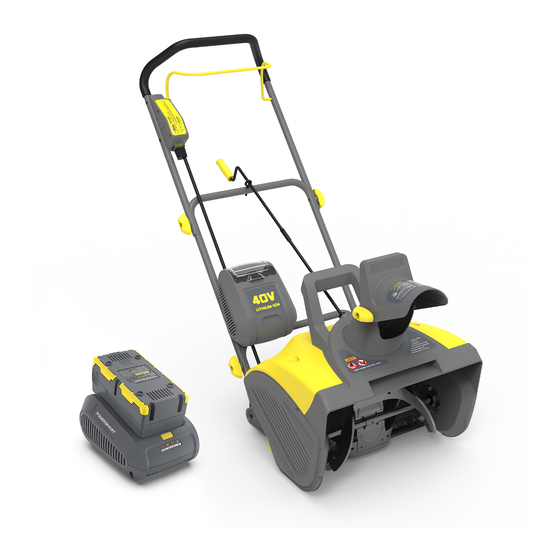
Lower frame Rubber plate Middle frame Scraper Upper frame wheel Connect line Switch housing Upper chute crank Battery holder Lower chute crank Handle bar Chute deflector Eye bolt with rubber grommet Discharge chute Discharge chute base Main cover Charger Auger Battery ASSEMBLY AND ADJUSTMENTS The following section describes steps necessary to prepare the snow thrower for use. - Page 9 3. Use the knob (CC) to secure the connection. The knob (CC) should be inserted outside of the frame. Tighten the knob just snug to the handle. NOTICE: Do Not over tighten the knob. The knob tightens as it is pivoted when clamped. If the knob is initially threaded too tight and then clamped, it will break.
- Page 10 11. Locate the upper chute crank (E) in the part bag. Remove the screw (EE) and nut (DD) from the upper chute crank (E) using a Phillips screwdriver and wrench. 12. Slide the upper chute crank (E) into the lower chute crank (F), aligning the screw holes. 13.
-
Page 11: Operating Your Snow Thrower
TO INSTALL BATTERY PACK • Open the battery compartment cover (1). • Slide the battery (2) down to lock it into position. The battery is fully inserted into the snow thrower when you hear an audible "click". • Close the battery compartment cover (1). TO REMOVE BATTERY PACK •... - Page 12 3. While holding the start switch button , pull the handle bar (P) toward you until it touches the handle . The start button must be pressed in and held before pulling the handle. Once the snow thrower starts, release the start button. To stop, release the handle bar (P) and allow the handle bar to return to the OFF position.
- Page 13 OPERATING TIPS WARNING If the Snow Thrower hits a foreign object while it is in use, the object could be thrown in the direction of the operator or a bystander. Thrown objects could cause serious personal injury. Keep the area to be cleared free of all foreign objects that may be picked up and thrown by the impeller.
-
Page 14: Maintenance
MAINTENANCE SERVICING Servicing should be performed by a qualified technician. Replacement parts for this snow thrower must be identical to the parts that they replace. If repairs are necessary, contact the toll-free helpline, at 1-800-791-9458. Note: Identify the left and right sides of the snow thrower when standing in the normal operating position. -
Page 15: Troubleshooting
TROUBLESHOOTING PROBLEM POSSIBLE CAUSE SOLUTION Make sure the bolts are correctly installed through the The handle is not in handle bars. Check to see if the hand knobs are tight. The bolts are not properly seated. position. Refer to Assembling the Handle section in this manual. Charge the battery by following the procedures in the The battery is not charged. -
Page 16: Exploded View And Part List
EXPLODED VIEW AND PARTS LIST... - Page 17 Item Stock# Description Item Stock# Description 303020242 Flange Bolt 203010948 Lower cover 203021491 Switch box compartment 303010028 Self tapping screw 303010027 Self tapping screw 203021266 Charger insert holder 203050970 Right Switch box 303010104 Self tapping screw 301100028 Switch 203010949 Bottom cover 303130112 Spring 303010104...
- Page 18 Item Stock# Description Item Stock# Description 303030032 Lock nut 203090011 Scraping snow plate 303010027 Self tapping screw 303020087 Screw 303042039 Flat washer 303042042 Flat washer 303121005 Cotter Pin 303030087 Lock nut 303010028 Self tapping screw 203010957 Right cover 203010951 Cover 303010026 Self tapping screw 303010226...
-
Page 19: Two (2) Years Limited Warranty
Limited Warranty, you must return the entire power tool product; transportation prepaid, to PowerSmart Include a legible copy of the original receipt, which lists the date of purchase (month and year) and the name of the company purchased from.
Need help?
Do you have a question about the DB2418 and is the answer not in the manual?
Questions and answers