
Related Manuals for DediProg NuProg-E2


Summary of Contents for DediProg NuProg-E2
- Page 1 DediProg User Manual 03/2021 NuProg-E2 Engineering Universal Programmer User Manual Version 1.0 © DediProg Technology Co., Ltd 2021 All rights reserved.
-
Page 2: Table Of Contents
DediProg. However, no responsibility is assumed for errors that might appear. DediProg reserves the right to make any changes to the product and/or the specification at any time without notice. No part of this document may be copied or reproduced in any form or by any means without prior written consent of DediProg. -
Page 3: Introduction
This manual will be focusing on the hardware specification and the software quick guide for NuProg-E2. NuProg-E2 is an universal engineering programmer. Widely supports most IC types on the market, and also support different types of IC packages. Designed FPGA kernel architecture supplies ultra-high speed programming performance. -
Page 4: Product Descriptions
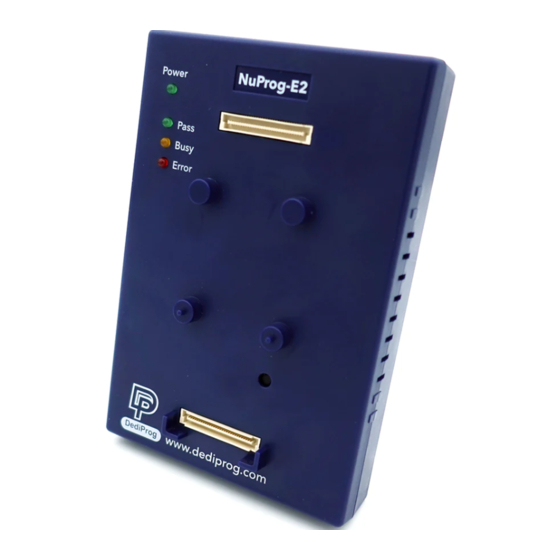
NuProg-E2 User Manual IV. Product Descriptions A. Power Signal Light E. Programming Socket Sites B. Operation Lights C. Alignment Pin D. Reset Button E. Programming Socket Sites www.dediprog.com... - Page 5 NuProg-E2 User Manual F. USB 3.0 Port G. Power Connector A. Power Signal Light The light indicates the programmer is powered on. B. Operation Lights Red LED (Error): Error; programming has failed. Yellow LED (Busy): The programmer is operating. Green LED (Pass): Passed; the programming has completed successfully.
-
Page 6: Dediware Quick Installation
NuProg-E2 User Manual V. Dediware Quick Installation The software is provided with the purchase of NuProg-E2. The latest version is available on our http://www.dediprog.com/download website. 5.1 Software Installation (DediWare version 3.16.8.3 above) 1. I nstall Dediware and driver 2. After installation, three Dediware icons will appear on the desktop. -
Page 7: Dediware (For Mcu/Flash/Eeprom)
5.3 Dediware (For MCU/Flash/EEPROM) Note It is able to create programming project file without connecting to NuProg-E2. The user can create project file on any computer that has installed Dediware. After creating the file, the user can save the file on computer for programming. - Page 8 NuProg-E2 User Manual Select IC brand and IC Part Number (or use search to find the model name) It is faster to find it by entering the IC model here 4. Load the image file www.dediprog.com...
- Page 9 NuProg-E2 User Manual 5. Set up the programming procedure and mode Other than set up Batch according to the programming need, user can also set up the Start Mode and other functions according to different kinds of IC. Click Auto Batch to start programming.
- Page 10 NuProg-E2 User Manual 6. Save/Load Programming Project File SavePrj can save the setting of Select/Load/Config,and pack to a project file(*.dprj) ; LoadPrj can load previously saved project files. Name the project file (*.npprj), once the user click ok, a window will appear for the user to set up the password for production management.
-
Page 11: Dediware (For Ufs/Emmc)
NuProg-E2 User Manual 5.4 Dediware (For UFS/eMMC) 1. Double click the software icon to open it Engineering Mode Click Detect > UFS/EMMC www.dediprog.com... - Page 12 NuProg-E2 User Manual Load the image and choose the target partition. 4. Set up programming procedure and mode Other than set up the Batch setting according to the programming need, the user can turn on the ID check function by checking the Skip Check ID box.
- Page 13 NuProg-E2 User Manual 5. Save project file After naming the file, it will create a folder at the assigned location, and it will store all the setting and content that the project file need. www.dediprog.com...
-
Page 14: Socket Adaptor Installation
The socket adapter has an alignment hole (the red circle in the picture below). Align the alignment hole with the alignment pin on the NuProg-E2 and then plug it in for use. Install the socket adaptor according to the below figure. If the connections are normal, then it is ready for programming. -
Page 15: Revision
209 E Baseline RD, Suite E208 #8, Tempe, AZ, 85283, USA Technical Support: support@dediprog.com Sales Support: sales@dediprog.com Information furnished is believed to be accurate and reliable. However, DediProg assumes no responsibility for the consequences of use of such information or for any infringement of patents or other rights of third parties which may result from its use.
Need help?
Do you have a question about the NuProg-E2 and is the answer not in the manual?
Questions and answers