Table of Contents
Advertisement
Quick Links
Advertisement
Table of Contents

Related Manuals for dispomed MODUFLEX 985-0025-000


Summary of Contents for dispomed MODUFLEX 985-0025-000
- Page 1 Imprimé au Canada...
-
Page 2: Table Of Contents
TABLE OF CONTENTS User Responsibility . . . . . . . . . . . . . . . . . . . . . . . . 3 Moduflex Scavenger Interface . -
Page 3: User Responsibility
Dispomed regional service center . • This product, or any of its parts, should not be repaired other than in accordance with written instructions provided by Dispomed and by Dispomed trained personnel . • The product may not be altered without prior written approval from Dispomed . -
Page 4: Moduflex Scavenger Interface
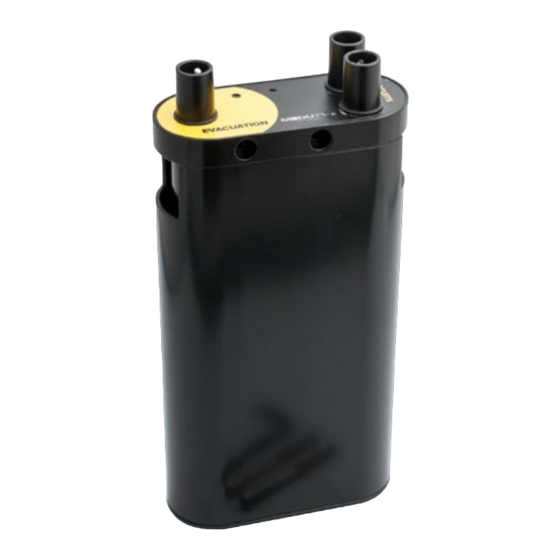
MODUFLEX SCAVENGER INTERFACE (MODEL #985-0025-000) Our gas evacuation interfaces are able to adapt to large variations in air flow, avoiding depletion of the breathing circuit bag or increased breathing resistance . Gas evacuation inlet Gas evacuation outlet Air intake Air intake 805-0985-0025... -
Page 5: Receiving And Assembly Instructions
RECEIVING AND ASSEMBLY INSTRUCTIONS SCAVENGER INTERFACE Your Moduflex Scavenger Interface requires some assembly before use . RECEIVING AND INSPECTION On receipt of your unit, inspect the shipping container and the enclosed components for signs of damage . Check your Materials List to ensure that all the necessary components are included . -
Page 6: Assembly On
ASSEMBLY ON MODUFLEX ELITE, COAXIAL AND OPTIMAX Attach the interface to the designated inserts with the screws included in the kit . Connect the evacuation of your device with Connect the evacuation hose to the evacuation hose to your anesthesia machine connection indicating “EVACUATION”... -
Page 7: Round Pole
ASSEMBLY ON ROUND POLE Installe the universal bracket (not-included) at the desired height on the anesthesia machine post . Attach the interface to the universal bracket with the screws included in the kit . Connect the evacuation of your device with Connect the evacuation hose to the evacuation hose to your anesthesia machine connection indicating “EVACUATION”... -
Page 8: Wall Mount
ASSEMBLY ON WALL Install the interface on the wall near your Connect the evacuation hose to the anesthesia machine and your evacuation connection indicating “EVACUATION” on the outlet . Use appropriate screws for your wall interface to your nearest evacuation outlet . type ( screws for wall-mount interfaces are not included in the kit) . -
Page 9: Consumable Materials List
CONSUMABLE MATERIALS LIST GAS EVACUATION TUBING 152.4cm / 5’ : # 985-0060-000 RELATED ITEMS GAS EVACUATION GAS EVACUATION VENTILATOR OUTLET # 985-0080-000 # 985-0021-000 805-0985-0025... -
Page 10: Warranty
. (5) years from the date of delivery to the Dispomed Ltd . is not responsible for deterioration, wear or abuse of this unit . customer, provided that it is used according... - Page 12 Manufactured by Dispomed ltd 745 Nazaire-Laurin Joliette (QC) Canada J6E 0L6 T : 1-800-363-1746 (Canada and U.S.A only) T : 1-450-759-9395 Fax : 1-450-759-8181 info@dispomed.com www.dispomed.com...
Need help?
Do you have a question about the MODUFLEX 985-0025-000 and is the answer not in the manual?
Questions and answers