Table of Contents
Advertisement
Quick Links
Precautions
Approved Locations
The MPG2000BBL series is approved for use in the fol-
lowing Hazardous Locations.
IS Class I Div 1 Gp ABCD
T3C Ta = –40ºC to 82ºC; T4 Ta = –40ºC to 66ºC.
CL I Zone 0 AEx/Ex ia IIC
T3 Ta = –40ºC to 82ºC; T4 Ta = –40ºC to 66ºC
Installation
4 Read these instructions before installing the gauge.
Configuration may be easier before the gauge is
installed. Contact the factory for assistance.
4 Installation instructions must be strictly followed in
compliance with Intrinsic Safety National Standard
NEC 504 or ANSI/ISA RP 12.6 and the National
Electrical Code.
4 Outdoor or wash down applications requires installa-
tion in a NEMA 4X housing.
4 Use fittings appropriate for the pressure range of the
gauge.
4 Due to the hardness of stainless steel, it is recom-
mended that a thread sealant be used to ensure leak-
free operation.
4 For contaminated media use an appropriate screen or
filter to keep debris out of gauge port.
4 Avoid permanent sensor damage! NEVER insert objects
into gauge port or blow out with compressed air.
4 Remove system pressures before removing or install-
ing gauge.
4 Install or remove gauge using a wrench on the hex fit-
ting only. Do not attempt to turn by forcing the housing.
Dimensions
2.88"
0.75"
¼" NPT
3.38"
Types of Gauges
Gauge reference reads zero with the gauge port open.
Bipolar ranges read positive pressure and vacuum in the
same units, and zero with the gauge port open.
Compound ranges read positive pressure in psig and
vacuum in inHg, and zero with the gauge port open.
Sealed reference reads zero with the gauge port open and
is referenced to 14.7 psi. Used for 1000 psi and up.
Absolute reference reads atmospheric pressure with gauge
port open and zero at full vacuum.
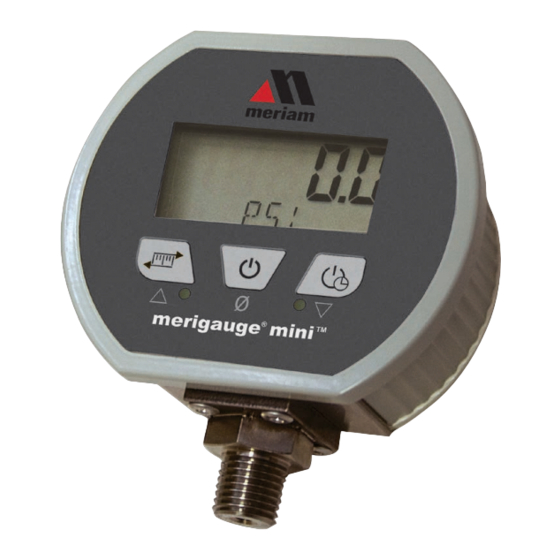
Display and Keypad
Low battery
Minus sign
88888
X X X X X
2
Units
Up
Power
Hold to zero gauge reference
ranges at start-up
MPG2000BBL D4-M2 Operating Instructions
Operation
4 Use within the pressure range indicated on gauge label.
4 Avoid permanent sensor damage! Do not apply vacu-
um to gauges not designated for vacuum operation.
4 Use only with media compatible with 316L stainless
steel.
Gauges are not for oxygen service. Accidental rupture
of sensor diaphragm may cause silicone oil inside sen-
sor to react with oxygen.
4 The MPG2000BBL series gauges must only be oper-
ated in specified ambient temperature ranges.
Maintenance
4 The non-metallic cover of the pressure gauge is con-
sidered to constitute an electrostatic discharge hazard.
Clean only with a damp cloth.
4 Batteries must be replaced when the low battery indica-
tion comes on to prevent unreliable readings.
4 WARNING: Replace batteries with approved type in
non-hazardous locations only.
4 Approved batteries are two Panasonic LR03 1.5 V
AAA alkaline cells. Replace both batteries at the same
time.
p WARNING: Substitution of batteries may impair
intrinsic safety. Improper voltages will damage the
gauge.
4 WARNING: Substitution of components may impair
intrinsic safety. Do not modify the gauge.
4 These products do not contain user-serviceable parts
except for batteries. Contact factory for repairs, ser-
vice, or refurbishment.
Operation
Power-Up
Press and hold the front button for approximately 1 second.
The display is tested, the full-scale range is indicated, the
display segments are briefly shown again, then the actual
pressure and units are displayed.
Power Up with Zero
This applies to gauge reference models only. Absolute ref-
erence gauges do not use the zero feature since they read
atmospheric pressure under normal conditions.
Be sure the gauge port is exposed to normal atmospheric
pressure and no pressure is applied. The zeroing function
is only activated at each power-up and the stored zero cor-
1.65"
rection is erased when the gauge is shut off.
Press and hold the front button. The display is tested.
Continue to press the button until oooo is displayed.
Release the button. The gauge in now zeroed.
The display is tested, the full-scale range is indicated, the
display segments are briefly shown again, then the actual
pressure and units are displayed.
Attempting to zero the gauge with greater than approxi-
mately 3% of full-scale pressure or vacuum applied will
result in an error condition, and the display will alternately
indicate Err 0 and the actual measured pressure. The
gauge must be powered down to reset the error condition.
Normal Operation
The display indicates the pressure reading updated approxi-
mately 3 times per second. The auto shutoff timer starts
when the gauge is powered up or whenever a button is
pushed, unless the shutoff time was set for on/off operation.
Numeric display
If excessive vacuum is applied to a pressure-only gauge,
the display will indicate -Err until the vacuum is released.
Alpha-numeric
Applying vacuum to a gauge designed for pressure may
display
damage the pressure sensor.
If excessive pressure is applied (112.5% over range), an
Shut off time
out-of-range indication of I – – – or I.–.–.– will be dis-
Down
played depending on model.
Display Backlighting
Display backlighting will operate for one minute when a
button is pressed provided the front light sensor detects
low ambient light levels. The red LED backlighting may
not be apparent under some lighting conditions.
Battery Replacement
A low battery indication (either LOBAT or the symbol
depending on the model) will be shown in the upper
left-hand corner of the display when the battery voltage
falls sufficiently. The batteries should be replaced when
the indicator comes on or unreliable readings may result.
WARNING: Replace batteries with approved type in
non-hazardous locations only. Replace batteries with two
Panasonic LR03 1.5 V AAA alkaline cells.
Replace both batteries with new ones at the same time.
Do not mix different types of batteries. Substitution of
components may impair intrinsic safety.
1. Remove the 6 Phillips
screws on the back of
the unit.
2. Remove batteries by
lifting up the posi-
tive end of the battery
(opposite the spring)
taking care not to bend
the spring.
3. Discard old batteries
properly, do not dis-
card into fire, sources
of extreme heat, or in any hazardous manner.
4. Install batteries with correct orientation. The negative
(flat) end of each battery should be inserted first facing
the battery holder spring.
5. Replace the back cover, including the rubber gasket.
DS-MPG2000BBL rev. 01-15
Operation—continued
Minimum and Maximum Readings
Gauges are configured with minimum and maximum
capture enabled. One or both can be enabled or disabled
in the User Configuration mode.
Minimum and maximum readings are continuously stored
and updated whenever the gauge is on. The stored read-
ings can be manually cleared if desired. The MAX and
MIN memory can be configured to save or clear the read-
ing whenever the gauge is off.
Press and hold the center button for about 1 second until
MAX is displayed alternating with the units. The maxi-
mum reading will be continuously updated. The gauge
may be left in this mode.
After MAX is displayed, press and hold the center button
for about 1 second until MIN is displayed alternating with
the units. The minimum reading will be continuously
updated. The gauge may be left in this mode. If excessive
vacuum is applied to a pressure-only gauge while in this
mode, the display will indicate -Err until the MAX/MIN
readings are cleared.
After MIN is displayed, press and hold the center but-
ton again for about 1 second until * * * * is displayed.
The MAX and MIN memory is not erased and the gauge
returns to normal operation.
Press and continue to hold the center button until the
display indicates clr MX/MN (about 3 seconds total) and
then release the button. Both maximum and minimum
values are cleared and the gauge returns to the normal
mode and displays the current pressure.
Shut-Down
To shut off the gauge manually at any time, press and hold
the center button until the display indicates OFF (about 5
seconds) and then release.
When an auto shutoff timer is used, the display indicates
OFF five seconds prior to auto shutoff. A button can be
pressed to keep the gauge on. The auto shutoff and back-
light (if equipped) timers are reset whenever a button is
pressed and released.
If the gauge is set up without auto shutoff (on/off opera-
tion) it will stay on until manually shut off or until the
batteries are depleted. Turn gauge off when not in use to
conserve batteries.
Two
AAA
batteries
Advertisement
Table of Contents

Subscribe to Our Youtube Channel
Related Manuals for Meriam MPG2000BBL Series


Summary of Contents for Meriam MPG2000BBL Series
- Page 1 Operation A low battery indication (either LOBAT or the symbol The MPG2000BBL series is approved for use in the fol- 4 Use within the pressure range indicated on gauge label. depending on the model) will be shown in the upper lowing Hazardous Locations.
- Page 2 MPG2000BBL D4-M2 Configuration Instructions Engineering Unit Selection User Configuration: Pass Code Entry Changing the Pass Code The selected engineering unit is stored in non-volatile The factory default is 3510, but this may be changed by User-defined pass code configuration allows changing of memory and will be retained even with the gauge off or the user under the Pass Code Configuration section.
- Page 3 Cleveland · Ohio Continue to the Calibration Mode section. 44102 1-216-928-1100 1-800-817-7849 Sales@Meriam.com www.Meriam.com Meriam® maintains a constant effort to upgrade and improve its products. Specifications are subject to change without notice. Consult factory for your specific requirements.
Need help?
Do you have a question about the MPG2000BBL Series and is the answer not in the manual?
Questions and answers