Table of Contents
Advertisement
Advertisement
Table of Contents

Related Manuals for Braaap CRUISER400


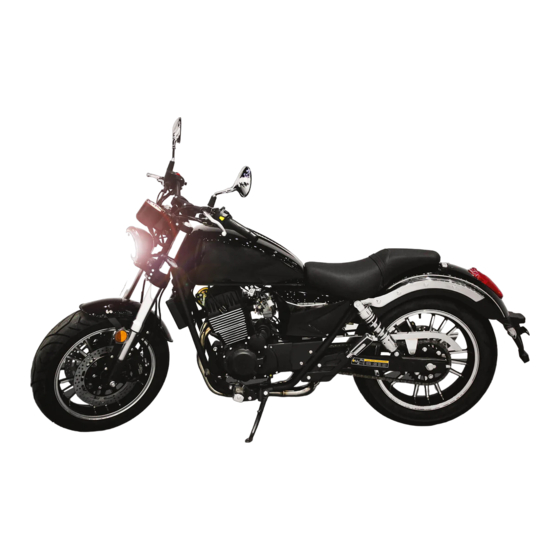
Summary of Contents for Braaap CRUISER400
-
Page 2: Table Of Contents
Table of Contents Foreword ......................................................- 5 - Important Information ..................................................- 6 - User’s Notice ...................................................... - 7 - Accessories and Safety Roles ................................................. - 7 - Safe Riding ..................................................... - 7 - Safe Riding Continued ................................................... - 8 - Operation ...................................................... - Page 3 Rear Brake Pedal ..................................................- 22 - Running in Period ..................................................... - 23 - How to run your Cruiser400 in properly: ............................................. - 23 - Circulate the engine before riding hard............................................- 23 - Perform the first but also the most important maintenance....................................... - 23 - Tips for Riding ....................................................
- Page 4 Cruiser400 Specifications ................................................- 34 - ABS Fault Codes, Cruiser400 ................................................- 37 - Maintenance Record Keeping ................................................- 38 - Logbook......................................................- 39 - Additional Cruiser400 Specs, Features, and Equipment not covered in the User Manual ............................... - 40 - - 4 -...
-
Page 5: Foreword
It is engineered for fun and designed to make you want to say ‘braaap’ every time you ride! Riding is one of the most exciting experiences. For the best performance from your Cruiser400 become very familiar with the rules and demands suggested in the manual before riding. -
Page 6: Important Information
Important Information This document will take you through the features of the Cruiser400. It is designed so that once it has been read, the new rider will have a good understanding of how to operate this motorcycle. Using this manual: The manual generally splits pages into two columns. -
Page 7: User's Notice
User’s Notice Accessories and Safety Roles You can select various kinds of accessories to add to your Cruiser400, but improper assembly may bring about danger and damage. We have listed The installation of accessories must not restrict the rider's operation of some instructions to help you select the right accessories and aid you through the motorcycle. -
Page 8: Safe Riding Continued
Your riding skills and knowledge of the structure of this motorcycle are the basis of safe riding. Practice riding in an open area without other vehicles when first getting used to the Cruiser400. Get to know your speed limit for safe riding The motorcycles' safety speed depends on the ground condition and your riding skills. -
Page 9: Operation
Operation Left side legend 1: Headlight 2: Left indicator light 3: Gear shift pedal 4: Riders left foot peg 5: Side Stand 6: Chain 7: Passengers left foot peg 8: Left rear indicator 9: Mirrors 10: Clutch 11: Display 12: Petrol tank and fuel cap - 9 -... - Page 10 Operation Right side legend 1: Handbrake 2: Front right indicator 3: Rear brake pedal 4: Adjustable suspension 5: Exhaust mufflers 6: Rear right indicator 7: Taillight 8: Passenger’s seat 9: Rider’s seat - 10 -...
-
Page 11: Operation
Operation Display Display legend ** Photos used may alter the colour or brightness of the appearance of the 1: Left and right indicators display. 2: ABS brake system indicator 3: Engine temperature indicator 4: Fuel indicator 5: RPM 6: Speedometer 7: Odometer 8: Gear indicator 9: Tripmeter (You will be shown... -
Page 12: Description Of The Display Features
Left and right indicators (1) Odometer (8) Indicators will flash on the display while the indicator is activated. The odometer shows the lifetime distance the Cruiser400 has travelled. This ABS brake system indicator (2) cannot be changed. The indicator will display each time you first start the bike. The indicator will Gear indicator (9) disappear shortly after riding begins. -
Page 13: Changing The Display Settings
Changing the display Changing the display colour settings The display colour can be changed on the Cruiser400. There are multiple different colours to choose from. Each new colour fills the whole display. The control button on the left-hand side of the display is used to change features on the display. -
Page 14: Trip Meter
Oil Light To access the trip meter, press the control button once. It will change the The oil light, as seen on page 9, will display every 1000 km. The Cruiser400 display from KM to TRIP as pictured below. needs an oil change every 3000-4000 km. If the oil light is displayed and it... -
Page 15: Features
Features Turn Signal Indicator Switch (6) When the turning switch is pushed to the left, the left indicator Left Handlebar will flash. When the turning switch is pushed to the right, the right indicator will flash. To turn off the indicator, press the indicator button in. -
Page 16: Right Handlebar
The starter button cranks the motor, turning it over to get it started. The started button must be used to get the bike to start after turning the ignition The kill switch will kill the engine if running and cause the Cruiser400 not to start if engaged. -
Page 17: Brake Lever Distance Adjuster
Brake fluid is a hydraulic fluid used in hydraulic brakes. It transfers brake lever sits from the handlebar. force into pressure to amplify braking force. The Cruiser400 has two brake fluid indicators on the bike. One on the handlebars and one on the right-hand side of the bike. Front handlebars... - Page 18 The brake fluid indicator found on the right-hand side of the bike, indicates the brake fluid levels for the rear brakes. Highest level of brake fluid Lowest level of brake fluid To fill the front brake fluid, undo the screws on either side of the cap and fill with dot4 - 18 -...
-
Page 19: Ignition Switch
What is included in the toolkit: Keys Screwdriver handle Screwdriver: Phillips The Cruiser400 comes with two keys as pictured below. The owner head is given a spare in the event one key gets lost. 10 & 12mm spanner 14 & 17mm spanner... -
Page 20: Fuel Cap
Reserve Position (Arrow Facing Down) The reserve tank contains 2L’s of petrol. If you run out of petrol in the main Fuel Cap: tank, there is a reserve. Arrow facing down to access this. To remove the fuel cap, insert the key and turn clockwise. Pull the fuel cap back towards the rider’s seat to open. -
Page 21: Main Tank Position (Up)
To shift down gears, decrease your speed before engaging the clutch. This method can avoid unnecessary wear of transmission parts and rear wheel. Kick Starter The Cruiser400 does NOT come with a kick starter. It is an electric start engine only. - 21 -... -
Page 22: Steering Lock
Steering Lock Rear Brake Pedal The brake pedal is found on the right-hand side of the bike, in front of the To lock steering, turn the front wheel to left, then insert the key into the rider’s foot peg. This foot pedal will activate the break on the rear wheel. ignition and turn the key anti-clockwise (left) to the lock symbol. -
Page 23: Running In Period
Running in Period Running in the Cruiser400 is vital to the overall health and longevity of the bike. The first 1000kms is the most important period for properly running in the Cruiser400. Running-in Speed control (km/h) Properly running in your Cruiser400 will impose stress on every... -
Page 24: Tips For Riding
Tips for Riding Engine start Caution: Check the engine oil. Make sure the bike is in the neutral position and After the engine is started, release the button immediately. Holding the start button the side stand is UP. after the bike has started and is idling can cause significant damage to the bike The bike will not start with the stand down Prevent excessive draining of your battery - after pressing the starter button for 5 Let the motorcycle be supported... -
Page 25: Riding The Cruiser400
You should shift gears quickly to avoid losing momentum. Safely Parking your Cruiser400 When driving down hills shift the engine to low gear to facilitate braking. The motorcycle should be parked on firm ground. -
Page 26: Pre-Riding Inspection
Pre-riding Inspection Inspection Objective Smooth 2) No operation restrictions 3) good clearance Steering 1) Free travel of pedal and lever 2) No "spongy" state 3) Brake Brake reliable Tire 1) Correct pressure 2) Suitable tread 3) no cuts F: 32PSI. R: 34PSI There is enough fuel to ride the planned distance. -
Page 27: Inspection And Maintenance
Inspection and maintenance Note: “*” Should be serviced by an authorised mechanic workshop unless the owner The periodic table of maintenance and repair has special tools, service material and is mechanically qualified. Please inspect and maintain your motorcycle periodically to ensure safe Clean more frequently when riding in dusty or wet conditions. -
Page 28: Service Manual
Odometer reading R(km) 1000 4000 8000 12000 Service Manual Fuel lines Fuel Filter Throttle operating Air Filter Washable foam plug D8EA x2 Spark Choke Operation Mineral or semi-synthetic Engine oil Brake fluid Dot 4. Oil Filter Replaceable Carburetor Chain Clean and lubricate every 500km. Batten Brake Pads Cables and hoses... -
Page 29: Parts, Usage, And Replacements
Parts, Usage, and Coolant Replacements Never remove the radiator cap with a hot engine. Check the coolant level, cold, by removing the cap. The level should be the Air Filter top of the neck, top up if necessary. The Air Filter is a washable foam filter within the air box. If the air filter is covered by dust, the inhaling resistance will increase, and the output power will decrease. -
Page 30: Carburetor
The bottle under the coolant tank is purely an overflow and need NOT be Brakes and brake fluid topped up. Check the brakes and brake fluid after the initial 1000km and then every 3000 km. Spark plug The spark plug gap between the two electrodes is 0.6-0.7mm. Replace the spark every 8000km The spark plug is D8EA Battery... -
Page 31: Engine Oil Level
Engine oil level Replacement Engine Oil Before starting the engine, make sure to check the engine oil level. At the first service, the oil and oil filter will be changed. It needs to be checked and replace every 4000 km thereafter. If the level is low, you should add the recommended engine oil. -
Page 32: Adjustment Of Clutch
There should be always 3mm free play at the lever. You need to adjust the clutch with the clutch cable adjuster. There are two clutch cable adjusters on the Cruiser400. The first is located to the right of the clutch lever on the left handlebar. -
Page 33: Throttle Cable Adjustment
Throttle cable adjustment Loosen the lock nut. Turn the adjuster to adjust the clearance so that the choke lever is in the range of 5—10mm Fasten the lock nut again after the adjustment is done. If your bike won’t start If the engine cannot be started, please make the following checks: Is there enough fuel in the tank? You can check fuel levels in the carburetor by draining the bowls by turning... -
Page 34: Cruiser400 Specifications
Cruiser400 Specifications Twin cylinder water cooled 4 Engine model 160kg Net weight Stroke Fuel Filter Working volume 382cc Inline Froe:110/70-17 Starting model Tire specification Electrical Rear:150/70-17 Wet multi-plate Clutch Fuel tank capacity Pressure-splash No.90 and above lead-free Lubrication model Fuel... - Page 35 Frequently Asked Questions Fuel: Regular 91 Oil: 10W / 40 Mineral or Semi Synthetic Motorcycle Oil Quantity 2 litres OIL Filter: Replaceable (braaap and KN equivalent) Airlifter: Washable Foam filter within the airbox Wheel Bearings: Front 6302 Rear 6303 Choke: Is located on Left hand Grip.
- Page 36 Frequently Asked Questions Warm start: No throttle NO choke Once started THEN rev it Fuel Cap: Click it to lock it Steering Lock: left hand lock push it down and turn it to its max. Side stand: Side stand (Note: bike won’t start if side stand is down, or bike is in GEAR) Kill Switch: Kill switch is on right hand block, please ensure Kill switch is not engaged if wanting to start bike.
-
Page 37: Abs Fault Codes, Cruiser400
ABS Fault Codes, Cruiser400 Fault Flash Times Check and repair change ECU control box Internal power supply failure of front rim sensor change ECU control box Internal power supply failure of rear rim sensor 2-1 2-2 2-1 to 2-4, the front pressure maintaining, the front pressure... -
Page 38: Maintenance Record Keeping
Maintenance Record Keeping - 38 -... -
Page 39: Logbook
Logbook SERVICE DATE MECHANIC KM OR TIME FROM PURCHASE SERVICE INTERVAL OR TO BE SIGNED MAINTENANCE PERFORMED Mechanic Owner 800/1000KM 4000KM 7000KM 10,000KM 13,000KM 16,000KM 19,000KM - 39 -... -
Page 40: Additional Cruiser400 Specs, Features, And Equipment Not Covered In The User Manual
Additional Cruiser400 Specs, Features, and Equipment not covered in the User Manual Visit the Braaap support website here: https://support.braaapmotorcycles.com/hc/en- au/sections/4418233393049-Cruiser-400- - 40 -...
Need help?
Do you have a question about the CRUISER400 and is the answer not in the manual?
Questions and answers