Table of Contents
Advertisement
Quick Links
Advertisement
Table of Contents

Related Manuals for Elation KL FRESNEL 6


Summary of Contents for Elation KL FRESNEL 6
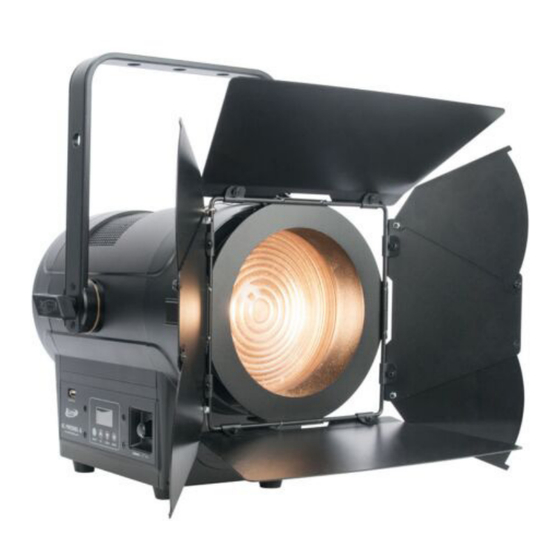
- Page 1 KL FRESNEL 6 User Manual...
- Page 2 ©2022 ELATION PROFESSIONAL all rights reserved. Information, specifications, diagrams, images, and instructions herein are subject to change without notice. ELATION PROFES- SIONAL logo and identifying product names and numbers herein are trademarks of ELATION PROFESSIONAL. Copyright protection claimed includes all forms and matters of copyrightable materials and information now allowed by statutory or judicial law or hereinafter granted.
-
Page 3: Table Of Contents
TA B L E O F C O N T E N T S General Information Limited Warranty (USA Only) Safety Guidelines Maintenance Guidelines Overview Installation Guidelines Remote Device Management (RDM) Control Panel System Menu Dimmer Curve Modes Manual Dimming Control DMX Traits Specifications Dimensional Drawings... -
Page 4: General Information
Barn Door (x1) Gel Frame (x1) Power Cable (x1) CUSTOMER SUPPORT Contact ELATION Service for any product related service and support needs. Also visit forums.elationlighting.com with questions, comments or suggestions. ELATION SERVICE USA - Monday - Friday 8:00am to 4:30pm PST 323-582-3322 | Fax 323-832-9142 | support@elationlighting.com... -
Page 5: Limited Warranty (Usa Only)
If the requested repairs or service (including parts replacement) are within the terms of this warranty, Elation Professional will pay return shipping charges only to a designated point within the United States. If any product is sent, it must be shipped in its original package and packag-ing material. -
Page 6: Safety Guidelines
This fixture is a sophisticated piece of electronic equipment. To guarantee a smooth opera- tion, it is important to follow all instructions and guidelines in this manual. Elation Profes- sional is not responsible for injuries and/or damages resulting from the misuse of this fixture due to the disregard of the information printed in this manual. - Page 7 S A F E T Y G U I D E L I N E S • DO NOT TOUCH the fixture housing during operation. Turn OFF the power and allow ap- proximately 15 minutes for the fixture to cool down before servicing. •...
-
Page 8: Maintenance Guidelines
Regular inspections are recommended to ensure proper function and extended life. There are no user serviceable parts inside this fixture. Please refer all other service issues to an autho- rized Elation service technician. Should you need any spare parts, please order genuine parts from your local Elation dealer. -
Page 9: Overview
O V E R V I E W Fuse USB Software Update Port Power In OLED Control Menu Display Power Out 10. Mode Button 5pin DMX In 11. Up Button 5pin DMX Out 12. Down Button 3pin DMX In 13. Enter Button 3pin DMX Out 14. -
Page 10: Installation Guidelines
I N S TA L L AT I O N G U I D E L I N E S FLAMMABLE MATERIAL WARNING Keep fixture minimum 5.0 feet (1.5m) away from flammable materials and/or pyro- technics. ELECTRICAL CONNECTIONS A qualified electrician should be used for all electrical connections and/or installa- tions. - Page 11 I N S TA L L AT I O N G U I D E L I N E S GEL FRAME AND BARN DOOR INSTALLATION The fixture has 2 slots on the front to hold the GEL FRAME and BARN DOOR. The first smaller slot is for the GEL FRAME and the second larger slot is for the BARN DOOR.
- Page 12 I N S TA L L AT I O N G U I D E L I N E S CLAMP INSTALLATION When mounting the fixture to truss, be sure to secure an appropriately rated professional grade rigging clamp to the fixture using an M10 screw fitted through one of the 3 holes of the yoke bracket.
- Page 13 I N S TA L L AT I O N G U I D E L I N E S RIGGING Overhead rigging requires extensive experience, including calculating working load limits, knowledge of installation material being used, and periodic safety inspection of all instal- lation material and the fixture, among other skills.
-
Page 14: Remote Device Management (Rdm)
R E M O T E D E V I C E M A N A G E M E N T ( R D M ) NOTE: In order for RDM to work properly, RDM enabled equipment must be used through- out the entire system, including DMX data splitters and wireless systems. -
Page 15: Control Panel
C O N T R O L P A N E L The fixture includes an easy to navigate system menu. The control panel (see image below) is located on the side of the fixture and provides access to the main system menu, where all nec- essary system adjustments canbe made. -
Page 16: System Menu
S Y S T E M M E N U ELATION KL FRESNEL 6 SYSTEM MENU Supports Software Versions: 1.02 and up Features subject to change without notice. Rotation direction (clockwise/counter-clockwise) and control of effects depend on head orientation and pan/tilt settings. - Page 17 Man Ctrl Dimmer, Strobe Test functions SYSTEM MENU UPDATE WITH SOFTWARE VERSION 1.06 AND UP ELATION KL FRESNEL 6 SYSTEM MENU Supports Software Versions: 1.06 and up Features subject to change without notice. Rotation direction (clockwise/counter-clockwise) and control of effects depend on head orientation and pan/tilt settings.
- Page 18 S Y S T E M M E N U SYSTEM MENU UPDATE WITH SOFTWARE VERSION 1.08 AND UP ELATION KL FRESNEL 6 SYSTEM MENU Supports Software Versions: 1.08 and up Features subject to change without notice. Rotation direction (clockwise/counter-clockwise) and control of effects depend on head orientation and pan/tilt settings.
- Page 19 S Y S T E M M E N U 900 Hz, 1000 Hz, 1100 Hz, 1200 Hz, 1300 Frequen Hz, 1400 Hz, 1500 Hz, 2500 Hz, 4000 Hz, Set LED refresh frequency 5000 Hz, 10 KHz, 15 KHz, 20 KHz, 25 KHz FUNCTION Software update port - con- USB Data...
-
Page 20: Dimmer Curve Modes
D I M M E R C U R V E M O D E S Select desired DIMMER MODE (Standard, Stage, TV, Architectural, Theatre, Stage2). Note: STAGE 2 DIMMING CURVE MODE ADDED WITH SOFTWARE UPDATE VERSION ≥1.06. -
Page 21: Manual Dimming Control
M A N U A L D I M M I N G C O N T R O L FEATURE IS DISABLED WHEN DMX INPUT CABLE IS CONNECTED TO FIXTURE! TO USE MANUAL DIMMING KNOB, DISCONNECT DMX CABLE IF CONNECTED. Follow steps below to enable manual DIMMING control knob. -
Page 22: Dmx Traits
D M X T R A I T S ELATION KL FRESNEL 6 DMX CHANNEL TRAITS Supports Software Versions: 1.02 and up Features subject to change without notice. CHANNEL FUNCTION VALUES 000 - 255 Dimmer Intensity, 0% to 100% 000 - 255 Dimmer Intensity Fine... - Page 23 D M X T R A I T S DMX TRAITS UPDATE WITH SOFTWARE VERSION 1.06 ELATION KL FRESNEL 6 DMX CHANNEL TRAITS Supports Software Versions: 1.06 and up Features subject to change without notice. CHANNEL FUNCTION VALUES 2-2CH 2-3CH...
- Page 24 D M X T R A I T S DMX TRAITS UPDATE WITH SOFTWARE VERSION 1.08 ELATION KL FRESNEL 6 DMX CHANNEL TRAITS Supports Software Versions: 1.08 and up Features subject to change without notice. CHANNEL FUNCTION Dimmer VALUES Dimmer...
- Page 25 D M X T R A I T S CHANNEL FUNCTION Dimmer VALUES Dimmer 16bit Dimmer Delay Times (continued) 7.0s 8.0s 9.0s 10.0s 142 - 255 Default LED Refresh Rate (hold values for 5 sec to set LED refresh rate) 000 - 100 Idle 101 - 105 900 Hz 106 - 110 1000 Hz...
-
Page 26: Specifications
S P E C I F I C AT I O N S SOURCE 150W >95CRI 3,000K Warm White LED 50,000 Hour Average LED Life* *May vary depending on several factors including but not limited to: Environmental Conditions, Power/Voltage, Usage Patterns (On-Off Cycling), Control, and Dimming. PHOTOMETRIC DATA 6,500+ Total Lumen Output 17,829 LUX 1,656 FC @6.6’... -
Page 27: Dimensional Drawings
D I M E N S I O N A L D R A W I N G S... -
Page 28: Optional Accessories | Fcc Statement
O P T I O N A L A C C E S S O R I E S ORDER CODE ITEM QUICK RIG CLAMP Low Profile Quick Release Clamp AC3PDMX5PRO 5 ft (1.5m) 3pin DMX Cable AC5PDMX5PRO 5 ft (1.5m) 5pin DMX Cable NEU088 3 ft (1m) Power Cable Please note that additional DMX cable and power cable lengths are available. - Page 29 This page has intentionally been left blank.
Need help?
Do you have a question about the KL FRESNEL 6 and is the answer not in the manual?
Questions and answers