Table of Contents
Advertisement
Quick Links
Advertisement
Table of Contents

Related Manuals for Zotac ZBOX PRO ZP-CI342


Summary of Contents for Zotac ZBOX PRO ZP-CI342
- Page 2 ZOTAC. Products and corporate names mentioned in this manual may be registered trademarks or copyrights of their respective companies, and are used for identification purposes only.
-
Page 3: Table Of Contents
Table of Contents Product specifications ----------------------------------------------------------------------------------------3 Safety information ----------------------------------------------------------------------------------------------4 Setting up your system -------------------------------------------------------------------------------------4 Care during use ----------------------------------------------------------------------------------------------4 Welcome -----------------------------------------------------------------------------------------------------------5 Package contents -------------------------------------------------------------------------------------------5 Getting to know your ZP-CI342 ----------------------------------------------------------------------------6 Front view -----------------------------------------------------------------------------------------------------6 Rear view ------------------------------------------------------------------------------------------------------7 Customizing the ZP-CI342 -----------------------------------------------------------------------------------9 Installing a memory module -------------------------------------------------------------------------------10 Removing the memory module --------------------------------------------------------------------------11 Installing M.2 SSD 2242 / 2280 module ---------------------------------------------------------------12 Setting up your ZP-CI342 ------------------------------------------------------------------------------------14... -
Page 4: Table Of Contents Product Specifications
Specifications Microprocessor Support • Intel Pentium N6415 (1.2GHz/3.0GHz, 1.5MB cache) Onboard Graphics Support • Integrated Intel UHD Graphics • HDMI 2.0 (max resolution: 4096x2160 @60Hz) • DP 1.2 (max resolution: 4096x2160 @60Hz) Memory • 2x DDR4-3200 SO-DIMM slot • Max 32GB USB Ports •... -
Page 5: Safety Information
Safety instructions ZP-CI342 is designed and tested to meet the latest standards of safety for information technology equipment. However, to ensure your safety, it is important that you read the following safety instruc- tions. Read and follow all instructions in the documentation before you operate your system. ™... -
Page 6: Welcome
Welcome Congratulations on your purchase of the ZP-CI342. The following illustration displays the package contents of your new ZP-CI342. If any of the below items are damaged or missing, contact your retailer. Package contents • 1 x ZP-CI342 • 1 x L-mount kit with 4 screws •... -
Page 7: Getting To Know Your Zp-Ci342
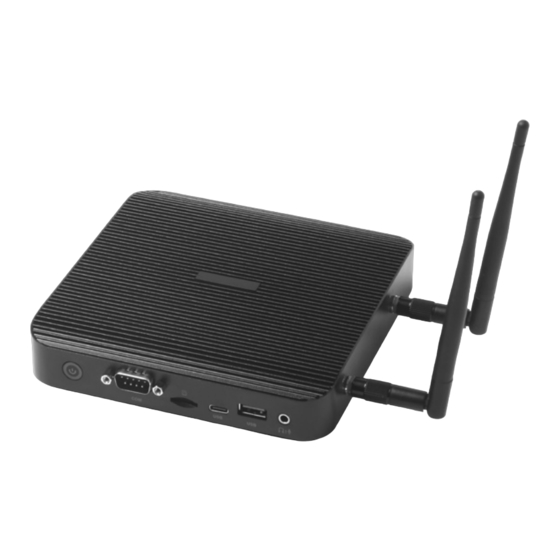
Getting to know your ZP-CI342 Front view Refer to the diagram below to identify the components on the front of the system. 1. Power button with LED indicator The power button turns the system ON and OFF. (Green=on, Red=standby) 2. COM port Use the COM port to connect serial devices such as mouse or fax/modem. -
Page 8: Rear View
Rear view Refer to the diagram below to identify the components on the back of the system. 1. Ethernet ports The eight-pin RJ-45 LAN port supports standard Ethernet cable for connections to local area networks (LAN) with speeds of 10/100/1000Mbps. 2. - Page 9 Right view Refer to the diagram below to identify the components on the right of the system. 1. WiFi antenna connectors The WiFi antenna connector supports the included WiFi antenna.
-
Page 10: Customizing The Zp-Ci342
Customizing the ZP-CI342 Before installing hardware, please follow the instructions below to remove the cover of your ZP-CI342. 1. Loosen the 4 screws securing the bottom cover. 2. Remove the bottom cover. -
Page 11: Installing A Memory Module
Installing a memory module 1. Locate the SO-DIMM memory slots and insert a SO-DIMM memory module into the slot at a 45 degree angle. 2. Gently press down on the memory module until it locks into place by the arms of the memory slot. -
Page 12: Removing The Memory Module
Removing the memory module 1. Locate the SO-DIMM memory slot and gently press the two arms securing the memory module outwards, as shown in the image below, to release the memory module. 2. Remove the memory module from the slot. -
Page 13: Installing M.2 Ssd 2242 / 2280 Module
Installing M.2 SATA SSD 2242/2280 module 1. Locate the M.2 SSD slot and remove the screw. 2. Insert an M.2 SATA SSD module into the slot at a 45 degree angle. M.2 SATA SSD 2242: M.2 SATA SSD 2280: 3. Attach the screw to the M.2 SATA SSD module as shown below. M.2 SATA SSD 2242: M.2 SATA SSD 2280:... - Page 14 4. Gently press down on the M.2 SATA SSD module, and install the screw on board. M.2 SATA SSD 2242: M.2 SATA SSD 2280: Note: PLUS/ Windows models include SSD pre-installed.
-
Page 15: Setting Up Your Zp-Ci342
Setting up your ZP-CI342 Please connect your peripherals before using your ZP-CI342 1. Connecting to a network device Connect one end of a network cable to the LAN port on the system rear panel and the other end to a network hub, switch or router. 2. - Page 16 4. Connecting to an HDMI display Connect one end of an HDMI cable to an HDTV or monitor, and the other end to the HDMI port on the system rear panel. 5. Connecting the power adapter and turning on the ZP-CI342 Connect the supplied AC adapter to the DC IN jack on the system rear panel and then press the power switch on the front panel to turn on the system.
-
Page 17: Positioning The Zp-Ci342
You can attach your ZP-CI342 to the back of a VESA75/100 compliant monitor. 1. Secure the VESA mount brackets to the bottom cover using 4 screws. Disclaimer: ZOTAC cannot be held liable for damages resulting from an improper installation. 2. Install the VESA mount attachment pegs to the LCD monitor. - Page 18 3. Align the ZP-CI342 mounting holes to the VESA mount attachment pegs, and gently press down to secure it to the mount. 4. Connect the ZP-CI342 to your LCD monitor with an HDMI/DP cable.
-
Page 19: Installing Drivers And Software
Installing drivers and software Installing an operating system The ZP-CI342 does not ship with an operating system preinstalled. The user must install the operating system before the ZP-CI342 can be used. The following operating systems are supported: • Windows 10/ 11 •... -
Page 20: Using Your Zp-Ci342
• Intel Graphics Driver • Realtek Ethernet PCI-E Driver • Wireless Network Driver • Bluetooth Driver • Intel Management Engine • CardReader Driver • Intel HID Driver • Intel SerialIO Each driver must be installed individually to ensure proper operation of the ZP-CI342 . Select the driver you want to install. -
Page 21: Configuring Audio Output
Configuring audio output Follow the steps below to enable audio output when connecting the ZP-CI342 to a TV or receiver via DP/ HDMI adapter. Access the Sound settings via the system Control Panel. Under Playback devices, click the display device that corresponds with your audio compatible display.
Need help?
Do you have a question about the ZBOX PRO ZP-CI342 and is the answer not in the manual?
Questions and answers