Table of Contents
Advertisement
Quick Links
Advertisement
Table of Contents

Related Manuals for Zotac ZBOX PRO ZP-QK7P3000


Summary of Contents for Zotac ZBOX PRO ZP-QK7P3000
- Page 2 ZOTAC. Products and corporate names mentioned in this manual may be registered trademarks or copyrights of their respective companies, and are used for identification purposes only.
-
Page 3: Table Of Contents
Table of Contents Specifications ----------------------------------------------------------------------------------------------------3 Safety instructions----------------------------------------------------------------------------------------------5 Package contents -----------------------------------------------------------------------------------------------6 Getting to know your ZP-QK7P3000 ----------------------------------------------------------------------7 Front view -----------------------------------------------------------------------------------------------------7 Rear view ------------------------------------------------------------------------------------------------------8 Installing hardware inside ZP-QK7P3000 ---------------------------------------------------------------9 Installing an M.2 SSD module ----------------------------------------------------------------------------10 Installing a memory module -------------------------------------------------------------------------------12 Installing a hard disk drive ---------------------------------------------------------------------------------13 Installing the L-shaped mountings ------------------------------------------------------------------------16 Installing your ZP-QK7P3000 to a monitor -------------------------------------------------------------17 Setting up your ZP-QK7P3000 ------------------------------------------------------------------------------18... -
Page 4: Specifications
Specifications Microprocessor Support • 7th gen Intel Core i7-7700T Quad-core 2.9GHz/3.8GHz, 6MB cache, 35W TDP Operating Systems • Support Windows 10 64-bit; Ubuntu Linux 16.04 LTS Onboard Graphics Support • NVIDIA Quadro P3000 MXM w/6GB GDDR5 • 4x HDMI2.0 (max resolution: 3840x2160 @60Hz) System Memory Support •... -
Page 6: Safety Instructions
Safety instructions ZP-QK7P3000 is designed and tested to meet the latest standards of safety for information technology equipment. However, to ensure your safety, it is important that you read the following safety instructions. Read and follow all instructions in the documentation before you operate your system. ™... -
Page 7: Package Contents
Package contents Thank you for choosing our ZP-QK7P3000. The following illustration displays the package contents of your new ZP-QK7P3000. If any of the below items is damaged or missed, contact your retailer. • 1 x ZP-QK7P3000 • 1 x L-shaped mounting kit •... -
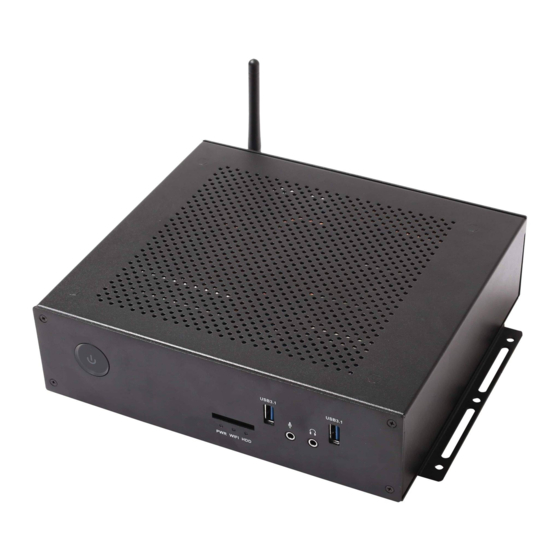
Page 8: Getting To Know Your Zp-Qk7P3000
Getting to know your ZP-QK7P3000 Front view 1. Power button The power button turns the system ON and OFF. 2. Power LED The Power LED is always ON when power is on. 3. WiFi LED The WiFi LED blinks when data is being transfered over WiFi. 4. -
Page 9: Rear View
Rear view 1. COM port Use the COM port to connect serial devices such as mouse or fax/modem. 2. Power input (DC19.5V) The supplied power adapter converts AC power to DC power for use with this power port. To prevent damage to the mini-PC, always use the supplied power adapter. 3. -
Page 10: Installing Hardware Inside Zp-Qk7P3000
Installing hardware inside ZP-QK7P3000 Before installing hardware, please follow the instructions below to remove the cover of your ZP-QK7P3000. 1. Remove the four thumb screws of bottom cover. 6. Hold the bottom cover with two hands, and lift it up as shown below. -
Page 11: Installing An M.2 Ssd Module
Installing an M.2 SSD module 1. Locate the M.2 SSD slot and remove the screw on the blot as shown below. 2. Insert an M.2 SSD module into the slot. The M.2 SSD slot only support SATA SSD module. - Page 12 3. Gently press down on the M.2 SSD module, and install the screw.
-
Page 13: Installing A Memory Module
Installing a memory module 1. Insert the memory module into the socket. 2. Gently press down on the memory module until it is locked by the arms of the socket. -
Page 14: Installing A Hard Disk Drive
Installing a hard disk drive 1. Unscrew and remove the hard disk drive bracket as shown below. 2. Locate the 2.5-inch SATA hard disk drive and the hard disk drive bracket. - Page 15 3. Install the hard disk drive/ SSD to the hard disk drive bracket. 4. Insert the hard disk drive /SSD into the socket and gently slide into the connector.
- Page 16 5. Reinstall the screw for the hard disk drive bracket. 5. Reinstall the bottom cover.
-
Page 17: Installing The L-Shaped Mountings
Installing the L-shaped mountings Locate the bottom cover upwards, and take out the L-shaped mounting kit and screws from accessory box. Install the L-shaped mountings to the bottom cover with screws. -
Page 18: Installing Your Zp-Qk7P3000 To A Monitor
Installing your ZP-QK7P3000 to a monitor You can also install your ZP-QK7P3000 to the back of a monitor. To do so: Secure four screws (M4XH15.0MM) to your monitor (VESA100 standard). Place your ZP-QK7P3000 to the monitor noting the correct alignment. Mechanical Loading Stability - Mounting of the equipment on the backside of the ... -
Page 19: Setting Up Your Zp-Qk7P3000
Setting up your ZP-QK7P3000 Please connect your peripherals before using your ZP-QK7P3000. 1. Connecting a COM device Connect serial devices such as mouse of fax/modems. 2. Connecting to USB 2.0 devices Connect USB 2.0 devices such as keyboards, mice, cameras and hard disk drives. 3. - Page 20 4. Connecting to HDMI displays Connect one end of an HDMI cable to an HDTV or monitor, and the other end to the HDMI port on the system rear panel. 5. Connecting to networks Connect one end of a network cable to the LAN port on the system rear panel and the other end to a network router, hub or switch.
-
Page 21: Installing Drivers And Software
Installing drivers and software Installing an operating system The ZP-QK7P3000 does not ship with an operating system preinstalled. The user must install the operating system before the ZP-QK7P3000 can be used. The following operating systems are supported: • Windows 10 64-bit •... -
Page 22: Using Your Zp-Qk7P3000
• HDA Sound Driver • Nvidia Graphics Driver • Realtek Ethernet PCI-E Driver • Management Engine Driver • Wireless Network Driver • CardReader Driver • USB Charger (optional) Note: If you want to use high-amperage USB charging for smartphones and tablets, please install the driver USB Charger driver. -
Page 23: Configuring Audio Output
Configuring audio output Follow the steps below to enable audio output when connecting the ZP-QK7P3000 to a TV or receiver via HDMI adapter. Access the Sound settings via the system Control Panel. Under Playback devices, click the display device that corresponds with your audio compatible display. -
Page 24: Edid Configuration
EDID configuration 1. Ports and function HDMI3: supports HDMI 2.0 and is backwards compatible with HDMI 1.4/1.2 devices. The built-in EDID MCU module will read the EDID message through HDMI3. HDMI1/2/4: The EDID MCU module does not support reading EDID through HDMI1/2/4. Note: EDID Emulation does not support the automatic recovery of EDID simulation during OS restart or warmboot. - Page 25 D. Situation b: You can press COPY/ERASE for 5 seconds to clear the EEPROM and exit the COPY/ERASE mode. E. EDID MCU module will be automatically set to BYPASS mode. Erase: A. Press and hold the COPY/ERASE button for 5 seconds, EEPROM will be erased. B.
Need help?
Do you have a question about the ZBOX PRO ZP-QK7P3000 and is the answer not in the manual?
Questions and answers