Table of Contents
Advertisement
Quick Links
Advertisement
Table of Contents

Related Manuals for Zotac ZBOX PRO ZP-CI333 NANO


Summary of Contents for Zotac ZBOX PRO ZP-CI333 NANO
- Page 2 ZOTAC. Products and corporate names mentioned in this manual may be registered trademarks or copyrights of their respective companies, and are used for identification purposes only.
-
Page 3: Table Of Contents
Table of Contents Specifications ----------------------------------------------------------------------------------------------------3 Safety instructions----------------------------------------------------------------------------------------------5 Package contents -----------------------------------------------------------------------------------------------6 Getting to know your ZP-CI333 NANO -------------------------------------------------------------------7 Front view -----------------------------------------------------------------------------------------------------7 Rear view ------------------------------------------------------------------------------------------------------8 Installing hardware inside ZP-CI333 NANO ------------------------------------------------------------9 Installing an M.2 SSD module ----------------------------------------------------------------------------12 Installing a memory module -------------------------------------------------------------------------------14 Installing a hard disk drive ---------------------------------------------------------------------------------15 Installing the L-shaped mountings ------------------------------------------------------------------------17 Installing your ZP-CI333 NANO to a monitor ----------------------------------------------------------18... -
Page 4: Specifications
Specifications Microprocessor Support • Intel Celeron J6412 (2.0GHz/2.6GHz, 1.5MB cache) Operating Systems • Supports Windows 11, Windows 10, Windows 10 IoT ENT LTSC and Ubuntu 20.04 LTS Linux Onboard Graphics Support • Intel UHD Graphics • 2x HDMI 2.0 (max resolution: 4096×2160 @60Hz) •... -
Page 6: Safety Instructions
Safety instructions ZP-CI333 NANO is designed and tested to meet the latest standards of safety for information tech- nology equipment. However, to ensure your safety, it is important that you read the following safety instructions. Read and follow all instructions in the documentation before you operate your system. ™... -
Page 7: Package Contents
Package contents Thank you for choosing our ZP-CI333 NANO. The following illustration displays the package contents of your new ZP-CI333 NANO. If any of the below items are damaged or missed, contact your retailer. • 1 x ZP-CI333 NANO • 1 x L-shaped mounting kit •... -
Page 8: Getting To Know Your Zp-Ci333 Nano
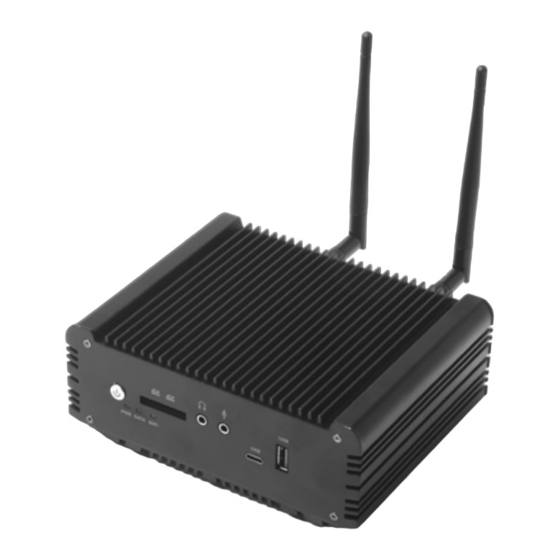
Getting to know your ZP-CI333 NANO Front view 1. Power button The power button turns the mini-PC ON and OFF. 2. Power LED The Power LED is always ON when power is on. 3. SATA status LED The SATA LED blinks when data is being written onto or read from the SATA. 4. -
Page 9: Rear View
Rear view 1. COM port Use the COM port to connect serial devices such as mouse or fax/modem. 2. WiFi antenna connectors The WiFi antenna connector supports the included WiFi antenna. 3. Display Continuity Switch For digital signage application, in some situations the HDMI/DP hot-plug detection may be unwanted. -
Page 10: Installing Hardware Inside Zp-Ci333 Nano
9. Power input (DC19V) The supplied power adapter converts AC power to DC power for use with this jack. Power supplied through this jack supplies power to the PC. To prevent damage to the PC, always use the supplied power adapter. ... - Page 11 3. Remove the four screws of rear cover. 4. Remove the seven screws as shown below. 5. Remove the the hard drive bracket, and remove the screw as shown below.
- Page 12 6. Take the the board out from the box. The plastic buckle is to prevent the Wi-Fi cables from falling out. 7. Turn the board upside down, and gently remove the COM connector.
-
Page 13: Installing An M.2 Ssd Module
Installing an M.2 SSD module 1. Locate the M.2 SSD mouting screw, and release the screw. 2. Insert the M.2 SSD module into the socket. - Page 14 3. Gently press down on the M.2 SSD module, and install the screw to secure the M.2 SSD module. 4. Install the board into the box with screws.
-
Page 15: Installing A Memory Module
Installing a memory module 1. Insert the memory module into the socket. 2. Gently press down on the memory module until it is locked by the arms of the socket. -
Page 16: Installing A Hard Disk Drive
Installing a hard disk drive 1. Install the hard disk bracket onto a 2.5-inch SATA hard disk drive /SSD with two screws. 2. Insert the hard disk drive /SSD into the socket and gently slide into the connector. - Page 17 3 Reinstall the screw for the hard disk bracket.
-
Page 18: Installing The L-Shaped Mountings
Installing the L-shaped mountings Locate the bottom cover upwards, and take out the L-shaped mounting kit and shipped screws. Install the L-shaped mountings to the bottom cover with screws. -
Page 19: Installing Your Zp-Ci333 Nano To A Monitor
Installing your ZP-CI333 NANO to a monitor You can also install your ZP-CI333 NANO to the back of a monitor. To do so: Unscrew and remove the bottom cover. Install the VESA mounting kit to the bottom cover with four screws as shown below. - Page 20 Reinstall the bottom cover to the ZP-CI333 NANO. Install the ZP-CI333 NANO to the monitor. Mechanical Loading Stability - Mounting of the equipment on the backside of the monitor should be lay this equipment on a reliable surface when install. A drop or fall could cause injury.
-
Page 21: Setting Up Your Zp-Ci333 Nano
Setting up your ZP-CI333 NANO Please connect your peripherals before using your ZP-CI333 NANO. 1. Connecting a COM device Connect serial devices such as mouse of fax/modems. 2. Connecting the WiFi antenna Connect the WiFi antenna to the WiFi antenna connector. 3. - Page 22 5. Connecting to USB 3.1 devices Connect USB 3.1 devices such as external hard disk drives, SSDs and flash drives to the USB 3.1 port on the system rear panel. 6. Connecting to an HDMI display Connect one end of an HDMI cable to an HDTV or monitor, and the other end to the HDMI port on the system rear panel.
-
Page 23: Installing Drivers And Software
Installing drivers and software Installing an operating system The ZP-CI333 NANO does not ship with an operating system preinstalled. The user must install the operating system before the ZP-CI333 NANO can be used. The following operating systems are supported: • Windows 10/ 11 •... -
Page 24: Using Your Zp-Ci333 Nano
• Intel Chipset Driver • Intel Graphics Driver • Realtek Ethernet PCI-E Driver • Wireless Network Driver • Bluetooth Driver • Intel Management Engine • Intel HID Driver • CardReader Driver • Intel SerialIO Each driver must be installed individually to ensure proper operation of the ZP-CI333 ... -
Page 25: Configuring Audio Output
Configuring audio output Follow the steps below to enable audio output when connecting the ZP-CI333 NANO to a TV or receiver via HDMI/DP adapter. Access the Sound settings via the system Control Panel. Under Playback devices, click the display device that corresponds with your audio compatible display.
Need help?
Do you have a question about the ZBOX PRO ZP-CI333 NANO and is the answer not in the manual?
Questions and answers