Fröling PE1e Pellet Operating Instructions Manual
Hide thumbs
Also See for PE1e Pellet:
- Installation instructions manual (76 pages) ,
- Service handbook (112 pages) ,
- Installation instructions manual (32 pages)
Table of Contents
Advertisement
Quick Links
Operating instructions
PE1e Pellet
Pellet boiler PE1e Pellet
Pellet condensing boiler PE1e Pellet
Translation of original German version of operating instructions for operators.
Read and follow all instructions and safety instructions.
All errors and omissions excepted.
B1650222_en | Edition 07/09/2022
Advertisement
Table of Contents

Subscribe to Our Youtube Channel
Related Manuals for Fröling PE1e Pellet


Summary of Contents for Fröling PE1e Pellet
- Page 1 Operating instructions PE1e Pellet Pellet boiler PE1e Pellet Pellet condensing boiler PE1e Pellet Translation of original German version of operating instructions for operators. Read and follow all instructions and safety instructions. All errors and omissions excepted. B1650222_en | Edition 07/09/2022...
-
Page 2: Table Of Contents
Table of contents 1 General ................................. 1.1 Product overview PE1e Pellet 45-60..................... 2 Safety................................2.1 Hazard levels of warnings ........................2.2 Pictograms used ........................... 2.3 General safety information ........................2.4 Permitted uses ............................2.4.1 Permitted fuels ........................... 2.4.2 Non-permitted fuels........................10 2.5 Qualification of operating staff....................... - Page 3 6.1 General fault with power supply ......................64 6.1.1 Behaviour of system after a power failure.................. 64 6.2 Excessive temperature.......................... 64 6.3 Faults with fault message........................65 6.3.1 Procedure for fault messages ....................65 B1650222_en | Operating instructions PE1e Pellet...
-
Page 4: General
Our sale and delivery conditions will be applicable. These conditions have been made available to customers, and customers have been made aware of them at the time of order completion. You can also find the guarantee conditions on the enclosed guarantee certificate. B1650222_en | Operating instructions PE1e Pellet... -
Page 5: Product Overview Pe1E Pellet
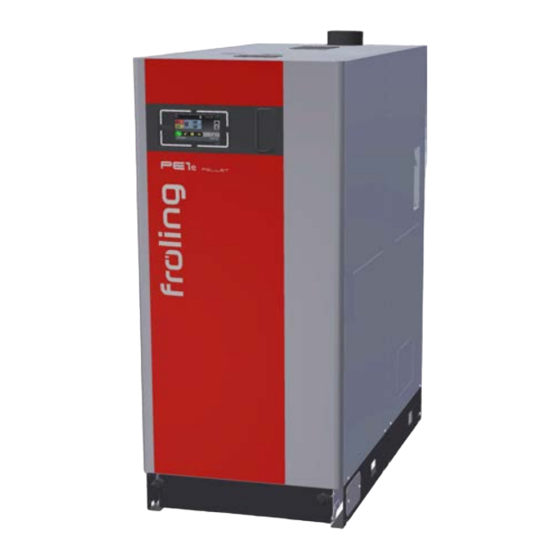
General | 1 1.1 Product overview PE1e Pellet 45-60 Ü "Overview of the Lambdatronic P 3200 control, Heat exchanger ash container touch display" [} 20] Lambdatronic P 3200 boiler controller Electrostatic particle separator (optional) Pellet container 175 L WOS Efficiency Optimisation System... -
Page 6: Safety
The dangerous situation may occur and if measures are not observed it will lead to minor injuries. NOTICE The dangerous situation may occur and if measures are not observed it will lead to damage to property or pollution. B1650222_en | Operating instructions PE1e Pellet... -
Page 7: Pictograms Used
Warning of injury to fingers or Warning of injury to fingers or hands, gear/chain drive hands, cutting edge Hand injury warning Warning of injury from being pulled into rotating shafts Increased CO concentration Slipping hazard warning warning B1650222_en | Operating instructions PE1e Pellet... -
Page 8: General Safety Information
(such as spontaneous combustion of carbonisation gases or flash fires). Take the following precautions: r Optimum boiler performance can only be guaranteed if the flue gas system is functioning correctly. B1650222_en | Operating instructions PE1e Pellet... -
Page 9: Permitted Uses
Safety | 2 2.4 Permitted uses The Froling Pellet boiler PE1e Pellet is designed solely for heating domestic water. Only the fuels specified in the "Permitted fuels" section may be used. Ü "Permitted fuels" [} 9] The unit should only be operated when it is in full working order. It must be operated in accordance with the instructions, observing safety precautions, and you should ensure you are aware of the potential hazards. -
Page 10: Non-Permitted Fuels
▪ For operation, inspection and cleaning: - suitable work wear - protective gloves - sturdy shoes - dust mask When working with dust from the electrostatic particle separator, use dust masks in filter class FFP2 or higher B1650222_en | Operating instructions PE1e Pellet... -
Page 11: Safety Devices
SAFETY VALVE (protection against overheating/excess pressure) When the boiler pressure reaches a maximum of 3 bar, the safety valve opens and the heated water is blown off in the form of steam. B1650222_en | Operating instructions PE1e Pellet... -
Page 12: Residual Risks
Protective gloves must usually be worn for work on the boiler, and it should only be operated using the handles provided r Insulate the flue gas pipes and do not touch them during operation B1650222_en | Operating instructions PE1e Pellet... -
Page 13: Emergency Procedure
Leave the boiler room and close the door r Open any thermostatic valves on the radiator and ensure sufficient heat dissipation from the rooms If the temperature does not drop: r Contact the installer or Froling customer services B1650222_en | Operating instructions PE1e Pellet... -
Page 14: Smell Of Flue Gas
In case of fire in the system: Risk of death by fire and poisonous gases Emergency procedure in case of fire: r Leave the boiler room r Close the doors r Inform the fire department B1650222_en | Operating instructions PE1e Pellet... -
Page 15: Notes For Operating A Heating System
The heating water must be clear and free from substances that lead to sediments. r With regard to corrosion protection, the use of fully demineralised filling and make- up water with an electrical conductivity of up to 100 µS/cm is recommended in accordance with EN 14868 B1650222_en | Operating instructions PE1e Pellet... - Page 16 ▪ After eight weeks, the pH value of the water must be between 8.2 and 10.0. If the central heating water comes into contact with aluminium, the pH value must be between 8.0 and ▪ Yearly. Values must be recorded by the owner B1650222_en | Operating instructions PE1e Pellet...
-
Page 17: Pressure Maintenance Systems
Automatic boilers for wood pellets with a rated thermal output of more than 70 kW must be equipped with a heat accumulator of a volume of at least 25 litres per kW rated thermal output. These dimensioning specifications apply up to 500 kW nominal heat output. B1650222_en | Operating instructions PE1e Pellet... -
Page 18: Chimney Connection/Chimney System
NOTICE! The condensate connection may not be changed or closed. NOTICE! If the pipework to the drain cannot be installed in a correct fashion, the use of waste water pumping system is recommended. Suitable systems are available on request from Fröling GesmbH. B1650222_en | Operating instructions PE1e Pellet... -
Page 19: Operating The System
NOTICE If condensation escapes during the initial heat-up phase, this does not indicate a fault. r Tip: If this occurs, clean up using a cleaning rag. B1650222_en | Operating instructions PE1e Pellet... -
Page 20: Switching On The Power Supply
Access all system information. No parameters may be changed in the info menu. System menu for opening the system settings. All parameters can be displayed and/or edited depending on the user level. Ü "Navigation within the system menu" [} 23] B1650222_en | Operating instructions PE1e Pellet... - Page 21 Opens quick menu. Selection of functions depending on user level, configuration and current status. Tap to change parameters (dropdown menu or numeric keypad) Opens system menu. Menu display depends on user level and configuration Back to higher menu level. B1650222_en | Operating instructions PE1e Pellet...
- Page 22 Tap the info menu in the basic display and navigate to the “froeling-connect” menu Ä The connection status is displayed in the lower range (connected, deactivated, …) NOTICE! Consult the “froeling-connect” operating instructions for a detailed description of the connection status as well as troubleshooting B1650222_en | Operating instructions PE1e Pellet...
- Page 23 Tap the respective tab to carry out settings in the menus. Icon Status Temperatures Times Service General settings Solar heat meter B1650222_en | Operating instructions PE1e Pellet...
- Page 24 Use the up and down arrows to set the start and end time and save by tapping the “Confirm” icon The time window set is saved for all selected days of the week. B1650222_en | Operating instructions PE1e Pellet...
- Page 25 List of all pending boiler faults and how to eliminate them. Setting wizard Switching on for the first time: Setting the language, manufacturer’s number, date and time Connect: Setting parameters required for the boiler to use the “froeling-connect.com” (IP address, display password, …) B1650222_en | Operating instructions PE1e Pellet...
-
Page 26: Select Information Displays
Temperatures Display of the status at the flow sensor (if pump present) and the current circulation return temperature. Differential Temperatures Display of the current temperature from source controller and recess of the differential regulator B1650222_en | Operating instructions PE1e Pellet... - Page 27 When using more than two store sensors, it is possible to have an information display with storage tank temperatures in accordance with the number of sensors. An information display that spans two areas is used. B1650222_en | Operating instructions PE1e Pellet...
-
Page 28: Switch Boiler On/Off
Supply heating circuits and domestic hot water tanks with heat according to the selected heating times. NOTICE! Consult the enclosed operating instructions for the boiler controller for a detailed description of the boiler modes. B1650222_en | Operating instructions PE1e Pellet... -
Page 29: Change Date And Time
Tap the mode icon for the DHW tank r Tap the “extra loading” icon Ä One-time loading of DHW tank starts. Once the selected DHW tank temperature setpoint has been reached, loading stops and the icon switches to “automatic”. B1650222_en | Operating instructions PE1e Pellet... -
Page 30: One-Time Extra Loading Of All Existing Dhw Tanks
“Reduction of flow temperature in setback mode”. Heating limits The outside air temperature heat limits are set in the “Temperatures” tab and they activate/deactivate the heating circuit depending on the outside air temperature or time period. B1650222_en | Operating instructions PE1e Pellet... -
Page 31: Change Room Temperature (Heating Circuit Without Room Temperature Sensor)
5°C, and never more than 3°C for a low temperature circuit. Once the changes have been made, wait a few days and assess comfort levels before carrying out additional changes. B1650222_en | Operating instructions PE1e Pellet... -
Page 32: Change Room Temperature (Heating Circuit With Room Temperature Sensor)
Extra heating The heating circuit is regulated to the set room temperature with no time limitation. To cancel this function prematurely, activate another mode/function. Continuous The heating circuit is regulated to the set setback mode setback temperature until activation of another mode/function. B1650222_en | Operating instructions PE1e Pellet... -
Page 33: Lock Display/Switch User Level
The names of the DHW tank, storage tank and heating circuits can be freely selected. A maximum of 20 characters are available for the name. r Navigate to the “System” menu and open the “Renaming” sub-menu r Tap the desired component and use the keyboard to rename it B1650222_en | Operating instructions PE1e Pellet... -
Page 34: Configure The Holiday Program
“holiday” mode Tap the “suitcase” icon to prematurely end the holiday program. The boiler then switches to the previously activated mode (“water tap” symbol = domestic hot water, “water tap/ radiator” symbol = automatic). B1650222_en | Operating instructions PE1e Pellet... -
Page 35: Switch The Boiler On/Off On The Room Console
[} 22]), the boiler can be switched on and off on the room console. Boiler remote control deactivated Boiler remote control activated r Switch the boiler ON/OFF by tapping on the current operating status B1650222_en | Operating instructions PE1e Pellet... -
Page 36: Adjust Pellet Consumption Counter After Fuel Delivery
Before filling check the store for fines and clean if necessary r Close all openings to the store to seal out dust r Fill the store with pellets Ä Only use permitted pellets! Ü "Permitted uses" [} 9] B1650222_en | Operating instructions PE1e Pellet... -
Page 37: Correct The Remaining Pellet Amount In Store Room
When the set minimum level in the pellet store is reached, a message is shown on the boiler display: r Select and confirm by tapping the “pen” icon Ä No more reminders Ä Reminder in two days Ä Reminder in one week B1650222_en | Operating instructions PE1e Pellet... -
Page 38: Resetting The Pellet Consumption Counter
In the “Consumption” menu, set the “RESET counter” to “YES” Ä Values of the parameters “Resettable t-counter” and “Resettable kg- counter” are reset to “0” Ä Parameter “RESET counter” is reset to “NO” B1650222_en | Operating instructions PE1e Pellet... -
Page 39: Check The Fill Level Of The Ash Container And Empty If Required
Ä The counter of the remaining heating hours is reset to the preset value If the ash container is not emptied: r Close the message by tapping on “NO” Ä The counter of the remaining heating hours remains unchanged B1650222_en | Operating instructions PE1e Pellet... -
Page 40: Empty Ash Container
Loosen the star-shaped knobs and swivel to one side r Fold the cover plate forward r Pull out both ash containers r Close the opening at the rear with the sliding valve r Transport the ash container to the emptying point B1650222_en | Operating instructions PE1e Pellet... -
Page 41: Switching Off The Power Supply
Turn off the main switch Ä Boiler controller is switched off Ä There is no power supply to any of the boiler components NOTICE! Frost protection function is no longer active! B1650222_en | Operating instructions PE1e Pellet... -
Page 42: Servicing The System
(e.g. spontaneous combustion of carbonisation gases / flash fires) and this can lead to serious accidents and damage! Take the following precautions: r Clean the boiler following the instructions in the instruction manual. Follow the boiler operating instructions. B1650222_en | Operating instructions PE1e Pellet... -
Page 43: Required Tools
Stainless steel cleaning brush (Ø 56 x 1350) in condensing boiler SW 13 mm socket wrench Not included: Screwdriver set (Philips, flat head, Torx T20, T25, T30) Spanner or box wrench set Small brush or cleaning brush Ash vacuum B1650222_en | Operating instructions PE1e Pellet... -
Page 44: Maintenance Work By The Operator
Regularly check all the quick vent valves on the entire heating system for leaks Ä If any liquid is leaking, replace the quick vent valves NOTICE! The vent cap (A) must be loose (screw on approx. two revolutions) to ensure correct functioning. B1650222_en | Operating instructions PE1e Pellet... -
Page 45: Periodic Inspection And Cleaning
Tap on “Service mode” in the quick menu r The “Cleaning” mode is activated in accordance with boiler-specific processes Ä As soon as this state is displayed, the cleaning process may begin. B1650222_en | Operating instructions PE1e Pellet... - Page 46 Remove ash deposits on the walls of the entire combustion chamber and the combustion chamber stones with a brush Ä Ash vacuum recommended r Check the combustion grate for dirt and clean if necessary B1650222_en | Operating instructions PE1e Pellet...
- Page 47 Switch of the boiler at the main switch and let cool down for at least one hour r Open the front insulating door r Loosen the star-shaped knobs and swivel to one side r Fold the cover plate forward B1650222_en | Operating instructions PE1e Pellet...
- Page 48 5 | Servicing the system r Pull out both ash containers r Remove the ash container bracket behind that r Remove the ashes under the combustion chamber Ä Use the ash vacuum and supplied flat scraper B1650222_en | Operating instructions PE1e Pellet...
- Page 49 Undo the wing screw (A) and take out the flue gas temperature sensor r Wipe the flue gas temperature sensor with a clean cloth r Push in the flue gas temperature sensor so that approx. 20 mm protrudes from the bushing B1650222_en | Operating instructions PE1e Pellet...
- Page 50 Checking the draught controller flap r Check that the draught controller flap moves freely Clean FGR duct r Remove lower back panel r Remove cover from the FGR duct r Clean FGR duct with cleaning brush B1650222_en | Operating instructions PE1e Pellet...
- Page 51 Unscrew siphon and check for dirt and deposits r Check the condensation drain up to where it enters the waste water system and clean if necessary Ä Ensure that the condensation is continually drained into the waste water system! B1650222_en | Operating instructions PE1e Pellet...
- Page 52 Ä When exiting the menu, the flushing process finishes r Check the cleaning status of the heat exchanger pipes Ä In the case of uneven cleaning, check the nozzles on the flushing device for blockages (lime scale, dirt, etc.) B1650222_en | Operating instructions PE1e Pellet...
- Page 53 Ä The flushing finishes when you exit the menu r Remove cover and thermal insulation above the condensing boiler heat exchanger r Unscrew the filter cover r Remove the screen and thoroughly clean it under running water B1650222_en | Operating instructions PE1e Pellet...
- Page 54 Clean FGR duct (with condensing boiler heat exchanger) r Remove left cover from the siphon and next to the induced draught unit fan r Remove flexible FGR hose on the induced draught unit housing and boiler body B1650222_en | Operating instructions PE1e Pellet...
- Page 55 Switch off the boiler at the main switch and let the boiler cool down for at least one hour r When using room air-independent operation: Pull off the silicone hose at the hose nozzle r Disconnect the plug from the electrode B1650222_en | Operating instructions PE1e Pellet...
- Page 56 Clean air opening (C) using a screwdriver r Remove the top cleaning cover r Insert the electrode unit r Position the electrode in the center between the linking plates r Tighten the screws (A) of the electrode unit evenly B1650222_en | Operating instructions PE1e Pellet...
-
Page 57: Maintenance Work By Technicians
Please be advised that, in Austria, commercial systems with a rated heat output of 50 kW or more must be regularly tested at yearly intervals in accordance with the Heating Plant Regulations (Feuerungsanlagen-Verordnung). B1650222_en | Operating instructions PE1e Pellet... -
Page 58: Cleaning The Measurement Line Of The Underpressure Controller
Ä WARNING! Do not direct compressed air into under-pressure sensor cartridge. This could damage it. r After cleaning, install measurement line to connection “P2” Ä Make sure that reducing plug (A) is completely pushed into connection "P2" B1650222_en | Operating instructions PE1e Pellet... -
Page 59: Cleaning The Lambda Probe
▪ Do not clean the Lambda probe with compressed air ▪ Do not use chemical cleaning agents (brake cleaner, etc.) ▪ Careful handling of the Lambda probe, no “tapping” or cleaning with a wire brush B1650222_en | Operating instructions PE1e Pellet... -
Page 60: Clean The Heat Exchanger And Wos Springs
Remove the driver lever and take the key out of the WOS shaft r Then remove the maintenance cover SW 17 mm r Remove WOS shafts r Undo screw connection (AF 17 mm) and open heat exchanger cover B1650222_en | Operating instructions PE1e Pellet... - Page 61 Push WOS springs with slot (D) downwards into heat exchanger pipes Ä Push inner plate of the springs as far as the stop in slots (A) Ä B: WOS springs for downwards stroke (front) Ä C: WOS springs for downwards stroke (rear) B1650222_en | Operating instructions PE1e Pellet...
-
Page 62: Emissions Measurement By Chimney Sweep Or Regulatory Body
Ä When the control has completed the system start, the boiler is ready for operation r Switch the boiler on by tapping “Boiler ON” Ä Automatic mode is active. The heating system is controlled via the controller according to the selected mode in automatic mode B1650222_en | Operating instructions PE1e Pellet... -
Page 63: Start Emissions Measurement
(e.g. AWG in Austria) r You can separate and clean recyclable materials and send them to a recycling centre. r The combustion chamber must be disposed of as builders' waste. B1650222_en | Operating instructions PE1e Pellet... -
Page 64: Troubleshooting
100°C. The pumps continue to run. Once the temperature falls below approx. 75°C, the STL can be reset mechanically. r Unscrew the cap on the STB (high-limit thermostat) r Unlock the STL by pressing with a screwdriver B1650222_en | Operating instructions PE1e Pellet... -
Page 65: Faults With Fault Message
The error display lists all current faults r Open by tapping the listed fault r The “Message” tab displays the current fault. r Press the “Error resolution” tab to view possible causes and troubleshooting procedures B1650222_en | Operating instructions PE1e Pellet... - Page 66 Tap the Cancel icon to close the current fault and display the fault list r Tap the Cancel icon again and confirm that you have read all of the errors to return to the basic display Ä The boiler is in the previously set mode B1650222_en | Operating instructions PE1e Pellet...
- Page 67 Notes B1650222_en | Operating instructions PE1e Pellet...
- Page 68 Manufacturer’s address Froling srl Froling SARL Fröling Heizkessel- und Zweigniederlassung Behälterbau GesmbH Aschheim Industriestraße 12 Max-Planck-Straße 6 Via J. Ressel 2H 1, rue Kellermann A-4710 Grieskirchen 85609 Aschheim I-39100 Bolzano (BZ) F-67450 Mundolsheim +43 (0) 7248 606 0 +49 (0) 89 927 926 0 +39 (0) 471 060460 +33 (0) 388 193 269 info@froeling.com...
Need help?
Do you have a question about the PE1e Pellet and is the answer not in the manual?
Questions and answers