Sony Airpeak S1 Startup Manual
Hide thumbs
Also See for Airpeak S1:
- Specifications (2 pages) ,
- Help manual (123 pages) ,
- Integration manual (12 pages)

Related Manuals for Sony Airpeak S1


Summary of Contents for Sony Airpeak S1
- Page 1 5-027-735-12(1) Airpeak S1 Mobile app “Airpeak Flight” installation/initial setup Startup Guide Setup Gimbal and camera mounting Flights Web app “Airpeak Base” After use Flight Information and Specifications ARS-S1...
-
Page 3: Table Of Contents
Help Guide (Web manual) Explains aircraft operation and features in detail and provides “Airpeak Flight” app and “Airpeak Base” app instructions. You can view the Help Guide online. Use a tablet, smartphone or computer. https://rd1.sony.net/help/airpeak/arss1/en/... -
Page 4: Warning
Refer to off immediately, and disconnect the power cord and these numbers whenever you call your Sony dealer connection cables. regarding this product. - Page 5 • Charge the battery only by the method specified by • Do not use the product if there is a possibility of Sony. Please refer to the Startup Guide and Help Guide lightning strike. A lightning strike may cause an electric for the aircraft.
- Page 6 Also, if you hear thunder, refrain from touching the product. • Use only the dedicated Sony manufactured battery pack for the aircraft. Use of a different battery pack may cause fire or electric shock.
-
Page 7: Compliance Information
Model: ARS-S1 • Do not allow children to use the battery pack, and do Responsible Party: Sony Electronics Inc. not use the battery pack within the reach of young Address: 16535 Via Esprillo, San Diego, CA 92127 U.S.A. - Page 8 Caution: Do not handle damaged or leaking Model: RCR-VH1 rechargeable batteries. Responsible Party: Sony Electronics Inc. Address: 16535 Via Esprillo, San Diego, CA 92127 U.S.A. Telephone Number: 858-942-2230 This device complies with part 15 of the FCC rules. Operation is subject to the following two conditions:...
- Page 9 Model: LBG-H1 interference in a residential installation. This equipment Responsible Party: Sony Electronics Inc. generates, uses and can radiate radio frequency energy Address: 16535 Via Esprillo, San Diego, CA 92127 U.S.A. and, if not installed and used in accordance with the...
-
Page 10: Introduction
Sony is not liable or responsible for any experience, including but not limited to videography, photography, content, income, fees, and/or other compensation associated with or related to the use and/or misuse of the aircraft, its parts, and/or accessories including hardware and software. - Page 11 Fees, registration, and credit card information may also be required. Supported mobile devices Make sure the supported mobile devices and system versions on following site. https://electronics.sony.com/airpeak/support/compatibility Compatible iPad models • iPad Air (3rd generation) • iPad mini (5th generation) •...
-
Page 12: Package Contents
Package contents Contact the place of purchase or Sony Customer Support if any components are missing. Quantities are indicated in parentheses. Please retain the cushionings as they will be used when assembling the aircraft. Bottom cushioning Bottom cushioning ... - Page 13 A C adapter for battery charger (1)/power cord (1) C ables • Power cable (aircraft — gimbal) (1) • Control cable (aircraft — gimbal) (1) L anding gear (2) ® • USB Type-C cable (aircraft — gimbal) (1) P ropeller (CW: clockwise rotation) (2)* Hub: silver •...
-
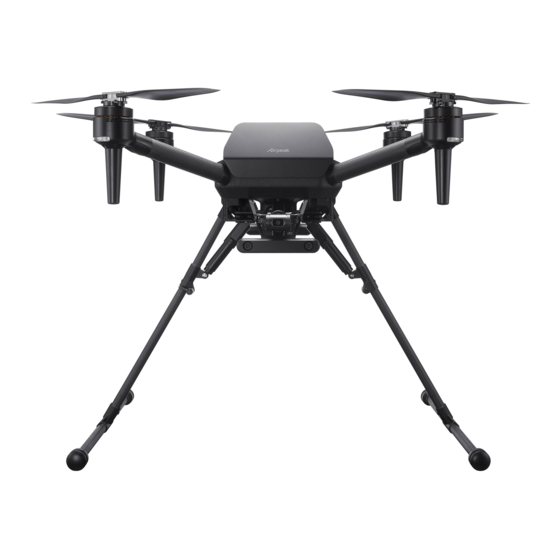
Page 14: Guide To Parts And Controls
Guide to parts and controls Aircraft Front Upward infrared range sensor Propellers Motors Flight status LEDs (Front LEDs) Antennas (built-in) Frame arms FPV gimbal camera ... - Page 15 Remote controller Status LED (Automated flight pause) button (Power) button Power port (MOVIE) button Battery level LEDs Control sticks Lever heads Mobile device holder ...
-
Page 16: Mobile App "Airpeak Flight" Installation/ Initial Setup
Signing in to the “Airpeak Flight” app A Sony account and an internet connection are required when setting up the aircraft. Start the “Airpeak Flight” app. The initial setup screen is displayed. Tap [Next] to begin the initial setup process. -
Page 17: Setup
Setup Charging the batteries First charge the aircraft battery packs and built-in remote controller battery. [1] Charging the aircraft battery packs The battery level LEDs flash during charging and go off when the battery pack is fully charged. The battery charger can hold two battery packs and will charge the second one after the first one is charged. Both cannot be charged at the same time. -
Page 18: Assembling The Aircraft
To check the battery level You can check the battery level by pressing the (Power) button on the remote controller once. Assembling the aircraft You can view an animation of the assembly procedure in the “Airpeak Flight” app. [1] Connecting cables to the aircraft Place the aircraft upside down. - Page 19 Connect the cables to the aircraft. Connect the cables to the connection hub on the aircraft. USB Type-C® cable (aircraft — gimbal) Power cable (aircraft — gimbal) Control cable (aircraft — gimbal) Front of aircraft Connect the control cable (aircraft — gimbal) to the control port. ...
- Page 20 [2] Attaching the damping plate to the aircraft The damping plate (with the quick-release pre-installed), hex wrench, and hex screws are included in the gimbal set (sold separately). Confirm the orientation of the damping plate and place it on the aircraft. With the quick-release arrow surface face-down and the arrow pointing toward the front of the aircraft, place the damping plate on the attachment points of the aircraft.
- Page 21 [3] Connecting cables to the quick-release Insert the plugs at the other ends of the cables connected to the aircraft in the corresponding quick-release ports. USB Type-C® cable (aircraft — gimbal) Power cable (aircraft — gimbal) Control cable (aircraft — gimbal) Front of aircraft Connect the control cable (aircraft —...
- Page 22 [4] Attaching landing gear to the aircraft Press in the ball detent and insert the landing gear. Make sure that the ball detent is fully engaged. Ball detent Turn the lever to lock the landing gear. Turn both landing gear levers below the dotted line as shown below. Lever Attach the other landing gear the same way.
-
Page 23: Attaching A Mobile Device To The Remote Controller
Attaching a mobile device to the remote controller [1] Attaching a mobile device On the remote controller, mount the mobile device (tablet or smartphone) on which you have installed the “Airpeak Flight” app. Extend the mobile device holder. Raise the lever on the back and extend the mobile device holder. Mount and secure the mobile device. - Page 24 Mounting smartphones Raise the smartphone holder in the middle of the mobile device holder, and then mount the smartphone. Smartphone holder Note Mobile devices may fall off unless they are correctly secured with the lever. [2] Connecting the cable Connect the cable included with your mobile device or another compatible cable to the remote controller USB port (USB-A) and the mobile device port.
-
Page 25: Loading Battery Packs In The Aircraft
Loading battery packs in the aircraft Load the two battery packs in battery slots 1 and 2 at the rear of the aircraft. Load the battery packs in the aircraft. Insert firmly until the battery packs click and lock into place. LE AS ER Y RE BA TT... -
Page 26: Linking/Setting Up The Remote Controller And Aircraft
Linking/setting up the remote controller and aircraft Follow the on-screen instructions in the “Airpeak Flight” app to link the remote controller and aircraft and set up the aircraft. Preparation • Confirm that the mobile device mounted on the remote controller is connected to the internet. •... - Page 27 Press and hold the LINK button on the aircraft. Within 2 min., press and hold the LINK button on the aircraft for 2 sec. to link it and remote controller. Successful linkage is indicated by a remote controller blue status LED (in purple when linked as [Sub] in dual operation mode) and the message [Aircraft and remote controller connected] on the “Airpeak Flight”...
-
Page 28: Gimbal And Camera Mounting Preparing A Camera
Gimbal and camera mounting Preparing a camera Prepare the camera before mounting it on the gimbal. (Both the camera and gimbal are sold separately.) [1] Inserting a battery pack and memory card Insert a battery pack and memory card in the camera in advance. (ILCE-7SM3 is used in this example.) Battery pack Memory card Notes... -
Page 29: Mounting The Gimbal On The Aircraft
Mounting the gimbal on the aircraft Carefully follow these instructions. Errors in set-up may cause the camera to detach and fall WARNING from the aircraft when in flight, which could result in injury or property damage. Make sure the aircraft is off. Confirm that the power status LED of the aircraft is off. -
Page 30: Mounting A Camera On The Gimbal
Mounting a camera on the gimbal The camera plate, hot shoe adapter, and top camera screw are included in the gimbal set (sold separately). [1] Attaching the camera plate and hot shoe adapter to the camera Attach the camera plate to the camera. Attach the camera plate to the tripod socket on the bottom of the camera. - Page 31 [2] Mounting the camera on the gimbal Place the camera in the gimbal. Loosen the locking screws on both sides of the gimbal frame, extend the tilt top bar to make it higher, and place the camera in the gimbal from the front. Slide the camera plate attached to the camera into the groove on the bottom part of the frame.
- Page 32 [3] Connecting cables between the camera and gimbal Use the included USB cable to connect ports on the camera and gimbal. Connect the USB cable to the camera. Insert the plug of the included USB Type-C® cable (gimbal — camera) or micro USB cable (gimbal — camera) in the camera USB port.
- Page 33 [4] Adjusting the balance of the gimbal Adjust the balances of the tilt, roll, and pan axes. Preparation • Confirm that the camera lens cap is removed. • Confirm that the camera and gimbal are connected using the USB cable (page 32). •...
- Page 34 Vertical balance adjustment of the tilt axis Rotate the gimbal tilt frame to aim the camera lens upward. Loosen the levers on both sides and slide the tilt frame back and forth to adjust the balance. Adjust so that the left and right adjusters are at the same level. After adjusting the balance, firmly tighten the levers on both sides.
- Page 35 Adjust the balance of the pan axis. Loosen the lever and slide the pan frame back and forth to adjust the balance. After adjusting the balance, firmly tighten the lever. With the gimbal stationary, tilt the aircraft forward, backward, left, and right to check if the balance is adjusted properly.
-
Page 36: Adjusting The Gimbal Parameters
Adjusting the gimbal parameters The gimbal parameters need to be adjusted. Visit the support site for details on adjustment. http://electronics.sony.com/airpeak/p/gblt3/settings... -
Page 37: Flights
Flights Operating an aircraft in the United States is regulated by federal law, regulations and ordinances. State and local ordinances may also apply to certain operations. When operating an aircraft, it is the remote pilot’s responsibility to always comply with applicable law, regulations and ordinances. Attaching the propellers The aircraft uses two types of propellers: clockwise (CW) and counterclockwise (CCW) propellers, which rotate in different directions. - Page 38 • If you do not hear a clicking sound when attaching the propellers, the propellers may not have been attached properly and pose a risk of crash. Refrain from using the aircraft and contact Sony Customer Support. • If the metal part of the propeller attachment point does not move smoothly, the propeller may fall off during flight and pose a risk of crash.
-
Page 39: Checking Settings Before Flights
Checking settings before flights [1] Checking error messages in the flight screen Error messages can be checked by accessing the flight screen from the “Airpeak Flight” app home page. Tap [Start flight] in the “Airpeak Flight” app home page. Confirm that no error messages are displayed on the flight screen. Confirm that no warnings, cautions, or dialogs are displayed. -
Page 40: Flying And Shooting Video
Flying and shooting video Bring the aircraft to the take-off site. Regarding the flight environment, see “Flight environment” (page 46). Start the “Airpeak Flight” app and tap [Start flight]. Launch the aircraft. Manual takeoff Tilt the left and right control sticks of the remote controller either inward and downward or outward and downward at the same time. -
Page 41: Web App "Airpeak Base" "Airpeak Base" Features
“Airpeak Base” is a dedicated web application for managing Airpeak products, creating mission flight paths, viewing flight logs, and more. It is available from browsers on a computer or iPad. https://base.airpeak.sony.com/ You can also take advantage of the “Airpeak Plus” cloud service for greater convenience. For detailed information on the cloud service, visit the product page. -
Page 42: After Use
After use Removing the propellers Make sure the aircraft is off. Confirm that the power status LED of the aircraft is off. LE AS ER Y RE BA TT Power status LED Remove the battery packs from the aircraft. While pressing the BATTERY RELEASE levers (), push out the projecting parts on the sides of the battery packs in the directions of the arrows to remove both battery packs (). - Page 43 • If the metal part does not move smoothly when you press the propeller against it for removal, the propeller may fall off during flight and pose a risk of crash. Refrain from using the aircraft and contact Sony Customer Support.
-
Page 44: Removing The Gimbal
Removing the gimbal Hold down the gimbal detach button on the quick-release and turn the ring toward the unlock icon ( ) to remove the gimbal from the quick-release. Gimbal detach button Ring Notes • Hold the gimbal with both hands when removing it. The gimbal or camera may be scratched or damaged if the gimbal rotates or drops. - Page 45 Remove the landing gear from the aircraft. Press in the ball detent and remove the landing gear. Ball detent Turn the landing gear levers until they are positioned in place. When storing the aircraft in the outer box, turn both landing gear levers below the dotted line as shown below. Lever...
-
Page 46: Flight Information And Specifications Flight Information
• Unless permitted by separate prior written agreement between — When the obstacle is small you and Sony, Airpeak is not for military use, including but not — When the surroundings or obstacles are moving limited to the following: development of arms or munitions —... - Page 47 • Make sure that the “Airpeak Flight” app is working properly to • To avoid affecting the service life of the motors, do not launch assist you in controlling the aircraft. Sony may not be able to or land the aircraft in sandy or dusty areas.
- Page 48 About the “Airpeak Flight” app • Since the video transmission signal may be delayed or lost due to interference, the wireless transmission settings of the • Fully charge your mobile device before starting the “Airpeak “Airpeak Flight” app ([Aircraft] — [Sensors/Radio]) should be Flight”...
-
Page 49: General Information
Do not install external devices that exceed the maximum payload. As external devices, use only genuine Sony devices or devices recommended by Sony, and install in the correct position as described in the instruction manual. Devices Built-in antenna position that shift the aircraft center of gravity pose a risk of crashes. - Page 50 Charging the battery pack not guaranteed when used in other countries or regions. • Before using the battery pack, be sure to charge it with a Sony • Do not connect the AC adapter to an electronic transformer dedicated battery charger or a Sony device with a battery- (travel converter).
-
Page 51: Troubleshooting
Aircraft: Turn off the power and remove both battery packs. After about 1 minute, reinsert the battery packs and turn the power back on. Check the additional information on our Customer Support Website. https://www.sony.com/electronics/support Consult Sony Customer Support. -
Page 52: Specifications
Specifications Transmission Operating Frequency: 2.4 GHz — 2.4835 GHz, 5.15 GHz — 5.25 GHz, 5.725 GHz — 5.85 GHz Aircraft (ARS-S1) EIRP: 2.4 GHz — 2.4835 GHz: 23.8 dBm, Size 5.15 GHz — 5.25 GHz: 18 dBm, Dimensions: 5.725 GHz — 5.85 GHz: 25.6 dBm Approx. - Page 53 Battery Pack (LBP-HS1) Remote Controller (RCR-VH1) Capacity Transmission 2 518 mAh Operating Frequency: 2.4 GHz — 2.4835 GHz, Voltage 5.15 GHz — 5.25 GHz, 37 V 5.725 GHz — 5.85 GHz Battery Type EIRP: 2.4 GHz — 2.4835 GHz: 24.6 dBm, 5.15 GHz —...
- Page 54 By updating the system software, you can add new owned by Bluetooth SIG, Inc. and any use of such marks by Sony Group Corporation and its subsidiaries is under license. features to this product, improve user experience of the • The terms HDMI and HDMI High-Definition Multimedia product, and enhance security of the product.
- Page 56 ©2021 Sony Group Corporation Printed in Japan...
Need help?
Do you have a question about the Airpeak S1 and is the answer not in the manual?
Questions and answers