Advertisement

Please read this guide and the safety/warranty leaflet before use
What is in the Box?
Radio, mains adaptor, quick start guide and safety/warranty leaflet.
Features
- Bluetooth audio streaming from smartphone, tablet or laptop
- DAB / DAB+ / FM RDS wavebands with built-in battery charger
- 20 radio station presets (10 DAB and 10 FM)
- FM RDS station name display
- Up / Down tuning buttons
- Search / manual tuning
- AC adaptor included
- Batteries 4 x AA size / LR6 or rechargeable equivalent (not included)
- Headphone socket for private listening
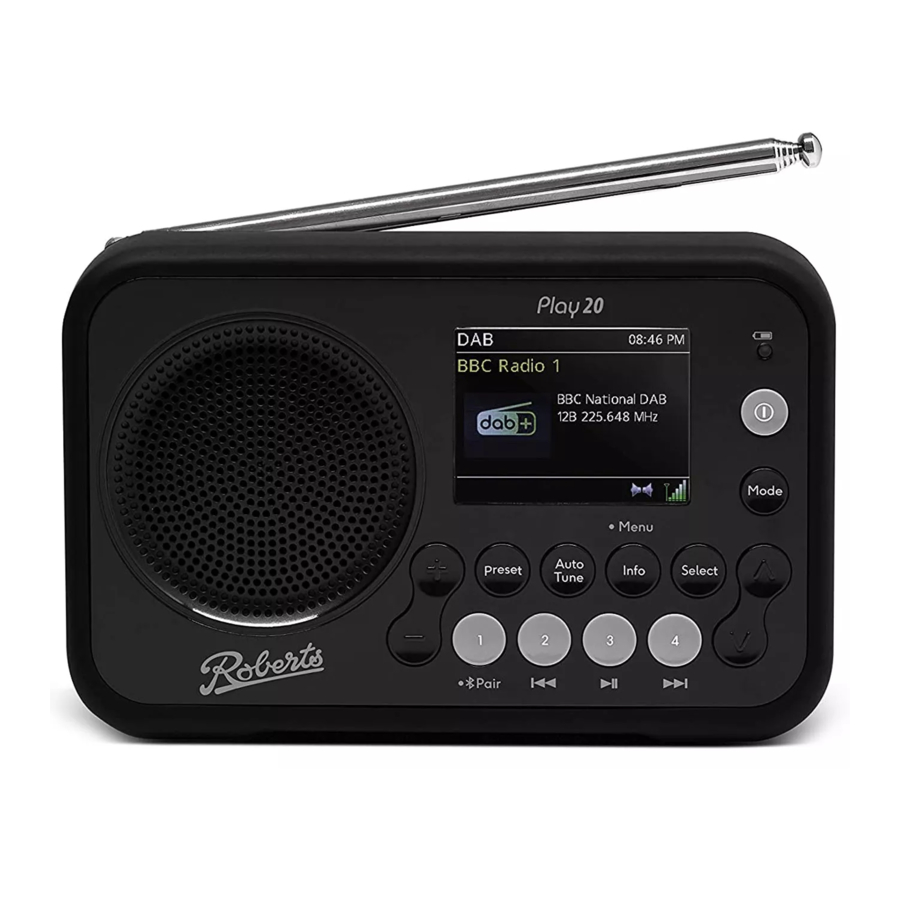
Controls

- Loudspeaker
- LCD display
- Charge / Low battery indicator
- On / Off button
- Mode button
- Tuning Up button
- Select button
- Info / Menu button
- Auto Tune button
- Preset button
- Volume Up button
- Volume Down button
- Preset 1 / Bluetooth Pair button
- Preset 2 / Previous button
- Preset 3 / Play/Pause button
- Preset 4 / Next button
- Tuning Down button
- Telescopic aerial
- Lock switch
- Battery charge switch (inside battery compartment) not shown
- Battery compartment
- USB socket (for software upgrades only)
- Headphone socket
- DC input socket
STEP 1 - Plug in & play DAB radio
A - Lock switch
- Ensure the Lock switch (located on the back of the radio) is in the 'Unlock' position (down) before switching on your radio. The lock switch is used to prevent unintentional operation of your radio when not in use.
![]()

- If you are not using your radio for some time, set the Lock switch to the 'Lock' position (up). The power and all other buttons will be disabled, this should prevent accidental operation when your radio is packed in a suitcase or travel bag.
B - Connect to the mains
Please read the safety leaflet provided before connecting your radio to the mains.
- Place your radio on a flat surface.
- Fully extend the telescopic aerial located on the rear of the radio.
- Plug the cable from the mains adaptor into the DC input socket. Plug the mains adaptor into a wall socket and switch on the socket.
![]()

C - Switch on your radio
- Press the On/Off button to switch on the radio. A start up screen will be displayed and a station scan will be performed.
![]()
- If this is the first time the radio is used a scan of the Band III DAB channels will be carried out. After each use the radio will remember the mode used and then switch on in that mode the next time it is used. To switch off your radio press the On/Off button.
- Note: If no signals are found it may be necessary to relocate your radio to a position giving better reception and carry out a scan for new stations.

D - Select a DAB radio station

- If needed, press and release the Mode button until the DAB mode is selected.
- Press the Tuning Up or Down buttons to step through the list of available DAB stations.
- Press the Select button to select the station.
- Adjust the Volume.
- Some radio stations may have one or more additional broadcasts associated with them. If these are available they will appear immediately after the main station.
- If a DAB broadcast provides a slideshow image, this may be viewed by pressing the Select button. For full-screen, press the Select button again. Press the Select button to exit the slideshow.
- Press and release the Info / Menu button to cycle through the various DAB display options. Choose from, scrolling text, program type, multiplex name, date, bit rate, audio type and signal strength.
E - Scan for DAB stations
As time passes new stations may become available or you may have moved to a different part of the country.
- Press and release the Auto Tune button.

- Your radio will perform a scan of the Band III DAB channels. As new stations are found, they will be added to the list stored in the radio.

- It is recommended that the DAB band be used wherever possible as better results in terms of quality and freedom from interference will usually be obtained than on the FM band.
STEP 2 - Play FM radio
A - Search tuning - FM

- Fully extend the telescopic aerial.
- Press and release the Mode button until FM is selected.
- Press the Tuning Up or Down buttons and then press and release the Auto Tune button. Your radio will scan upwards (low to high frequency) or downwards (high to low frequency) and will stop automatically when it finds a station of sufficient strength.
- If the signal is strong enough and there is RDS data present then the radio will display the station name.
- Adjust the Volume.
- Press and release the Info / Menu button to cycle through the various FM display options. The display options are station name, scrolling text, program type,
B - Manual tuning - FM

- Fully extend the telescopic aerial.
- Press and release the Tuning Up or Down buttons to tune to a station.
- The frequency will change in steps of 50 kHz.
- Adjust the Volume.
Preset radio stations
You may store your preferred DAB or FM radio stations to the preset station memories. There are 20 memory presets, 10 for DAB and 10 for FM. To store presets (5 -10) see overleaf.
Presets are remembered by the radio in the event of a power failure.

To store a preset (1 - 4)
- Ensure your radio is switched on.
- Tune to the required radio station.
- Apply a long press on the required Preset button 1 - 4. The display will show for example, 'Preset 01 Saved'.
- The station will be stored under the chosen preset button. Stations stored in the preset memory may be overwritten by following the above procedure.
To recall a preset (1 - 4)
- Choose DAB or FM mode.
- Press and release the required Preset button 1 - 4.
- Your radio will tune to the station stored in the preset
Menu options

- To access your radios menu system, apply a long press on the Info / Menu button.
- Use the Tuning Up or Down and Select buttons to select menu options.
- To exit a menu, press the Info / Menu button as needed.
STEP 3 - Bluetooth
Connecting Bluetooth devices

- Ensure Bluetooth is enabled on your smart device.
- Press and release the Mode button until the Bluetooth mode is selected on your radio.
- The Bluetooth indicator will flash and your radio will become 'discoverable'.
- On your smart device select 'Play20'. Once the connection is established you may play your music. The Bluetooth indicator will remain steady. Adjust the volume using the volume controls on the radio and on the connected Bluetooth device.
- Press and release the Info / Menu button to cycle through the various display options.
- The audio player in your phone, tablet or PC may be able to respond to the Play/Pause, Next track orPrevious track buttons on the radio. Note: Not all player applications or devices may respond to all of these buttons.
- To connect a different device apply a long press on the Bluetooth Pair button. Your radio will become discoverable by other devices.
DAB menu

Apply a long press on the Info / Menu button to access the following DAB menu options.
Scan - Choose 'Scan' to scan the band III DAB channels.
Prune - Choose 'Prune' and then choose 'Yes' to remove any stations that are no longer available.
Manual tune - Choose 'Manual tune' and then choose the desired DAB channel. The signal strength will be displayed.
Station order - Choose 'Station Order' and then choose from Multiplex, Alphanumeric or Active (available stations).
DRC - Choose 'DRC' then choose 'Off', 'Low' or 'High'. The DRC facility can make quieter sounds easier to hear when your radio is used in a noisy environment. Note: Not all DAB broadcasts use the DRC function.
FM menu

Apply a long press on the Info / Menu button to access the following FM menu options.
Scan setting - Choose 'Scan setting' and then choose either 'Distant' (your radio will scan for both weak and strong signals) or 'Local' (your radio will scan for stations with good reception).
Audio setting - Your radio will play stereo broadcasts in stereo (via headphones) so long as the received signal is of adequate strength. However, as a stereo signal becomes weaker the audio signal will become poorer.
If a station being received is weak some hiss may be audible. To reduce the hiss choose 'Audio setting' then choose 'Mono only'. To return to stereo/mono mode choose 'Stereo'.
System settings

Access your radios 'System settings' from the current menu.
Clock format - Choose 'System' then 'Clock format' and then choose '12 or 24 hour'.
Backlight - Choose 'System' then 'Backlight'. To adjust the display brightness when the unit is playing select 'On Level' then choose 'High', 'Medium', 'Low' or 'Off'.
To change the duration for which the display will remain bright after using any of the controls choose 'System' then 'Backlight'. Choose 'Timeout' and then choose from 'On' or 10, 30, 60 or 180 seconds.
Language - Choose 'System', 'Language' and then choose a desired language from the list.
Factory reset - If you wish to completely reset your radio to its initial state perform a factory reset. Choose 'System' then 'Factory reset' and then choose 'Yes'. All user entered settings will be erased.
SW version - The software display cannot be altered and is just for your reference. Choose 'System' then 'SW version'.
Preset radio stations
There are 20 memory presets, 10 for DAB and 10 for FM.

To store a preset 1 - 10
- Tune to the required radio station.
- Apply a long press on the Preset button, 'Save to Preset' will be displayed.
- Use the Tuning Up or Down buttons to scroll to an unused preset or a preset you wish to change.
- Press the Select button to save the preset.
To recall a preset 1 - 10
- Choose DAB or FM mode.
- Give a short press on the Preset button, 'Preset Recall' will be displayed.
- Use the Tuning Up or Down and Select buttons to select the desired preset station.
Battery operation
Please read the safety leaflet provided before using batteries.
Battery operation (Alkaline)
- Remove the battery cover on the back of the unit by pushing the catches in the direction of the arrows.
- Slide the switch inside the battery compartment to the Alkaline position (as shown) and insert four AA size alkaline batteries. Take care to ensure all batteries are inserted with the correct polarity as shown inside the battery compartment. Then replace the battery cover.
![]()
when using alkaline batteries the battery switch must be placed in the alkaline position. Failure to do so could result in serious damage to the batteries or radio. If no batteries are fitted then set the switch to the Alkaline position. This minimises the power consumption when the radio is powered from the mains.
![]()


Battery operation (Rechargeable)
- Remove the battery cover on the back of the unit by pushing the catches in the direction of the arrows.
- Slide the switch inside the battery compartment to the NiMH position (as shown).
![]()
- Insert four identical Rechargeable AA size batteries. Take care to ensure all batteries are inserted with the correct polarity as shown inside the battery compartment. Then replace the cover. The radio is designed to be used with Nickel Metal Hydride (NiMH) rechargeable batteries. No other type of rechargeable battery should be used in the radio.
- Plug the mains adaptor into your radio and then plug the adaptor into the mains. The charge / battery indicator
![]() will flash green indicating the batteries are charging. Batteries will be fully charged in around 7 hours and a message will be displayed. The charge / battery indicator shows a steady green light when the battery charging is complete.
will flash green indicating the batteries are charging. Batteries will be fully charged in around 7 hours and a message will be displayed. The charge / battery indicator shows a steady green light when the battery charging is complete. - Under some conditions the charging indicator may switch off after flashing only briefly. This may happen if the batteries are already freshly charged, or if the radio detects that you may be attempting to recharge alkaline batteries. In these cases the charging will be stopped. If the charge process stops this may be due to a faulty battery. In this case the charge / battery indicator will show red and a battery fail message will be displayed. The faulty battery will be marked with a red cross.

Note: You should never attempt to recharge alkaline batteries in the radio. Attempted recharging of alkaline batteries can be dangerous.
![]()
when using rechargeable batteries the battery switch must be placed in the NiMH position. Batteries will only be charged when the radio is switched off and connected to the AC adaptor.- When the batteries are exhausted, the low battery indicator will show red for a short while. The radio will then switch itself off. It may not be possible to switch the radio back on until the batteries are recharged, or until the radio is connected to the mains adaptor.
- If the radio is not to be used for any extended period of time it is recommended that the batteries are removed from the radio.
- We would recommend for economy that the Play 20 is used via the AC adaptor whenever possible with battery operation for occasional or standby use only. If extended listening using batteries is anticipated, then the use of rechargeable batteries is recommended.
![]()
Replace batteries only with the same or equivalent type. Danger of explosion if the batteries are incorrectly replaced.
Note: Never mix alkaline and rechargeable batteries.

Headphone socket

A 3.5mm Headphone socket located on the left hand side of your radio is provided for use with headphones. Inserting a plug automatically mutes the internal loudspeaker.
Please be aware that the sensitivity of headphones can vary widely. We therefore recommend setting the volume to a low level before connecting headphones to the radio.
Note: If the unit is in the Bluetooth stop mode position for more than 15 minutes it will automatically switch off. To use the radio again, simply press On/Off.
Specifications
Power requirements
Mains (adaptor) AC100 - 240V  50/60Hz
Batteries 4 x AA size / LR6 Alkaline or NiMH rechargeable (not included)
Battery life Up to 25 hours using alkaline cells depending upon volume, and operating mode.
Circuit features
Headphone socket - 3.5mm dia. Aerial System - DAB / FM telescopic aerial
Bluetooth standards A2DP, AVRCP Bluetooth codecs supported SBC and AAC
Frequency coverage FM 87.5 - 108MHz, DAB 174.928 - 239.200MHz
Bluetooth 4.1 frequencies 2.402 - 2.480GHz
Product markings
DC Power input 7.5V / 0.8A
This symbol indicates AC voltage.  This symbol indicates DC voltage.
Mains adaptor
Manufacturer of AC Adaptor: Dongguan Becky Electronics Tech Co.,Ltd, Model: BQ12E-0750800-B, Input voltage: AC100 - 240V, Input AC frequency: 50/60Hz, Output voltage: DC7.5V, Output current: 0.8A, Output power: 6.0W, Average active efficiency: > 79.71%, No-load power consumption: < 0.1W
The name plate is located on the rear of the radio.
The company reserves the right to amend the specification without notice.
Designed & Engineered in the UK
Made in China
Issue 2
2021-01-27

ROBERTS RADIO LIMITED
www.robertsradio.com
© 2021 Roberts Radio Limited


VideosRoberts Play 20 Review Video
Documents / Resources
References
Download manual
Here you can download full pdf version of manual, it may contain additional safety instructions, warranty information, FCC rules, etc.
Download Roberts Play 20 - DAB / DAB+ / FM Radio With Bluetooth Manual
Advertisement


Need help?
Do you have a question about the Play 20 and is the answer not in the manual?
Questions and answers