Advertisement
Quick Links
Advertisement

Related Manuals for MSI P230


Summary of Contents for MSI P230
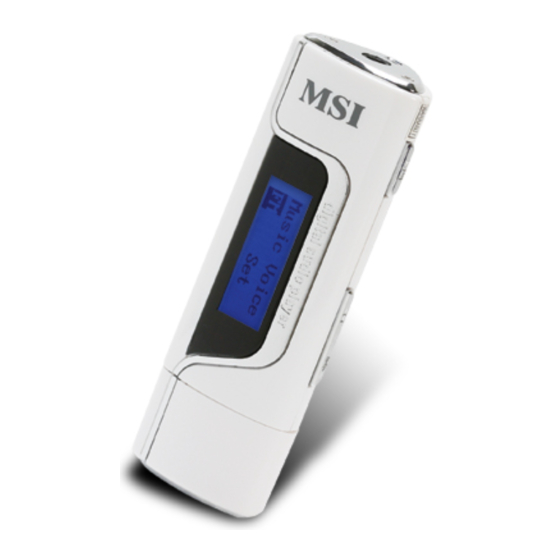
- Page 1 P230 Instruction manual...
- Page 2 Notice: ★ he battery should be taken out if the unit is left unused for a long period in order to avoid being corroded by the seepage. ★Do not use the unit in places that are extremely hot, cold, dusty, or humid. ★Avoid dropping the unit.
- Page 3 Features: 7-Color backlight MP3/ WMA player No driver necessary under Windows 2000/ XP/ ME 128MB-2048MB USB movable storage disk, have movable storage functions. High quality digital voice recording Adjust several sound effects Supports DRM10 function FM tuner and FM recording Support Lyric Synchonization function A-B repeat USB 2.0...
- Page 4 1. Music mode 2. Playback mode 3. Play sequence 4. EQ mode 5. AB repeat icon 6. Battery capacity 7. lyrics/menu display 8. Track display 9. Time display 10-Lock icon...
- Page 5 1-LCD display 2-Battery cover 3-Play button 4-Record button 5-M button 6-FF 7-Lock button 8-REW 9-String slot 10-Earphone Jack...
- Page 6 1. Basic operation 1) Battery Installation Note: this player is powered only by battery. When the battery icon displays, please replace the battery with new one in time. Please finish replacing the battery within 5 minutes, or the set time and date in the player would lose and needs to be re-set.
- Page 7 1). playback: Under stop or pause status, press the “ the playback indicator, repeat indicator, song number, song time, the battery level , volume, and track icon. 2), Pause/Stop/Power off Pause: under playback mode, press “ displayed on the LCD. Press the button again, the unit continues to play. Stop: under playback or pause status, press and hold “...
- Page 8 FF/REW function. Press M button to cancel the FF/REW function. 4). Output EQ Mode Setting: Press M button to enter the menu, press ◄◄ or ►► button to select “setting” and press M button to confirm. Select “EQ” and press M button to confirm to enter. Press ◄◄ or ►►...
- Page 9 button to select “yes” or “no”. Select “yes” and press M to delete the current file and skip to the next one. Select “no” to give up deleting the current file and skip to the next one. Press ◄◄ or ►► to select the track you want to delete. 8).
- Page 10 press M button again to confirm, the LCD will display "VER", "Total Capacity", "Rest Capacity", press any button to exit. 11). Language selection: Press M button to enter the menu, then press ◄◄ or ►► to select “Setting" and press M button again to confirm.
- Page 11 to confirm. Press ◄◄ or ►► button again to adjust the date or date format. Press “cancel” to give up setting; press “OK” button or press and hold “M” button to confirm and return to the previous menu. 14). Check Time/Date Press M button, select “time/date”...
- Page 13 Note: 1. each sentence shall not exceed 12 single-characters (i.e. English or number characters) or 8 double-characters (i.e. Chinese characters). 2. Characters as follows should not be used in title blank and singer blank: \ /: *? " < > | [ ] 3.
- Page 14 4) Volume Adjustment 5) Delete Track The above operations are as same as the operations of MP3, WMA. 5. A-B Repeat Setting: Under playback mode, press REC button to set the start point A, the LCD displays A-; then press REC button again to set the end point B, the LCD display A-B at this time.
- Page 15 ·Search for next station: Press “ hold “►►”button to search for the next station from high frequency; press and hold “◄◄” button to search for the next station from low frequency. · Auto searching: Press “ all of the stations. The player will save the stations automatically. The unit can store 20 stations at most.
- Page 16 the power directly, the file will lose .so if you want to keep them, you must press and hold button, until the unit powered off normally. 5). Previous/Next station Under FM receiving status, press◄◄ button to skip to the previous station, and press ►►to skip to the next station.
- Page 17 ·when the recording source is microphone, the player starts to record and save the external sounds in the flash memory. 3). Pause recording Under recording status, press button to pause recording; press button again to resume. 4). Stop recording Under recording status, press REC button to stop recording. Other keys are invalid. Note: Fxxx.
- Page 18 Note: A. Windows98 needs installation of the driver program, while Windows 200/XP/ME do not .B. DO NOT connect the MP3 player to the computer before installation is completed. C. If you want to use Win 2000, the windows2000 service pack 3.0 (in the install CD) must be installed.
- Page 19 Note: if the window shown below appears, please click yes (Y) to continue the installation 1). Connecting to a computer Connect your MP3 player to PC via USB cable, press “ ” button or under the condition that the unit was turned on, the window will appear indicating the new...
- Page 20 LCD display. 2). Upload/ Download files So long as the driver program has been properly installed, the MP3 player itself is a mobile disk after being connected to a computer. Therefore the file transfer is operated in the same way as the ordinary disk.
- Page 21 or Windows XP; otherwise it may cause damage or data loss to the player. Operation steps are as follow: a. Double clicks on icon of “Unplug or Eject Hardware ” on bottom right corner of the computer (note: under XP, it is “delete hardware safely”) as following: b.
- Page 22 Click OK on the pop-up window. See the following picture on the right. You may then unplug the MP3 player from USB port after the above steps. 3) Upgrade/Renew Software You’d better not upgrade the software unless the player works abnormally, i.e. not able to...
- Page 23 be powered on. A. Connect MP3 with computer. B. Then a mobile disk icon will appear in My Computer, see picture a: C. Steps: Start>Program>Sigmatel MSCN Audio Player>Sigmatel MSCN Firmware Download, see the following picture b. Then a window will pop out as picture c:...
- Page 24 After the above windows close automatically, the window of upgrading software will pop out as picture d: Note: if you want to format data area of the flash while upgrading, you need to choose Format Data Area. System will pop out a window as the following picture. If you want to format Data Area, click yes.
- Page 25 E: After upgrading, please click Close button. 4). Format the MP3 Player A. Connect the player to the computer. B. Click mobile disk with right button of the mouse, and choose “Format’ from the menu, see the right picture:...
- Page 26 C. That the format window will pop out, see the above picture: D. Click Start in the format window. Then click OK in the pop-out window and start formatting MP3 flash memory. E. After formatting, click OK button in the right picture.
- Page 27 5). Uninstall the driver program A. Disconnect the player to the computer. B. According to the following picture, click Start>Program>Sigmatel MSCN Audio Player>Uninstall, or Control Panel>Explorer Immediately the following window will pop out. Click Cancel if you want to cancel the operation, otherwise the following conversation window will appear.
- Page 28 Click OK to start cancel the driver program, with the following conversation window appears then. Click Finish when uninstall completes. Note: This driving program may prevent driving program installation of other MP3...
- Page 29 products. Download driving program manually under device manager or refer to the technical support of our company. Steps for downloading driving program manually: A. Under Windows 2000/XP, click My computer>Properties>Hardware>Device Manager with the right button on the mouse. See following picture on the left. Double click Player Recovery Device Class>Player Recovery Device, see as follows: Click Driver>Update Driver…...
- Page 30 Click NEXT on each continuously appearing window. Click NEXT, the following will pop-up: Find out the corresponding program driving by “Browse” and then click “OK”, following window (left) will pop-out. Select “uninstall one if the drive (I)” and then click NEXT(as the right chart).
- Page 32 B After connecting the player to the computer, click My computer>Properties>Device Manager by right button on mouse under Windows 98, to check whether there is Player Recovery Device in device manager, see following picture. Double click Player Recovery Device Class>Player Recovery Device, see as follow left chart: Click Driver Program as follow right chart:...
- Page 33 “Upgrade driver(U)…”, as chart 1. Click NEXT, chart 2 will pop-out: Find out the corresponding program driving by “Browse”, and then click NEXT, chart 3 will pop-out: Select the “install other driver (I) in the dialogue box, and click NEXT, chart 4 will pop-out.
- Page 34 ① ③ ② ④...
- Page 35 2) Why doesn’t the memory size displayed under the operational system match the figure on the tab? The software in the MP3 player takes up a small portion of the memory, which coincides with the corresponding standards. 3) About WAV format This solution supports WAV files of IMA ADPCM format only.
- Page 36 Using or deleting files frequently in a long time will generate fragments in the flash memory, like fragment in the hard disk, which will cause the player running slowly. 5) What if the driver program of the MP3 player be damaged? This is caused by improper operation. For details, please refer to the Upgrade/Renew Software part.
- Page 37 Instruction of DRM10 function: (by using this function, you should install Windows Media Player 10 first) 1. Insert the USB, the dialogue box “MTP Media Player” appears. Select “OK” 2. Searching for device, it enters the interface of Windows Media Player 10. Sometimes the second dialogue box as below appears.
- Page 38 3. Synchronize the downloaded registered music files to the MP3 player. Operations are as below: a. Select the file, click the right mouse button and select “add to sync list”. Select “sync” on the pop-up interface, the selected music file is added to the sync list then.
- Page 39 b. Click “start sync”, and the selected file will be synchronized to “MTP Device”.
- Page 40 Instruction of coping files: 1. Open “my computer” and double click “MTP Device”. 2. There are two folders: “media” and “data”. The “media” folder is used for depositing registered music files and the “data” folder deposit other files. Note: registered music files can only be synchronized into “MTP Device”.
- Page 41 Switchover in the USB on-line mode The set can realize the switchover between MTV and common mobile disk in the two on-line modes by the updated driver. Operations are as below: 1 When the set is connected with a PC for the first time, the system will identify it as the...
- Page 42 “MTP device”, the dialogue box as below appears, see picture 1:...
- Page 44 2. Click “Cancel”, close picture 1, click “My computer” with the right mouse button, select “Property” and then open the “System properties” dialogue box to select “Hardware”,see picture 2:...
- Page 46 3. Click “Device Manager” button,it will pop-up the “Device Manager” dialogue box, then click “Windows Portable Devices”, it appears “MTP Player”, see picture 3:...
- Page 48 4.Click “MTP Player” with the right mouse button to select “Update Diver”, the “Hardware update wizard” dialogue box will be popped up, then select “Install it from the list or the specific location(Advanced) ”, see picture 4:...
- Page 50 5. Click “Next”, select “Don’t search, I’ll choose the driver to install”, see picture 5:...
- Page 52 6. Click “Next”, choose “Show compatible hardware”, it will appear “MTP device” and “USB Mass Sorage Device”, see picture 6, select “USB Mass Sorage Device”.
- Page 54 7. Click “Next”, update the driver, then click “Finish”, it will switch the MTP mode to the common mobile disk mode. 8. To switch the common mobile disk mode to MTP mode, just click “Universal Serial Bus Controllers” to find “MTP” in the “Device Manager” dialogue box, see picture 7. Update the driver as per step 4-7, and select “MTP mode”...
-
Page 56: Weee Statement
WEEE Statement English To protect the global environment and as an environmentalist, MSI must remind you that... Under the European Union ("EU") Directive on Waste Electrical and Electronic Equipment, Directive 2002/96/EC, which takes effect on August 13, 2005, products of "electrical and electronic equipment"... - Page 57 MSI will comply with the product take back requirements at the end of life of MSI-branded products that are sold into the EU. You can return these products to local collection points.
- Page 58 MSI prendra en compte cette exigence relative au retour des produits en fin de vie au sein de la communauté européenne. Par conséquent vous pouvez retourner localement ces matériels dans les points de collecte.
- Page 59 Electronische producten (2002/96/EC), die op 13 Augustus 2005 in zal gaan kunnen niet meer beschouwd worden als vervuiling. Fabrikanten van dit soort producten worden verplicht om producten retour te nemen aan het eind van hun levenscyclus. MSI zal overeenkomstig de richtlijn handelen voor de...
- Page 60 MSI dragen en verkocht zijn in de EU. Deze goederen kunnen geretourneerd worden op lokale inzamelingspunten. ČESKY Záleží nám na ochraně životního prostředí - společnost MSI upozorňuje... Podle směrnice Evropské unie ("EU") o likvidaci elektrických a elektronických výrobků...
- Page 61 MSI si adeguerà a tale Direttiva ritirando tutti i prodotti marchiati MSI che sono stati venduti all’interno dell’Unione Europea alla fine del loro ciclo di vita.
- Page 62 MSI će poštovati zahtev o preuzimanju ovakvih proizvoda kojima je istekao vek trajanja, koji imaju MSI oznaku i koji su prodati u EU. Ove proizvode možete vratiti na lokalnim mestima za prikupljanje.
- Page 63 çöpe atılamayacak ve bu elektonik cihazların üreticileri, cihazların kullanım süreleri bittikten sonra ürünleri geri toplamakla yükümlü olacaktır. Avrupa Birliği’ne satılan MSI markalı ürünlerin kullanım süreleri bittiğinde MSI ürünlerin geri alınması isteği ile işbirliği içerisinde olacaktır. Ürünlerinizi yerel toplama noktalarına bırakabilirsiniz.
Need help?
Do you have a question about the P230 and is the answer not in the manual?
Questions and answers