Table of Contents
Advertisement
Quick Links
Advertisement
Table of Contents

Related Manuals for MSI P650


Summary of Contents for MSI P650
- Page 1 P610/ P650 User’s Manual...
- Page 2 MSI will comply with the product take back requirements at the end of life of MSI-branded products that are sold into the EU. You can return these products to local collection points.
- Page 3 Elettronici non possono più essere eliminati come rifiuti municipali: i produttori di detti materiali saranno obbligati a ritirare ogni prodotto alla fine del suo ciclo di vita. MSI si adeguerà a tale Direttiva ritirando tutti i prodotti marchiati MSI che sono stati venduti all’interno dell’Unione Europea alla fine del loro ciclo di vita.
-
Page 4: Table Of Contents
How to Use This Manual ... 1 Safety Instructions ... 2 Unpack... 2 Chapter 1. Introduction ... 3 Chapter 2. Getting Started... 4 Overview ... 4 LCD Display... 5 Main Menu ... 5 Normal Playback Mode ... 6 Battery Recharge... 7 Battery Status ... - Page 5 Video... 20 Play Video ... 20 Notes... 21 Read *.txt File ... 21 FM Radio (optional) ... 22 Listen to FM Ratio... 22 Customize Channels/ Auto-Scan ... 23 Browser... 24 Browse Contents... 24 Game (optional) ... 25 Classic Sudoku ... 25 Photo Puzzle ...
-
Page 6: How To Use This Manual
ME / 2000 / XP, and you are capable to follow the step-by-step instructions to install the utility of P610/ P650. For users who are not able to manage the OS properly, it is suggested to learn more about Microsoft Windows by referring to your Microsoft Windows manual before installing the provided utility. -
Page 7: Safety Instructions
Safely Remove Hardware procedures in manual, or the system might be failure. 11. Do not format the device, or the device might be corrupted. 12. Do not try to disassemble or repair P610/ P650 by your own, every repair of this device should be done by qualified personnel. -
Page 8: Chapter 1. Introduction
P610/ P650. P610/ P650 will improve the convenience of listening music, viewing photos/ videos, and sharing data. We are proud to say that P610/ P650 is thoroughly tested and certified by our reputation for unsurpassed dependability and customer satisfaction. -
Page 9: Chapter 2. Getting Started
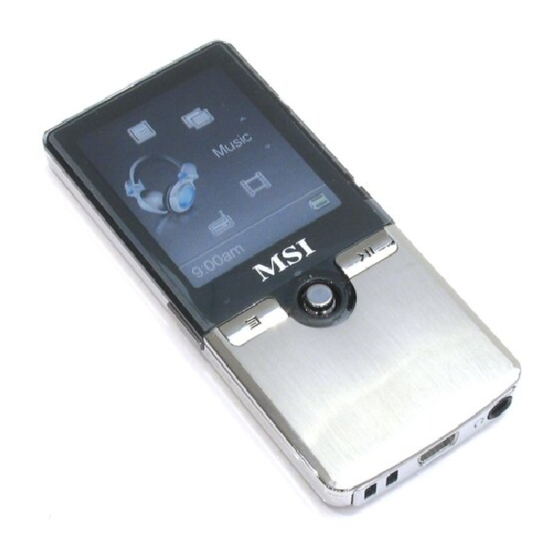
Chapter 2. Getting Started Overview 1. Display Screen 2. MIC 3. Exit/ Submenu 4. Play/Pause Power 5. Record Repeat A->B 6. Lock 7. Up Volume Up Read status and information at this window. Internal Microphone. Press it to exit to higher level menu. Hold it for two seconds to display available options. -
Page 10: Lcd Display
8. Down Volume Down 9. Left Previous/Rewind 10. Right Next/Forward 11. OK/ Enter 12. USB Connecter 13. Strap Hole 14. Earphone Jack Line-In Jack LCD Display Main Menu 1. Function Icon 2. Function Name 3. Scroll 4. Function Icon 5. Clock 6. -
Page 11: Normal Playback Mode
Normal Playback Mode A. Function B. Play/Pause C. Track Name D. Album Name E. Artist Name F. Equalizer G. Playback Time Bar Shows the playback progress. H. Track Timer Track Number Clock K. Repeat/ L. EQ/SRS M. Battery Displays current function. Displays music or recording files playback status. -
Page 12: Battery Recharge
Li-ion battery, follow the instructions below: 1. On the bottom side of P610/ P650, you could see a USB (B type, female) port. 2. Do not turn on P610/ P650. Plug mini USB (B type, male) end of supplied USB cable to P610/ P650, and USB (A type, male) end to your computer. -
Page 13: Lock Switch
P610/ P650 has a Lock Switch to avoid accidental operation. Slide it to lock position while power is on, and all function keys are disabled. Slide it to unlock to continue. If the switch is at lock position, P610/ P650 can not be turned on. Unlock it to continue. Utility CD P610/ P650 package includes a Utility CD. -
Page 14: Chapter 3. Connect And Disconnect
Internet beforehand, to help system recognize P610/ P650 in MTP mode. 1. On the bottom side of P610/ P650, you could see a USB (B type, female) port. 2. Plug mini USB (B type, male) end of supplied USB cable to P610/ P650, and plug USB (A type, male) end to your computer. -
Page 15: Safely Remove From Computer
Safely Remove from Computer After managing the files by PC, follow the steps to safely remove P610/ P650 to prevent system or device corrupt: 1. While an USB device is connecting to a computer, there will be an the task bar. Double click the icon to bring Safely Remove Hardware dialog box. -
Page 16: Chapter 4. Basic Usage
Lock switch and battery capacity. Refresh Music Database If the transfer mode has been set to be MSC, the display of P610/ P650 will show “Refresh Music Database” message once power on after disconnecting from computer. Select Yes and confirm to refresh the music database for sorting the music files by latest management. -
Page 17: Power Off
2. The screen will display the Power Off Logo. 3. Then the screen will be all dark, the device is turned off. Note: if P610/ P650 does not response for several minutes, press for about 10 seconds to force shut down. -
Page 18: Music
Music Music Playback P610/ P650 supports MP3 the steps below to enjoy music. 1. To play music/ voice, select and enter the Music option on Main Menu. 2. Then press the music files. - Select All List to play all music files stored. -
Page 19: Add Songs To Playlist
Add Songs to Playlist In P610/ P650, you can edit personal playlist to include your favorite songs. Follow the steps below. 1. In playback mode or on Music file list, press for 2 seconds to call submenu. 2. Select the Add to PL item and press OK key to activate. -
Page 20: Remove A Song From Playlist
Remove a Song from Playlist 1. Select and enter the Music item in Main Menu. 2. Select the Playlist you want to edit. 3. Use key to select a song to delete, and press button for 2 seconds to call submenu. 4. -
Page 21: Lyric Function On/ Off
Lyric Function On/ Off P610/ P650 supports lyric display. If you stored songs with lyric files, you can turn on the lyric to read by the steps below. 1. In playback mode, press submenu. 2. Select the Lyric On item and press OK key to confirm, you can read the lyric as the track is playing. -
Page 22: Set Eq
Set EQ P610/ P650 provides various EQ modes, such as POP, Rock, Jazz, and Classical. You can choose as following steps to increase the enjoyment of listening to music and to meet your personal needs. 1. In playback mode, press submenu. -
Page 23: Photo
Photo P610/ P650 supports JPEG graphics (up to 8 mega pixels) and provides slideshow function. View Photo 1. To view photos stored on P610/ P650, select Photo option on Main Menu and press OK key to enter the photo function. -
Page 24: Slideshow
Slideshow You can have the JPEG files slideshow on P610/ P650. 1. While viewing one photo, press slideshow. There will be a corner of the display. 2. To stop slideshow, press be a icon at the bottom right corner of the display. -
Page 25: Video
Video Play Video P610/ P650 supports M-JPEG format (the .mov and M-JPEG .avi files). 1. To play video files stored on P610/ P650, select Video option on Main Menu and press OK key to enter the video function. 2. Select a video file on the file list and press OK key to play the selected file. -
Page 26: Notes
Notes Read *.txt File P610/ P650 supports reading .txt and .lrc Unicode files. 1. To read text files stored on P610/ P650, select Notes option on Main Menu and press OK key to enter the Notes function. 2. Select a text file on the file list and press OK key to read it. -
Page 27: Fm Radio (Optional)
FM Radio (optional) Listen to FM Ratio FM radio function is optional for P610/ P650. If your P610/ P650 supports FM Radio function, follow steps below to enjoy FM radio. 1. To listen to the FM radio broadcast by P610/ P650, select the Radio option on Main Menu and press down navigator key or OK key to enter. -
Page 28: Customize Channels/ Auto-Scan
Customize Channels/ Auto-Scan You can also set channels at your preference. And if you go to different region, you can perform Auto Preset to scan available stations. 1. Adjust the frequency to the station you need, press button for 2 seconds to call submenu, and select Save CH option. -
Page 29: Browser
Browser P610/ P650 provides an easy access to file management. The file browser can open and arrange files stored on the device. Browse Contents In Browser, you can open video, music, photo, note files which are readable by each function page. -
Page 30: Game (Optional)
Game (optional) P610/ P650 might be bundled with easy game (s), depends on the model you purchase. Please select a game to play when need. Below are the descriptions and instructions of games. If the game bundled in your device is not mentioned below, you can understand and enjoy it with few tries. -
Page 31: Mini Sudoku
move the piece at the left of the box to right. (Quit by press button once. Hold button can rewind the steps.) After all pieces are replaced in order, the black box will also appear. You can read available steps to move at the right lower corner. If you can not restore the photo within, the game will be over. -
Page 32: Setting
Setting Enter Setting Menu, you can adjust all the options and allow P610/ P650 to meet your needs. 1. Select Setting option on Main Menu and press OK key to enter. Lyric On/ Off P610/ P650 supports lyric display. If you store songs with lyric files, you can turn on the lyric to read lyric by the steps below. -
Page 33: Srs
P610/ P650 supports SRS effect. WOW is a special combination of SRS audio technologies that creates a thrilling experience with deep rich bass from sound source. Note that when SRS is enabled, the EQ settings will be disabled at the same time. -
Page 34: Set Eq
Set EQ P610/ P650 provides POP, Rock, Jazz, and Classical EQ modes. Note: Once EQ is enabled, SRS settings will be disabled at the same time. 1. Select Setting option on Main Menu and press OK key to enter. 2. Select and enter EQ item. -
Page 35: Record Settings
Record Settings 1. Select Setting option on Main Menu and press OK key to enter. 2. Select and enter Record option. 3. Select and enter the Quality item. 4. Select one of the options by your needs. 5. You can set the record file type to be MP3 or WAV by selecting the options in File Type, then press OK key to confirm. -
Page 36: Slide Settings
Slide Settings You can set how long each image is displayed. 1. Select and enter Setting item in Main Menu. 2. Select and enter Slide Interval item. 3. Select one from the options to meet your needs. 4. Press button once to go back to upper level. Select and enter Slide Repeat item. -
Page 37: Radio Region
OK key to confirm. Power Off You can set the timer under Power Off setting to turn off P610/ P650 auto- matically. After the selected period, P610/ P650 will stop playing and be off. 1. Select the Setting item in Main Menu. -
Page 38: Backlight Off
Backlight Off Backlight timer program can save the power. After having been idle for selected period, the device will cease backlight. Press any button to have backlight on. 1. Select the Setting item in Main Menu. 2. Select and enter Backlight Off item. 3. -
Page 39: Language
Language 1. Select the Setting item in Main Menu. 2. Select and enter Language item. 3. Select a language you want to use, then press OK key to confirm. -
Page 40: Date And Time
Date and Time 1. Select the Setting item in Main Menu. 2. Select and enter Date/Time item. 3. To adjust how you want the time to be displayed, select the Time Format item, and then select 12 hour or 24 hour format. -
Page 41: Transfer Mode
Transfer Mode 1. Select the Setting item in Main Menu. 2. Select and enter Transfer Mode item. 3. Select MTP/ MSC item. Note: MTP: Media Transfer Protocol mode; supported by Windows Media Player 10. Use MTP mode to synchronize music files by Windows Media Player 10 can shorten the time to load music tracks. -
Page 42: Info
Info 1. Select the Setting item in Main Menu. 2. Select and enter Info item. 3. You can read device information on the screen. -
Page 43: Record
Record Line-In Recording P610/ P650 has a build-in encoder. With this encoder, you can record external audio via Line-In Jack. First of all, plug one end of Line-In cable to the Audio-out jack of a Walkman, Computer, Radio, TV, or other Audio Equipments, and plug the other end to the Line-In jack of P610/ P650. -
Page 44: Microphone Recording
Microphone Recording P610/ P650 has a built in Microphone, which can also works as a synchronizing recorder. In other words, you can use it to record your voice in either an interview or a speech. To proceed Microphone Recording, follow the steps below. -
Page 45: Language Learning Function
Language Learning Function P610/ P650 enables users to listen to a particular section repeatedly during music or voice playback. With this function, users will be able to pay attention to the repeated section and to achieve the result of language learning. -
Page 46: Synchronize Songs
Synchronize Songs Once the Windows Media Player Plug-in of P610/ P650 has been installed (from the supplied CD), refer to steps below to synchronize: Note: If the version of Windows Media Player on your computer is below 10, upgrade it via Internet beforehand. -
Page 47: Appendix A. Specifications
Supports up to more than 10 languages which may vary from country to country. NOTE: The firmware of P610/ P650 can be recovered or updated by advanced users. To know details of the procedures to recover or update firmware, please visit http://www.msi.com.tw...
Need help?
Do you have a question about the P650 and is the answer not in the manual?
Questions and answers