
Related Manuals for Kohler VEIL+ K-5401T-3-0


Summary of Contents for Kohler VEIL+ K-5401T-3-0
- Page 1 Installation Guide 安装说明 VEIL INTELLIGENT TOILET 新维亚智能座便器 K-5401T-3-0 K-5401T-XP3-0 科勒(中国)投资有限公司 静安 制造商: 中国上海市宝山区丰翔路1955号 邮编: 200444 2-15 English page 16-29 中 文 页 码 1332623-T01-H...
-
Page 2: Before You Begin
These instructions contain important care, cleaning, and warranty information - please leave instructions for the consumer. We appreciate your commitment to Kohler quality. Pleas e take a few minutes to review this manual before installation. If you encounter any installation or performan ce problems, please don't hesitate to contact us.Thanks again for choosing Kohler Company. -
Page 3: Specifications
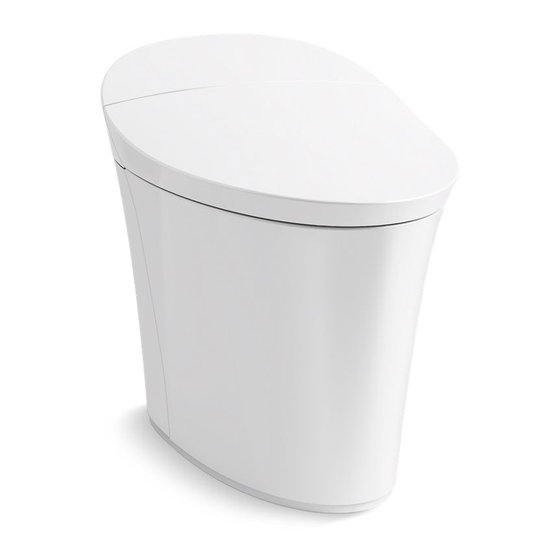
Measurements Unit: mm Remote control Waterproof socket (grounding type) Water Inlet hose Fig.#3 Kohler reserves the right to change marked dimensions without prior notice. SPECIFICATIONS Flush volume 4.0L Water efficiency grade* Level III 305mm Pit distance Min water pressure 0 .07MPa (dynamic pressure) Water pressure Max water pressure 0.74MPa... -
Page 4: Preparations Before Installation
A. Hold the rim of the vitreous shell and take out the toilet. WARNING: Risk of personal injury and product damage!Please do not hold the rim of the bidet seat when lifting the the toilet. As the toilet is heavy, please seek help if necessary. Toilet Fig.#5 1332623-T01-H Kohler Co. -
Page 5: Installation
(GFCI's) or Earth-Leakage Circuit-Breakers (ELCB's). Keep bath and shower away from electrical parts (such as remote controller, receptacle,etc). When the electrical supply is mounted on the wall, a GFCI or ELCB protected and water proof receptacle is required. Kohler Co. 1332623-T01-H... - Page 6 Make sure the toilet side mark symbol is align to the drain hole centerline on the finished floor.Mark down the left and right holes. Mark symbol Hole(two sides) Fig.#9 D. Drill two holes and insert plastic inserts and T-bolts (Purchased by customer) 10mm Bolt Fig.#10 1332623-T01-H Kohler Co.
- Page 7 Position the floor flange align the drain hole, and press it onto the finished floor . Silica gel Fig.#1 G. Remove side plates Unscrew the nut cap on the tee joint. Nut cap Side Plate Fig.#1 Kohler Co. 1332623-T01-H...
- Page 8 CAUTION: Risk of product damage . Do not move the toilet after the trap way is properly seated to avoid the wax seal invalidated, Change the wax ring if it is needed to move. WARNING: Risk of personal injury or product damage. Overtightening may cause breakage or chipping. Fig.#14 1332623-T01-H Kohler Co.
- Page 9 The supplied hose must be used for this installation. 1. Connect the water outlet. 2. Open the shut-off valve. NOTE:Please use the water supply hose accompanying with new machine. The old hose assembly shall not be used again. Fig.#16 Kohler Co. 1332623-T01-H...
- Page 10 Apply one circle of silicone gel around toilet bottom to seal the gaps. Wipe the excessive silicone gel on the bottom of left/right plate. Projecting portion Coated with silica gel of silica gel are cu Side plate (two sides) t off (two sides) Fig.#18 1332623-T01-H Kohler Co.
-
Page 11: Installation Steps
Install the screw so it is covered. Place the remote controller on the holder. Fig.#19 Installation Steps: Public Anti-loss Installation Screw Hook Expansion Remove the Expansion screw pipe silicome plug Remove the Hook plate silicome plug Remote control Dock Seat gasket Fig.#20 Kohler Co. 1332623-T01-H... - Page 12 Water Pump: On (Press and hold flush and front wash button on toilet side panel, short Spiral Wash: “beep” indicates water pump is on, long Water Temperature: mid “beep” indicates water pump is off. ) Water flow intensity: mid Position: dial 3 1332623-T01-H Kohler Co.
-
Page 13: Troubleshooting
Trouble shooting This guide of trouble shooting is for general help only. Authorised representatives or qualified electricians of Kohler Company shall be able to solve all electrical failures. If you want to know about the service of warranty, please contact local dealers or wholesalers. - Page 14 If this toilet is to be repaired and maintained, you have to: Disconnect the power plug of toilet If necessary, turn on the water valve. 1332623-T01-H Kohler Co.
-
Page 15: Important Consumer Information
Do not use abrasive cleaners or solvents. WARNING: Risk of property or product damage. Kohler Company shall not be responsible or liable for any damage to these fittings caused by the use of cleaners containing chlorine (calcium hypochlorite). WARNING: Do not use any hard setting material (cement mortar) while installing the toilet. - Page 16 VEIL+ 新维亚 INSTALLATION INSTRUCTIONS INTELLIGENT TOILET 智能座便器 K-5401T-3-0 K-5401T-XP3-0 在安装本产品的同一房间中,需要在触手可及的位置安装一个止水阀,用于紧急情况下,无需借助工具即可切断本 产品的进水水路;否则本产品的意外故障可能会导致用户损失。 305mm, 坑距需满足292-350mm 。 如未满足, 可能会影响安装。 确认出水接头距离完工墙面凸出不超过3mm。沉入完工墙壁不超过5mm。如未满足,可能会影响安装。 推荐使用内径 DN15mm 以上的主水管,以确保下述供水条件要求。 请不要使用科勒不推荐的附件,如角阀等。 为了达到更好的冲洗效果,用户在安装进水管如PPR管的热熔连接时,应尽量避免明显的缩径或热熔挤出物堵塞部分 管道等现象,并确保连接后进水管内径大于15mm。 若供水管路中装有减压阀,请使用DN32mm以上的减压阀。 GFCI ELCB 220V~ , 50 H z, 10A带 警告:触电、火灾或人身伤害的危险。 1332623-T01-H Kohler Co.
- Page 17 Unit: mm 遥控器(随机配) 防水插座(带接地) 坑距 (随机配角阀及软管) Fig.#3 图3 Kohler reserves the right to change marked dimensions without prior notice. 4.0L 冲水用水量 3级 水效等级* 305mm 最小进水压力0.07MPa(动压) 供水压力 最大进水压力 0.74MPa 额定电压 220V~, 50Hz 1090W 约1600W 约1.3m 约670mm x 438mm x 533mm 4 kg 进水温度...
- Page 18 × 4 Fig.#4 (停电后长按,启动应急冲水功能) 图4 * 抗菌:含无机系抗菌材料的座圈、盖板长期抗细菌,抑制产品表面的细菌生长,这一加工处理不代表防霉等附带效果。抗菌率大于90%(依据GB21551.2-2010进行试验。测试机构:中国家 用电器检测所、上海出入境检验检疫局机电产品检测技术中心) Toilet Fig.#5 1332623-T01-H Kohler Co.
- Page 19 800mmX800mm Fig.#6 法兰附件包,拆除及扔掉旧的T型螺栓。 法兰附件包堵住。 Closet Floor Flange 法兰附件包 Fig.#7 (GFCI) (ELCB) Kohler Co. 1332623-T01-H...
- Page 20 Unit: mm Fig.#8 C. 1.确定排污口中心点并垂直墙面划上十字线 2.侧放座便器,按陶瓷排污口找出前后左右中心标记,并记于陶瓷外侧壁上 3.座便器平稳对准地面上的中心线。记下左右地脚孔的位置 Fig.#9 中心标记 地脚孔(两侧) D. 钻两个地脚孔,安装膨胀塑料及地脚螺钉(由客户自行购买) 10mm Fig.#10 地脚螺钉 1332623-T01-H Kohler Co.
- Page 21 (GFCI) 220V~, 50Hz ,10A 不允许使用不带接地线的插座。 F.安装法兰 将法兰盘反面涂满硅胶 将法兰盘对正下水孔插入 并压贴住地面 硅胶 Fig.#1 G. 拆下左右侧板 卸下供水三通上的螺纹帽 侧板 螺纹帽 Fig.#12 Kohler Co. 1332623-T01-H...
- Page 22 将蜡封安装在法兰附件包上。 Fig.#13 座便器。 参考地面排污口中心线及陶瓷上前后左右中心标记, 用螺母及垫片拧紧 座便器 安装到位后,不能再次搬动座便器,以免蜡封失效。如需搬动,需更换蜡封。 警告 提防身体受伤或产品破裂 螺母不可上得太紧,否则会导致釉面陶瓷损坏及崩裂。 螺母 Fig.#14 图14 1332623-T01-H Kohler Co.
- Page 23 J. 安装角阀 重要提示如下 Unit: mm 图中尺寸为角阀建议安装尺寸 . 安装前, 角阀必须装上装饰盖 角阀 把手顺时针关闭,逆时针打开 角阀把手 250 10 装饰盖 Fig.#15 必须使用随器具附带的新软管组件,旧软管组件不能重复使用。 Fig.#16 Kohler Co. 1332623-T01-H...
- Page 24 测试应急冲水按键。断电后,长按 启动应急冲水功能。 power Fig.#17 注意: Fig.#1 图18 1332623-T01-H Kohler Co.
- Page 25 图 公共场所防遗失安装方式 取下硅胶塞 取下硅胶塞 遥控器 充电座 Fig.#20 图20 Kohler Co. 1332623-T01-H...
- Page 26 Fig.#21 确认进水阀是否已打开。 确认遥控器充电座内已正确装入电池。 女性冲洗: 臀部冲洗: 旋转冲洗: 圈温:中档 水温:中档 水温:中档 水温:中档 夜灯:开 水流强度:中档 水流强度:中档 水流强度:中档 节能模式:关 冲洗位置:第 3档 冲洗位置:第 3档 冲洗位置:第3档 智感除菌功能:开 除臭:开 自动翻盖功能:开,距离中 自动冲水功能:开 除菌水功能:开 水泵:开(同时长按本体侧键盘上的冲水 键和女性冲洗键,短音“滴”声表示水泵 开启,长音“滴”声表示水泵关闭。) 1332623-T01-H Kohler Co.
- Page 27 A.连续使用暖风功能4分钟,风机自动停止 A.如需要,请再次按下暖风按键 机停止工作 B.座圈未感应到人体 B.变换坐姿或者重新入座 9.除臭风机不工作 A.座圈未感应到人体 A.变换坐姿或者重新入座 B.使用过程中误按停止键 B.如需要,请离座2S后重新入座 C.自动除臭功能被禁止 B.查看“遥控器设置指南”部分 10.不能开关盖 A.座圈上有异物覆盖或者座圈是湿的 A.移除异物或者擦干座圈 B.便盖在先前开关过程中受到人为干扰 B.使用遥控器开关便盖或手动打开便盖直至正常, 便盖开关过程中不阻挡其开关 11.不能自动开关盖 A.用户没有进入或离开感应区域 A.请进入或离开感应区域 B.遥控器“自动翻盖”功能被关闭 B.查看“遥控器设置指南”部分 C.座便器正在冲水中 C.等待座便器冲水结束 12.夜灯不亮 A.夜灯功能被关闭 A.查看“辅助键盘功能”中的夜灯部分来打开夜灯 功能 B.室内光线太亮 B.请关闭室内灯光并拉上窗帘 A.有人坐在座便器上 关闭盖子再 智感除菌 关闭 13.智感除菌不工作 B.座圈上有异物覆盖或者座圈是湿的 Kohler Co. 1332623-T01-H...
- Page 28 如要检修此座便器,您必须首先: 1332623-T01-H Kohler Co.
- Page 29 在安装本座便器时切勿使用任何凝胶材料(水泥砂浆)。因为凝胶材料(水泥砂浆)的热膨胀可能使 座便器的脚部挤破或损坏。科勒对所有因为凝胶材料(水泥砂浆)安装而引起的座便器破裂恕不负责。 Kohler Co. 1332623-T01-H...
Need help?
Do you have a question about the VEIL+ K-5401T-3-0 and is the answer not in the manual?
Questions and answers