Table of Contents
Advertisement
Quick Links
Advertisement
Table of Contents

Related Manuals for Quantum TRU-BALANCE 4


Summary of Contents for Quantum TRU-BALANCE 4
- Page 1 basic operation instructions...
- Page 2 We reserve the right to make A Quantum Rehab Provider or a qualified technician changes as they become necessary. Any changes to must perform the initial setup of this power chair and our products may cause slight variations between the must perform all of the procedures in this manual.
-
Page 3: Table Of Contents
System ..............6 of the finished power chair or its componentry Range of Motion ............6 manufactured by a third party. While Quantum Rehab Power Anterior Tilt ............. 8 makes every effort to assure that our components are iLevel® Feature ............10... -
Page 4: Product Safety Symbols
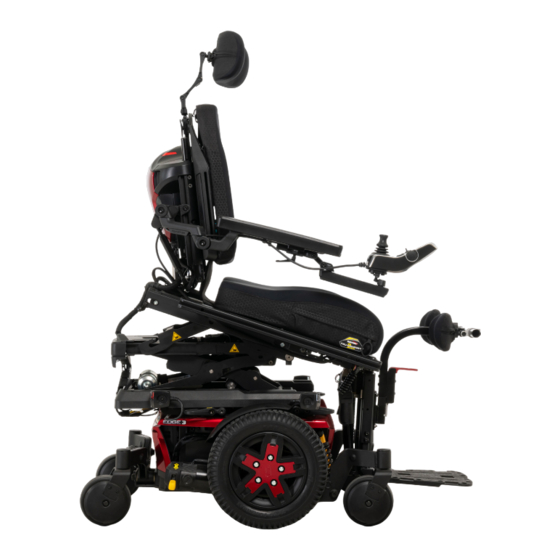
Chair. It is fully adjustable to meet the individual needs of the user, and it is mounted to a Quantum power base to provide maximum maneuverability. Read and follow the instructions in the Reusable hook and loop fasteners are included in your owner’s... - Page 5 At the time of initial manufacture, the center of gravity of your power chair was factory set to a position appropriate for the demographic majority of users. At the time of delivery, a Quantum = Accessory Channel Rehab authorized provider should perform a user-in-...
-
Page 6: Operating The Tru-Balance® 4 Power Positioning System
12 in. (30.5 cm) to 50° of tilt, 12 in. (30.5 cm) of lift, can recline 85°–165°, and can tilt/recline up to 165°. The TRU-Balance 4 Power Positioning System is available in 10, 20 and 30 degrees of 165° maximum anterior tilt. See figure 2. - Page 7 BASIC OPERATION INSTRUCTIONS Elevated Tilted Reclined Tilt/ more than more than reclined 20° 20° more than 125° Recline Lockout Tilt Lockout Elevate Lockout Speed Full Drive Lockout iLevel Figure 3. Inhibit Matrix Anterior tilt Anterior tilt Anterior tilt (0°–10°) (11°–20°) (21°–30°) Lift 2 mph...
-
Page 8: Power Anterior Tilt
Never tilt the seat forward on an system. The power anterior tilt feature is mounted on a inclined surface. Failure to heed this warning can result Quantum power base for enhanced stability when the in the power chair tipping over. seating system is tilted forward. - Page 9 0% (full drive lockout) when elevated, during power anterior tilt. If this warning appears while on level ground, please discontinue use of power anterior tilt feature and consult your Quantum Rehab Provider for assistance.
-
Page 10: Ilevel® Feature
Feature Your power chair may be equipped with the iLevel feature that will be used in conjunction with your TRU-Balance 4 Power Positioning System. The iLevel feature is mounted on a Quantum power base for maximum stability when the seating is elevated and/or anterior tilted. - Page 11 25% when elevated. If this warning appears while on level ground, please discontinue use of iLevel feature and consult your Quantum Rehab Provider for assistance.
-
Page 12: Armrest Options
Not all tightening rear screw of rear armrest support joint. armrest options are available on all TRU-Balance 4 Power 7. Loosen front screw on front armrest support joint. See Positioning Systems. - Page 13 BASIC OPERATION INSTRUCTIONS Seatback Seatback Side Rail Rear Armrest Support Joint Rear Screw Setscrews Front Armrest Support Joint Front Screw Armrest Support Turnbuckle 14–16 in. (35.6–40.6 cm) 11–13 in. (27.9–33 cm) 8–10 in. (20.3–25.4 cm) Screw Bottom Screw Figure 6. Flip-up Armrest Height and Angle Adjustments To install the armrest: To adjust the armrest armpad: 1.
-
Page 14: Chest Bar
Any adjustments needed to Anterior knee blocks need to be completed by a Quantum Authorized Provider. Any adjustments needed to the chest bar or chest bar receiver mounts need to be completed by a Quantum When using knee blocks, certain AFP configurations Authorized Provider. -
Page 15: Transfers
BASIC OPERATION INSTRUCTIONS Transfers Optional transfer bars are available. Transfer bars are designed to make it easier to reposition while seated in the power chair and to transfer into or out of the power chair. Refer to the Consumer Safety Guide provided with your power chair owner’s manual for additional information on transfers. - Page 16 BASIC OPERATION INSTRUCTIONS To change the controller extension: 1. Turn off the power to the controller. 2. Remove the controller harness from the clips securing it to the armrest. 3. Flip and then rotate the release lever to loosen the clamp.
-
Page 17: Seatback
BASIC OPERATION INSTRUCTIONS Seatback The Seatback can be adjusted for height and width. To adjust the height and/or width of the seatback: 1. Loosen the hardware. See figure 12. 2. Place the seatback into the desired height and/or desired width. 3. -
Page 18: Cleaning
BASIC OPERATION INSTRUCTIONS Cleaning The seatback cushion can be easily cleaned. WARNING! Headrest Do not use bleach when washing the outer cover. Doing so may cause damage to the cover. Optional Lateral Anchor Hook Follow all safety instructions for the proper use of the Supports (1 of 2) disinfectant and/or cleaning agent before applying it... -
Page 19: Lateral Adjustment
NOTE: If the power chair is occupied when installing or adjusting the laterals, first ensure that the occupant Cover is in a secure position. Contact your Quantum Rehab Provider with any questions you may have. To install laterals: 1. Remove the cover from the lateral extrusion on the side of the seatback. -
Page 20: Headrest Adjustment
„ overtighten any hardware. „ To clean the TRU-Balance 4 Power Positioning system, wipe it with a cloth dampened with mild soap and water. Thoroughly dry the unit before using. To properly clean the TRU-Comfort back cushion, follow the cleaning instructions in the “TRU-Comfort”... -
Page 21: Warranty
Three-Year Limited Warranty (1) year from the date of purchase and to the extent For three (3) years from the date of purchase, Quantum will permitted by law. Any and all implied warranties are repair or replace at our option to the original purchaser, free excluded. - Page 22 22 BASIC OPERATION INSTRUCTIONS...
- Page 24 Switzerland (Authorised CH Representative) 401 York Avenue SODIMED SA Duryea, PA 18642 Chemin Praz Devant 12 www.quantumrehab.com 1032 Romanel-sur-Lausanne Canada Italy 5096 South Service Road Via del Progresso, ang. Via del Lavoro Beamsville, Ontario L3J 1V4 Loc. Prato della Corte www.quantumrehab.ca 00065 Fiano Romano (RM) www.quantumrehab-italia.it...
Need help?
Do you have a question about the TRU-BALANCE 4 and is the answer not in the manual?
Questions and answers
Hello- I need help with the lumbar support. I was not shown how to adjust it. Thank you
To adjust the lumbar support on the Quantum TRU-BALANCE 4:
1. Place the lumbar support flat side down onto the seatback.
2. Position it as needed for user comfort and positioning.
3. Push it onto the seatback to secure it.
This answer is automatically generated