Advertisement
Advertisement
Table of Contents

Related Manuals for Quantum Q6 Series


Summary of Contents for Quantum Q6 Series
- Page 1 Owner’s Manual Including Models: Q6 Edge HD , Q6 Ultra , and Q6 Edge Z...
- Page 2 Safety Guidelines WARNING! A Quantum Rehab Provider or a qualified technician must perform the initial setup of this power chair and must perform all of the procedures in this manual. The symbols below are used throughout this owner’s manual and on the power chair to identify warnings and important information.
-
Page 3: Table Of Contents
Contents Introduction ............................6 Safety ..............................7 Your Power Chair ..........................9 Assembly ............................17 Comfort Adjustments ........................22 Batteries and Charging ........................28 Care and Maintenance ........................32 Language Usage This owner’s manual is intended for distribution in all English-speaking countries where our Power Chairs are sold. - Page 4 Identification Key ...
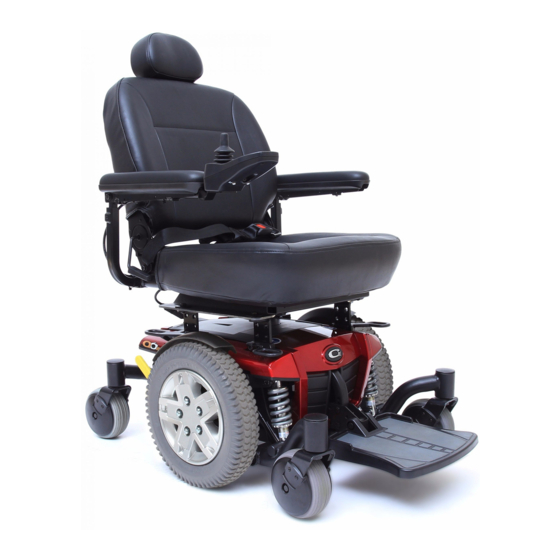
- Page 5 Identification Key Seat Assembly Seatback Armrest Seat Base Joystick Controller Power Base Assembly Rear Cover Trapeze Bar (If Equipped) Manual Freewheel Lever Drive Wheel Caster Wheel Front Rigging Front Cover (Foot Platform Shown)
-
Page 6: Introduction
Quantum Rehab to enhance or preserve the safe use of this product. -
Page 7: Safety
Safety Product Safety Symbols The symbols below are used on the power chair to identify warnings, mandatory actions, and prohibited actions. It is very important for you to read and understand them completely. NOTE: There are more warnings identified and explained in the Consumer Safety Guide that is included with your power chair. - Page 8 Quantum Rehab Provider in the instruction process for the use of the product. There are certain situations, including some medical conditions, where the power chair user will need to practice operating the power chair in the presence of a trained attendant.
-
Page 9: Your Power Chair
Your Power Chair The Q6 Series Power Chair Your power chair has two main assemblies: the seat and the power base. Typically, the seat assembly includes the armrests, seatback, and seat base. The power base assembly includes two motor/brake assemblies, two drive wheels, four caster wheels, two batteries, and wiring harnesses. - Page 10 Identification Key 1. To Motor Connector 2. Controller Power Module 3. Controller Connector 4. To Battery Connectors 5. Main Circuit Breaker 6. Quick Release Battery Connectors 7. Fender Lights Figure 1. Q6 Series Electrical Components...
- Page 11 To clear this code, turn off the controller and place the power chair in drive mode. Then, turn on the controller. The error message should be cleared. If it is not, contact your Quantum Rehab Provider. NOTE: The power chair will be significantly easier to push with the power off.
- Page 12 Your power chair may be equipped with the iLevel® feature what will be used in conjunction with your TRU-Balance® 3 Power Positioning System. The iLevel® feature is mounted on a Quantum power base for maximum stability when the seating sytem is elevated.
- Page 13 WARNING! The center of gravity of your power chair was factory set to a position that meets the needs of the demographic majority of users. Your Quantum Rehab Provider has evaluated your power chair and made any necessary adjustments to suit your specific requirements. Do not change your seating configuration without first contacting Quantum Rehab or your Quantum Rehab Provider.
- Page 14 NOTE: If a warning or visual indicator appears on your controller stating that iLevel® is not engaged, the power chair’s speed will be reduced to 25% when elevated. If this warning appears on level ground, please discontinue use of iLevel® feature and consult your Quantum Rehab Provider for assistance.
- Page 15 Fender Lights (Optional) Your power chair may be equipped with fender lights. The lights are composed of three white LEDs in the front and three red LEDs in the rear and are mounted on the fenders of your power base. See figure 5. NOTE: Prior to initial use, ensure that the fender light switch is connected.
- Page 16 Identification Key 1. Single Switch 2. Fender Light Figure 5. Q6 Edge 2.0 with Single Switch to operate Fender Lights.
-
Page 17: Assembly
Nylon insert lock nuts should not be reused as it may cause damage to the nylon insert, resulting in a less secure fit. Replacement nylon insert lock nuts are available at local hardware stores or through your Quantum Rehab Provider. Seat Installation It may be necessary to install the seat either prior to initial operation or after transporting your power chair. - Page 18 Identification Key 1. Armrest Angle Adjustment 2. Controller Position 3. Foot Platform Angle Adjustment 4. Foot Platform Height/Depth Adjustment Figure 6. Q6 Series Assembly View...
- Page 19 Identification Key 1. Rear Extrusion 2. Seat Latch Safety 3. Front Extrusion 4. Trapeze Bars Figure 7. Universal Mounting System and Contour Seat Figure 8. Controller Harness Routing on a Synergy Seat Identification Key 1. Wire Ties 2. To Power Base Figure 9.
- Page 20 See figure 12. MANDATORY! The power chair should be used as indicated in the manufacturer’s instructions. If you have any questions about the proper use of your power chair, contact your Quantum Rehab Provider.
- Page 21 Front of Vehicle Figure 12. Unoccupied Transit System Securement Points...
-
Page 22: Comfort Adjustments
MANDATORY! If your power chair is equipped with a transit securement system and any adjustment to the seat height or seat angle is necessary, contact your Quantum Rehab Provider. Thse comfort adjustment can only be made by a Quantum Rehab Provider. - Page 23 Identification Key Identification Key 1. Seat Interface Weldment 1. Seat Mounting Holes 2. Trapeze Bars 3. Hardware Figure 13. Seat Height/Angle Adjustment Figure 14. Seat Position Adjustment Seat Position You can move the seat forward or rearward by changing the extrusion mounting position. To change the position: 1.
- Page 24 Identification Key 1. Jam Nut 2. Armrest Angle Adjusting Screw 3. Armrest Height Adjusting Setscrews 4. Seat Back Angle Adjusting Screw 5. Armrest Knob 6. Controller Bracket 7. Setscrew Figure 15. Seatback and Armrest Adjustments for Contour Seat Seatback Angle Adjustment If your power chair is equipped with an adjustable seatback, you can adjust it to four (4) different angles: 90°, 102°, 105°, or 107°.
- Page 25 Armrest Angle Adjustment To change the armrest angle: 1. Lift the armrest straight up so that is perpendicular to the floor. See figure 15. 2. Loosen the jam nut. 3. Turn the adjusting screw to raiser or lower the front of the armrest. 4.
- Page 26 Foot Platform Height Adjustment The foot platform height is easily adjusted to several different heights. To raise or lower the foot platform 1. Remove the hardware from the foot platform bracket. See figure 16. 2. Raise or lower the foot platform to the desired height. 3.
- Page 27 MANDATORY! Inspect the positioning belt for loose parts or damage, including tears, worn spots, bent hardware, damaged latch mechanisms, dirt or debris, before each use of the power chair. If you discover a problem, contact your Quantum Rehab Provider for maintenance and repair.
-
Page 28: Batteries And Charging
Batteries and Charging The Q6 Series uses two long-lasting, 12-volt, deep-cycle batteries. These batteries are sealed and maintenance free. Since they are sealed, there is no need to check the electrolyte (fluid) level. Deep-cycle batteries are designed to handle a longer and deeper discharge. Though they are similar in appearance to automotive batteries, they are not interchangeable. - Page 29 We do not recommend using other types of chargers (e.g., an automotive battery charger). NOTE: Your power chair’s charger will not operate after the batteries have been discharged to nearly zero voltage. If this happens, call your Quantum Rehab Provider for assistance.
- Page 30 How often must I charge the batteries? Many factors come into play when deciding how often to charge the batteries. You may use your power chair all day on a daily basis or you may not use it for weeks at a time. „...
- Page 31 We work closely with our battery manufacturer to provide a battery that best suits your power chair’s specific demands. Fresh batteries arrive regularly at Quantum and are promptly shipped with a full charge. During shipping, the batteries encounter temperature extremes that may influence initial performance.
-
Page 32: Care And Maintenance
Care and Maintenance Your Q6 Series is a sophisticated power chair. Like any motorized vehicle, it requires routine maintenance checks. You can perform some of these checks, but others require assistance from your Quantum Rehab Provider. Preventive maintenance is very important. If you follow the maintenance checks in this section as scheduled, you can help ensure that your power chair gives you years of trouble-free operation. - Page 33 Check the rubber boot around the base of the joystick for damage. Visually inspect the boot. Do not handle or try to repair it. See your Quantum Rehab Provider if there is a problem.
- Page 34 Yearly Checks Take your power chair to your Quantum Rehab Provider for yearly maintenance, especially if you use your power chair on a daily basis. This helps ensure that your power chair is functioning properly and helps prevent future complications.
- Page 35 Replacement tires, tubes, and wheel assemblies are readily available through your Quantum Rehab Provider. WARNING! The wheels on your power chair should only be serviced or replaced by a Quantum Rehab Provider or a qualified technician.
- Page 36 Identification Key 1. Lug Nuts 2. Wheel Hub Figure 19. Q6 Series Drive Wheel Identification Key 1. Front Rim Half 2. Tube 3. Tire 4. Rear Rim Half 5. Screws Figure 20. Q6 Series Drive Wheel Disassembled...
- Page 37 WARNING! The batteries in your power chair should only be serviced or replaced by a Quantum Rehab Provider or a qualified technician. WARNING! Do not replace batteries when seat is occupied. WARNING! Power chair batteries are heavy. See specifications table. If you are unable to lift that much weight, be sure to get help.
- Page 38 Identification Key 1. Quick Release Battery Connectors 2. Rear Battery 3. Front Battery 4. Front Cover 5. Release Handles 6. Battery Wiring Diagram Label Battery Seat Configuration: + = Positive (Red) Terminal Post - = Negative (Black) Terminal Post Connect Red wire to Red Positive (+) Terminal Posts.
- Page 39 Disconnect both batteries before load testing and follow the directions that come with the load tester. If either one of the batteries fails the load test, replace both of them. If your power chair still does not power up, contact your Quantum Rehab Provider.
- Page 40 ...
- Page 41 ...
- Page 42 ...
- Page 44 401 York Avenue Duryea, PA 18642 Canada 5096 South Service Road Beamsville, Ontario L0R 1B3 32 Wedgwood Road Bicester, Oxfordshire OX26 4UL www.quantumrehab.co.uk Australia 20-24 Apollo Drive Hallam, Victoria 3803 www.quantumrehab.com.au New Zealand 38 Lansford Crescent Avondale Auckland, New Zealand 1007 www.pridemobility.co.nz Italy Via del Progresso, ang.
Need help?
Do you have a question about the Q6 Series and is the answer not in the manual?
Questions and answers
Q6 Edge how do I readjust the back to release it a little? Mine is too straight up so I have to use the functon of tilting the seat/back as one unit.
To make the back of the Quantum Q6 Series Edge less upright, use the seatback release lever located on the right side of the seat base if your power chair is equipped with a reclining set. This allows you to adjust the seatback angle.
This answer is automatically generated
How to adjust the seat depth (i.e., the distance to the backrest from the front of the seat)
In the upper left corner of the controller is a green light. It now has an eye in it. What does that mean?