Tineco FLOOR ONE S7 PRO Series Instruction Manual
Smart cordless vacuum & washer
Hide thumbs
Also See for FLOOR ONE S7 PRO Series:
- Instruction manual (184 pages) ,
- Instruction manual (108 pages)

Related Manuals for Tineco FLOOR ONE S7 PRO Series


Summary of Contents for Tineco FLOOR ONE S7 PRO Series
- Page 1 FLOOR ONE S7 PRO SERIES Smart Cordless Vacuum & Washer Instruction Manual Manual De Uso Mode D’emploi *Actual product may differ from illustration. TINECO IS HERE TO HELP. www.tineco.com 1-855-292-8864 We’ll get back to you within 1 business day.
-
Page 2: Table Of Contents
Specifications ..................6 Overview ....................7 Accessories .................... 8 Assembly ....................9 Operation .................... 10 Maintenance ..................16 Troubleshooting .................. 20 Warranty ....................21 TINECO IS HERE TO HELP. www.tineco.com 1-855-292-8864 We’ll get back to you within 1 business day. -
Page 3: Important Safety Instructions
Important Safety Instructions SAVE THESE INSTRUCTIONS Household use only. When using an electrical appliance, basic precautions should always be followed, including the following: READ ALL INSTRUCTIONS BEFORE USING (THIS APPLIANCE). Failure to follow the warnings and instructions may result in electric shock, fire and/or serious injury. WARNING –... - Page 4 16. Recharge only with the charger specified by Tineco. A charger that is suitable for one type of battery pack may create a risk of fire when used with another battery pack. 17. Use appliances only with specifically designated Tineco battery packs. Use of any other battery packs may create a risk of injury and fire.
- Page 5 1. Do not modify or attempt to repair the appliance except as indicated in the instructions for operating and cleaning. 2. Charge the appliance with the Tineco adaptor. Input Voltage: AC 100-240V. Both high and low voltages can damage the adaptor, appliance, or even cause danger to the user.
- Page 6 FCC Supplier’s Declaration of Conformity TINECO / Smart Cordless Vacuum & Washer (FW200300US) This appliance complies with part 15 of the FCC Rules. Operation is subject to the following two conditions: (1) This appliance may not cause harmful interference, and (2) this appliance must accept any interference received, including interference that may cause undesired operation.
-
Page 7: Specifications
DWT Capacity ~0.72L Waterproof IPX4 • For use only with TINECO charger KL-WA300100-X. Disposal • The battery contains materials that are harmful to the environment and must be removed from the appliance before it is discarded. • When removing the battery, the appliance must be powered off. -
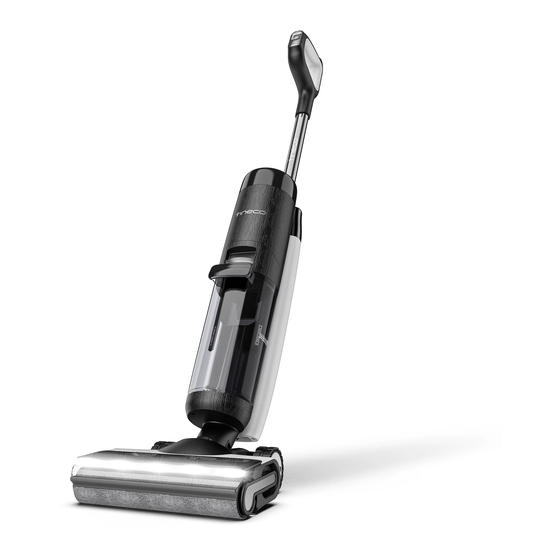
Page 8: Overview
Overview A. Menu Button K. Dirty Water Tank (DWT) B. Power On/Off L. Brush Roller Cover C. Digital Display M. Brush Roller D. Dirty Water Tank Release N. Deodorizing & Cleaning Solution E. Dirty Water Tank Handle O. Cleaning Tool F. -
Page 9: Accessories
Accessories Note: Accessories may vary between markets. If you require more accessories, please go to www.tineco.com or store.tineco.com. Deodorizing & Cleaning Solution Removes dirt, grime, grease and tough stains from most types of hard surfaces, like tile, marble, sealed hardwood floors, and more. -
Page 10: Assembly
Assembly How to Assemble/Disassemble Note: For water tank and brush assembly, please refer to “Operation” and “Maintenance”. To assemble the handle, insert it into the In the event that the handle need to be appliance until you hear a click. disassembled, press the spring to release the handle with a tool (like a screwdriver) and lift the released handle from the appliance. -
Page 11: Operation
• Before first use, please charge the appliance for 4-5 hours (refer to “Charging Instructions” for details). * Based on results from Tineco lab tests. Lab temperature 39.2°F (4°C) ~ 104°F (40°C). • For the first use, the appliance will display the Quick Start Guide and Interactive Tutorial, press the Self-cleaning button to exit. - Page 12 Press the button and the appliance will start in AUTO mode by default, press the Select button to switch between different modes. Stop Working Start Again The appliance will stop working when put uprightly Place the appliance on the charging base and start running again when you recline.
- Page 13 Warning: • Only charge the appliance with the adaptor supplied by Tineco. • During long periods of not being used, the appliance must be charged once every 3 months for optimal performance. It may take 4-5 hours for a full charge.
- Page 14 Digital Display An updated display shows everything with interactive animation, giving you a brand new experience during and after cleaning. Note: Keep sharp objects away from the digital display screen to avoid scratches and scrapes. Cleaning Mode Selection AUTO Mode •...
- Page 15 • Estimated data was obtained by a Tineco Laboratory using ambient temperatures between 39.2°F (4°C) to 104°F (40°C). All the functions can be performed using the Tineco app. Download the Tineco app from the App Store, Google Play and Tineco Official Site.
- Page 16 Voice Prompt (Contents may vary, please in kind prevail.) Status Reminder Hi, welcome to Tineco Assistant. Let’s begin the Before first use Quick Start Guide. Voice prompts on Voice prompts on. Voice prompts off Voice prompts off. Scan QR code to download app and connect Connect the Tineco app appliance.
-
Page 17: Maintenance
Maintenance Note: • For optimal performance and to prevent odors, always clean and dry DWT, filters, brush roller, brush roller cover completely after each use. • Please make sure each part is installed correctly or the appliance may not work properly. •... - Page 18 Dirty Water Tank • When dirty water reaches the Max line, the appliance will stop working and show a reminder on the display and play a voice prompt. • Pull up the tank lid to empty the DWT. Use the cleaning tool to remove remaining debris. Rinse the inside of the DWT and place back into the appliance.
- Page 19 Brush Roller Self-cleaning 1. Place the appliance on the charging base after use, the sensor will auto-detect the level of dirt. 2. Press the self-cleaning button and you can select the Quick Self-cleaning (takes 2 minutes) or Super Self- cleaning (takes 6 minutes) to begin the process. 3.
- Page 20 Brush Roller Remove the brush roller by grabbing the Using the cleaning tool, remove the hair and brush roller tab and pulling out. debris wrapped around the roller and rinse with water. Replace the brush roller back into the accessory holder, and allow it to dry completely before reinstalling.
-
Page 21: Troubleshooting
Voice prompt: Dirt sensor malfunction or Remove blockages, clean the Please perform self-cleaning to blocked debris channel, or restart ensure cleaning performance Note: If the above troubleshooting guide fails to provide a solution, please visit our website www.tineco.com for further support. -
Page 22: Warranty
WHAT IS COVERED? • Your Tineco appliance has a 2-year warranty against original defects in material and workmanship, when used for private household purposes in accordance with the Tineco Instruction Manual. Motorized accessories and battery bought separately come with a 1-year warranty. - Page 23 All work will be carried out by Tineco or its authorized agency. Any replaced defective parts will become the property of Tineco.
- Page 24 Spécifications ..................52 Présentation ..................53 Accessoires ..................54 Assemblage ..................55 Fonctionnement ................. 56 Entretien ....................62 Guide de dépannage ................. 66 Garantie ....................67 TINECO EST LÀ POUR VOUS AIDER. www.tineco.com 1-855-292-8864 Nous vous répondrons dans 1 jour ouvrable.
- Page 25 Consignes de sécurité importantes CONSERVEZ CES INSTRUCTIONS Usage domestique exclusivement. Lorsque vous utilisez un appareil électrique, veuillez respecter les précautions de sécurité élémentaires, notamment celles indiquées ci-dessous : LISEZ TOUTES LES INSTRUCTIONS AVANT L’UTILISATION (DE CET APPAREIL). Le non-respect des consignes de sécurité et des instructions peut provoquer une décharge électrique, un incendie et/ou des blessures graves.
- Page 26 Ces mesures de sécurité permettent de réduire les risques de démarrage accidentel de l’appareil. 16. Rechargez uniquement l’appareil avec le chargeur spécifié par Tineco. Un chargeur adapté à un seul type de batterie peut présenter un risque d’incendie s’il est utilisé...
- Page 27 34. Toutes les données et instructions techniques de ce manuel sont basées sur les résultats des tests effectués en laboratoire par Tineco ou des tiers désignés. La société se réserve tous les droits pour les explications finales.
- Page 28 1. Ne modifiez pas et n’essayez pas de réparer l’appareil sauf comme indiqué dans les instructions de fonctionnement et de nettoyage. 2. Chargez l’appareil avec l’adaptateur Tineco. Tension d’entrée : 100 - 240 V c.a. Les tensions élevées et basses peuvent endommager l’adaptateur, l’appareil ou même entraîner un danger pour l’utilisateur.
- Page 29 interférences nuisibles à la réception des signaux de radio ou de télévision, ce qui peut être déterminé en éteignant et en rallumant l’équipement, il est recommandé à l’utilisateur d’essayer de corriger les interférences en prenant une ou plusieurs des mesures suivantes : (1) Réorienter ou déplacer l’antenne de réception.
- Page 30 Capacité du RES environ 0,72 L Étanchéité IPX4 • À n’utiliser qu’avec le chargeur TINECO KL-WA300100-X. Élimination des déchets • La batterie contient des matériaux nuisibles à l’environnement. Elle doit donc être retirée de l’appareil avant l’élimination de celui-ci. • Éteignez l’appareil avant d’enlever la batterie.
Need help?
Do you have a question about the FLOOR ONE S7 PRO Series and is the answer not in the manual?
Questions and answers