Table of Contents
Advertisement
Quick Links
Advertisement
Table of Contents

Related Manuals for Hanwha Techwin WISENET TNU-6322ER


Summary of Contents for Hanwha Techwin WISENET TNU-6322ER
- Page 1 NETWORK CAMERA User Manual TNU-6322ER/TNU-6322E...
- Page 2 Network Camera User Manual Copyright ©2021 Co., Ltd. All rights reserved. Hanwha Techwin Trademark Each of trademarks herein is registered. The name of this product and other trademarks mentioned in this manual are the registered trademark of their respective company. Restriction Copyright of this document is reserved.
- Page 3 overview IMPORTANT SAFETY INSTRUCTIONS 19. Do not install on environment where temperature would exceed its operating temperature. The equipment is certified for use in ambient temperatures from -40°C to 60°C (Start up should be done at above -30°C) 1. Before installation, read all manuals thoroughly and proceed with the installation according to the directions.
-
Page 4: Table Of Contents
overview CONTENTS OVERVIEW WEB VIEWER Important Safety Instructions Connecting to the Camera Recommended PC Specifications Password setting NAS recommended specs Login What’s Included (TNU-6322ER) Camera Web Viewer Setup What’s Included (TNU-6322E) At a Glance (TNU-6322ER) At a Glance (TNU-6322E) APPENDIX Troubleshooting INSTALLATION &... -
Page 5: Recommended Pc Specifications
※ The video play performance of the web viewer depends on the performance of the user’s CPU and GPU. ※ Before installing or while using this product, please visit the website of Hanwha Techwin, http://www.hanwha- security.com, to confirm the latest S/W version, then download and update it if necessary. -
Page 6: What's Included (Tnu-6322Er)
overview WHAT’S INCLUDED (TNU-6322ER) Please check if your camera and accessories are all included in the product package. (As for each sales country, accessories are not the same.) Appearance Item Name Quantity Description Appearance Item Name Quantity Description Options (not included) Rotating explosion-protected Wall bracket Used to install a camera on the wall... -
Page 7: What's Included (Tnu-6322E)
WHAT’S INCLUDED (TNU-6322E) Please check if your camera and accessories are all included in the product package. (As for each sales country, accessories are not the same.) Appearance Item Name Quantity Description Appearance Item Name Quantity Description Options (not included) Rotating explosion-protected Wall bracket Used to install a camera on the wall... -
Page 8: At A Glance (Tnu-6322Er)
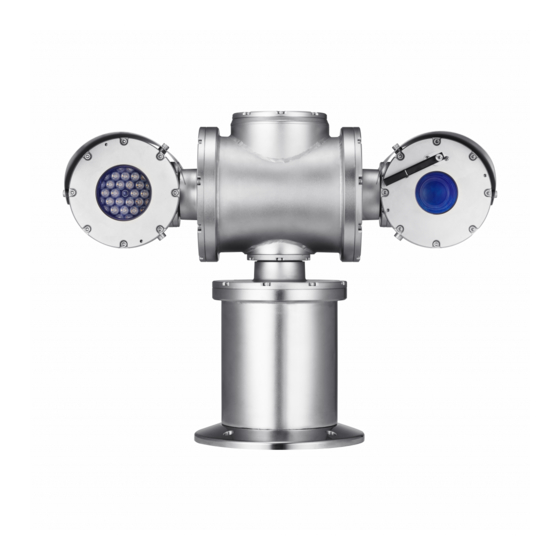
overview AT A GLANCE (TNU-6322ER) AT A GLANCE (TNU-6322E) Appearance Appearance Item Description Item Description Main Housing Built-in main circuit board and tilt motor system. Main Housing Built-in main circuit board and tilt motor system. IR housing Built-in IR LED circuit board. Shaft Cables pass through a pan/tilt shaft. -
Page 9: Installation & Connection
60079-1 standard. Contact the manufacturer for details of the flameproof joints. Contact a HANWHA TECHWIN or WONWOO Engineering representative to send the device back for 2. For equipment to which the cable is permanently connected, the user connects the free end of the cable function verification. - Page 10 installation & connection Camera Install Guide How to install Sunshield This device can be installed as following references. If you want to install the other way, you must contact Use wrench bolts (M6X12) to secure the sun shield to the camera housing. manufacturer for safety recommendation.
- Page 11 Optional Accessories for Installation ` Mounting the wall bracket For your easier installation, you can purchase appropriate optional accessories available. ` Mounting the pedestal <TNU-6322ER> <TNU-6322ER> <TNU-6322E> 1. Assemble the wall bracket under the base housing using 4 wrench bolt (M8X15). <TNU-6322E>...
- Page 12 installation & connection ` How to install wall/pole brackets on the system ` How to install a corner bracket on the system <TNU-6322ER> <TNU-6322ER> <TNU-6322E> <TNU-6322E> 1. Assemble corner bracket sides with the wall bracket using a set of 4 bots. 1.
-
Page 13: Connecting With Other Device
CONNECTING WITH OTHER DEVICE How to install the grounding wires Ethernet External cables <TNU-6322ER> <TNU-6322ER> Ethernet <TNU-6322E> External cables 1. Insert the grounding wires into the cable terminal. 2. Clamping the terminal using cable clamper tool. <TNU-6322E> 3. Connecting earth cable to external earth bar. Ethernet Connection Do not disassemble the device during operation. - Page 14 installation & connection Network Cable Specification How to connect external cables for each model Connect external cables by referring the table below. Item Contents Remark Connector RJ45 Connect alarm input/output cables for each terminals one by one. Ethernet 10/100Base-T 10/100 Mbps Cable UTP Category 5e TNU-6322ER...
- Page 15 How to connect the RJ45 waterproof cable to a LAN cable How to interconnect Washer pump It is recommended that the camera use the following washer pump. 1. Insert it through the arrow direction. ~ Honeywell EXWJ400-10A Refer to the washer pump manual for details on connection of washer pump and usage. 2.
-
Page 16: Network Connection And Setup
network connection and setup network connection and setup You can set up the network settings according to your network configurations. CONNECTING THE CAMERA DIRECTLY TO A DHCP BASED DSL/CABLE MODEM CONNECTING THE CAMERA DIRECTLY TO LOCAL AREA NETWORKING Connecting to the camera from a local PC in the LAN INTERNET 1. -
Page 17: Using Device Manager
If using a Broadband Router ~ IP Address : Enter an address falling in the IP range provided by the Broadband Router. Device manager program can be downloaded from <Technical Support>-<Online Tool> menu at Hanwha Techwin website ex) 192.168.1.2~254, 192.168.0.2~254, (http://www.hanwha-security.com). -
Page 18: Manually Registering Camera
network connection and setup Configuring Dynamic IP AUTOMATICALLY CONFIGURING IP Receive IP address from DHCP 1. Click the camera from the list that you want to automatically ~ Example of the Dynamic IP environment configure the IP. TNU-6322ER - If a Broadband Router, with cameras connected, is assigned an IP address by the DHCP server 2. -
Page 19: Port Range Forward (Port Mapping) Setup
PORT RANGE FORWARD (PORT MAPPING) SETUP Setting up Port Range Forward for several network cameras ~ You can set a rule of Port Forwarding on the Broadband Router device through its configuration web page. If you have installed a Broadband Router with a camera connected, you must set the port range forwarding on the ~ A user can change each port using the camera setting screen. -
Page 20: Connecting To The Camera From A Shared Local Pc
network connection and setup CONNECTING TO THE CAMERA FROM A SHARED LOCAL PC 1. Run device manager. It will scan for connected cameras and display them as a list. 2. Double-click a camera to access. The Internet browser starts and connects to the camera. Access to the camera can also be gained by typing the camera’s IP address in the address bar of the Internet browser. -
Page 21: Connecting To The Camera
web viewer CONNECTING TO THE CAMERA Connecting via Bonjour 1. Run the client or operating system in support of the Bonjour protocol. Normally, you would 2. Click the camera name for search. In the Mac operating system, click the camera name searched from the Bonjour tab of Safari. 1. -
Page 22: Password Setting
web viewer PASSWORD SETTING CAMERA WEB VIEWER SETUP When you access the product for the first time, you must register the 1. Click the [Setup ( )] icon. login password. 2. The Settings window appears. 3. You can configure settings for the camera’s basic information, video, audio, network, event, analysis, and For a new password with 8 to 9 digits, you must use at least 3 of system over the network. -
Page 23: Troubleshooting
appendix TROUBLESHOOTING PROBLEM SOLUTION PROBLEM SOLUTION No operation ~ Check the power source. Make sure the power supply termination. ~ If the transmission method is set to multicast, check whether there is a router that supports No image appears. multicast in the LAN the camera is connected to. No network ~ Check the RJ45 cable termination. - Page 24 Operation of this equipment in a residential area is likely to cause harmful interference in which case the user will be required to correct the interference at his own expense. Hanwha Techwin cares for the environment at all product manufacturing stages, and is taking measures to provide customers with more environmentally friendly products.
Need help?
Do you have a question about the WISENET TNU-6322ER and is the answer not in the manual?
Questions and answers