Table of Contents
Advertisement
Advertisement
Table of Contents

Subscribe to Our Youtube Channel
Related Manuals for Moog MINIMOOG MODEL D


Summary of Contents for Moog MINIMOOG MODEL D
- Page 4 Moog Music Inc. could void the user’s 9. This product, in combination with an amplifier authority granted by the FCC to operate the and headphones or speakers, may be capable equipment.
-
Page 5: Table Of Contents
Table of Contents INTRODUCTION A Brief History New Features GETTING STARTED Setup & Connections AC Power Raising the Panel Creating Sound Audio Monitoring Headphone Monitoring Sound Experiments FEATURES & CONTROLS Oscillator Bank Controllers Left-Hand Keyboard Panel Keyboard Mixer & Noise Modifiers Output TOP PATCH PANEL... - Page 6 Minimoog Model D...
- Page 7 Originally released in 1970, Minimoog Model D was the world’s first portable synthesizer and served as the archetype for all electronic keyboards that followed. The all-analog instrument gained acclaim for combining the colossal sound of Moog large- format modular synthesizers with the accessibility of pre-wired modules;...
-
Page 10: New Features
VELOCITY • AFTER PRESSURE POWER-ON COMMANDS By holding down specific keys as Minimoog Model D is powered on, you can select a MIDI Channel, transpose the instrument, choose the note priority, and set other global functions. MIDI Five-pin DIN MIDI In, MIDI Out, and MIDI Thru jacks have been added to provide basic MIDI connectivity. -
Page 11: Getting Started
SETUP & CONNECTIONS The front panel of Minimoog Model D is hinged, so use caution and avoid grasping the top of the panel when lifting or moving the instrument. Place Minimoog Model D on a stable surface, such as a table or keyboard stand. Be sure the instrument is placed at a comfortable playing height. -
Page 12: Creating Sound
Oscillators to change the pitch, and also sends a gate signal to trigger the Loudness Contour and Filter Contour generators. Additional patch points are provided on the Top Patch Panel to expand the functionality of Minimoog Model D and to allow it to interface with other voltage-controlled equipment. -
Page 13: Sound Experiments
Sound Experiments If you are not familiar with analog subtractive synthesis or with Minimoog Model D, here is a quick experiment to introduce you to the main sound-creation components and their functions. Begin by setting the Minimoog Model D front panel controls as shown below. -
Page 14: Features & Controls
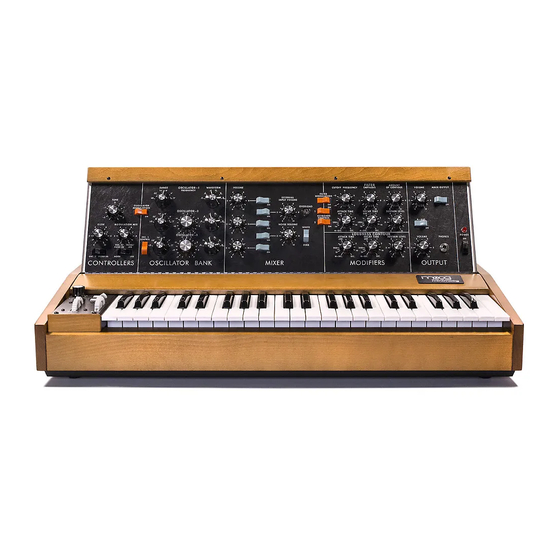
Features & Controls... - Page 15 Minimoog Model D is a self-contained monophonic analog synthesizer and a direct descendant of the Moog modular synthesizers that preceded it. The main synthesizer components include: • Oscillator-1 • Loudness Contour (Envelope Generator) • Oscillator-2 • 44 full-size keys with •...
-
Page 16: Oscillator Bank
Oscillator Bank Oscillators are the primary source of sound in each with its own Waveform, Octave, and Pitch an analog synthesizer. The Minimoog Model D setting—creating a deep or complex sound. The OSCILLATOR BANK contains three nearly Mixer then controls the balance between the identical Oscillators. - Page 17 TUNE The tuning of Oscillator–1 is determined by the master TUNE knob, located at the top of the CONTROLLERS panel. RANGE The RANGE knob selects the fundamental octave for each oscillator over a five-octave range. A sixth LO setting brings the pitch down even further, allowing the Oscillator to be used for other purposes, such as a modulation source.
- Page 18 Oscillator Bank TRIANGLE/SAWTOOTH (OSCILLATOR–1 AND OSCILLATOR–2 ONLY) This waveform is a hybrid of the Triangle and the Sawtooth waveforms. It contains more harmonic energy than the Triangle wave and adds in some of the even-numbered harmonics, but it is not nearly as brash as the Sawtooth wave. This hybrid waveform can add a little more edge than the Triangle wave alone, allowing it to cut through the mix with a bit more clarity.
- Page 19 Oscillator Bank PULSE 3 / NARROW RECTANGLE As the Pulse wave continues to get narrower, lower numbered harmonics—both odd and even—are emphasized. The resulting timbre takes on a more nasal tone. TIP: Mixing a Triangle wave from one Oscillator with the more complex wave of another Oscillator allows you to emphasize one particular harmonic without adding unwanted overtones.
-
Page 20: Controllers
Modulation Mix knob controls the Oscillators or the Cutoff Frequency of the the balance between them. The Modulation Filter. In this regard, Minimoog Model D has Wheel (located on the Left-Hand Keyboard been modified from its original design, and... - Page 21 OSC. 3/FILTER EG SWITCH This switch to the bottom left side of the CONTROLLERS panel is used to choose the modulation source that will be assigned to the counterclockwise position of the MODULATION MIX knob. Originally, this modulation source was fixed to OSC. 3, but this updated reissue allows FILTER EG to be selected as well.
-
Page 22: Left-Hand Keyboard Panel
Left-Hand Keyboard Panel 22 | Left-Hand Keyboard Panel... - Page 23 LFO (Low Frequency Oscillator) modulation source that has been added to Minimoog Model D. Normally, the LFO uses a Triangle wave. The LFO RATE knob is a push/pull knob allowing you to switch the LFO waveshape between triangle and square.
- Page 24 The PITCH Wheel will go up a fifth in its maximum position and down a fifth in its minimum position. NOTE: The PITCH Wheel on Minimoog Model D is now spring-loaded and will return to center on release. 24 |...
-
Page 25: Keyboard
Filter, and will trigger both of outputs. the Contour Generators. The original keyboards used on Minimoog Model D in the 1970s have long TIP: Using Power-On Commands, the performance of the keyboard can be customized. For example,... -
Page 26: Mixer & Noise
Mixer & Noise The Mixer sets the levels of all five of the source to be quickly removed from the mix Minimoog Model D audio sources—3 Oscillators, while preserving their Volume knob position, Noise Generator, and External Audio Input. and can also be useful when setting the tuning of each Oscillator. - Page 27 If no cable is connected to the EXT. INPUT SIGNAL jack, the main audio output of Minimoog Model D is attenuated slightly and then normalled to the External Input signal path. In this case, the Main Output signal is sent back to the input of the mixer.
-
Page 28: Modifiers
Modifiers The MODIFIERS Panel contains three separate Generators, provide a control signal that FILTER, FILTER CONTOUR, changes over time. The FILTER CONTOUR sections: LOUDNESS CONTOUR. The Filter selectively controls the Filter’s Cutoff Frequency over time. modifies the harmonic content of the sound. The LOUDNESS CONTOUR controls the output The Contour controls, also known as Envelope volume level over time. - Page 29 Ladder Filter with 10Hz-32kHz frequency response. This is a critical component to the thick, punchy, and powerful Minimoog Model D sound. When a note is played, harmonic content occurring above the filter Cutoff Frequency is reduced by the filter at a rate of 24dB/Octave. Harmonic content, or sound, below the filter Cutoff Frequency will freely pass unaffected.
- Page 30 KEYBOARD CONTROL (1&2) SWITCHES The Keyboard Control switches allow the note played on the keyboard of Minimoog Model D to affect the Filter Cutoff Frequency, a process also known as key tracking. This allows notes played higher on the keyboard to have brighter sound.
- Page 31 Modifiers SUSTAIN LEVEL KNOB After the Attack and Decay stages have been completed, the Filter Contour Generator will hold the Filter’s Cutoff Frequency at the level determined by the Sustain Level knob for as long as a note is held. AMOUNT OF CONTOUR KNOB The Amount of Contour knob determines how much of the control signal created by the Filter Contour will be applied to...
-
Page 32: Output
Output The OUTPUT section is divided into three OUTPUT and the PHONES OUTPUT feature functions: MAIN OUTPUT, PHONES OUTPUT, independent Volume controls. The Main Output and the A-440 Reference Tuner. The MAIN also offers an On/Off switch. 32 | Output... - Page 33 1/4” TRS Stereo jack, delivering the same signal to both ears. TIP: Mute the Main Output and use a pair of headphones to monitor Minimoog Model D in order to prepare the next sound or to check the tuning. 33 | Output...
-
Page 34: Top Patch Panel
Top Patch Panel 34 | CHAPTER... -
Page 35: Midi Ports
Control Voltage, Trigger signals, and MIDI. This Patch Panel also expands the expressive performance capabilities of Minimoog Model D itself. The Patch Panel is located along the top edge of the synthesizer. MIDI PORTS... -
Page 36: Audio Outputs
AUDIO INPUT An external audio source can be introduced into Minimoog Model D via this input jack. The signal appears at the EXTERNAL INPUT switch and VOLUME knob in the MIXER panel. -
Page 37: Control Inputs
It uses a standard V-Trigger connector in place of the S-Trigger and Cinch-Jones connector used on the original Minimoog Model D. A trigger signal received here will cause the Contour Generators to fire and will act as a keyboard gate. -
Page 38: Performance Tips & Techniques
Performance Tips & Techniques 38 | CHAPTER... -
Page 39: Processing External Audio
Even with its streamlined control panel, Minimoog Model D remains a deep and versatile instrument for audio synthesis. Here are just a few examples of how Minimoog Model D may be used in interesting and perhaps unexpected ways. PROCESSING EXTERNAL AUDIO Using a Moog Ladder Filter to process external sounds can lead to extremely creative explorations. -
Page 40: Enhancing A Keyboard Performance
LFO RATE, FILTER CUTOFF FREQUENCY, and EMPHASIS knobs accordingly. ENHANCING A KEYBOARD PERFORMANCE In this example, the expressive capabilities of the Minimoog Model D keyboard are enhanced by adding Velocity control to the volume and After Pressure control to the filter brightness. -
Page 41: Creating Fm Effects
CREATING FM EFFECTS Often when we think of Modulation, we are thinking of adding a slow, cyclic change in pitch, filter brightness, etc. Minimoog Model D also allows one audio oscillator to modulate another, creating interesting Frequency Modulation effects. STEP 1 Set the OSCILLATOR MODULATION rocker switch to ON to enable frequency modulation of the Oscillators via the modulation bus. -
Page 42: Creative Switching
Performance Tips & Techniques CREATIVE SWITCHING With a little forethought, the blue and orange rocker switches on Minimoog Model D can be used to quickly introduce new elements to your performance. For example, by tuning OSCILLATOR–2 and OSCILLATOR–3 to specific intervals in regard to OSCILLATOR–1, extra harmonies or chords can be added to your performance as you play. -
Page 43: Oscillator Tuning Procedure
WARNING: Before tuning your Minimoog Model D, you MUST first perform the Global Reset procedure. To perform the Global Reset, which returns Minimoog Model D back to the factory settings, hold the lowest four white keys —F0, G0, A0, B0—while turning on power. - Page 44 Oscillator Tuning Procedure OSC 1 RANGE AND SCALE BOARD 1 The following procedure uses headphones for the oscillator tuning. An audio amplification system can be used for this instead of the headphones. NOTE: Periodically check the tuning of the A-440 tuner. If it is out of tune, simply use the A-440 trimpot to adjust its tuning.
- Page 45 Oscillator Tuning Procedure OSC 2 RANGE AND SCALE BOARD 1 1. Set the OSC 2 VOLUME switch to the ON position. 2. Depress the HIGHEST “A” KEY on the keyboard, and adjust the OSC 2 RANGE trimpot for zero beats to OSC 1. 3.
-
Page 46: Global Settings
SysEx (System Exclusive) messages—or both. cumulative. Power-On Commands are retained SysEx documentation can be downloaded at by the Minimoog Model D, even when the power moogmusic.com. has been turned off. 46 | Global Settings... - Page 47 GLOBAL PARAMETER KEY SELECTION Global Reset Hold the lowest four white keys—F0, G0, A0, B0—while turning on power. This returns the instrument to its original factory settings. Note Priority Power-On Commands The Priority function specifies which note will take priority when more than one note is played at a time on the keyboard: the last note played, the highest note, or the lowest note.
- Page 48 Global Settings Gate Source Power-On Commands Determines which sources will trigger the Keyboard Gate and Contour Generators External Gate Hold F2 + A2 while turning on the power. Sets gate source as EXT. V-TRIG input only External and Local Hold F2 + Bb2 while turning on the power. Keys (No MIDI) Sets gate source as both the local keyboard and the EXT.
- Page 49 Keyboard Tuning Error Power-On Command The Pratt-Read keyboard on the original Minimoog Model D used a fixed resistor network on each key to set the pitch. This feature can recreate the tuning errors caused by variations in the resistor values to add a more vintage sound and feel to the instrument.
- Page 50 TIP: By transposing the MIDI note output, you can command another MIDI synthesizer to play in parallel harmony with the Minimoog Model D. Additionally, by setting MIDI Local to Off and transposing the MIDI note output, you can play in any key while using normal fingering.
- Page 51 Pitch CV Zero Volt Power-On Command Primarily of value when interfacing Minimoog Model D with other analog synthesizers, this command allows you to specify which note will cause the PITCH OUT control voltage (Pitch CV) to have a value of zero volts.
-
Page 52: 52 | Signal Flow
52 | Signal Flow... -
Page 54: Patch Sheets
Patch Sheets 54 | CHAPTER... - Page 55 Midnight Funk Sound: Notes: Set the LFO Rate knob to triangle wave (down position). Adjust Filter Cutoff Frequency to taste. Air Bass Sound: Notes: 55 | Patch Sheets...
- Page 56 Sawyer = Bass Sound: Notes: Adjust External Input Volume to taste. Kraft Bass Sound: Notes: Set the LFO Rate knob to triangle wave (down position). Adjust External Input Volume to taste. Use Mod Wheel to introduce vibrato. 56 | Patch Sheets...
- Page 57 Dark Toms Sound: Notes: Vocal-Bot Sound: Notes: Set the LFO Rate knob to triangle wave (down position). 57 | Patch Sheets...
- Page 58 Very Bad Place Sound: Notes: ‘70s Violin Lead Sound: Notes: Set the LFO Rate knob to triangle wave (down position). Use Mod Wheel to introduce vibrato. 58 | Patch Sheets...
- Page 59 Room Snare Sound: Notes: Play up and down the keyboard. Adjust Filter Decay and Cutoff Frequency. Hi-Hat Sound: Notes: Adjust Loudness Decay Time to change behavior/hat tension. 59 | Patch Sheets...
- Page 60 Droning Brass Intro Sound: Notes: Set the LFO Rate knob to triangle wave (down position). Turn Oscillator-2 range to 32’ for added depth. Bright & Rude Sound: Notes: Set the LFO Rate knob to triangle wave (down position). Reduce Filter Emphasis for less rudeness. 60 | Patch Sheets...
- Page 61 Steel Wound Sound: Notes: Fuzz Lead Sound: Notes: Set the LFO Rate knob to triangle wave (down position). Use Mod Wheel to add Filter Modulation. 61 | Patch Sheets...
- Page 62 Tri Kick Sound: Notes: Increase Amount of Contour to add punch. Abandoned Planet Sound: Notes: Use Mod Wheel to introduce modulation. 62 | Patch Sheets...
- Page 63 Bubble Bass Sound: Notes: Hold Notes. Pull down Mod Wheel for variation. 3-Square Lead Sound: Notes: Slightly detune Oscillator-2 and Oscillator-3. Add vibrato with Mod Wheel. 63 | Patch Sheets...
- Page 64 Freqy Sound: Notes: Jurassic Love Sound: Notes: Set the LFO Rate knob is set to square wave (up position). 64 | Patch Sheets...
- Page 65 Tornadus Sound: Notes: Set the LFO Rate knob to triangle wave (down position). Octave Ouroborus Sound: Notes: Set the LFO Rate knob to square wave (up position). 65 | Patch Sheets...
- Page 66 Light Cycle Sound: Notes: Set the LFO Rate knob to square wave (up position). Experiment with the position of the modulation selection switches in the CONTROLLERS section. More Bounce Bass Sound: Notes: Mod Wheel controls vibrato amount. 66 | Patch Sheets...
- Page 67 ‘70s French Sci-Fi Movie Sound: Notes: With Mod Wheel up, Oscillator-3 Frequency controls the rate of “wobbly” modulated Filter. Classic Stanley Sound: Notes: Set the LFO Rate knob to triangle wave (down position). Use Mod Wheel for seasick vibrato. 67 | Patch Sheets...
- Page 68 Sub Bass Sound: Notes: Set the LFO Rate knob to triangle wave (down position). Sync-Strike Sound: Notes: Ensure Oscillator-3 tuning is exact for proper performance. 68 | Patch Sheets...
- Page 69 Nothin’ Lead Sound: Notes: Mod Wheel adds vibrato. Smooth-E-P Sound: Notes: Use Mod Wheel to introduce modulation. 69 | Patch Sheets...
- Page 70 ‘60s Space Sound: Notes: Use Oscillator-3 Frequency knob to adjust modulation rate. Soft Rez Bass Sound: Notes: 70 | Patch Sheets...
- Page 71 Singing Wind Sound: Notes: Sonic 7 Sound: Notes: Set the LFO Rate knob to square wave (up position). Add Beefy square wave bass with Mod Wheel down. Add Crazy FX “ala Sonic 6” with Mod Wheel up. 71 | Patch Sheets...
- Page 72 Destitution Sound: Notes: Use Mod Wheel to introduce modulation. Looking Glass Rock Sound: Notes: Set the LFO Rate knob to triangle wave (down position). Try manipulating the Modulation Mix Control position. 72 | Patch Sheets...
- Page 73 Rez Hit Sound: Notes: Play with the Mod Wheel for varied effect. Square Meow Sound: Notes: Set the LFO Rate knob to square wave (up position). 73 | Patch Sheets...
- Page 74 Level 3 Sound: Notes: The Haunting Sound: Notes: 74 | Patch Sheets...
- Page 75 The Jump Sound: Notes: Use Mod Wheel to introduce modulation. Broken Radio Sound: Notes: All Oscillator-3 controls, Filter Cutoff, and Mod Wheel values can be changed or varied to create interesting effects. Having a long release time after striking notes allows both hands to change multiple knob values at once.
- Page 76 West Coast Ghost Lead Sound: Notes: Using the A-440 Switch, press A2 on the Keyboard and tune the Cutoff Frequency to A-440 (approx. 9 o’clock). Use Mod Wheel to introduce modulation. Outlaw Sound: Notes: Turn Oscillator-2 On/Off to introduce bass. Use Mod Wheel to introduce modulation.
- Page 77 Additional patch sheets can be downloaded at www.moogmusic.com Sound: Notes: Sound: Notes: 77 | Patch Sheets...
- Page 78 Sound: Notes: Sound: Notes: 78 | Patch Sheets...
- Page 79 Sound: Notes: Sound: Notes: 79 | Patch Sheets...
-
Page 80: Specifications
Input Impedance: 1MEGOhms Glide Rate (octave): 1 millisecond to 10 seconds Pitch Bend Range: (+/-) 7 semitones FILTER Filter Type: Voltage-Controlled Low Pass (Moog Ladder Filter) Cutoff Frequency Range: 10Hz to 20kHz Filter Slope: 24dB per Octave Filter Resonance: At Cutoff Frequency... - Page 81 Manual attenuation with trimpot. CONTROL VOLTAGE INPUTS Loudness: 1/4” TRS 0 to +5 volts; +5 volts = Unity Gain Ring connector allows pedal control via Moog EP-3 Expression Pedal Filter (Cutoff Frequency): 1/4” TRS 1 volt per octave of change Ring connector allows pedal control via Moog EP-3 Expression Pedal Oscillators (Pitch): 1/4”...
- Page 82 The warranty will not be honored if the product is not properly packed. Once you have received the RMA number and carefully packed your Minimoog Model D, ship the product to Moog Music Inc. with transportation and insurance charges paid, and be sure to include your return shipping address.
- Page 83 CARING FOR MINIMOOG MODEL D Clean Minimoog Model D with a soft, dry cloth only—do not use solvents or abrasive detergents. Heed the safety warnings at the beginning of the manual. AN IMPORTANT NOTE ABOUT SAFETY: There are no user serviceable parts in Minimoog Model D.
- Page 84 ©2022 Moog Music, Inc. All rights reserved. MOOG, the MOOG logo, MINIMOOG, and MINIMOOG MODEL D are registered in US Patent & Trademark Office and elsewhere. Minimoog Model D User’s Manual Version 2 www.moogmusic.com/ For the most up-to-date user manual go to...
Need help?
Do you have a question about the MINIMOOG MODEL D and is the answer not in the manual?
Questions and answers