Table of Contents
Advertisement
Available languages
Available languages
Advertisement
Table of Contents

Related Manuals for Aritech ATS111-N Series


Summary of Contents for Aritech ATS111-N Series
- Page 1 ATS111x-N Arming Station Installation Sheet EN DA DE ES NL NO PL PT SV ( ) 5 ( ) 5 © 2020 Carrier P/N 466-2915 (ML) • REV C • ISS 11DEC20 1 / 54...
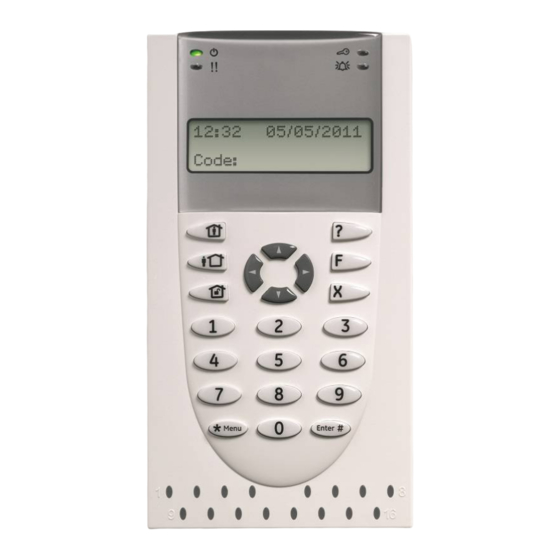
- Page 2 Figure 2 legend (1) Cable entry (4) Tamper switch (2) DIP switches (5) Mount lock (3) LAN terminals Connecting control panel to keypad Refer to the ATS control panel installation guide for instructions. Tamper switch See figure 2. The rear tamper switch must be sealed for the system to work correctly.
-
Page 3: Status Led Indications
• OUT: Open collector output. Use the first output number of LCD backlight the output controller assigned to the RAS. Refer to the The LCD backlight illuminates for 30 seconds following a key ATS control panel programming manual for details. press. -
Page 4: Programming Options
Area and Status LEDs are flashing and the LCD display reads ➔ 10-Card Beep Options Card Beep Enabled System Fault: 0-Exit, Menu: *-Change, #-Exit • Verify the D+ and D− wire connections (may be reversed ➔ 11-Option Card Option Card Enabled or open circuit). -
Page 5: Technical Data
Menu 7, Security Mode (ATS1115-N / ATS1116-N only) ATS1110-N ATS1115-N ATS1111-N ATS1116-N (with This option selects the type of user card the ATS1115-N and smart card reader) ATS1116-N reader will recognise. The reader will recognise Open collector output (“OUT” 15 V max. at 50 mA max. configuration and default cards in both modes. - Page 6 For more information see: recyclethis.info centrelenheden Yderligere oplysninger kan findes i installationsvejledningen til Contact information ATS-centralenheden. www.firesecurityproducts.com or www.aritech.com Sabotagekontakt For customer support, see www.firesecurityproducts.com Se figur 2. Sabotagekontakten skal være lukket, for at systemet kan DA: Installations vejledning fungere korrekt.
- Page 7 • RTE: Et UD-tryk (normalt åben, pulskontakt) kan forbindes LCD-lysstyrke mellem IN- og 0 V-terminalerne (se figur 4). Når kontakten LCD-lysstyrke kan justeres ved at trykke og holde menu aktiveres, sendes signal for UD-tryk til centralen. knappen inde samtidig med at der trykkes på Højre eller •...
- Page 8 Fejlfinding ➔ Indlæs Fabriksindstillinger? 6-Fabriksindstillinger 0-Forlad, Menu: *-Ja, #-Nej Generelle fejl ➔ Rå Kort Data 7-Sikkerhedstilstand Ingen LED-aktivitet eller LCD-display 0-Forlad, Menu: *-Ændre,#-Forlad • Kontroller forbindelserne for +13,8 og 0 V på både RAS- enheden og strømforsyningen. ➔ 8-Blink for Gyldig Kort Blink Aktiveret 0-Forlad, Menu:...
-
Page 9: Tekniske Data
• UD-tryk alene: Denne indstilling kræver, at en simpel konfigurationen ændres af et konfigurationskort, bør denne trykknap skal tilsluttes IN-terminalen. Et tryk på knappen indstilling være deaktiveret. vil udløse dørlåsrelæet. Anvendes til hurtig udgang fra et område (aktiveret som standard). Menu 12, Sidste Kort (kun for ATS1115-N / ATS1116-N) •... -
Page 10: Montage Des Geräts
Yderligere oplysninger findes på webstedet recyclethis.info Legen Sie das BDT auf die Montageplatte und schieben Sie die Einheit etwa um 8 mm nach unten, bis sie Kontaktinformation einrastet. www.firesecurityproducts.com eller www.aritech.com Abbildung 2 Positionen For kundesupport se www.firesecurityproducts.com (1) Kabeleingang (4) Sabotageschalter (2) DIP-Schalter (5) Verriegelung montieren (3) Bus-Anschlüsse... - Page 11 Auf der Rückseite der BDT befindet sich eine Reihe von DIP- LED-Statusanzeigen Schaltern (Abbildung 2), die zur Einstellung der BDT-Adresse Siehe Abbildung 1. und der bus-Abschlussbedingung (TERM) dienen. Diese Einstellungen werden in den folgenden Abschnitten Grün: Die Netz-LED leuchtet, wenn beschrieben.
-
Page 12: Fehlerbehebung
LCD-Hintergrundlicht Fehlerbehebung Das LCD-Hintergrundlicht leuchtet nach einem Tastendruck Allgemeine Störungen 30 Sekunden lang. Keine LED- oder LCD-Anzeige: Signalton • Überprüfen Sie sowohl am BDT als auch am Netzteil Sie können den Signalton anpassen, indem Sie die Clear- die Kabelverbindungen für +13,8 V und 0 V. Taste gedrückt halten, während Sie kurz die Pfeiltaste nach •... - Page 13 Menü 4, A-T (Türfreigabe) Steuerung 4-A-T (Türfreigabe) Steuerung ➔ Nur A-T 0-Ende, Menü: *-Ändern,#-Ende Das BDT verfügt am Verkabelungsanschluss über eine Türfreigabe-Steuerungsschnittstelle für 5-Reserviert Austrittsanforderungen (RTE, Request To Exit) mit 0-Ende, Menü: der Beschriftung IN. Der OUT-Anschluss (Open-Collector- Anschluss) kann zur Steuerung eines Türrelais verwendet ➔...
-
Page 14: Technische Daten
• Magnetkarte: Der Leser sendet Daten in einem 32-Bit- Rechtliche Hinweise Magnetstreifenkartenformat an Hersteller INVERKEHRBRINGER: die Einbruchmeldezentrale. Carrier Fire & Security Americas Corporation Inc. • 13995 Pasteur Blvd Tecom Smart Karte: Dieses Format ist in Palm Beach Gardens, FL 33418, USA der Einbruchmeldezentrale nicht implementiert und sollte BEVOLLMÄCHTIGTER EU REPRÄSENDANT: nicht ausgewählt werden. - Page 15 Kontaktinformation Figura 2 elementos (1) Entrada del cable (4) Interruptor tamper www.firesecurityproducts.com oder www.aritech.com (2) Conmutadores DIP (5) Bloqueo de montaje Kontaktinformationen für den Kundendienst finden Sie unter (3) Terminales del BUS www.firesecurityproducts.com Conexión del panel de control al teclado ES: Instrucciones de instalación...
-
Page 16: Características De Funcionamiento
terminales “IN” y “0 V” (vea figura 4). Cuando se presiona, las teclas de las flechas Arriba ó Abajo. El rango permitido es el pulsador controla la función de petición de salida al 1 a 14, el valor por defecto es 8. panel. -
Page 17: Solución De Problemas
sistema está armado. Para permitir el acceso a las opciones ➔ 4-Control RTE (Salida) RTE Solo del menú de programación del instalador, todas las áreas 0-Salir, Menú: *-Camb, #-Salir deben desarmarse. 5-Reservado 0-Salir, Menú: Solución de problemas ➔ ¿Valores Predeterminados? 6-Valores Predeterminados Fallos generales... -
Page 18: Especificaciones
Menú 4, Control RTE (Salida) Menú 10, Opciones Pitido Tarjeta (sólo ATS1115-N / ATS1116-N) La RAS lleva un puerto de control Egress (Petición de salida) Esta opción activa (valor predeterminado) y desactiva el (RTE) (etiqueta IN) en el conector de cableado. El terminal OUT (colector abierto) se puede utilizar para controlar un relé... -
Page 19: Información De Contacto
Para obtener más información, consulte: recyclethis.info Keskuslaitteen kytkeminen näppäimistöön Información de contacto Katso ohjeet ATS-keskuslaitteen asennusohjeesta. www.firesecurityproducts.com o www.aritech.com Kansikytkin Para acceder al servicio técnico, consulte www.firesecurityproducts.com Katso kuva 2. Takana olevan kansikytkimen on oltava alhaalla, jotta järjestelmä... - Page 20 näppäimistö asennuslevyyn ja painamalla se lukitusasentoon. Keltainen: Vian merkkivalo palaa, kun on havaittu Kansihälytystilanteessa LCD-näyttöön tulee teksti järjestelmävika. ”Käyttölaitesabotaasi”, jos kytkin ei ole alhaalla. Sininen: Pääsyn merkkivalo palaa, kun pääsy käyttölaitteelle määritetylle alueelle on myönnetty tai Käyttölaitteen DIP-kytkinten asetukset ovi on avattu.
-
Page 21: Virran Kytkeminen
LCD-näytön tekstin muotoilu Smart Card -kortinlukijalla varustettu ATS1115-N- tai ATS1116-N-käyttölaite ei reagoi Smart Card -korttiin: ATS1111-N / ATS1116-N-keskusyksikön käyttölaitteessa on 4 rivin ja 16 merkin LCD-näyttö, jonka teksti voi näkyä • Käyttölaite saattaa olla typpiä ATS1110-N tai ATS1111-N, jolloin siinä ei ole Smart Card -lukijaa. seuraavilla tavoilla muotoiltuna: •... -
Page 22: Tekniset Tiedot
• Turvaton Tila (oletusasetus): Lukija tunnistaa vain tyhjät Ohjelmoitavat asetukset tai ohjelmoimattomat kortit käyttämällä kortin yksilöivää Malleissa ATS1110-N, ATS1111-N, ATS1115-N ja ATS1116- sarjanumeroa. Nelitavuinen turvallisuussalasana ei ole N on valikko, josta voi ottaa käyttöön erilaisia asetuksia. käytössä. Turvaamaton tila edellyttää laajennetun muistijärjestelmän käyttöä. - Page 23 IP-luokka IP30 keräyspisteeseen. Lisätietoja sivuilla ACE-tyyppi recyclethis.info (sabotaasisuojaus) Yhteystiedot Sertifiointi ja määräysten nuodattaminen www.firesecurityproducts.com tai www.aritech.com MARKKINOIJA: Valmistaja Tietoja asiakastuesta on osoitteessa Carrier Fire & Security Americas Corporation Inc. 13995 Pasteur Blvd www.firesecurityproducts.com Palm Beach Gardens, FL 33418, USA VALTUUTETTU EDUSTAJA EU-ALUEELLA: FR: Instructions d’installation...
- Page 24 à l’arrière est utilisée (via la plaque de montage), • D+/D− : D+ correspond à la connexion positive des découpez un trou dans la surface de montage pour le données et D− correspond à la connexion négative des passage du câble. données du bus de données.
-
Page 25: Caractéristiques De Fonctionnement
Caractéristiques de fonctionnement ou « HORS »en appuyant sur la touche Menu et sur 0 successivement pour afficher les trois possibilités. Eclairage du clavier et voyant de nuit Touches de fonction Les paramètres par défaut du voyant de nuit et de l’éclairage •... - Page 26 Menu 1, Options LED d’accès Carte de programmation Contrôle la LED Accès bleue (activé par défaut). La LED CARRIER F&S, RAS1115.V10 Accès bleue peut être désactivée si elle n’est pas nécessaire. 0-Sortie, Menu: Menu 2, Options LED armé 1-Options Led d'accès ➔...
-
Page 27: Information Réglementaire
Menu 9, Options protocole (ATS1115-N / ATS1116- ATS1110-N, ATS1115-N, N uniquement) ATS1111-N ATS1116-N avec lecteur de carte Cette option sélectionne la méthode par laquelle un lecteur à puce ATS1115-N ou ATS1116-N envoie les données à la centrale. Combinaisons de codes: Les options sont les suivantes : 5 chiffres 100 000... -
Page 28: Montaggio Dell'unità
(2) Interruttori DIP (5) Blocco del supporto (3) Terminali LAN Pour nous contacter www.firesecurityproducts.com ou www.aritech.com Collegamento della centrale alla tastiera Pour contacter l'assistance clientèle, voir Per le istruzioni sul collegamento, consultare la guida www.firesecurityproducts.com. all'installazione della centrale ATS. - Page 29 • D+/D−: D+ è la connessione positiva dati e D− la Caratteristiche connessione negativa dati del bus dati. Retroilluminazione e illuminazione notturna della tastiera La RAS è collegata alla centrale ATS tramite il bus dati RS485, fino a una distanza massima di 1,2 km dalla centrale o dal Le impostazioni predefinite di retroilluminazione e di concentratore controller a 4 varchi.
-
Page 30: Risoluzione Dei Problemi
• F2 = ‘OPEN’ + 2 ➔ LED Abilitato 1-LED Accesso Opzioni • F3 = ‘OPEN’ + 3 0-Uscita, Menu: *-Varia,#-Uscita • F4 = ‘OPEN’ + 4 • TZ62 = ‘OPEN’ + 5 ➔ Illumuminazione Notturna Acc 2-Illumuminazione Notturna •... - Page 31 • Menu 3, Retroilluminazione Opzioni Wiegand: Per impostazione predefinita, i dati della Smart Card vengono trasmessi utilizzando il protocollo Wiegand. La retroilluminazione della tastiera si accende per Il numero di bit (26 o 27) viene impostato dal l'illuminazione notturna delle etichette dei tasti (attivata per programmatore ATS1620/1621/1622 durante impostazione predefinita).
- Page 32 Certificazione e conformità Informazioni di contatto Costruttore MESSO SUL MERCATO DA: www.firesecurityproducts.com o www.aritech.com Carrier Fire & Security Americas Corporation Inc. Per l'assistenza clienti, vedere www.firesecurityproducts.com 13995 Pasteur Blvd AUTORIZZATO RAPPRESENTANTE UE: Carrier Fire & Security B.V. Kelvinstraat 7, 6003 DH Weert, Netherlands...
- Page 33 aangesloten. Wanneer deze schakelaar wordt ingedrukt, Bediendeel op het controlepaneel zal deze de uitgangsverzoekfunctie activeren. aansluiten • UIT: Open collector uitgang. Deze heeft het eerste Raadpleeg de installatiehandleiding van het ATS- uitgangsnummer van de uitgangcontroller die aan de GI is controlepaneel voor instructies.
- Page 34 LCD Contrast Inschakelen Het LCD-contrast kan worden ingesteld door de Menu-toets Wanneer u de GI op spanning zet hoort u twee pieptonen die ingedrukt te houden en korstondig op de Omhoog of Omlaag aangeven dat het interne geheugen in orde is. Mogelijk gaan pijl toets te drukken om het contrast van het LCD te wijzigen.
- Page 35 Menu 3, Bediendeelverlichting Opties ➔ 3-Bediendeelverlichting Opties Bediendeelverlichting Aan 0-Einde, Menu: *-Wijzig,#-Einde De bediendeelverlichting is actief om de toetsen in het donker te verlichten (standaard ingeschakeld). U kunt de ➔ 4-Uitgangsverzoek(RTE) Enkel RTE bediendeelverlichting uitschakelen. 0-Einde, Menu: *-Wijzig,#-Einde Menu 4, Uitgangsverzoek (RTE) 5-Gereserveerd De GI is uitgerust met een uitgangsverzoek ingang (Request...
-
Page 36: Algemene Informatie
(sabotagebeveiliging) gespecialiseerde verzamelpunt. Meer informatie vindt u op de volgende website: recyclethis.info Contact informatie www.firesecurityproducts.com of www.aritech.com Voor klantenondersteuning, zie www.firesecurityproducts.com P/N 466-2915 (ML) • REV C • ISS 11DEC20 36 / 54... - Page 37 Innstillinger for betjeningspanelets DIP- NO: Installasjonsveiledning brytere Se figur 3. Montere enheten En rad DIP-brytere er plassert på baksiden av betjeningspanelet (figur 2) og disse brukes til å angi BP- Lokket på betjeningspanelet er hengslet nederst. Det kan åpnes ved at du tar tak i sidene eller øvre kant og trekker adressen og betingelsen for bussterminering (TERM).
- Page 38 Trykk ned og hold ‘0’ (nulltasten) samtidig som Opp eller Ned Rød: Alarm-LEDen lyser når systemet saboteres tastene trykkes et øyeblikk for å endre formatet. eller når et området som er tildelt betjeningspanelet, er i alarmtilstand. Området kan identifiseres ved Dette alternativet finnes ikke på...
- Page 39 • Rx: Den gule Rx-LEDen blinker for å indikere at polledata F&S, RAS111x» (x er 0, 1, 5 eller 6 avhengig av type mottas til systembussen fra sentralenheten. Hvis LEDen betjeningspanel) etterfulgt av versjonsnummeret. ikke blinker, er sentralenheten ikke i drift eller det er en feil Trykk på...
- Page 40 For mer informasjon se: recyclethis.info Kodekombinasjoner: 5 sifre 100 000 9 sifre 1 000 000 000 Kontaktinformasjon IP-klassifisering IP30 www.firesecurityproducts.com eller www.aritech.com ACE-type (sabotasjebeskyttelse) For kundestøtte, se www.firesecurityproducts.com P/N 466-2915 (ML) • REV C • ISS 11DEC20 40 / 54...
-
Page 41: Montaż Urządzenia
Podłączanie klawiatury do centrali PL: Instrukcja montażu Informacje na temat podłączenia klawiatury do centrali alarmowej zawarte są w instrukcji instalacji central Montaż urządzenia alarmowych ATS. Pokrywa klawiatury stacji ZAZ (ang. RAS — Remote Arming Przełącznik sabotażowy Station) jest umocowana na zawiasach na dole obudowy. W celu otwarcia należy chwycić... - Page 42 przycisku wysyła żądanie otwarcia drzwi do centrali Jasność wyświetlacza LCD alarmowej. Jasność wyświetlacza LCD można wyregulować przez • OUT: Zacisk wyjścia typu otwarty kolektor (OC). Wyjście wciśnięcie i przytrzymanie klawisza Menu, a następnie sterowane pierwszym wyjściem kontrolera wyjść chwilowe wciskanie klawiszy strzałek W prawo lub W lewo. przypisanego do stacji ZAZ.
-
Page 43: Rozwiązywanie Problemów
dostęp do opcji menu programowania instalatora, należy rozbroić wszystkie obszary. ➔ Wprowadzić Ustawienia fabr.? 6-Ustawienia fabryczne 0-Wyjdź, Menu: *-Yes, #-No Rozwiązywanie problemów ➔ Bez Kodu Zabezpieczenia 7-Tryb z Kodem Zabezpieczenia 0-Wyjdź, Menu: *-Zmień,#-Wyjdź Ogólne błędy 8-Ważna Karta Miganie ➔... -
Page 44: Dane Techniczne
Wciśnięcie przycisku zwolni przekaźnik blokady drzwi. Menu 12, Karta (tylko ATS1115-N / ATS1116-N) Używane do szybkiego opuszczania obszaru (domyślnie Ta opcja wyświetla numer ostatniej karty użytej z czytnikiem włączone). ATS1115-N lub ATS1116-N. Informacja wyświetlona jest • Tryb Specjalny (RTE+zazbr/rozbr): Nie stosować. w następującym formacie: kod systemowy, numer karty (ID) •... - Page 45 (3) Terminais LAN patrz: recyclethis.info Ligação de um painel de controlo a um Informacje kontaktowe teclado www.firesecurityproducts.com lub www.aritech.com Para obter instruções, consulte o guia de instalação do painel Informacje na temat pomocy technicznej można znaleźć na de controlo ATS. stronie www.firesecurityproducts.com Switch de tamper PT: Instruções de Instalação...
- Page 46 painel de controlo para obter detalhes sobre a utilização Indicações dos LEDs de Área das ligações ou switches TERM. Ver figura 1. • Endereço RAS: Defina o endereço RAS utilizando os Quando a cobertura RAS é aberta ou removida, são visíveis switches 1 a 4.
-
Page 47: Troubleshooting
Para alterar o formato, prima e mantenha premida a tecla ‘0’ Indicações dos LEDs RX e TX (zero) enquanto prime momentaneamente as teclas PARA Os LEDs RX e TX encontram-se na placa de circuito para ou PARA . prestar assistência aos diagnósticos de falha e são visíveis Esta opção não está... - Page 48 Para entrar no menu de programação para os teclados • Modo Seguro: Neste modo, só os cartões programados no programador ATS1620/1621/1622 são reconhecidos. ATS111x-N: É utilizada a password de segurança de 4 bytes. Entre no menu 28 do menu do instalador do Painel de Controlo.
-
Page 49: Montera Enheten
Carrier Fire & Security Americas Corporation Inc. 13995 Pasteur Blvd Informação de contacto Palm Beach Gardens, FL 33418, USA REPRESENTANTE EU AUTORIZADO: www.firesecurityproducts.com ou www.aritech.com Carrier Fire & Security B.V. Para assistência ao cliente, consulte Kelvinstraat 7, 6003 DH Weert, Netherlands www.firesecurityproducts.com Avisos e isenções... - Page 50 • RTE: En RTE-knapp (vanligen öppen, momentan Stäng av strömmen till centralapparaten innan VARNING: du kopplar RAS-enheten. tryckknappsbrytare) kan kopplas mellan IN- och 0 V- plintarna (se figur 4). När knappen trycks in kontrollerar Täck för oanvända kabelgenomföringar genom att sätta den funktionen Utgångsförfrågan till centralen.
- Page 51 Felsökning LCD-intensitet LCD-intensiteten kan justeras genom att hålla Meny-knappen Allmänna fel intryckt samtidigt som man trycker momentant på Vänster eller Höger pil. Inställningen kan göras mellan 1 till 9, Inga LED lyser och inget visas på LCD-skärmen: fabriksinställningen är 5. •...
- Page 52 Meny 5, Reserverad ➔ Osäkert Läge 7-Säkerhetsläge 0-Avbryt, Meny: *-Ändra,#-Avbryt Reserverat för framtida bruk. ➔ 8-Giltig Kort Blink Blink Aktiverad Meny 6, Fabriksinställningar 0-Avbryt, Meny: *-Ändra,#-Avbryt Med detta alternativ återställs alla RAS-inställningar till de inställningar som enheten hade när den lämnade fabriken. ➔...
- Page 53 Luftfuktighet <95% ej kondenserande se: recyclethis.info Kodkombinationer: 5 siffror 100 000 Kontaktuppgifter 9 siffror 1 000 000 000 www.firesecurityproducts.com eller www.aritech.com Kapslingsklass IP30 Kundsupport finns på www.firesecurityproducts.com ACE-typ (sabotageskydd) Information om regler och föreskrifter SLÄPPT PÅ MARKNADEN AV: Tillverkare Carrier Fire & Security Americas Corporation Inc.
- Page 54 P/N 466-2915 (ML) • REV C • ISS 11DEC20 54 / 54...
Need help?
Do you have a question about the ATS111-N Series and is the answer not in the manual?
Questions and answers