Aritech Advisor MASTER ATS4000 Manager's Manual
Hide thumbs
Also See for Advisor MASTER ATS4000:
- User manual (25 pages) ,
- Quick programming manual (20 pages)
Table of Contents
Advertisement
Advisor MASTER
ATS4000
Manager's guide
Version 1.0
1) Format: 34 pages A4 Bookshape (stapled).
Formaat: 34 pagina's A4 Boekvorm (geniet).
2) Text may differ from original and is for reference only.
Tekst kan verschillen met origineel en is alleen voor referenties.
White paper: 70gr/m² progresso; overprint black. If P.O.D.: use 80gr/m².
Wit papier: 70gr/m² progresso; opdruk zwart. Wanneer P.O.D.: gebruik 80gr/m².
Manual ATS4000 MM (UK)
F. Rennenberg
A4
®
4234
14
29-11-'01
110-01
2 A 2 9 - 1 1 - ' 0 1
1 0 5 2 0
999-
Advertisement
Table of Contents

Related Manuals for Aritech Advisor MASTER ATS4000


Summary of Contents for Aritech Advisor MASTER ATS4000
- Page 1 Advisor MASTER ® ATS4000 Manager's guide Version 1.0 1) Format: 34 pages A4 Bookshape (stapled). Formaat: 34 pagina's A4 Boekvorm (geniet). 2) Text may differ from original and is for reference only. Tekst kan verschillen met origineel en is alleen voor referenties. White paper: 70gr/m²...
- Page 2 ® Advisor MASTER ATS4000 Manager’s guide Version 1.0...
- Page 3 Aritech is an interlogiX Company © interlogix B.V. 2000. All rights reserved. No part of this publication may be reproduced, transmitted, stored in a retrieval system, or transmitted in any form, or by any means – electronic, photocopying, recording, or otherwise – without the prior...
-
Page 4: Table Of Contents
ONTENTS Welcome ................................3 The Advisor MASTER keypad......................... 4 The keypad .............................. 4 The LCD display ............................5 The LED’s ..............................5 User identification............................6 Duress ................................8 Door opening option............................9 Disarming your system ..........................12 Active zones (When arming)14 Types of alarms.............................. - Page 5 23. Unlock, lock, disable and enable doors....................52 24. Print history ............................54 Programming records............................ 55 User record – Menu option 14 ........................56 Door group record – Menu option 20......................57 Floor group record – Menu option 20 ......................58 Holiday record –...
-
Page 6: Welcome
ELCOME This manual explains how to use the Advisor MASTER system if you are responsible for managing the system. There is also a shorter user guide available that explains every day usage. The Advisor MASTER panel combines sophisticated design with versatility, which makes it the leader in its field. -
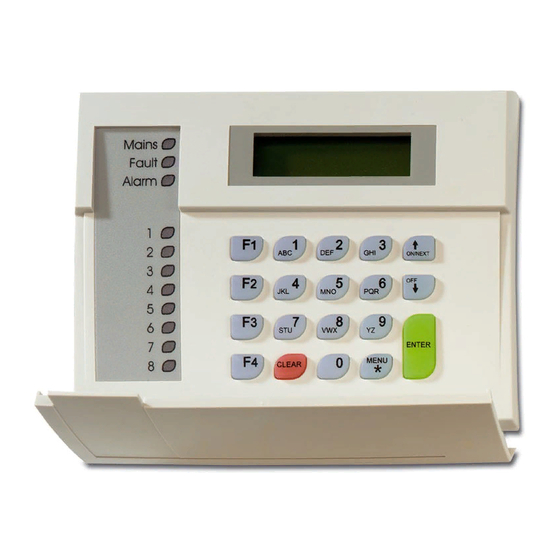
Page 7: The Advisor Master Keypad
MASTER DVISOR KEYPAD Figure 1: The keypad The keypad ➀ Used to enter alphanumeric information. 0 - 9 ➁ Used after entering your PIN code to tell the system that you want to arm your area(s). (some arming stations may have a # as ON key) ➂... -
Page 8: The Lcd Display
The LCD display Messages are displayed on the liquid crystal display (LCD) on the keypad. They guide you through the functions of the Advisor MASTER SYSTEM, such as identifying problems, the procedures necessary to rectify problems, programming functions and other menu options. The display might also show information you have entered on the keypad. -
Page 9: User Identification
System alarm LED’s: (available on some arming stations only) The system alarm LED’s indicate a breach of security. One of the system alarm LED’s flashes when an alarm has occurred (the area’s armed LED also flashes to indicate the location of the alarm). Flashes when an alarm has occurred in an occupied area and DISARMED alarm the area was disarmed. - Page 10 Door groups: Door groups contain options available to gain access to the premises by controlling doors. There are at least 10 and up to 128 door groups in your system for controlling access to doors. Each door group is allocated specific door numbers, and each door number is allotted a timezone during which you can access the door.
-
Page 11: Duress
URESS The duress function activates a silent signal to alert security personnel. For example, if you are asked, under threat, to breach your system security (e.g. forced to disarm the system), this function lets you do so while at the same time activating the system duress facility. -
Page 12: Door Opening Option
OOR OPENING OPTION An Advisor MASTER keypad can be used to open a door by entering a door code. Your door code is related to your PIN code. It varies, depending on whether your PIN code has been programmed to allow you to arm/disarm your system, as well as open doors. - Page 13 When to arm You arm your premises, or areas in it, when they are unoccupied. Then if an unwanted event occurs, such as someone forcing a door open, this sets off the alarm. The time limit when arming Once you have armed the system, you must leave the area within a preset time as otherwise you will set off the alarm.
- Page 14 Areas displayed: If the areas assigned to your PIN are displayed, any of those areas that are disarmed will be listed. 0-All 1, Office 2, Boardroom 3, Workshop Enter Area: e.g. You have four options: Option Action Result Arm all areas Press 0 and Arms all areas at once.
-
Page 15: Disarming Your System
ISARMING YOUR SYSTEM When to disarm If the area you want to enter is armed, you must first disarm the alarm system before you can enter, otherwise you will set off the alarm. You will know which zone is armed because it’s LED on the keypad will be lit red. - Page 16 From this display you have several options: Option Action Result Disarm all areas Press O and Disarms all areas at once. Returns [ENTER] you to the original display. Disarm individual Enter area number Disarms the selected area. If there areas and press are more armed areas, they will be [ENTER].
-
Page 17: Active Zones (When Arming)14
CTIVE ZONES HEN ARMING You cannot arm (or disarm, if your system is programmed that way) an area unless all the zones in that area are normal, as an active zone would usually set off an alarm. For example, all the doors and windows must be closed. If a zone is active while you try to arm or disarm an area, the Advisor MASTER keypad sounds seven quick beeps and displays the active zones. -
Page 18: Types Of Alarms
YPES OF ALARMS There are three types of alarms used in the Advisor MASTER system. Local alarm Alarm System alarm Local alarm • It occurs when an area is occupied (that is, disarmed). For example, zones with 24-hour security have been activated: a firedoor has been opened. •... -
Page 19: What To Do When There Is An Alarm
• The exact type of alarm (siren, flashing light, etc.) depends on how the system has been programmed. Your system has been programmed to respond to a system alarm in one of two ways: Latching System Alarms A PIN code, which is authorised to reset system alarms, must be entered to reset a system alarm. -
Page 20: Resetting A Zone In Alarm
From either display: Option Action Result Acknowledge the Press 0 and Acknowledge the local alarm (see [ENTER] local alarm below). Depending on programming a user code is required to reset. Display the zone Press [NEXT] Display the complete zone name. name in full Update the list of Enter the zone... -
Page 21: Further Information About Alarms
To reset a zone in alarm Enter your PIN code. Press [OFF]. The display shows. 0- All 1, Area One 2, Area Two 3, Area three Enter Area: Enter the area number of the zone in alarm (flashing LED) and press [ENTER]. The display shows: There are no alarms in this area Code:... -
Page 22: Listing Past Alarm Events
ISTING PAST ALARM EVENTS This list provides you with a quick alarm history. It is a fast and easy way to review where alarms have happened. This information is useful when you have had to reset an alarm without initially checking its cause. To list past alarm events Before commencing, the display must show: There Are No Alarms In This Area... -
Page 23: The Advisor Master Menu
MASTER DVISOR MENU The Advisor MASTER menu has 23 options available for performing various functions. Some of the functions are specific only to certain installations, while others might not be authorised to you. Therefore, you are unlikely to see all the menu options when you access the menu, but only those which have been programmed to be available when your PIN code is used. - Page 24 From the display you can now: Option Action Result Scroll forwards Press [ENTER] Scroll forwards through the menu options one by one. Scroll backwards Press [MENU*] Scroll backwards through the alarm history one by one. Select a menu Enter menu option Jump to a specific menu option.
-
Page 25: Panel Status
ANEL STATUS Use this function to list all zones that are in alarm, tamper alarm, inhibited or active and any system alarms. There are menu options available that display each of these conditions separately. However, this option can be used to check on all zones that need attention. The status is shown by the letter preceding the zone number: Code Zone... -
Page 26: Active Zones
CTIVE ONES Use this function to list all active zones. e.g. An open door. To list all active zones Access menu option 2. What happens next depends on whether there are any active zones: No zones active Zones are active Active zones are listed either one at a time, or as a list of numbers: All Zones are Normal... -
Page 27: Zones In Alarm
ONES IN ALARM Use this function to list all zones that are in alarm. Alarms must be acknowledged and reset. See the section What to do when there is an alarm on page 16. To list all zones in alarm Access menu option 3. -
Page 28: Inhibited Zones
NHIBITED ZONES Use this function to list all inhibited zones. You inhibit a zone to exclude it from the security system when it is broken or faulty. This stops it causing an alarm. Use this function to determine which zones are not operating properly and need attention. - Page 29 Example of one event: 13:49 26/11 Menu Entered at Keypad 1> 1-Scan, 0-Exit The top line of the display shows: • The time of the event in hours and minutes - HH:MM. • The date of the event as day and month - DD/MM. •...
-
Page 30: Test Report
EST REPORT Use this function to display the results of the Disarm Test or Arm Test. Disarm test report: The test results to see if specific zones and cameras are operating correctly. The zones need to be programmed to be included in the test, and operate when areas are disarmed. - Page 31 DISARM TEST All zones tested successfully Untested zones Untested zones are listed either one at a time, or No Untested Zones as a list of numbers: Press ENTER Untested Disarm On 25, Reception Hold UP NEXT or ENTER Untested Disarm On 25, 26, 27. Zone No: All cameras tested successfully Untested cameras...
-
Page 32: Service Menu
From the display you can now: Option Action Display the complete zone name Enter the zone number and press [ENTER] Update the list of zones and display the remaining Press [NEXT] zones (if any) Exit Press [ENTER] ERVICE MENU Use this function to allow the user to request a service call or to establish a connection to a remote service centre in order to program over the telephone network. - Page 33 To request the service menu Access menu option 7. The display shows: Code Required Code: Enter your PIN code Press [ENTER]. The display shows: 1 - Request Service Technician 0-Exit, Menu: Enter the service option number required (see table above) and press [ENTER]. In some cases this will bring up another display for more information to be entered: Option Procedure...
-
Page 34: Film Counters
Dial temporary This option allows a temporary telephone number to be management programmed and dialed by the system. software Press 4 and [ENTER]. The display shows: "*"-Pause, Ph No: Serv No: Then: - Enter the temporary service telephone number (up to 10 digits) and press [ENTER], and/or - Press [ENTER] to save the displayed telephone number and move to the “Confirm Dial”... -
Page 35: List Zone Names
9. L ONE NAMES Use this function to display the zone names (text that describes the zones) in your system. To display the zone names. Access menu option 9. The zones are listed either: e.g. One at a time Zone 1, Rear Door Zone No: As a list of numbers e.g. -
Page 36: Inhibit Zone
10. I NHIBIT ZONE Use this function to inhibit zones and exclude them from the security system. A zone is inhibited when it is faulty or broken (that is, it is active). By inhibiting it, you prevent it causing an alarm until it is fixed. You can also inhibit normal zones if you know their zone number. -
Page 37: Uninhibit Zone
11. U NINHIBIT ZONE Use this function to uninhibit zones and include them again in the security system. Do not uninhibit a zone before checking the circumstances, as uninhibiting an active zone might cause an alarm. To uninhibit a zone Access menu option 11. -
Page 38: Test Zone
12. T EST ZONE Use this function to test if an individual zone is operating correctly. To test a zone Access menu option 12. The display shows: Test Individual Zone: Zone No: Enter the zone number you want to test and press [ENTER], or press [ENTER] to exit and return to the menu. -
Page 39: Start Auto Disarm Test
13. S DISARM TART AUTO TEST Use this function to start the disarm test. To start the disarm test Access menu option 13. The display shows: Disarm Test, NEXT For Untested "0"-Cancel: Press: [NEXT] to display the untested zones, or 0 and [ENTER] to cancel the arm test and move on to test completed/not completed display. -
Page 40: Program Users
The test is completed Test Completed Press ENTER Test Not completed The test is not completed Press ENTER Press [ENTER] to return to the menu. 14. P ROGRAM USERS Use this function to add, delete or create a user. Your system might have been set up to require two authorised users to enter this menu. - Page 41 To program user if two users are required Access menu option 14. If your system requires two users to access this option, the display shows: Enter Second Code Code: Enter the second user’s PIN code. Press [ENTER]. The display shows: 1-Delete 2-Display 3-Create Option: Select the function you want to perform, or...
- Page 42 e.g. Door Group: 2 Press ENTER Press [ENTER] The display shows the user's floor group. e.g. Floor Group: 1 Press ENTER Press [ENTER]. If your system is programmed to assign special User Flags to users, the display will now show the User Flags in sequence. See the section "Create (and change) a user" for User Flag details.
- Page 43 Do one of the following options: Option Action Select the number of the alarm group to be issued to this Enter the zone number user. See Note 2. and press [ENTER] Display the list of alarm groups that you can issue to a Press [NEXT] user (if any).
- Page 44 Privileged If set to YES, the User's code/card will over-ride any "Anti- Passback" restrictions on Doors 17 to 64. Extended If set to YES, the user will be allowed extended door access times Access at Doors 17 to 64. e.g. To allow the door to remain open longer for disabled access. The display shows: e.g.
- Page 45 If the user number that you are programming is higher than 1000, then all options available have been programmed and the display returns to step 1. If the system has been programmed so that users do not have name files, or if you are programming a user higher than 200, skip to step 10.
- Page 46 You cannot program a PIN code or user number that already exists. You cannot program a PIN code that will conflict with another user's duress code. (Refer to the section on Duress.) You cannot program a PIN code that will conflict with another user's door code.
-
Page 47: Time And Date
15. T IME AND DATE Use this function to program a new time and date. The time and date are not visible during normal use of the Advisor MASTER system, however, all internal functions rely on them. A new date or time only needs to be programmed when the Advisor MASTER system is first installed, or if the time needs to be adjusted for daylight saving. - Page 48 Time & Date hh:mm dd/mm/yy Xxxxday Day: Enter the correct day (2 digits) and press [ENTER]. The display shows: Time & Date hh:mm:ss dd/mm/yy Xxxday Month: Enter the correct month (2 digits) and press [ENTER]. The display shows: Time & Date hh:mm:ss dd/mm/yy Xxxday Year: Enter the correct year (2 digits) and press [ENTER].
-
Page 49: Inhibit/Uninhibit Ras/Dgp
Enter the month number and press [ENTER], [ENTER] 2- Last Sunday, Month 3 End Day: Select: 1: DST end at FIRST Sunday of the month 2: DST end at LAST Sunday of the month Press [ENTER], [ENTER] to accept 2- Last Sunday, Month 00 End Sunday Enter the month number when the time changes from summertime to wintertime and press [ENTER]... -
Page 50: Enable / Disable Service Technician
To inhibit/uninhibit RASs/DGPs Access menu option 16. The display shows: 1-RAS, 2-DGP Inhibit / Uninhibit 0-Exit, Menu: Enter 1 for RAS or 2 for DGP, and press [ENTER]. • If RAS is selected, the display shows any RASs that are inhibited: No RAS's Are Inhibited Inhibit RAS: •... -
Page 51: Reset Cameras
Option Action Enable the Service Technician's code for the Press 1 and [ENTER]. programmed timeperiod, and return to the menu. Press 0 and [ENTER] Cancel the Service Technician's code, and return to the menu. Return to the menu. Press [ENTER] 18. - Page 52 To program door and floor groups Access menu option 20. The display shows: Groups, 1-Doors 2-Floors Option: Select the option you want to access (1 for door groups, and 2 for floor groups), and press [ENTER], or press only [ENTER] to return to the menu. Door groups: (if you selected option number 1) The display shows: Door Groups...
- Page 53 Floor groups: (if you selected option number 2) The display shows: Floor Groups Group No: Enter the floor group number and press [ENTER] to move to the next display, or press only [ENTER] to return to the initial display ("Groups, 1-Doors 2-Floors”). The display shows: Floor Grp 1 F1-00 F2-00 F3-** F4-** e.g.
-
Page 54: Holidays
21. H OLIDAYS Use this function to record the date of holidays. The holidays recorded here can be used in conjunction with timezones to control access. e.g. staff who are allowed access during normal weekdays can be denied access on weekdays declared a holiday. The control panel can record up to 24 holiday dates. -
Page 55: Open Doors
22. O PEN DOORS Use this function to open a valid door via the LCD arming station. To open a door via the arming station Access menu option 22. The display shows: Open Door Door No: Enter the number of the door you want to open and press [ENTER], or Press only [ENTER] to return to the menu. - Page 56 Enter the door function option you want to do and press [ENTER], or Press [ENTER] to return to the menu. The display shows the option selected: Unlock Door Door No: e.g. Enter the door number to unlock and press [ENTER] to return to the menu, or Press only [ENTER] to return to the menu.
-
Page 57: Print History
24. P RINT HISTORY Use this function to instruct the control panel to print the complete system history from when the last print history command was issued (maximum 200 events with standard memory or 2000 events with expanded memory). To print complete system history Access menu option 24. -
Page 58: Programming Records
ROGRAMMING RECORDS Use the following pages to record details of the relevant data programmed for your system that relates to: Menu option 14 - Users Menu option 20 - Door Groups Menu option 20 - Floor Groups Menu option 21 - Holidays Alarm Groups - when programming users. -
Page 59: User Record - Menu Option 14
– M SER RECORD ENU OPTION Use this page to record details of the relevent user data for your system. By using a pencil to complete these details, you can then easily erase obsolete entries and keep the record up to date and compact. User Alarm Door... -
Page 60: Door Group Record - Menu Option 20
– M OOR GROUP RECORD ENU OPTION Door Group N°: Door Group N°: Door Time Door Time Door Time Door Time N°: zone: N°: zone: N°: zone: N°: zone: * = Disabled * = Disabled ATS4000 Manager’s Guide... -
Page 61: Floor Group Record - Menu Option 20
– M LOOR GROUP RECORD ENU OPTION Floor Group N°: Floor Group N°: Floor Time Floor Time Floor Time Floor Time N°: zone: N°: zone: N°: zone: N°: zone: * = Disabled * = Disabled ATS4000 Manager’s Guide... -
Page 62: Holiday Record - Menu Option 20
– M OLIDAY RECORD ENU OPTION Holiday Number: Number Date Month Year Holiday Number: Number Date Month Year Holiday Number: Number Date Month Year Holiday Number: Number Date Month Year Holiday Number: Number Date Month Year Holiday Number: Number Date Month Year Holiday Number: Number... -
Page 63: Alarm Group Record Details To Be Supplied By The Installer
LARM GROUP RECORD ETAILS TO BE SUPPLIED BY THE INSTALLER Number: Name: Function Summary: Number: Name: Function Summary: Number: Name: Function Summary: Number: Name: Function Summary: Number: Name: Function Summary: Number: Name: Function Summary: ATS4000 Manager’s Guide... -
Page 64: Timezone Record Details To Be Supplied By The Installer
IMEZONE RECORD ETAILS TO BE SUPPLIED BY THE INSTALLER Timezone Number Start Days: SUN/MON/TUE/WED/THU/FRI/SAT/HOL Start Days: SUN/MON/TUE/WED/THU/FRI/SAT/HOL Start Days: SUN/MON/TUE/WED/THU/FRI/SAT/HOL Start Days: SUN/MON/TUE/WED/THU/FRI/SAT/HOL Start Days: SUN/MON/TUE/WED/THU/FRI/SAT/HOL Start Days: SUN/MON/TUE/WED/THU/FRI/SAT/HOL Start Days: SUN/MON/TUE/WED/THU/FRI/SAT/HOL Start Days: SUN/MON/TUE/WED/THU/FRI/SAT/HOL Start Days: SUN/MON/TUE/WED/THU/FRI/SAT/HOL Start Days: SUN/MON/TUE/WED/THU/FRI/SAT/HOL Start Days:... -
Page 65: Glossary
LOSSARY Access control The control of entry to, or exit from, a security area. Active See Normal/Active/Tamper/Inhibited Alarm The state of a security system when a device connected to a zone is activated and the condition of the area is such that activation should be signalled. - Page 66 order to allow selection of floors when accessing a lift reader. Access to each floor in a group can be restricted via a timezone. History A list of past alarm and access control events stored in memory that can be viewed on an LCD arming station or sent to a printer. Hold-up A (silent) alarm that is triggered by a hold-up button.
-
Page 67: Index
NDEX Active zones when arming/disarming, 14 inhibiting, 46 Adding a user to the system, 37 Disarm test, 27 Advisor MASTER menus starting auto arm test, 36 accessing, 20 Disarming the system door and floor groups, 48 active zones, 14 enable/disable service technician, 47 cannot disarm, 12 film counters, 31 when to disarm, 12... - Page 68 user records, 56 Time Programming users, 37 programming, 44 importance of alarm groups, 37, 42 Two cards using two cards, 38 definition, 38 Quick alarm history, 19 programming a user, 38 Types of alarms inhibiting, 46 alarm, 15 Remote arming stations local, 15 inhibiting, 46 Users...
- Page 69 14 4234 999-2A...
Need help?
Do you have a question about the Advisor MASTER ATS4000 and is the answer not in the manual?
Questions and answers