
Related Manuals for Wiesenfield WIE-CCD-100


Summary of Contents for Wiesenfield WIE-CCD-100
- Page 1 U S E R M A N U A L I N S T R U K C J A O B S Ł U G I CHICKEN DOOR OPENER WIE-CCD-100 expondo.com...
- Page 2 Product name: CHICKEN DOOR OPENER Nazwa produktu: AUTOMATYCZNA KLAPA KURNIKA Product model: WIE-CCD-100 Model produktu: Manufacturer expondo Polska sp. z o.o. sp. k. Producent Manufacturer Address ul. Nowy Kisielin – Innowacyjna 7, 66-002 Zielona Góra | Poland, EU Adres producenta...
-
Page 3: General Description
Technical data Parameter description Parameter value Product name CHICKEN DOOR OPENER Model WIE-CCD-100 Batteries 4xAA or 6V Ambient temperature [°C]. > -18 Overall dimensions (width x 670 x 300 x 100 depth x height) (mm] Weight [kg] 1. General Description This manual is intended to assist you for safe and reliable use. -
Page 4: Safety Of Use
CAUTION! or WARNING! or REMEMBER! describing a given situation (general warning sign). CAUTION! The figures in this manual are illustrative only and may vary in some details from the actual appearance of the product. 2. Safety of use CAUTION! Read all safety warnings and instructions. Failure to follow the warnings and instructions may result in electric shock, fire and/or serious injury or death. - Page 5 The appliance is not a toy. Children should be watched to ensure that they do not play with the appliance. 2.3. Safe use of the device Repairs and maintenance should be carried out by qualified personnel using only original spare parts. This will ensure the safety of use. To ensure the designed operational integrity of the device, do not remove factory-installed covers or loosen screws.
-
Page 6: Product Overview
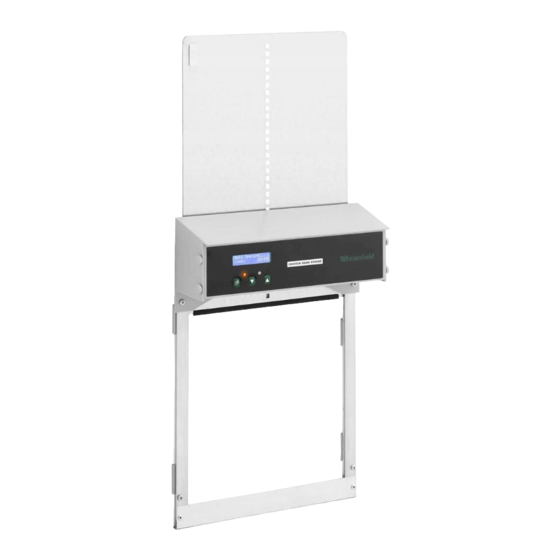
3.1. Product overview 1 - Door 2 - Control panel 3 - Bar Control panel... -
Page 7: Preparation For Operation
1 - Display 2 - Warning light 3 - Light sensor 4 - "MENU" button 5 - "↓" button (down) 6 - "↑" button (up) 3.2. Preparation for operation Set contents... - Page 8 a - Controller b - 7x M4 x 12 self-tapping screws c - 4x M4 knobs d - 6V battery terminals Note: a screwdriver (not included) is a tool for assemblying the unit. Place of installation: • The door should be mounted on the outer wall of the poultry house (the controller has a light sensor).
- Page 9 2) Screw the guides to the wall of the poultry house with 4 self-tapping screws.
- Page 10 3) Remove the 4 locking knobs from the sides of the controller. Make sure the sensor is on the left side of the door, in the lower corner.
- Page 11 4) Gently remove the control panel cover to install 4 AA batteries or 1 6V battery. Next reinstall the front panel of the controller and tighten the 4 locking knobs.
- Page 12 5) Press "↑" to open the door. Install 2 screws approximately 10 cm above the control panel in the wall of the poultry house to prevent the door from tilting to the left or right. The screws should be screwed in right next to the door protruding above the controller.
-
Page 13: Working With The Device
3.3. Working with the device Driver settings 1) The current time Press and hold the "MENU" button for 2 seconds to start changing the clock settings. Press the "Menu" button to switch between hours and minutes. Press "↑" or "↓" to change the values. - Page 14 2) Mode of operation The device can operate in one of the two available modes: • TIMER-TIMER: closing and opening depending on the time • LIGHT-LIGHT: closing and opening depending on the lighting The TIMER-TIMER operation mode allows users to set the time of automatic opening and closing of the door.
- Page 15 The LIGHT-LIGHT mode allows the user to set when the door is to open and close automatically depending on the lighting. The degree of light can be set from 0 to 23. Smaller values correspond to lower lighting. Press the "MENU" button to go to the settings.
- Page 16 This screen allows users to set the protection level (in the range 0-8 OFF). Press "↑" or "↓" to select the level. The higher the value, the higher the level can be. 4) Saving the settings Press the "MENU" button to save the settings. Tips: When it comes to the light level setting mode, the range in which the door •...
- Page 17 Connecting 6V/4xAA batteries Cables for connecting to different types of batteries are included in the set. Depending on the user's choice, connect the cable plug to the PCB and the other end to the AA battery compartment or to the 6V battery (in this case, attach the terminals to the appropriate poles of the battery).
-
Page 18: Cleaning And Maintenance
3.4. Cleaning and maintenance Before cleaning the device, remove the batteries. Use only non-corrosive cleaning agents for cleaning the surfaces. After each cleaning, all the parts should be dried well before the unit is used again. Store the unit in a dry and cool place protected from moisture and direct sunlight. - Page 19 Return the batteries to a unit responsible for their disposal. DISPOSAL OF USED UNITS. At the end of its useful life, this product should not be disposed of with normal household waste but should be taken to a collection point for the recycling of electrical and electronic equipment.
- Page 20 3. If there are no obstructions, add some lubricant to the guides. 4. Increase the degree of protection After solving the problem, press the "MENU" button to clear the error. The top door Reinstall the magnet, then press magnet has fallen "MENU"...
-
Page 21: Ogólny Opis
Dane techniczne Opis parametru Wartość parametru Nazwa produktu AUTOMATYCZNA KLAPA KURNIKA Model WIE-CCD-100 Baterie 4xAA lub 6V Temperatura otoczenia [°C] > -18 Wymiary gabarytowe (szerokość x głębokość x 670 x 300 x 100 wysokość) [mm] Ciężar [kg] 1. Ogólny opis Instrukcja przeznaczona jest do pomocy w bezpiecznym i niezawodnym użytkowaniu. -
Page 22: Bezpieczeństwo Użytkowania
Produkt podlegający recyklingowi. UWAGA! lub OSTRZEŻENIE! lub PAMIĘTAJ! opisująca daną sytuację (ogólny znak ostrzegawczy). UWAGA! Ilustracje w niniejszej instrukcji obsługi mają charakter poglądowy i w niektórych szczegółach mogą różnić się od rzeczywistego wyglądu produktu. 2. Bezpieczeństwo użytkowania UWAGA! Przeczytać wszystkie ostrzeżenia dotyczące bezpieczeństwa oraz wszystkie instrukcje. - Page 23 Urządzenie nie jest przeznaczone do tego, by było użytkowane przez osoby (w tym dzieci) o ograniczonych funkcjach psychicznych, sensorycznych i umysłowych lub nieposiadające odpowiedniego doświadczenia i/lub wiedzy, chyba że są one nadzorowane przez osobę odpowiedzialną za ich bezpieczeństwo lub otrzymały od niej wskazówki dotyczące tego, jak należy obsługiwać...
-
Page 24: Zasady Użytkowania
dodatkowych elementów zabezpieczających użytkownika, nadal istnieje niewielkie ryzyko wypadku lub odniesienia obrażeń w trakcie pracy z urządzeniem. Zaleca się zachowanie ostrożności i rozsądku podczas jego użytkowania. 3. Zasady użytkowania Produkt przeznaczony jest do użycia jako automatycznie otwierane i zamykane drzwi do kurnika. Odpowiedzialność... -
Page 25: Opis Urządzenia
3.1. Opis urządzenia 1 - Drzwi 2 - Panel sterowania 3 - Prowadnica Panel sterownia... -
Page 26: Przygotowanie Do Pracy
1 - Wyświetlacz 2 - Lampka ostrzegawcza 3 - Czujnik światła 4 - Przycisk „MENU” 5 - Przycisk „↓” (w dół) 6 - Przycisk „↑” (w górę) 3.2. Przygotowanie do pracy Zawartość zestawu... - Page 27 a - Sterownik b - 7x Śruby samogwintujące M4 x 12 c - 4x Pokrętła M4 d - Zaciski baterii 6V Uwaga: Niezbędnym narzędziem potrzebnym do montażu będzie śrubokręt (brak w zestawie). Miejsce montażu: Drzwi powinny być zamontowane na zewnętrznej ścianie kurnika (w •...
- Page 28 2) Przykręcić prowadnice urządzenia do ściany kurnika za pomocą 4 śrub samogwintujących.
- Page 29 3) Usunąć 4 pokrętła blokujące z boków sterownika. Upewnić się, że czujnik znajduje się po lewej stronie drzwi, w dolnym narożniku.
- Page 30 4) Delikatnie zdjąć osłonę panelu sterowania, aby zainstalować 4 baterie AA lub 1 baterię 6V. Następnie zainstalować ponownie panel przedni sterownika i przykręcić 4 pokrętła blokujące.
- Page 31 5) Nacisnąć „↑”, aby otworzyć drzwi. W ścianie kurnika zainstalować 2 śruby około 10 cm powyżej panelu sterującego, aby zapobiec przechyleniu się drzwi w lewo lub w prawo. Śruby powinny być wkręcone tuż obok drzwi wystających ponad sterownik. Należy zachować ostrożność, aby nie uszkodzić drzwi.
-
Page 32: Praca Z Urządzeniem
3.3. Praca z urządzeniem Ustawienia sterownika 1) Aktualny czas Nacisnąć i przytrzymać przycisk „MENU” przez 2 sekundy, aby rozpocząć zmianę ustawień zegara. Nacisnąć przycisk „Menu”, aby przełączać pomiędzy godzinami i minutami. Nacisnąć „↑” lub „↓”, aby zmienić wartości. - Page 33 2) Tryb pracy Urządzenie może pracować w jednym z dwóch dostępnych trybów: • TIMER-TIMER: zamykanie i otwieranie w zależności od czasu • LIGHT-LIGHT: zamykanie i otwieranie w zależności od oświetlenia Tryb pracy TIMER-TIMER pozwala użytkownikom, ustawić czas automatycznego otwierania oraz zamykania drzwi. Nacisnąć przycisk „MENU”, aby przejść do ekranu ustawień.
- Page 34 Tryb pracy LIGHT-LIGHT pozwala użytkownikowi ustawić, kiedy drzwi mają się automatycznie otwierać i zamykać w zależności od oświetlenia. Stopień oświetlenia można ustawić w zakresie od 0 do 23. Mniejsze wartości odpowiadają słabszemu oświetleniu. Nacisnąć przycisk „MENU”, aby przejść do ekranu ustawień. Oświetlenie wywołujące otwarcie: Dostosować...
- Page 35 Ten ekran pozwala użytkownikom ustawić poziom ochrony (w zakresie 0-8 OFF). Nacisnąć „↑” lub „↓”, aby wybrać poziom. Im wyższa wartość, tym większy może być poziom mocy. 4) Zapisanie ustawień Nacisnąć przycisk „MENU”, aby zapisać ustawienia. Wskazówki: • W trybie ustawienia poziomu oświetlenia, zakres, w którym drzwi pozostaną otwarte to 15-23, a zakres, w którym drzwi będą...
- Page 36 • Po wymianie baterii należy ustawić ponownie aktualny czas i zapisać ustawienia. Ręczne zamykanie/otwieranie drzwi • Nacisnąć i przytrzymać przycisk „↓” przez 4 sekundy - drzwi zamkną się tymczasowo (po 3 minutach nastąpi otwarcie). Nacisnąć i przytrzymać przycisk „↑” przez 4 sekundy - drzwi otworzą się •...
-
Page 37: Czyszczenie I Konserwacja
3.4. Czyszczenie i konserwacja Przed czyszczeniem urządzenia należy wyjąć z niego baterie. Do czyszczenia powierzchni należy stosować wyłącznie środki niezawierające substancji żrących. Po każdym czyszczeniu wszystkie elementy należy dobrze wysuszyć, zanim urządzenie zostanie ponownie użyte. Urządzenie należy przechowywać w suchym i chłodnym miejscu chronionym przed wilgocią... - Page 38 INSTRUKCJA BEZPIECZNEGO USUNIĘCIA AKUMULATORÓW I BATERII: W urządzeniach zamontowane są baterie. Zużyte baterie należy zdemontować z urządzenia postępując analogicznie do ich montażu. Baterie przekazać komórce odpowiedzialnej za utylizację tych materiałów. USUWANIE ZUŻYTYCH URZĄDZEŃ: Po zakończeniu okresu użytkowania nie wolno usuwać niniejszego produktu poprzez normalne odpady komunalne, lecz należy go oddać...
- Page 39 3. Jeśli nie występują żadne przeszkody, dodać środka smarującego na prowadnice. Po rozwiązaniu problemu nacisnąć przycisk „MENU”, aby usunąć błąd. Close Blocked Drzwi 1. Sprawdzić czy na dole drzwi nie zablokowane w znajdują się żadne przeszkody. trakcie zamykania 2. Sprawdzić czy w prowadnicach nie ma przeszkód.
- Page 40 zawartych w tej tabeli, wysłać urządzenie do serwisu producenta.
- Page 41 UMWELT – UND ENTSORGUNGSHINWEISE Hersteller an Verbraucher Sehr geehrte Damen und Herren, gebrauchte Elektro – und Elektronikgeräte dürfen gemäß europäischer Vorgaben [1] nicht zum unsortierten Siedlungs- abfall gegeben werden, sondern müssen getrennt erfasst werden. Das Symbol der Abfalltonne auf Rädern weist auf die Notwendigkeit der getrennten Sammlung hin.
Need help?
Do you have a question about the WIE-CCD-100 and is the answer not in the manual?
Questions and answers