
Related Manuals for Philips AUT3234


Summary of Contents for Philips AUT3234
- Page 1 Water Solutions Under-the-sink ltration AUT3234 User manual Manual del usuario Manuel d'utilisation Manuale utente Руководство пользователя...
-
Page 2: Table Of Contents
Content I. Product Introduction VI. Maintenance Routine maintenance Filter lifetime II. Product Specifications Filter cartridge replacement III. Product overview and VII. Precautions installation illustration Warning VIII. Troubleshooting IV. Installation Install the three-way ball valve Install the faucet IX. Guarantee & Service Install the system X. -
Page 3: Product Introduction
I. Product Introduction Congratulations on your purchase and welcome to Philips! Our under-the-sink water filtration system AUT3234 comes with a 4-stage ultrafiltration, which e ectively reduces particles, heavy metals, volatile organic compounds, pesticides, bacteria, and pollutants down to 0.01 micron*, while retaining beneficial minerals at the same time. -
Page 4: Product Overview And Installation Illustration
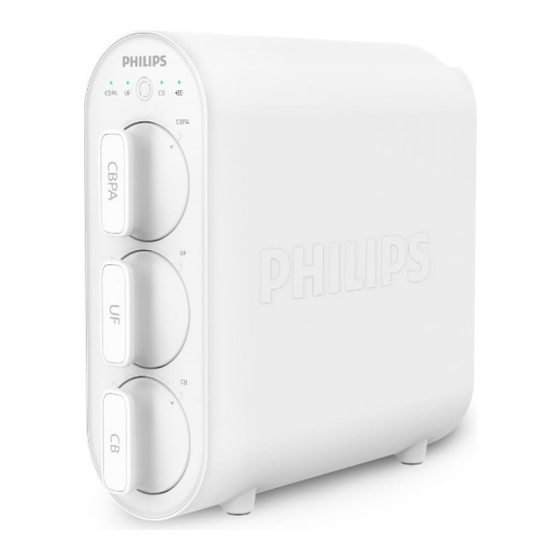
III. Product overview and installation illustration Carbon block and sediment filter 2-in-1 filter (CBPA) Hollow ber membrane lter (UF) Carbon block filter (CB) System 1/4” PE pipe Three-way ball valve Quick connect fitting Faucet and accessory Cold Water inlet pipe Filtered water outlet pipe Faucet... -
Page 5: Installation
IV. Installation Note: - Before installation, it is important to check the condition of the system to make sure it has not been damaged during transport. - Unpack the system and its accessories. Remove the protective packaging material. Recyclable materials have been used for the packaging and should be disposed of in the appropriate recycling bins or at the specific local recycling center. - Page 6 b. Slide the nut of the three-way ball valve onto the 1/4" PE pipe and insert the pipe into the opening of the three-way ball valve. Tighten the nut with a wrench. c. Install the three-way ball valve on the cold water valve.
-
Page 7: Install The Faucet
e. Switch off the three-way ball valve. Turn on the cold water supply. Wipe the connections with a tissue to see if there is leakage. If the tissue stays dry, it means the three-way ball valve is installed properly. Cold 2. - Page 8 This system should be placed on a stable and at surface. Keep the system away from heat. It shall not be placed in a place that may have in ammable gas leakage. a. Press down the collets and pull out the plugs of the water inlet and outlet holes in the back of the system.
- Page 9 c. Connect the water outlet and the faucet. Measure the length of the 1/4” pipe you need, and cut it with a pipe cutter. Insert one end of the pipe into a quick connect fitting, and connect the quick connect fitting on the stem of the faucet. Use a clip to secure the pipe. Insert the other end of the 1/4"...
- Page 10 d. Put in 3 AAA batteries. e. Move the system to its space in the under-the-sink cabinet. f. Remove the plastic wrap of the lter cartridges. Insert the lter cartridges in the system accordingly, and turn them clockwise to align the triangle icon on the filter cartridge with the lock icon on the system.
-
Page 11: Usage Instruction
V. Usage instruction 1. Before the first-time use a. Wipe all the joints and connections with tissue to check if there is leakage. If the tissue stays dry, it means the system is installed properly. b. Turn on the faucet to allow water to run for 10 minutes to flush the air and carbon nes through the lters. -
Page 12: Maintenance
For the best performance, please change your filter cartridge according to the filter lifetime indicator, or the filter replacement cycle suggested below. When a signi cantly lower ow rate is observed, we recommend changing the lters as well. This system can only work with Philips filters. -
Page 13: Filter Cartridge Replacement
Filter Model code Filter lifetime CBPA filter AUT805 6-12 months* UF filter AUT825 24 months* CB filter AUT806 6-12 months* *The actual lifetime of the filter cartridge depends on the local tap water quality and daily usage. The recommended replacement cycle is an average based on di erent local tap water quality. -
Page 14: Troubleshooting
- The inlet water temperature of the system should be within 5-38℃. When the inlet water temperature exceeds 38℃, the filter could be damaged and become invalid. If the inlet water temperature is lower than 5℃, it may cause freezing and the parts of the system to rupture, resulting in water leakage. -
Page 15: Guarantee & Service
5 seconds. IX. Guarantee & Service If you need information or if you have any problems, please visit www.philips.com or contact the consumer care center in your country. If there is no consumer care center in your country, go to a local dealer. Within two years from the date of... -
Page 16: Packaging List
X. Packaging list System CBPA filter UF filter CB filter Three-way ball valve 1/4" PE pipe Faucet and accessory User manual Note: the AAA batteries need to be purchased separately. Please keep this user manual for future reference. The information of this user manual is subject to change without prior notice to the users. - Page 17 Contenido I. Introducción del producto VI. Mantenimiento Mantenimiento de rutina Duración de los filtros II. Especificaciones del producto 16 Reemplazo del cartucho de filtro III. Descripción general del producto VII. Precauciones e ilustración de instalación Advertencia VIII. Resolución de problemas IV.
-
Page 18: Introducción Del Producto
I. Introducción del producto ¡Felicitaciones por su compra y bienvenido a Philips! Nuestro sistema de ltración de agua debajo del fregadero AUT3234 cuenta con una ultra ltración de 4 etapas, que reduce eficazmente partículas, metales pesados, compuestos orgánicos volátiles, pesticidas, bacterias y contaminantes de hasta 0,01 micras*, mientras que al mismo tiempo retiene minerales beneficiosos. -
Page 19: Descripción General Del Producto E Ilustración De Instalación
III. Descripción general del producto e ilustración de instalación Filtro de bloque de carbono y sedimentos 2 en 1 (CBPA) Filtro de membrana de bra hueca (UF) Filtro de bloque de carbón (CB) Sistema Tubería de PE de 1/4 ” Válvula de bola de tres vías Accesorio de conexión rápida Grifería y accesorios... -
Page 20: Instalación
IV. Instalación Nota: - Antes de la instalación, es importante verificar el estado del sistema para asegurarse de que no se haya dañado durante el transporte. - Desembale el sistema y sus accesorios. Retire el material de embalaje protector. Se han utilizado materiales reciclables para el embalaje y deben eliminarse en los contenedores de reciclaje apropiados o en el centro de reciclaje local especí... - Page 21 Fría Caliente Fría b. Deslice la tuerca de la válvula de bola de tres vías en la tubería de PE de 1/4" e inserte la tubería en la abertura de la válvula de bola de tres vías. Apriete la tuerca con una llave. c.
-
Page 22: Instale El Grifo
d. Conecte la manguera de agua fría con la válvula de bola de tres vías y atorníllela firmemente con una llave. No se olvide de la junta de la manguera de agua fría durante la instalación. Junta e. Cierre la válvula de bola de tres vías. Active el suministro de agua fría. -
Page 23: Instalación Del Sistema
b. Instale el grifo de acuerdo con el diagrama. Atornille la tuerca del vástago del grifo hasta Water outlet arriba del vástago del grifo y apriétela para fijar el grifo. Palanca Arandela Arandela Espaciador Tuerca Accesorio de conexión rápida 3. Instalación del sistema Nota: Compruebe si hay su ciente espacio para instalar el sistema en sí, sus accesorios, las conexiones y para el mantenimiento y la reparación. - Page 24 b. Conecte la entrada de agua y la válvula de bola de tres vías. Mida la longitud de la tubería de 1/4" que necesita para conectar el sistema y la válvula de bola de tres vías, y córtela en consecuencia con un cortatubos.
- Page 26 d. Coloque 3 pilas AAA. e. Mueva el sistema a su espacio en el armario debajo del fregadero. f. Retire la envoltura de plástico de los cartuchos de ltro. Inserte los cartuchos de ltro en el sistema según corresponda y gírelos en el sentido de las agujas del reloj para alinear el icono de triángulo del cartucho de ltro con el icono de candado del sistema.
-
Page 27: Instrucción De Uso
V. Instrucción de uso 1. Antes del primer uso a. Limpie todas las uniones y conexiones con un pañuelo para comprobar si hay fugas. Si el pañuelo permanece seco, significa que el sistema está instalado correctamente. b. Abra el grifo para permitir que el agua corra durante 10 minutos para eliminar el aire y las partículas de carbón a través de los filtros. -
Page 28: Mantenimiento
b. Indicador de vida útil de la batería Estado Indicador Alerta sonora Hay suficiente batería Luz azul constante No disponible Habrá pitidos cada vez que se El nivel de batería está bajo Luz azul intermitente abra el grifo, recordándole que debe reemplazar las baterías. -
Page 29: Duración De Los Filtros
útil del filtro o el ciclo de reemplazo del filtro que se sugiere a continuación. Cuando se observa un caudal significativamente menor, recomendamos cambiar también los filtros. Este sistema solo puede funcionar con filtros Philips Filtro Código de modelo Vida útil del filtro... -
Page 30: Precauciones
VII. Precauciones 1. Advertencia - Este NO es un puri cador de agua. Utilice siempre agua del grifo municipal como fuente de agua. No utilice agua microbiológicamente no segura o de calidad desconocida sin una desinfección adecuada antes o después del sistema. - Este sistema no está... -
Page 31: Resolución De Problemas
VIII. Resolución de problemas Problema Causa posible Solución La válvula de agua fría o la válvula Abra las válvulas. de bola de tres vías está cerrada. No sale agua del grifo. El filtro está bloqueado. Reemplace el filtro. El filtro no está instalado Vuelva a instalar el ltro según correctamente. -
Page 32: Garantía Y Servicio
5 segundos. IX. Garantía y servicio Si necesita información o si tiene algún problema, visite www.philips.com o comuníquese con el centro de atención al consumidor de su país. Si no hay un centro de atención al consumidor en su país, vaya a un distribuidor local. En un plazo de dos años a partir de la fecha de compra, recibirá... - Page 33 Nota: Las pilas AAA deben comprarse por separado. Guarde por favor adecuadamente estas instrucciones, para futura referencia. La información de este manual de usuario está sujeta a cambios sin previo aviso a los usuarios.
- Page 34 Contenu I. Présentation du produit VI. Entretien Entretien de routine Durée de vie du filtre II. Spécification du produit Remplacement de la cartouche de ltration III. Présentation du produit et VII. Précautions illustration de l’installation Avertissement VIII. Diagnostic des défaillances 46 IV.
-
Page 35: Présentation Du Produit
I. Présentation du produit Félicitations pour votre achat et bienvenue chez Philips ! Notre système de ltration d’eau sous évier AUT3234 est doté d’un dispositif d’ultrafiltration en 4 phases, qui réduit e cacement les particules, les métaux lourds, les composés organiques volatils, les pesticides, les bactéries et les agents polluants jusqu’à... -
Page 36: Présentation Du Produit Et Illustration De L'installation
III. Présentation du produit et illustration de l’installation Filtre à bloc de carbone et sédiments 2-en-1 (CBPA) Filtre à bre creuse à membrane (UF) Filtre à bloc de carbone (CB) Système Tuyau PE 1/4” Robinet à boisseau sphérique à trois voies Raccord rapide Robinetterie et accessoire Chaud... -
Page 37: Installation
IV. Installation Remarque: - Il est important avant l’installation de vérifier l’état du système pour s’assurer qu’il n’a pas été endommagé au cours du transport. - Déballer le système et ses accessoires. Retirer le matériau d’emballage protecteur. Des matériaux recyclables ont été utilisés à cette fin et doivent être éliminés dans les bacs de recyclage dédiés ou collectés dans un centre de recyclage local spécifique. - Page 38 Froid Chaud Froid b. Faire glisser l’écrou du robinet à boisseau sphérique à trois voies sur le tuyau PE 1/4” et insérer le tuyau dans l’ouverture du robinet à boisseau sphérique à trois voies. Serrer l’écrou avec une clé. c. Installer le robinet à boisseau sphérique à trois voies sur le robinet d’eau froide.
-
Page 39: Installer La Robinetterie
d. Connecter le tuyau d’eau froide au robinet à boisseau sphérique à trois voies et le visser fermement avec une clé. Ne pas oublier le joint situé à l’intérieur du tuyau d’eau froide au cours du montage. Joint e. Fermer le robinet à boisseau sphérique à trois voies. -
Page 40: Installation Du Système
b. Installer la robinetterie conformément au schéma. Visser l’écrou de la tige de robinetterie jusqu’en haut de la tige et le serrer Sortie d’eau pour sécuriser la robinetterie. Levier Rondelle Rondelle Entretoise Écrou Raccord rapide 3. Installation du système Remarque: Vérifier s’il y a suffisamment d’espace pour installer le système en lui-même, ses accessoires, les raccords et pour l’entretien et la réparation. - Page 41 b. Connecter l’admission d’eau et le robinet à boisseau sphérique à trois voies. Mesurer la longueur du tuyau 1/4” requise pour raccorder le système et le robinet à boisseau sphérique à trois voies, et le couper en conséquence avec un dispositif dédié. Insérer l’autre extrémité...
- Page 43 d. Mettre 3 piles AAA. e. Placer le système dans l’emplacement dédié sous l’évier. f. Retirer le film plastique des cartouches de filtration. Insérer les cartouches de filtration dans le système de manière conforme et les tourner dans le sens horaire de sorte à...
-
Page 44: Mode D'emploi
V. Mode d’emploi 1. Avant la première utilisation a. Essuyer tous les joints et raccords avec un mouchoir pour vérifier l’absence de fuites. Si le tissu reste sec, cela signifie que le système est installé de manière appropriée. b. Ouvrir la robinetterie pour permettre à l’eau de couler pendant 10 minutes pour chasser l’air et les éléments en carbone à... -
Page 45: Entretien
b. Voyant de durée de vie de la batterie Statut Voyant Alerte sonore Lumière bleue La batterie est suffisante permanente Des bips seront émis chaque fois Lumière bleue La pile est faible que la robinetterie sera ouverte pour clignotante rappeler de remplacer les batteries c. -
Page 46: Durée De Vie Du Filtre
En cas de baisse agrante du débit, nous recommandons de changer également les filtres. Ce système ne peut fonctionner qu’avec des filtres Philips. Filtre Code du modèle Durée de vie du filtre... -
Page 47: Précautions
VII. Précautions 1. Avertissement - CE N’EST PAS un purificateur d’eau. Toujours utiliser l’eau du robinet comme source d’eau. Ne pas utiliser d’eau dangereuse d’un point de vue microbiologique ou de qualité inconnue sans une désinfection adéquate en amont ou en aval du système. -
Page 48: Diagnostic Des Défaillances
VIII. Diagnostic des défaillances Problème Cause possible Solution L’alimentation en eau froide ou le robinet à boisseau sphérique Les ouvrir. à trois voies sont fermés. Aucune eau ne sort de la robinetterie. Le filtre est bloqué. Remplacer le filtre. Le filtre n’est pas installé de Réinstaller le ltre conformément manière appropriée. -
Page 49: Garantie Et Service
IX. Garantía y servicio Si vous avez besoin d’informations ou si vous rencontrez des problèmes, veuillez-vous rendre sur www.philips.com ou contacter le service client de votre pays. S’il n’y a pas de centre d’assistance aux consommateurs dans votre pays, adressez-vous à un revendeur local. Dans les deux ans à compter de la date d’achat, vous bénéficierez d’un service de garantie gratuit pour tout dommage confirmé... - Page 50 Indice I. Introduzione prodotto VI. Manutenzione Manutenzione ordinaria Vita utile filtro II. Specifica del prodotto Sostituzione della cartuccia del filtro III. Panoramica del prodotto e VII. Precauzioni illustrazioni per l’installazione Attenzione VIII. Risoluzione dei problemi IV. Installazione Installare la valvola a sfera a tre vie Installare il rubinetto IX.
-
Page 51: Introduzione Prodotto
I. Introduzione prodotto Complimenti per l’acquisto e benvenuti nel mondo Philips! Il nostro sistema AUT3234 di ltraggio acqua sotto il lavandino assicura un ultra- ltraggio a 4 livelli, con efficace riduzione di particelle, metalli pesanti, composti organici volatili, pesticidi, batteri e sostanze inquinanti no a 0,01 micron* – e al tempo stesso con preservazione di minerali benefici. -
Page 52: Panoramica Del Prodotto E Illustrazioni Per L'installazione
III. Panoramica del prodotto e illustrazioni per l’installazione Blocco carbone e filtro sedimento 2 in 1 filtro (CBPA) Filtro con membrana a bra cava (UF) Filtro a blocchi di carbone (CB) Impianto Tubo 1/4” PE Valvola a sfera a tre vie Raccordo con connessione rapida Rubinetto e accessori Calda... -
Page 53: Installazione
IV. Installazione Nota: - Prima dell’installazione è importante verificare le condizioni dell’impianto e assicurarsi che non si siano verificati danni durante il trasporto. - Disimballare l’impianto e i suoi accessori. Rimuovere il materiale d’imballaggio protettivo. Per l’imballaggio sono stati utilizzati materiali riciclabili, che dovranno essere gettati negli appositi contenitori per la raccolta differenziata oppure consegnati al locale centro di raccolta rifiuti. - Page 54 Cold Cold b. Far scorrere il dado della valvola a sfera a tre vie nel tubo 1/4" PE; e inserire il tubo nell’apertura della valvola a sfera a tre vie. Serrare il dado con una chiave. c. Installare la valvola a sfera a tre vie sulla valvola dell’acqua fredda.
-
Page 55: Installare Il Rubinetto
d. Connettere il tubo dell’acqua fredda con la valvola a sfera a tre vie e avvitare serrando con una chiave. Non dimenticare la guarnizione nel tubo dell’acqua fredda durante l’installazione. Guarnizione e. Spegnere la valvola a sfera a tre vie. Aprire l’afflusso di acqua fredda. -
Page 56: Installazione Dell'impianto
b. Installare il rubinetto secondo lo schema. Avvitare il dado dello stelo del rubinetto no al massimo e serrare bene, per proteggere il Uscita acqua rubinetto. Leva Rondella Rondella Spaziatore Dado Raccordo con connessione rapida 3. Installazione dell’impianto Nota: Verificare che vi sia spazio a sufficienza per l’installazione dell’impianto stesso, dei suoi accessori e connessioni, e per le operazioni di assistenza e riparazione. - Page 57 b. Connettere l’attacco dell’ingresso dell’acqua e la valvola a sfera a tre vie. Misurare la lunghezza del tubo 1/4" da connettere all’impianto e alla valvola a sfera a tre vie. Se necessario, tagliare il tubo con un’apposita taglierina. A questo punto l’altra estremità...
- Page 59 d. Inserire 3 batterie AAA. e. Spostare l’impianto nell’alloggiamento riservato, nell’armadietto sotto il lavandino. f. Rimuovere l’avvolgimento di plastica delle cartucce del ltro. Inserire le cartucce del ltro nell’impianto e girarle in senso orario, allineando l’icona triangolo sulla cartuccia all’icona lucchetto sull’impianto. CBPA CBPA g.
-
Page 60: Istruzioni Per L'uso
V. Istruzioni per l’uso 1. Prima del primo utilizzo a. Stro nare ed asciugare tutti i giunti e le connessioni con un panno, per veri care eventuali fughe. Se il panno resta asciutto, vorrà dire che l’impianto è stato installato correttamente. b. -
Page 61: Manutenzione
b. Spia vita utile batteria Stato Spia Avviso sonoro C’è ancora abbastanza Luce blu fissa carica nella batteria Vengono emessi dei beep ogniqualvolta il rubinetto è Batteria quasi esaurita Luce blu lampeggiante aperto, a rammentarvi che è necessario sostituire le batterie. c. -
Page 62: Vita Utile Filtro
Se si osserva un flusso decisamente ridotto, consigliamo di sostituire anche i filtri. L’impianto funziona unicamente con filtri Philips Filtro Codice modello... -
Page 63: Precauzioni
VII. Precauzioni 1. Attenzione - Il prodotto NON agisce da depuratore d’acqua. Come fonte di acqua utilizzare sempre acqua di rubinetto. Non utilizzare acqua microbiologicamente poco sicura o di qualità sconosciuta senza adeguata disinfezione a monte o a valle del sistema. - L’impianto non è... -
Page 64: Risoluzione Dei Problemi
VIII. Risoluzione dei problemi Problema Causa possibile Soluzione La valvola dell’acqua fredda o la Accendere le valvole. valvola a sfera a tre vie è spenta. Non esce acqua dal rubinetto Il filtro è bloccato. Sostituire il filtro. Il filtro non è installato Installare di nuovo il ltro correttamente. -
Page 65: Garanzia E Assistenza
Se nel vostro paese non sono a disposizione centri assistenza clienti, rivolgersi ad un locale agente Philips. Nell’arco di due anni dalla data di acquisto, riceverete assistenza gratuita in garanzia per ogni e qualsiasi danno... - Page 66 Nota: le batterie AAA vanno acquistate a parte. Conservare il presente manuale d'uso in condizioni idonee per ulteriori impieghi. Le informazioni riportate nel presente manuale utente sono soggette a modifiche senza previa notifica agli utenti.
- Page 67 Содержание I. Знакомство с продуктом VI. Техническое обслуживание Регулярное техническое обслуживание Срок службы фильтра II. Спецификация продукта Замена фильтрующего картриджа III. Краткое описание продукта и VII. Меры предосторожности иллюстрация установки Предупреждение VIII. Выявление неисправностей IV. Установка Установите трехходовой шаровой кран Установите...
-
Page 68: Знакомство С Продуктом
I. Знакомство с продуктом Поздравляем с покупкой и добро пожаловать в Philips! Наша система фильтрации воды для установки под раковину AUT3234 оснащена 4-ступенчатой ультрафильтрацией, которая эффективно уменьшает количество твердых частиц, тяжелых металлов, летучих органических соединений, пестицидов, бактерий и загрязняющих веществ до 0,01 микрона*, сохраняя... -
Page 69: Краткое Описание Продукта И
III. Краткое описание продукта и иллюстрация установки Углеродный блок и осадочный фильтр 2-в-1 фильтр (CBPA) Фильтр с половолоконной мембраной (УФ) Углеродный блок (CB) Система Полиэтиленовая труба 1/4” (6,35 мм) Трехходовой шаровой кран Фитинг быстрого соединения Смеситель и аксессуары Горячая Холодная Шланг... -
Page 70: Установка
IV. Установка Примечание: - Распакуйте систему и ее аксессуары. Удалите защитный упаковочный материал. Для упаковки использовались перерабатываемые материалы, которые следует утилизировать в соответствующих мусорных баках или в специальном местном центре по переработке отходов. Предупреждение: Храните полиэтиленовые пакеты в недоступном для детей месте, так... - Page 71 Холодная Горячая Холодная b. Наденьте гайку трехходового шарового крана на полиэтиленовую трубу 1/4" (6,35 мм) и вставьте трубу в отверстие трехходового шарового крана. Затяните гайку гаечным ключом. c. Установите трех ходовой шаровой кран на смеситель холодной воды. Пожалуйста, во время установки не забудьте про уплотняющую...
-
Page 72: Установите Смеситель
d. Соедините шланг холодной воды с трехходовым шаровым краном и плотно закрутите гаечным ключом. Пожалуйста, во время установки не забудьте про уплотняющую прокладку в шланге для холодной воды. Gasket e. Выключите трехходовой шаровой кран. Включите подачу холодной воды. Протрите места соединения салфеткой, чтобы... -
Page 73: Установка Системы Примечание
b. Установите смеситель согласно схеме. Закрутите гайку штока смесителя до упора вверх по штоку смесителя и затяните ее, чтобы зафиксировать Сливное отверстие смеситель. Рычаг Уплотнительное кольцо Уплотнительное кольцо Шайба Гайка Фитинг быстрого соединения 3. Установка системы Примечание: Пожалуйста, проверьте, достаточно ли места для установки самой системы, ее аксессуаров и соединений, а... - Page 74 b. Соедините впускное отверстие для воды и трехходовой шаровой кран. Отмерьте длину трубы 1/4" (6,35 мм), необходимую для соединения системы и трехходового шарового крана, и в соответствии с этим обрежьте ее труборезом. Вставьте другой конец трубы 1/4" (6,35 мм), которая была...
- Page 75 d. Вставьте 3 батарейки типа ААА. e. Переместите систему на свое место в тумбе под раковиной. f. Снимите пластиковую пленку с фильтрующих картриджей. Вставьте фильтрующие картриджи в систему соответствующим образом и поверните их по часовой стрелке, чтобы совместить значок треугольника на фильтрующем картридже со значком замка на системе.
-
Page 76: Инструкция По Применению
CBPA CBPA g. Убедитесь, что система установлена надлежащим образом, и включите трехходовой шаровой кран. V. Инструкция по применению 1. Перед первым использованием a. Протрите все стыки и места соединения салфеткой, чтобы проверить, нет ли протечки. Если салфетка останется сухой, это значит, что система установлена правильно. b. -
Page 77: Пользовательский Интерфейс
2. Пользовательский интерфейс Индикатор срока службы фильтра CBPA Индикатор срока службы УФ-фильтра Кнопка сброса Индикатор срока службы углеродного блока Индикатор срока службы батареи При включении смесителя все индикаторы загораются, чтобы показать срок службы фильтра и батареи. Когда система находится в режиме ожидания, индикаторы не горят. Можно нажать кнопку сброса, и... -
Page 78: Техническое Обслуживание
2. Срок службы фильтра Примечание Для лучшей производительности меняйте фильтрующий картридж в соответствии с индикатором срока службы фильтра или циклом замены фильтра, предложенным ниже. Если наблюдается значительно сниженная скорость потока, мы рекомендуем также заменить фильтры. Эта система может работать только с фильтрами Philips. -
Page 79: Замена Фильтрующего Картриджа
Фильтр Код модели Срок службы фильтра CBPA фильтр 6-12 месяцев* AUT805 УФ-фильтр 24 месяца* AUT825 Углеродный блок 6-12 месяцев* AUT806 * Фактический срок службы фильтрующего картриджа зависит от качества местной водопроводной воды и ежедневного использования. Рекомендуемый цикл замены — это среднее... -
Page 80: Выявление Неисправностей
- Температура воды на входе в систему должна быть в пределах 5-38 ℃ . Если температура воды на входе превысит 38 ℃ , фильтр может повредиться и выйти из строя. Если температура воды на входе будет ниже 5 ℃ , это может вызвать замерзание и разрушение частей... -
Page 81: Гарантия И Техническое Обслуживание
IX. Гарантия и техническое обслуживание Если вам нужна информация или если у вас возникли какие-либо проблемы, посетите сайт www.philips.com или обратитесь в центр сервисного обслуживания клиентов в вашей стране. Если в вашей стране нет центра сервисного обслуживания клиентов, обратитесь к местному... -
Page 82: Упаковочный Лист
X. Упаковочный лист Система 1 шт CBPA фильтр 1 шт УФ-фильтр 1 шт Углеродный блок 1 шт Трехходовой шаровой кран 1 шт Полиэтиленовая труба 1/4” (6,35 мм) 1 шт Смеситель и аксессуары 1 шт Руководство пользователя 1 шт Примечание: батарейки типа AAA необходимо приобретать отдельно. Сохраните... - Page 84 © 2021 AquaShield All rights reserved. The Philips trademark and the Philips Shield Emblem are registered trademarks of Koninklijke Philips N.V. used under license. This product has been manufactured by and is sold under the responsibility of Hong Kong AquaShield Health Technology Company Limited and Hong Kong AquaShield Health Technology Company Limited is the warrantor in relation to this product.
Need help?
Do you have a question about the AUT3234 and is the answer not in the manual?
Questions and answers