
Related Manuals for Ocean Signal EPIRB3 Pro


Summary of Contents for Ocean Signal EPIRB3 Pro
- Page 1 User Manual EPIRB3 Pro Category 1 Emergency Position Indicating Radio Beacon with AIS and RLS English www.oceansignal.com...
- Page 2 The technical data, information and illustrations contained in this manual were believed to be correct at the time of print. Ocean Signal Ltd reserve the right to change specifica- tions and other information contained in this manual as part of our continual improvement process.
- Page 3 EPIRB3 Pro USER MANUAL IN CASE OF EMERGENCY USE ONLY IN SITUATIONS OF GRAVE AND IMMINENT DANGER MANUAL ACTIVATION 14/11/2022 912S-03968 - 01.02...
-
Page 4: About Your Epirb
Earth orbit (GEO) which form the GEOSAR System The future Cospas-Sarsat System will include a new type of satellite in the medium-al- titude Earth orbit (MEO) which will form the MEOSAR System. The EPIRB3 Pro is fully compatible with the new MEOSAR satellites. -
Page 5: Return Link Service
Galileo Navigation Signal in Space. The RLS feature is an indication on the EPIRB3 Pro that confirms to the User that the distress signal from the EPIRB3 Pro has been localised by the Cospas-Sarsat system and is being sent to the SAR authorities. -
Page 6: Table Of Contents
Operating Modes EPIRB3 PRO OVERVIEW INSTALLATION Location Removing the EPIRB from the Auto Release Housing Mounting Dimensions Fitting the Auto Release Housing Loading the EPIRB3 Pro into the housing OPERATION Manual Activation Optical Indications on activation Deactivation FALSE ALERTS TESTING NFC and Mobile App. -
Page 7: General
This product complies with EN62479 (EU) and RSS-102 (Canada). Warnings It is a legal requirement to register your EPIRB3 Pro with your National Authority. Only use your EPIRB3 Pro in a situation of grave and imminent danger. Deliberately misusing your EPIRB3 Pro or setting it off accidentally may result in prosecution and a fine. -
Page 8: What's In The Box
It is recommended that the EPIRB3 Pro is held outside of the canopy. The EPIRB3 Pro can also be tethered to the life-raft and allowed to float alongside. -
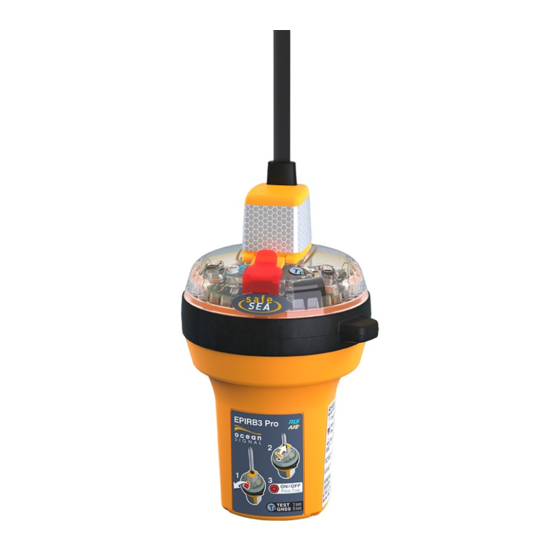
Page 9: Epirb3 Pro Overview
Serial Number/ UIN Label Programming Details Label The lanyard is provided to attach the EPIRB3 Pro to the life raft or your person, once it is activated. Do not use it to attach it to the ship, as this may result in the loss of the EPIRB3 Pro if the vessel sinks. -
Page 10: Installation
EPIRB3 Pro for maintenance and servicing. To ensure that the EPIRB3 Pro will always float free from the sinking vessel ensure that the Auto Release Housing is located high up on the superstructure, free from any obstructions and located in a position where it will not be trapped, regardless of the angle of the sinking vessel. -
Page 11: Removing The Epirb From The Auto Release Housing
Release the safety catch from the release knob Turn the knob anti-clockwise to release the cover Pull the cover free and place to one side. Lift the Hydrostatic clip and remove the EPIRB3 Pro from the mount 14/11/2022 912S-03968 - 01.02... -
Page 12: Mounting Dimensions
(not supplied). Fixing holes ‘E’ are provided to match the Ocean Signal E100/E100G if this product is being used to replace these older models. 912S-03968 - 01.02... - Page 13 EPIRB3 Pro USER MANUAL 4.3.1 Retro-fit Adapter Bracket The EPIRB3 Pro Auto Release Housing comes with an Adapter Bracket that allows easy installation where older EPIRBs from other manufacturers have been fitted. Attach the Adapter Bracket to the Auto Release Housing using the two holes ‘A’ and two of the No10 x 1”...
-
Page 14: Loading The Epirb3 Pro Into The Housing
The area around the activation controls and the lanyard should be free from water and dirt to ensure reliable operation. The EPIRB3 Pro is held in place inside the Auto Release Housing by the HR1E Hydrostatic Release Unit (HRU) which locks into position using a spring. - Page 15 EPIRB3 Pro USER MANUAL Place the housing cover over the back plate, by placing the locating holes (on the side of the housing) over the clips. Push and rotate the housing release knob into the locked position (right). Fold the latch up over the release knob...
-
Page 16: Operation
The EPIRB3 Pro is designed for best operation while floating in water. If used in other situa- tions ensure that the EPIRB3 Pro is placed in the open, clear of any cover and kept upright. Do not place the EPIRB3 Pro close to large structures or under cover. -
Page 17: Manual Activation
Remove the pin Release the safety catch from the release knob Turn the knob anti-clockwise to release the cover Pull the cover free and discard. Lift the Hydrostatic clip and remove the EPIRB3 Pro from the mount 14/11/2022 912S-03968 - 01.02... - Page 18 – as indicated on the top of the EPIRB3 Pro. A lanyard is provided to tether the EPIRB3 Pro to the lifeboat or life raft to ensure that it does not drift away. Make sure this is firmly attached.
-
Page 19: Optical Indications On Activation
EPIRB3 Pro USER MANUAL Optical Indications on activation • The LED will illuminate green (blue if RLS is enabled) for 1 second. • The strobe light will start flashing. • Within 1 minute* of activation, the indicator LED will flash a quick burst of 5 indicating 406MHz transmission. -
Page 20: Deactivation
The EPIRB3 Pro is fitted with water activation contacts. Although the Auto Release Housing is designed to prevent accidental activation in heavy seas and adverse weather conditions, if the EPIRB3 Pro is not correctly fitted in its housing it is possible that this may cause a false alert situation. -
Page 21: Testing
NFC technology allows communication between two electronic devices over a distance of 4cm (1.5”) or less. The benefit of using NFC in the EPIRB3 Pro is that the power used for communication comes from the mobile device and not the beacon. -
Page 22: Beacon Test
Ensure the antenna is free and above the EPIRB3 Pro before commencing the test. Fold the antenna back behind the EPIRB3 Pro as you replace it in the housing. Because the test transmits a short burst on the aircraft distress frequency of 121.5MHz, please only carry out this test in the first five minutes of each hour. - Page 23 121.5MHz, please only carry out this test in the first 5 minutes of each hour. The battery must be replaced either prior to the expiry date shown on the rear label or after the EPIRB3 Pro has been activated. If, during a self test, the LED flashes magenta...
-
Page 24: Gnss Test
The test result flashes will be repeated after 2 seconds. If there are 10 or more tests remaining then the LED will flash 10 times only (repeated). The EPIRB3 Pro has the capacity to carry out 60 GNSS tests within the lifetime of the battery. -
Page 25: Beacon Registration
EPIRB3 Pro USER MANUAL BEACON REGISTRATION It is the owner’s responsibility to register this beacon with the appropriate National Authority before operation. Documentation is provided within the packaging with information regarding registration with the relevant body to comply with the required configuration of the beacon. -
Page 26: Unregistered Beacon
EPIRB3 Pro USER MANUAL UNREGISTERED BEACON It is important to register your beacon. Operation of a beacon that is unregistered or incorrectly registered could lead to delays in providing the rescue services required by the operator of that beacon. 912S-03968 - 01.02... -
Page 27: Appendix
EPIRB3 Pro USER MANUAL APPENDIX Maintenance EPIRBs require little maintenance except periodic cleaning, if required. Always use a damp cloth to clean the case and dry thoroughly. Do not use solvents or other cleaning fluids as this may cause the plastics to deteriorate. - Page 28 MSC/Circ.1039 guidelines for shore-based maintenance of Satellite EPIRBs within 5 years, or by the date of battery expiry, whichever comes first. There are no user serviceable parts inside the EPIRB3 Pro. DO NOT OPEN THE EPIRB, DOING SO WILL INVALIDATE THE WARRANTY AND MAY CAUSE FALSE ALERTS 912S-03968 - 01.02...
-
Page 29: Batteries
The EPIRB3 Pro contains Lithium iron batteries for long operating life. The battery must be replaced either prior to the expiry date or after the EPIRB3 Pro has been used, even if only activated for a short period of time. The battery condition can be determined by carrying out the Self Test procedure shown in section 7 of this manual. -
Page 30: Transport
IATA packing instruction 970 section II. If you are hand carrying your EPIRB3 Pro on an aircraft please contact your airline for advice. Safety Data sheets for all Ocean Signal products can be found on the Ocean Signal website: www.oceansignal.com/safety-data-sheets/ 912S-03968 - 01.02... -
Page 31: Hru Replacement
EPIRB3 Pro USER MANUAL HRU Replacement The EPIRB3 Pro is mounted in a Auto Release Housing which contains a HR1E Hydrostatic Release Unit (HRU). The HRU unit must be replaced two years after installation - the expiry date is marked on the HRU and on the front of the housing. -
Page 32: Specifications
EPIRB3 Pro USER MANUAL Specifications 406MHz Transmitter Transmit Power (EIRP) Frequency 406.031 MHz ±1KHz Modulation Phase ±1.1 Radians (16K0G1D) Encoding Biphase L Rate 400 bps AIS Transmitter Transmit Power (EIRP) 1Watt±3dB Frequency 161.975/162.025MHz ±500Hz Baud rate 9600baud Synchronisation Messages Message 1 (Position), Message 14 (Status) -
Page 33: Approvals
EPIRB3 Pro USER MANUAL General Dimensions of EPIRB (Inc. antenna) 410mm x 90mm x 101mm (16.1 x 3.5 x 3.9 in.) Weight (EPIRB Only) 422grams (0.92lbs) Dimensions of Automatic Release Housing 237mm x 191mm x 121mm (9.3” x 7.5” x 4.8”) Weight (Inc. - Page 34 EPIRB3 Pro USER MANUAL THIS PAGE LEFT INTENTIONALLY BLANK 912S-03968 - 01.02 14/11/2022...
-
Page 35: 10. Warranty Information
Proof of purchase shall be required in order for a warranty claim to be valid from the original purchaser. All claims shall be made in writing to Ocean Signal or an approved service dealer or distributor. - Page 36 Ocean Signal Ltd. Unit 4, Ocivan Way Margate CT9 4NN United Kingdom info@oceansignal.com www.oceansignal.com...
Need help?
Do you have a question about the EPIRB3 Pro and is the answer not in the manual?
Questions and answers