Table of Contents
Advertisement
Available languages
Available languages
Quick Links
INSTRUCTION MANUAL
MANUEL D'INSTRUCTIONS
www.atgames.net
This product is intended for indoor, home use only and is not to be used in a commercial setting.
Ce produit est destiné à une utilisation intérieure et domestique uniquement et ne doit pas être utilisé dans un cadre commercial.
TAITO, the TAITO logo, ARKANOID™ and BUBBLE BOBBLE™ and DARIUS™ and FRONT LINE™ and RAINBOW ISLANDS™ and RASTAN SAGA™ and
SPACE INVADERS™ and THE LEGENDS OF KAGE™ are trademarksand/or registered trademarks of TAITO CORPORATION in Japan and/or other countries.
Advertisement
Table of Contents

Related Manuals for AtGames LEGENDS PINBALL MICRO


Summary of Contents for AtGames LEGENDS PINBALL MICRO
- Page 1 INSTRUCTION MANUAL MANUEL D'INSTRUCTIONS www.atgames.net This product is intended for indoor, home use only and is not to be used in a commercial setting. Ce produit est destiné à une utilisation intérieure et domestique uniquement et ne doit pas être utilisé dans un cadre commercial.
-
Page 3: Table Of Contents
INDEX Assembly Guide Packaging/Unboxing Warning Controls & Inputs Quick Start Guide/How to Update Firmware How to Register/Sign In Your Legends Account Product Registration/When to Safely Power Off THE ALP Micro/ Warranty Info Game List Warning/FCC Statement/Safety Notice Guide d'assemblage Avertissement sur l'emballage et le déballage Commandes et périphériques d’entrée Guide de démarrage rapide / Comment mettre à... - Page 4 ASSEMBLY GUIDE TOOLS INCLUDED Philips head screwdriver Backglass SCREWS CORD AC adapter...
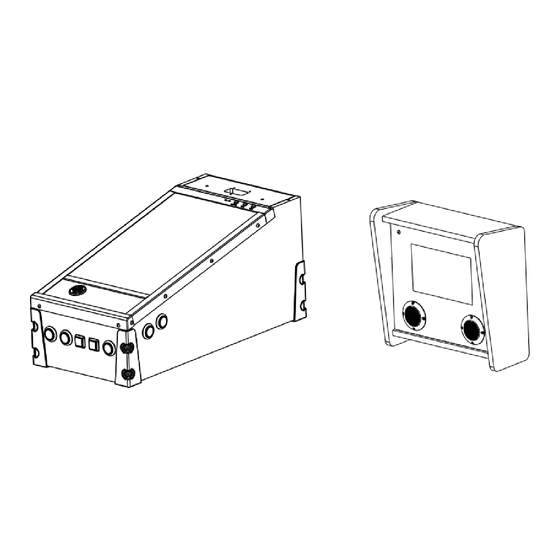
- Page 5 ASSEMBLY GUIDE Step 1: Use the included Philips head screwdriver to open up the back panel on the Backglass. Step 2. Insert [S2] Dowels to the matching hole on top the Playfield. Step 3. Feed the video and audio cables through the hole on the back of Backglass, and attach the Backglass to the top of the Playfield through the dowels.
-
Page 6: Assembly Guide P4
Assembly Guide Step 5. Connect the video and audio cables to the matching slots. Step 6. Attach the back cover of the backglass and tighten it with the included Philips head screwdriver. -
Page 7: Packaging/Unboxing Warning P7
PACKAGING/UNBOXING WARNING • Please note that when assembling the machine that the top rear • Due to the weight of the cabinet body, do not carry the cabinet body by grabbing the opening on the backglass. This can cause serious damage to both the body and electronics inside. •... -
Page 8: Controls & Inputs P8
CONTROLS AND INPUTS Plunger Button AtGames/Home Button HDMI Indicator Cabinet Indicator Channel Volume +/- Buttons Power Switch HDMI Port Ethernet Input Power Input Left USB Port for Right USB Port for • • additional storage OTG (on-the-go) connectivity (USB flash drive... -
Page 9: Quick Start Guide/How To Update Firmware P9
WiFi for system updates and to play more games on ArcadeNet®. Settings When prompted, enter the Wi-Fi password using the on-screen HOW TO UPDATE FIRMWARE ALP Micro. Settings Note: If you encounter any issues during firmware update, contact support at: https://arcades.atgames.net/contact/... -
Page 10: How To Register/Sign In Your Legends Account P10
HOW TO REGISTER/SIGN IN YOUR LEGENDS ACCOUNT Make sure your device is connected via Wi-Fi or Ethernet, then go to [Settings] and select [SIGN IN]. Create a new account if you do not have one yet. Once you have a Legends account, you can choose either to sign in with your Legends ID or with the QR code. -
Page 11: Product Registration/When To Safely Power Off The Alp Micro/P11
Shipping and handling fees are to be paid for by the customer. To make a warranty claim, please submit a service request here: https://www.atgames.net/arcades/contact Standard warranty coverage for the AtGames Legends Pinball Micro does not apply to and is considered invalid due to misuse, improper maintenance, self-repair, tampering, or invasive hardware related causes. -
Page 12: Game List P12
GAME LIST Aerobatics House of Diamonds Deluxe Aerobatics Retro Lucky Fruit Arkanoid Pool Champion Deluxe Battle Rainbow Islands™ Battle 2016 Rastan Saga™ Battle Deluxe Red Show Deluxe Battle Retro Robot Deluxe Beast Master Space Invaders™ Blackbelt Spooky Deluxe Blackbelt Retro Strike Deluxe Blackbelt2018 The Legends of Kage™... -
Page 13: Warning/Fcc Statement/Safety Notice P13
WARNING Adult assembly required. Due to the presence of small parts during assembly, keep out of reach of children until assembly is complete. FCC STATEMENT This equipment has been tested and found to comply with the limits for a Class B digital device, pursuant to part 15 of the FCC Rules. -
Page 14: Guide D'assemblage P14
GUIDE D'ASSEMBLAGE OUTILS INCLUS Tournevis cruciforme Moniteur secondaire Moniteur principal VISSES CABLES Adaptateur secteur... - Page 15 GUIDE D'ASSEMBLAGE Étape 1. Utilisez le tournevis cruciforme fourni pour ouvrir le panneau arrière du moniteur secondaire. Étape 2. Insérez les chevilles [S2] dans le trou correspondant sur le dessus du moniteur principal. Étape 3. Faites passer les câbles vidéo et audio par le trou situé à l'arrière du moniteur secondaire et fixez le moniteur secondaire au sommet du moniteur principal à...
- Page 16 GUIDE D'ASSEMBLAGE Étape 5. Connectez les câbles vidéo et audio aux fentes correspondantes. Étape 6. Fixez la trappe du moniteur secondaire et serrez-la à l'aide du tournevis cruciforme fourni.
-
Page 17: Avertissement Sur L'emballage Et Le Déballage P17
AVERTISSEMENT SUR L'EMBALLAGE ET LE DÉBALLAGE • Veuillez noter que lors de l'assemblage de la machine, la partie arrière supérieure du moniteur principal comporte une ouverture pour le raccordement au moniteur secondaire. • En raison du poids de la machine, ne portez pas celle-ci en la saisissant par l'ouverture sur le moniteur secondaire. - Page 18 COMMANDES ET PERIPHERIQUES D’ENTREE Croix directionnelle Bouton retour/sélection Bouton Flipper Bouton avancer Bouton secouage Bouton Start Bouton Plunger Bouton AtGames/Home Voyant HDMI Voyant d’alimentation Source Boutons de volume +/- SITUÉ À L'ARRIÈRE DE L'APPAREIL Interrupteur Port HDMI Entrée Ethernet Entrée d'alimentation •...
-
Page 19: Guide De Démarrage Rapide / Comment Mettre À Jour Le Micrologiciel P19
Une fois le logiciel installé avec succès, sélectionnez [Upgrade] et l’appareil redémarrera automatiquement afin d’activer la nouvelle version du logiciel. Note : Si vous rencontrez un problème lors de la mise à jour de votre logiciel, merci de contacter notre service client à : https://arcades.atgames.net/contact/... -
Page 20: Comment S'inscrire / Vous Connecter À Votre Compte Legends
COMMENT S'INSCRIRE / VOUS CONNECTER À VOTRE COMPTE LEGENDS 1. Assurez-vous que votre appareil est connecté par Wi-Fi ou Ethernet, puis allez dans [Settings] et sélectionnez [SIGN IN]. 2. Créez un nouveau compte si vous n'en avez pas encore. 3. Une fois que vous avez un compte Legends, vous pouvez choisir de vous connecter avec votre Legends ID ou avec le code QR. -
Page 21: Enregistrement Du Produit / Quand Mettre Hors Tension En Toute P21
Pour faire une demande de garantie, veuillez soumettre votre demande à l’adresse ci-dessous: https://www.atgames.net/arcades/contact La couverture de la garantie standard pour le AtGames Legends Pinball Micro ne s'applique pas et n’est pas considérée comme invalide en raison d'une mauvaise utilisation, d'un entretien inadéquat, d'une auto-réparation, d'une modification ou de l’ajout d'un matériel invasif. -
Page 22: Liste Des Jeux
LISTE DES JEUX Aerobatics House of Diamonds Deluxe Aerobatics Retro Lucky Fruit Arkanoid Pool Champion Deluxe Battle Rainbow Islands™ Battle 2016 Rastan Saga™ Battle Deluxe Red Show Deluxe Battle Retro Robot Deluxe Beast Master Space Invaders™ Blackbelt Spooky Deluxe Blackbelt Retro Strike Deluxe Blackbelt2018 The Legends of Kage™... - Page 23 AVERTISSEMENT Un assemblage par un adulte est requis. En raison de la présence de petites pièces lors de l'assemblage, gardez-les hors de portée des enfants jusqu'à ce que l'assemblage soit terminé. AVIS DE SÉCURITÉ Ne pas plonger la machine dans l’eau ni l’exposer à une forte chaleur ou un champ magnétique puissant. •...
- Page 24 Please find the most updated product info at www.atgames.us. Veuillez trouver les informations les plus récentes sur les produits à l'adresse www.atgames.us . For customer service, warranty info, and technical support please find us here: https://www.atgames.net/arcades/contact/ © 2022 AtGames Interactive www.atgames.net...
Need help?
Do you have a question about the LEGENDS PINBALL MICRO and is the answer not in the manual?
Questions and answers