
Related Manuals for Hoover HV-C60CI


Summary of Contents for Hoover HV-C60CI
- Page 1 INDUCTION 60 cm Induction Cooktop Model Number: HV-C60CI INSTRUCTION MANUAL AFTER SALES SUPPORT (AU) 1300 886 649 (NZ) 0800 836 761...
-
Page 2: Table Of Contents
Contents 03 General Safety Instructions 06 Product Overview 08 Installation 16 Getting Started 19 Instructions 25 FAQs & Troubleshooting Guide 28 Other Useful Information After Sales Support (AU) 1300 886 649 (NZ) 0800 836 761 | tempo.org/support... -
Page 3: General Safety Instructions
General Safety Instructions IMPORTANT SAFETY INSTRUCTIONS READ CAREFULLY AND KEEP FOR FUTURE REFERENCE Read this manual thoroughly before first use, even if you are familiar with this type of product. The safety precautions enclosed herein reduce the risk of fire, electric shock and injury when correctly adhered to. - Page 4 General Safety Instructions (Cont.) • Usage restriction: The appliance is not intended for use by persons (including children) with reduced physical, sensory or mental capabilities, or lack of experi- ence and knowledge, unless they have been given supervision or instruction concerning use of the appliance by a person responsible for their safety.
- Page 5 General Safety Instructions (Cont.) • Handle with care: Do not place or drop heavy objects on your cooktop. Do not stand on your cooktop. Do not use pans with jagged edges or drag pans across the induction glass surface as this can scratch the glass. •...
-
Page 6: Product Overview
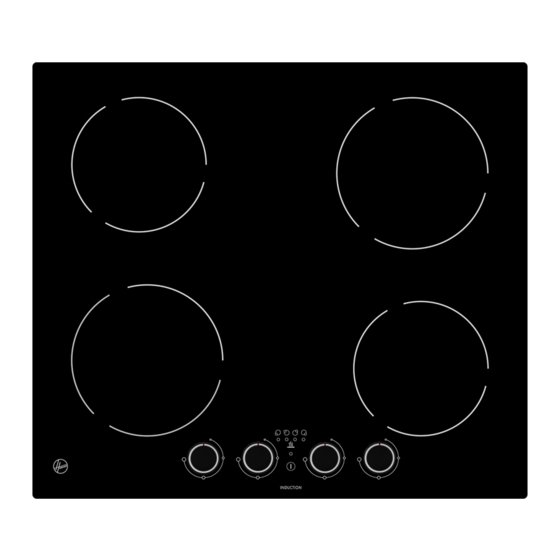
Product Overview Induction cooktop layout INDUCTION Control panel layout INDUCTION After Sales Support (AU) 1300 886 649 (NZ) 0800 836 761 | tempo.org/support... - Page 7 Product Overview (Cont.) Scope of delivery Induction cooktop Max. 1800 W cooking zone (180 mm Ø) Max. 1200 W cooking zone (160 mm Ø) Max. 1800 W cooking zone (180 mm Ø) Max. 1200 W cooking zone (160 mm Ø) Control panel Control panel POWER control...
-
Page 8: Installation
Installation Unpacking the appliance • This product has been packaged to protect it against transportation damage. Unpack the appliance and remove all packaging materials from around all parts of the appliance. • WARNING: CUT HAZARD! Take care, the panel edges are sharp. Failure to use caution when unpacking and installing the appliance could result in injury or cuts. - Page 9 Installation (Cont.) Important installation advice: read before starting the installation! Kitchen and benchtop requirements • Kitchen area: Before installation, make sure the kitchen area is dry and there is sufficient ventilation and easy access to all control elements. • Benchtop: The benchtop surface must be level, and no structural members must interfere with space requirements.
- Page 10 Installation (Cont.) Important clearances • Walls or vertical structures must be at least 200 mm away from the cooktop. • Overhanging surfaces: There must be no overhanging surfaces, and no rangehood or exhaust system within 760 mm above the cooktop. •...
- Page 11 Installation (Cont.) Benchtop preparation The cooktop can be fitted to any benchtop with a minimum thickness of 30 mm. For the purpose of installation and use, make sure to maintain a minimum space of 50 mm around the opening. The safety distance between the sides of the hob and the inner surfaces of the worktop should be at least 3 mm.
- Page 12 Installation (Cont.) Installation (Cont.) Ventilation and space requirements Make sure to observe the clearance requirements as illustrated in Fig. 3. Fig. 3 A (mm) B (mm) C (mm) E (air exit) 50 min. 20 min. Air intake 5 mm Seal application The installation hardware includes a quantity of sealing tape which, when applied around the cooktop, prevents liquid from entering the cabinet.
- Page 13 Installation (Cont.) Inserting and fixing the cooktop • Carefully lower the cooktop into the aperture hole that you have cut out. • Using the screws provided, affix two mounting brackets to the left side of the cooktop and two to the right side, as illustrated (Fig. 4). Fig.
- Page 14 Installation (Cont.) Electrical connection Household socket installation As this device draws 2400 W, a standard household socket is sufficient for installation. Ensure this appliance is only connected to a standard 10 amp household wall socket. WARNING: ELECTRIC SHOCK HAZARD! When hardwiring this appliance, the connection to the electricity supply, and any eventual alterations to the domestic wiring system, must only be made by a licensed electrician and in accordance with all applicable regulations in force.
- Page 15 Installation (Cont.) Connecting the cooktop to the mains power supply The power supply should be connected in compliance with any relevant standards according to the connection method shown below (Fig. 6): Fig. 6 If you are not hardwiring this cooktop, please disregard this diagram. Instead, you may connect the appliance to a standard and pre-existing 10 amp household wall socket.
-
Page 16: Getting Started
Getting Started Before first use When your new induction cooktop has been professionally installed, follow a few simple steps to prepare it for your first use. • Most importantly, read this manual thoroughly to familiarise yourself with the appliance. Pay particular attention to the safety instructions on pages 3–5. Refer to pages 6–7 for a picture and list of the controls. - Page 17 Getting Started (Cont.) Suitable cookware IMPORTANT! Induction cooktop compatible cookware must have a base made of material that attracts a magnet. Only use cookware with a base suitable for induction cooking. Look for the induction symbol on the packaging or on the bottom of the pan. Is your cookware suitable? •...
- Page 18 Getting Started (Cont.) • The bases of pots and pans should be smooth, sit flat against the glass and be the same size as the cooking zone. To maximise efficient energy usage, the base of the pot should have a diameter equal to, or slightly larger than the cooking zone diameter.
-
Page 19: Instructions
Instructions Cooking on the induction cooktop Once the cooktop has been connected to the power supply, the buzzer will emit a beep sound and all indicators light up briefly and then go out. This indicates that power is connected to the cooktop. To start cooking •... - Page 20 Instructions (Cont.) When you have finished cooking • Turn the knob of the cooking zone you would like to switch off to the left (Fig. 18). • Turn the whole cooktop off by touching the POWER control (Fig. 19). Fig. 18 Fig.
- Page 21 Instructions (Cont.) Heat settings (levels) The settings in Table 1, below, are guidelines only. The exact setting will depend on several factors, including your cookware, the amount of food you are cooking, and how many hobs you are using simultaneously (see page 22 for more information).
- Page 22 Instructions (Cont.) Auto shut-down protection Table 2 If a cooking zone is accidentally left on, a safety Power level Time limit shut-down will activate after a certain period (hrs:min) of time and switch off the zone. The length of 1–3 8:00 time depends on the set power level for that zone (Table 2).
- Page 23 Instructions (Cont.) Hints and tips Preventing spillage • Take care when cooking to prevent liquids spilling onto the cooktop surface. • Food or liquid with a high sugar content may damage the cooktop if it comes into contact with the cooktop surface. Wipe up any spillages immediately;...
- Page 24 Instructions (Cont.) Cooking guidelines Searing steak Follow the steps below to cook juicy, flavoursome steak. 1. Stand the meat at room temperature for about 20 minutes before cooking. 2. Heat up an induction compatible, heavy-based fry pan. 3. Brush both sides of the steak with oil. Drizzle a small amount of oil into the hot pan and then lower the meat into the hot pan.
-
Page 25: Faqs & Troubleshooting Guide
FAQs & Troubleshooting Guide If you experience problems with your induction cooktop, or if it appears not to be operating correctly, check the information below and on the next page for solutions to common problems. If none of the solutions offered help you solve your problem, please contact our after sales support centre for advice. - Page 26 FAQs & Troubleshooting Guide (Cont.) Table 4 Problem Possible cause and solution The cooktop makes This is caused by the induction cooking technology. a low humming noise It is normal, but the noise should quieten down or when cooking on a disappear completely when you decrease the heat high heat level.
- Page 27 FAQs & Troubleshooting Guide (Cont.) Table 5: Specific failures (and solutions for the service technician) Failure Possible cause and solution No power supplied — check whether the plug is properly inserted and that the outlet is working. The LED indicator does not illuminate when the Failure of the accessorial power board and display power button is pressed, or...
-
Page 28: Other Useful Information
Other Useful Information Care and cleaning Everyday cleaning of the glass surface Remove fingerprints, marks, stains left by food of non-sugary spill-overs daily from the glass surface. Switch off the power to the cooktop at the wall. Apply a cooktop cleaner while the glass is still warm, but not hot! Rinse and wipe dry with a clean cloth or paper towel. - Page 29 Other Useful Information (Cont.) Spill-overs on the touch controls 5. Switch the power to the cooktop off at the wall. 6. Soak up the spill using a dry cloth or paper towel. 7. Wipe the touch control area with a clean damp sponge or cloth. 8.
- Page 30 This appliance must only be serviced by authorised personnel. There are no spare parts available for purchase. Technical specifications Model number HV-C60CI Rated voltage and frequency 220–240 V~, 50 or 60 Hz 2x 1800 W (180 mm Ø) Cooking zones (4) 2x 1200 W (160 mm Ø)
- Page 31 Other Useful Information (Cont.) Responsible disposal Packaging materials are recyclable. Please dispose of them responsibly for recycling. At the end of its working life, do not throw this appliance out with your household waste. Electrical and electronic products contain substances that can have a detrimental effect on the environment and human health if disposed of inappropriately.
- Page 32 Warranty returns Should you for any reason need to return this product for a warranty claim, make sure to include all accessories with the product. Product does not work? If you encounter problems with this product, or if it fails to perform to your expectations, make sure to contact our After Sales Support Centre on (AU) 1300 886 649 or (NZ) 0800 836 761 for advice.
Need help?
Do you have a question about the HV-C60CI and is the answer not in the manual?
Questions and answers