Reolink E1 Outdoor Manual
Hide thumbs
Also See for E1 Outdoor:
- User manual ,
- Operational instruction (45 pages) ,
- Manual (13 pages)

Subscribe to Our Youtube Channel
Related Manuals for Reolink E1 Outdoor


Summary of Contents for Reolink E1 Outdoor
- Page 1 J u l y 2 02 1 Q S G 1 _ B _ J P_ E N Reolink E1 Outdoor クイックスタートガイド @ R e o l i n kTe c h h t t p s ://re o l i n k . c o m...
- Page 2 目次 同梱物一覧 同梱物一覧 カメラ各部の名称 カメラの設定 E1 Outdoor カメラの取り付け方法 トラブル診断 Reolink E1 Outdoor カメラブラケット 電源アダプター リセットピン ネジパック 製品仕様 製品コンプライアンス 4.5m 電源 取り付け クイックスタート 監視 延長ケーブル ネットワークケーブル テンプレート ガイド ステッカー Japanese Japanese...
- Page 3 初期設定は、イーサネットケーブルを使用して行うことをお勧めします。カメラを設定するには、次の手順を実行 マイクロ SD カードスロット してください。 * レンズを回転させると、底面にリセットボタ ンとマイクロ SD カードスロットがあります。 ステップ 1 イーサネットケーブルを使用して、カメラをルーターの LAN ポートに接続します。 昼光センサー ステップ 2 付属の電源アダプターを使って、カメラの電源を入れます。 スポットライト 赤外線 LED レンズ Reolink E1 Outdoor ステータス LED あなたのスマートデバイス 内蔵マイク スピーカー ネットワークケーブル 電源ケーブル ネットワークケーブル ルーター 電源アダプター 電源ケーブル ステータス LED の表示内容 : ステータス...
- Page 4 Devices Cloud You haven't added any device. Please click the"+"button in the top right corner to add • パソコン Reolink クライアントのダウンロードパス : https://reolink.com > サポート > アプリとクライアント。 注 : Reolink クライアントを使用してカメラにアクセスする場合は、「デバイスの追加」アイコンをクリック し、 「UID」オプションを選択してカメラの UID を入力することができます。UID はカメラ本体に記載され ています(QR コードの真下)。 Japanese Japanese...
- Page 5 E1 Outdoor カメラの取り付け方法 カメラを壁に取り付ける 屋外で使用する場合は、防水性能を高めるために E1 Outdoor を上下逆さまに設置する必要があります。 取り付けテンプレートに合わせて穴を開け、セキュ カメラの適切な監視方向を選択し、ブラケットをセ リティマウントを壁にねじ込みます。 キュリティマウントに合わせ、反時計回りに回してカ メラを固定します。 注 : 必要に応じて、付属の乾式壁用アンカーを使用することもできます。 セキュリティーマウントのボタンを引き、ブラケット ブラケットをカメラの底面にねじ込みます。 のネジを外して 2 つのパーツを分離します。 Japanese Japanese...
- Page 6 天井にカメラを取り付ける トラブル診断 それでもうまくいかない場合は、Reolink サポートに お問い合わせください。 セキュリティマウントのボタンを引き、マウントからシーリングブラケットを外します。 カメラの電源が入らない 製品仕様 カメラの電源が入らない場合は、次の対策を試してく ださい : ハードウェア規格 • カメラを別のコンセントに接続します。 • 別の 12V 電源アダプターでカメラの電源を入れま 解像度 : 5MP 赤外線距離 : 12 メートル(40ft) す。 パン / チルト角度 : 水平方向 : 355° / 垂直方向 : 50° それでもうまくいかない場合は、Reolink サポートに 電源入力 : DC 12V/1A お問い合わせください。...
- Page 7 2412MHz---2472MHz (19dBm) 返品をお考えの場合は、カメラを工場出荷時の設定に https://reolink.com/fcccompliance-notice/ 簡略化された EU 適合宣言 戻し、挿入されている SD カードを取り出してから返 5150MHz---5350MHz (18dBm) を参照してください。 品することを強くお勧めします。 5470MHz---5725MHz (18dBm) 注 : 本機器は、FCC 規則のパート 15 に従い、クラス B デジタルデバイスの制限を満たすことが試験で証明 Reolink は、このデバイスが指令 2014/53/EU の必 利用規約とプライバシー 技術サポート されています。これらの制限は、住宅地での使用にお 須要件およびその他の関連規定に準拠していることを いて、有害な干渉が生じないように適切に保護する目 宣言します。 製品のご使用には、reolink.com にて利用規約とプラ 技術的なサポートが必要な場合は、或いは製品を返品 的で設けられています。本機器は、無線周波数エネル イバシーポリシーへの同意が必要です。子供の手の届 する前に、公式サポートサイトにお問い合わせくださ...
-
Page 8: What's In The Box
Content What's in the Box What’s in the Box Camera Introduction Set up the Camera Install the E1 Outdoor Camera Troubleshooting Reolink E1 Outdoor Camera Bracket Power Adapter Reset Needle Pack of Screws Specifications Notification of Compliance 4.5m Power Mounting... -
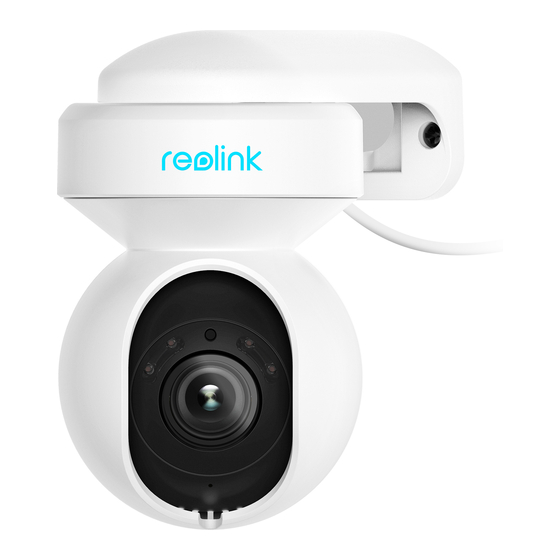
Page 9: Camera Introduction
Step 1 Connect the camera to a LAN port on your router with an Ethernet cable. Daylight Sensor Step 2 Use the power adapter provided to power on the camera. Spotlight Infrared Lights Lens Reolink E1 Outdoor Status LED Your Smart Device Built-in Mic Speaker Network Cable... -
Page 10: Wireless Setup
Step 3 Download and launch the Reolink App or Client software, and follow the onscreen instructions to finish initial setup. If you set up Reolink E1 Outdoor without the Ethernet cable, you may follow the steps below. • On Smartphone Step 1 Use the power adapter provided to power on the camera. - Page 11 Install the E1 Outdoor Camera Mount the Camera to the Wall For outdoor use, E1 Outdoor must be installed upside down for better waterproof performance. Drill holes in accordance with the mounting Choose a proper direction of the camera template and screw the security mount to and then align the bracket to the security the wall.
-
Page 12: Troubleshooting
• Set your password using only the characters Camera is Not Powering on on the keyboard. If your camera is not powering on, please try If these won’t work, please contact Reolink the following solutions: Support. • Plug the camera into another outlet. -
Page 13: Notification Of Compliance
Reolink product, you agree is connected. systems or contact the retailer where the to the terms of this End User License interference that may cause undesired •... - Page 14 OPERATING FREQUENCY (the maximum transmitted power) 2412MHz---2472MHz (19dBm) 5150MHz---5350MHz (18dBm) 5470MHz---5725MHz (18dBm) Technical Support If you need any technical help, please visit our official support site and contact our support team before returning the products, https://support.reolink.com. English English...
Need help?
Do you have a question about the E1 Outdoor and is the answer not in the manual?
Questions and answers