Table of Contents
Advertisement
Quick Links
Installing and Connecting the Router
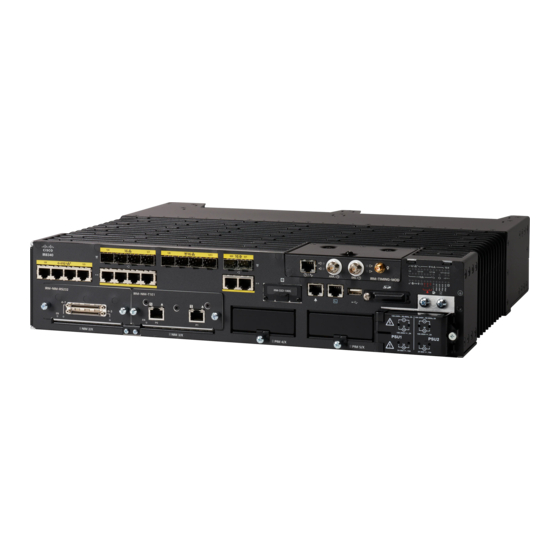
This section describes how to install and connect the Cisco IR8340 router.
•
•
•
•
•
•
•
•
Installing and Connecting the Router
This section describes how to install and connect the Cisco IR8340 router.
Caution
Note
Safety Warnings
Warning
Installing and Connecting the Router, on page 1
Safety Warnings, on page 1
Before You Begin, on page 4
Unpacking the Router, on page 4
Installing the Router in a Rack, on page 5
Replacing the SD Flash Memory Card, on page 7
Connecting the Console Port, on page 8
Connecting WAN and LAN Interfaces, on page 9
For the optimum temperature ranges, do not operate it in an area that less than the minimum of -40°C
and exceeds a maximum recommended ambient temperature of 60°C.
To view specifications for the Cisco Catalyst IR8340 Rugged Series Router, see the IR8340 data sheet.
Only trained and qualified personnel should be allowed to install, replace, or service this equipment.
Statement 1030
Installing and Connecting the Router
1
Advertisement
Table of Contents

Related Manuals for Cisco IR8300


Summary of Contents for Cisco IR8300
-
Page 1: Table Of Contents
For the optimum temperature ranges, do not operate it in an area that less than the minimum of -40°C and exceeds a maximum recommended ambient temperature of 60°C. Note To view specifications for the Cisco Catalyst IR8340 Rugged Series Router, see the IR8340 data sheet. Safety Warnings Warning Only trained and qualified personnel should be allowed to install, replace, or service this equipment. -
Page 2: Installing And Connecting The Router
Installing and Connecting the Router Safety Warnings Warning This unit might have more than one power supply connection. All connections must be removed to de-energize the unit. Statement 1028 Warning Hazardous network voltages are present in WAN ports regardless of whether power to the unit is OFF or ON. - Page 3 Installing and Connecting the Router Statement 191 Voluntary Control Council for Interference (VCCI) Class A Warning for Japan Warning To reduce the risk of fire, use only No. 26 AWG or larger telecommunication line cord. Statement 1023 Warning Use copper conductors only. Statement 1025 Warning A readily accessible two-poled disconnect device must be incorporated in the fixed wiring.
-
Page 4: Before You Begin
ステートメント 1008 クラス 1 レーザー製品 警告 クラス 1 レーザー製品です。 Before You Begin Before installing and connecting a Cisco IR8340 router, read the safety warnings and gather the following tools and equipment: • ESD-preventive cord and wrist strap • Number 2 Phillips screwdriver •... -
Page 5: Installing The Router In A Rack
Allow at least one rack unit of vertical space above and below the router. Rack-Mounting the Chassis The Cisco IR8340 router can be installed in a 19-inch (48.26-cm) standard rack. It is required that at least one rack unit of vertical space is left empty above and below the router. - Page 6 Installing and Connecting the Router Attaching Rack-Mount Brackets to Cisco IR8340 Routers Figure 2: Bracket Installation With Vertical Space Below the Router Figure 3: Bracket Installation With Vertical Space Above the Router Rack-mount bracket Number-8 Phillips flat-head screws (8) Caution Do not over-torque the screws.
-
Page 7: Replacing The Sd Flash Memory Card
Installing and Connecting the Router Mounting the Router in a Rack Mounting the Router in a Rack After you attach the rack-mount brackets to the router chassis, use the screws provided with the rack to install the chassis in the rack. Note The screw slots in the brackets are spaced to line up with every second pair of screw holes in the rack. -
Page 8: Connecting The Console Port
Close the cover, and hand-tighten the screw. Connecting the Console Port To configure the router through the Cisco IOS command-line interface (CLI), you must establish a connection between the router console port and either a terminal or a PC. Console Port Connection to a PC To connect a PC terminal to the console port, use the RJ-45-to-RJ-45 rollover cable, and either the RJ-45-to-DB-25 female DTE adapter or the RJ-45-to-DB-9 female DTE adapter (labeled TERMINAL ). -
Page 9: Connecting Wan And Lan Interfaces
Installing and Connecting the Router Console Port Signaling and Cabling with a DB-25 Adapter Figure 6: RJ-45 to RJ-45 Rollover Cable For the pinout descriptions for the DB-9 connections, see Console Port Adapter Pinouts. Console Port Signaling and Cabling with a DB-25 Adapter This section describes the console port signaling and cabling with a DB-25 adapter as shown in the following figures. - Page 10 Installing and Connecting the Router Connection Procedures and Precautions Warning Hazardous network voltages are present in WAN ports regardless of whether power to the unit is OFF or ON. To avoid electric shock, use caution when working near WAN ports. When detaching cables, detach the end away from the unit first.
Need help?
Do you have a question about the IR8300 and is the answer not in the manual?
Questions and answers