
Related Manuals for Digi X4K-Z1U-00011-A1


Summary of Contents for Digi X4K-Z1U-00011-A1
- Page 1 iDigi Gateway Development Kit ® Getting Started Guide December 16, 2010 90001205 _A Downloaded from Elcodis.com electronic components distributor...
- Page 2 ©2010 Digi International Inc. All rights reserved. Digi, iDigi, Digi International, the Digi and iDigi logos, ConnectPort, Digi ESP, iDigi Dia, XBee, Digi XBee Smart Plug, iDigi Manager Pro, iDigi Web Services API, and a Digi International Company are trademarks or registered trademarks of Digi International, Inc. in the United States and other countries worldwide. All other trademarks are the property of their respective owners. Information in this document is subject to change without notice and does not represent a commitment on the part of Digi International. Digi provides this document “as is,” without warranty of any kind, either expressed or implied, including, but not limited to, the implied warranties of fitness or merchantability for a particular purpose. Digi may make improvements and/or changes in this manual or in the product(s) and/or the program(s) described in this manual at any time. This product could include technical inaccuracies or typographical errors. Changes are periodically made to the information herein; these changes may be incorporated in new editions of the publication. iDigi Gateway Development Kit Getting Started Guide 2 Downloaded from Elcodis.com electronic components distributor...
- Page 3 Using this Guide Contact Information Please always check the product specific section on the Digi support website for the most current revision of this document: http://www.digi.com/gatewaydevelopmentkit. For more information about your Digi products, or for customer service and technical support, contact Digi International. To contact Digi International by Use Mail Digi International 1101 Bren Road East Minnetonka, MN 55343 U.S.A. World Wide Web http://www.digi.com/support Telephone (US) (952) 912‐3444 or (877) 912‐3444 Telephone (other locations) +1 (952) 912‐3444 or (877) 912‐3444 Conventions used in this Guide This icon indicates a step that has the potential to be troublesome. Further information regarding items marked with this symbol can be found in Appendix A: Troubleshooting on page 60. This icon indicates a hint, or concept that is learned. This icon indicates that a goal of the kit has been completed. This icon indicates a warning of the potential for ...
-
Page 4: Table Of Contents
X4 to iDigi .................. 10 Step 4: Install the Digi ESP™ for Python Development Environment ............. 14 ® Step 5: Create your first iDigi Dia Project .................... 17 Step 6: Perform an iDigi Web Services API™ Request ................ 38 ® Step 7: Using the iDigi Gateway Development Kit Demonstration Application ........ 45 Part 2: Learn More ............................ 52 ® ® iDigi Dia & iDigi ............................. 52 Digi ESP™ for Python .......................... 54 ® Digi’s Gateway products ........................ 58 ® XBee Sensor ............................ 59 ® XBee Smart Plug™ (or XBee Wall Router in non‐US kits) .............. 59 ® Digi’s ZigBee RF Modules ........................ 59 Appendix A: Troubleshooting ........................ 60 ® ®... - Page 5 Is the ASSC LED blinking green? ...................... 60 ® iDigi Manager Pro™ does not discover your ConnectPort X4 ............... 61 iDigi Manager Pro™ lists the ConnectPort® X4 as ‘Disconnected’ ............ 63 iDigi Gateway Development Kit Getting Started Guide 5 Downloaded from Elcodis.com electronic components distributor...
-
Page 6: Introduction To The Idigi Gateway Development Kit
Introduction to the iDigi Gateway Development Kit ® Thank you for purchasing an iDigi Gateway Development Kit. The kit is designed to make it easy to setup an XBee network, upload a custom iDigi Dia application, and provide seamless connectivity to the iDigi platform for web services integration to standard business applications over the Internet. Before you start working with the kit, let’s cover some basics. Goals of the Kit As you go through the steps in this kit, you will: 1. Create an iDigi developer account on the iDigi M2M operating platform. 2. Setup and configure the physical elements of an XBee wireless network and understand how the network is managed through a ConnectPort X4 gateway. 3. Use the Digi ESP for Python IDE to build, download, and launch an iDigi Dia application for your ConnectPort X4 gateway, then interact with the application in a realistic setting. 4. Use the iDigi Manager Pro Web Services Console to send a web service request to the ConnectPort X4 retrieving the current XBee devices’ sensor readings. 5. Use the iDigi Gateway Development Kit Demonstration Application to understand how an Enterprise application could use the iDigi Web Services API to monitor the data gathered by the XBee devices’ sensors. Requirements of the Kit System Requirements To install the software mentioned in the Getting Started Guide, you will need a PC running Microsoft Windows XP, Vista or Windows 7. Web Browser Requirements Microsoft Internet Explorer 7.0 or newer Google Chrome 4.0 or newer Mozilla Firefox 3.0 or newer Additional Requirements This Getting Start Guide assumes a scenario where there are no other XBee wireless devices in the area (other than the ones provided with this kit) and that the local network has an Internet connection. Note: If other XBee networks are present and open for joining, the XBee Sensor and XBee Smart Plug may join the wrong network. Please refer to the “XBee devices fail to join the ConnectPort X4’s network” section of Appendix A: Troubleshooting on page 60 for more information. ... -
Page 7: Part 1: Setup Your Digi Gateway Development Kit
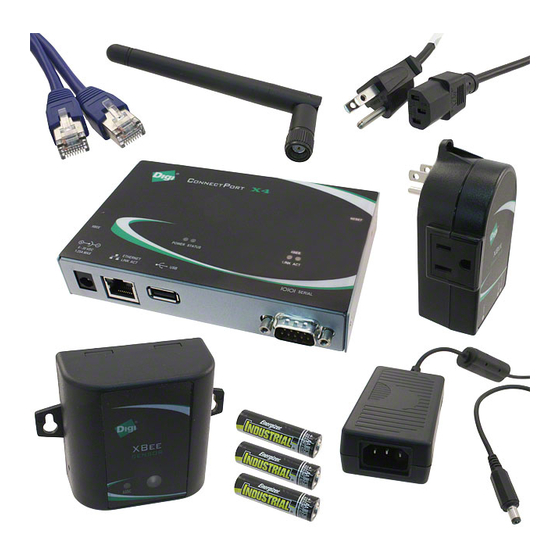
Part 1: Setup your Digi Gateway Development Kit ® Step 1: Kit Preparation Identify Your Kit Components Carefully unpack and verify the contents of your kit. Your kit should include each of the following: Figure 1: Kit Contents Download the Digi® Device Discovery Application For proper kit configuration and operation, the Digi Device Discovery Application must be downloaded and installed. To download the Digi Device Discovery Application: 1. Navigate to http://www.digi.com/gatewaydevelopmentkit and then click on the “Download Digi Device Discovery Application” link (within the Documentation tab). 2. Click the “Download your file” link and then follow the prompts to install the application. iDigi Gateway Development Kit Getting Started Guide 7 Downloaded from Elcodis.com electronic components distributor... -
Page 8: Step 2: Connect The Connectport X4 To Your Local Network
Step 2: Connect the ConnectPort X4 to your Local Network ® To begin setting up your iDigi Gateway Development Kit you will need to connect and power on the ConnectPort X4, and form your XBee network. To do so, follow these steps: Note: If you have additional XBee/ZigBee devices, for the best kit experience, we recommend that you power down or disable joining on other XBee/ZigBee PANs in the area before beginning this step. If you are unable to do this other devices might join the kit network and create interference when deploying your iDigi Dia project. You could also encounter issues connecting the XBee Sensor and XBee Smart Plug to the ConnectPort X4 as they are configured to join any available PAN. 1. Remove the ConnectPort X4 from the box and attach the XBee antenna to the ConnectPort X4. 2. Connect one end of the Ethernet cable to the ConnectPortX4, and the other end to your Ethernet switch (as shown below). Figure 2: Ethernet Switch WARNING: If the ConnectPort X4 does not have access to the Internet this kit cannot be completed. iDigi Gateway Development Kit Getting Started Guide 8 Downloaded from Elcodis.com electronic components distributor... - Page 9 3. Connect the power supply to the ConnectPort X4 and then plug the power supply into a wall outlet. Note: The power supply has a twist‐locking connector, ensure that the connector is locked into place. 4. Remove the XBee Smart Plug from the box and plug it into a wall outlet. The green LED will blink to indicate that the XBee Smart Plug is associated with an XBee network. 5. Remove the batteries (3) from the box and install them into the XBee Sensor (unscrew the two screws on the XBee Sensor to install the batteries). The XBee Sensor’s ASSC LED will blink when the device is connected to your XBee network. Note: If either of the XBee devices fails to blink its ASSC LED indicating that it is connected to your XBee network, please refer to the “Is the ASSC LED solid green? ” section of Appendix A: Troubleshooting on page 60 for more information. Figure 3: Setting up your ConnectPort X4 iDigi Gateway Development Kit Getting Started Guide 9 Downloaded from Elcodis.com electronic components distributor...
-
Page 10: Step 3: Connect Your Connectport X4 To Idigi
Step 3: Connect your ConnectPort X4 to iDigi ® ® The iDigi platform is an on‐demand hosted service platform with no infrastructure requirements for the user. The iDigi platform provides device management, iDigi client application to iDigi device data interaction (messaging), and data storage for a network comprised of both wired and wireless Digi and third‐party Gateways (called iDigi devices). The iDigi platform provides easy integration with M2M and mesh network devices. First, before you can connect your ConnectPort X4 to iDigi, you must create an iDigi developer account. 1. To set up an iDigi developer account: a. Navigate to http://www.idigi.com. b. Click on the iDigi Login button. Figure 4: iDigi Home Page Want to learn more about iDigi? Please refer to the iDigi User’s Guide which can be found at http://www.digi.com/gatewaydevelopmentkit iDigi Gateway Development Kit Getting Started Guide 10 Downloaded from Elcodis.com electronic components distributor... - Page 11 c. If you do not already have an iDigi developer account, click on the “Are you a new user" link and create your account. If you already have an account, login and skip ahead to the “Add the ConnectPort X4 to your iDigi inventory” section on the next page. Figure 5: iDigi Login Page Continue filling in all required fields of the iDigi Registration Form until you complete the iDigi Registration process. Figure 6: New User Registration Page d. After completing the iDigi Registration process, you will be redirected to the iDigi Login page (refer to Figure 5, above). Enter your iDigi user credentials and then click the Login button. You have just completed Goal #1: Creating an iDigi developer account on the iDigi M2M operating platform. iDigi Gateway Development Kit Getting Started Guide 11 Downloaded from Elcodis.com electronic components distributor...
- Page 12 Add the ConnectPort X4® to your iDigi® inventory The iDigi platform allows you to securely manage the devices in your device inventory. 1. To add the ConnectPort X4 to your inventory, follow these steps: a. Select the Devices link in the Left Navigation Bar. b. Click the Add Devices button in the Tool Bar to open the Add Devices applet. The Add Devices applet will discover the Digi devices on your network. Note: In order to discover devices on your network automatically, the Add Devices applet requires Java Runtime Environment (JRE) 1.6 or newer. If Java Runtime Environment (JRE) 1.6 is not installed, you must add your device manually; see the “iDigi Manager Pro does not discover your ConnectPort X4” section of Appendix A: Troubleshooting, on page 61 for more information. c. Select your ConnectPort X4 from the list. To verify that you are selecting the correct device from the list, match the MAC address listed on your label (found on the bottom of the device) with the MAC address listed within the Add Devices applet. Click the OK button. Figure 7: Add Devices Applet iDigi Gateway Development Kit Getting Started Guide 12 Downloaded from Elcodis.com electronic components distributor...
- Page 13 d. Wait about 60 seconds then go back to the Devices list and click the Refresh button. The status of your ConnectPort X4 should now appear as “Connected.” Figure 8: iDigi Device Inventory Note: If the device still appears as ‘Disconnected’ after clicking the Refresh button, please refer to the “’iDigi Manager Pro lists the ConnectPort X4 as ‘Disconnected'” section of Appendix A: Troubleshooting, on page 63 for more information. iDigi Gateway Development Kit Getting Started Guide 13 Downloaded from Elcodis.com electronic components distributor...
-
Page 14: Step 4: Install The Digi Esp™ For Python Development Environment
Step 4: Install the Digi ESP™ for Python Development Environment The Digi ESP for Python Development Environment is an Eclipse‐based Integrated Development Environment (IDE) that simplifies the process of creating Python applications for iDigi devices. It also provides many example projects, one of which we will be using later in this section. To download and install the Digi ESP for Python Development Environment: 1. Navigate to http://www.digi.com/gatewaydevelopmentkit and click on the “Download Digi ESP for Python” link. 2. You will be redirected to the Python Product page. The various download options for the Digi ESP for Python framework will be displayed on this page. Click on the “Digi ESP for Python ‐ Windows XP/Vista/Windows 7 installer ver. 1.2.0.5” link to download the Digi ESP for Python Development Environment. Note: Mac operating systems are not supported in this Development Kit experience. Figure 9: Select Digi ESP for Python Download Variant iDigi Gateway Development Kit Getting Started Guide 14 Downloaded from Elcodis.com electronic components distributor... - Page 15 3. Once the Digi ESP for Python framework has been downloaded, run the Digi ESP for Python framework installation wizard. Follow the steps in the wizard to complete the installation process. Click Finish at the end of the installation. Note: A prompt will ask you if you would like to open the Release Notes associated with the Digi ESP for Python framework, deselect this checkbox. 4. The Digi ESP for Python framework will launch automatically and prompt you to select a workspace directory. Use the default workspace directory (or click the Browse button and navigate to your desired alternate workspace location), check the “Use this as the default and do not ask again” box, and click OK. Note: The Digi ESP for Python framework 'workspace' is the directory where projects and configurations will be stored. The default location for this directory is a subfolder called workspace on the user home directory, for example, C:/Documents and Settings/[username]/workspace. Figure 10: Selecting your Digi ESP for Python Workspace iDigi Gateway Development Kit Getting Started Guide 15 Downloaded from Elcodis.com electronic components distributor...
- Page 16 5. The first time you run Digi ESP for Python the Welcome screen is displayed. Figure 11: Digi ESP for Python Welcome Screen 6. Open the Digi ESP for Python Workbench by clicking on the Workbench icon (as indicated above). Figure 12: Digi ESP for Python Workbench iDigi Gateway Development Kit Getting Started Guide 16 Downloaded from Elcodis.com electronic components distributor...
-
Page 17: Step 5: Create Your First Idigi Dia Project
Step 5: Create your first iDigi Dia Project ® The iDigi Dia (Device Integration Application) is software written in Python that simplifies the task of gathering data from attached devices (such as XBee Sensors), and sending the gathered data to iDigi, allowing for easy integration with client applications using the iDigi Web Services API to access it. The steps in this section will help you build, download, and launch your first iDigi Dia application. The resulting iDigi Dia application will contain drivers for the XBee Sensor and XBee Smart Plug. The application will also be configured to report its data using the RCI presentation for access with iDigi Web Services (which will be demonstrated later in this guide). To begin creating your first iDigi Dia project: 1. Open the iDigi Dia Project Wizard by clicking File > New > iDigi Dia Project from the File menu. Figure 13: Selecting an iDigi Dia Sample Project iDigi Gateway Development Kit Getting Started Guide 17 Downloaded from Elcodis.com electronic components distributor... - Page 18 2. The main wizard page contains a text box to insert the name of the project to be created; name your project. This example uses a project name of “Demo_Project1” but you can choose any unique name. Once the project name has been provided, click Next. Figure 14: Name your iDigi Dia Project iDigi Gateway Development Kit Getting Started Guide 18 Downloaded from Elcodis.com electronic components distributor...
- Page 19 3. Within the Remote Device selection wizard page ensure that Use Current Remote Configuration is selected, and then click the New… button to create a new remote configuration. Figure 15: Create New Configuration A new Remote Device Configuration is needed to work with each specific target device (your ConnectPort X4 in this case). Multiple remote configurations can be created for working with different devices. iDigi Gateway Development Kit Getting Started Guide 19 Downloaded from Elcodis.com electronic components distributor...
- Page 20 a. After clicking the New… button, the Device Manager wizard dialog will open. Figure 16: Device Manager Home Page Note: The left side of the dialog lists the Remote Configurations that exist in the Workbench. b. Initially, there are no Remote Configurations listed in the Device Manager. To begin the process of creating your first Remote Configuration, enable the Device Manager to discover the ConnectPort X4 automatically by clicking the Device Discovery button. iDigi Gateway Development Kit Getting Started Guide 20 Downloaded from Elcodis.com electronic components distributor...
- Page 21 A dialog will ask you to identify a location where the Digi ESP for Python framework should look for devices. Select Local area network/USB devices and click OK. Figure 17: Digi Device Discovery Search Location Selection d. When finished, the Digi Device Discovery dialog will appear listing all the Digi devices discovered on your local network. Your device should be listed within the dialog table. e. Click on your device to select it from the list, and then click the Create Configuration button. Figure 18: Digi Device Discovery Applet iDigi Gateway Development Kit Getting Started Guide 21 Downloaded from Elcodis.com electronic components distributor...
- Page 22 The new configuration will receive a generic name, “ConnectPort X4” in this case, with all the settings configured automatically. Click Set Current to make this configuration the current one, which means that the Digi ESP for Python framework will use it to perform several operations that require interaction with the remote device (reboot, transfer files, etc.). Figure 19: Device Manager iDigi Gateway Development Kit Getting Started Guide 22 Downloaded from Elcodis.com electronic components distributor...
- Page 23 4. After clicking the Set Current button you will be redirected back to the iDigi Dia Project wizard. Ensure that Use Current Remote Device is selected, and click Next. Figure 20: Remote Device Selection iDigi Gateway Development Kit Getting Started Guide 23 Downloaded from Elcodis.com electronic components distributor...
- Page 24 5. Ensure that Python Interpreter version 2.4.3 is selected within the Python settings section, and that iDigi Dia is supported then click Finish to create the project. Figure 21: Remote Device’s Information Note: If a prompt appears asking you to set a secure password click no. iDigi Gateway Development Kit Getting Started Guide 24 Downloaded from Elcodis.com electronic components distributor...
- Page 25 6. Once the project is created the Smart Project Editor for iDigi Dia screen will be displayed. Figure 22: Smart Project Editor for iDigi Dia Screen a. The created project is displayed in the Pydev Package Explorer view; expand it to see its contents. To open the Pydev Package Explorer view, select Window > Show View > Pydev Package Explorer. If Pydev Package Explorer does not appear in the list, select Other to open the Show View dialog. Note: Depending on your screen’s resolution, it may be helpful to maximize the Digi ESP for Python Screen. Figure 23: Pydev Package Explorer iDigi Gateway Development Kit Getting Started Guide 25 Downloaded from Elcodis.com electronic components distributor...
- Page 26 b. The main file of the project, dia.yml, will be opened and displayed in the Smart Project Editor view. It contains the iDigi Dia elements (devices, services, etc.) that will be used by the iDigi Dia project. Figure 24: Smart Project Editor View iDigi Gateway Development Kit Getting Started Guide 26 Downloaded from Elcodis.com electronic components distributor...
- Page 27 7. The XBee Sensor and XBee Smart Plug need to be added to your project via the iDigi Dia Project Editor. To add these items, perform the following steps: a. Click the Add… button to begin adding your XBee devices. b. For the XBee Senor, select “XBee Sensor” from the Devices category, then click the Add button. Repeat this process for the XBee Smart Plug by selecting “XBee RPM” from the Devices category and then clicking the Add button. Note: For non‐US kits, select the “XBee Wall Router” instead of XBee RPM. 8. At this point in time the two XBee devices have been added to your project, but the iDigi Dia Project Editor is missing the XBee MAC addresses for your XBee Sensor, and XBee Smart Plug. Figure 25: Missing MAC Addresses The XBee MAC address information for your XBee devices can be determined by connecting to the web UI of the ConnectPort X4. Note: If you already know the IP address of your ConnectPort X4 Gateway open a web browser and type in the IP address, and move onto Step 12. Otherwise, use the Digi Device Discovery tool (described in the next step). iDigi Gateway Development Kit Getting Started Guide 27 Downloaded from Elcodis.com electronic components distributor...
- Page 28 9. Run the Digi Device Discovery Tool from your PC's Start Menu. Figure 26: Device Discovery Path 10. Running the Digi Device Discovery Tool will bring up the Digi Device Discovery Application Devices list. Figure 27: Locate your Device in the Device List Locate your device in the list and double‐click on it to bring up the ConnectPort X4 Home page. iDigi Gateway Development Kit Getting Started Guide 28 Downloaded from Elcodis.com electronic components distributor...
- Page 29 Figure 28: ConnectPort X4 Configuration and Management Home Page 11. The ConnectPort X4’s Home page contains several links. Click on the XBee Network link from the left menu to access the XBee Configuration page. Figure 29: XBee Network Option iDigi Gateway Development Kit Getting Started Guide 29 Downloaded from Elcodis.com electronic components distributor...
- Page 30 12. The XBee Configuration page shows the network view of the XBee devices attached to the ConnectPort X4. Verify that your XBee L/T Sensor, ConnectPort X4, and XBee Smart Plug are all listed (as shown below). Figure 30: XBee Network View If your XBee L/T Sensor, ConnectPort X4, and/or XBee Smart Plug are not listed, try clicking the Discover XBee Devices button to force the ConnectPort X4 to discover its attached XBee devices. If this does not fix the problem, see the “XBee devices fail to join the ConnectPort X4’s XBee network” section of Appendix A: Troubleshooting on page 60 for more information. You have just completed Goal #2: Setting up and configuring the physical elements of an XBee wireless network, and understanding how the network is managed through a ConnectPort X4 gateway. iDigi Gateway Development Kit Getting Started Guide 30 Downloaded from Elcodis.com electronic components distributor...
- Page 31 13. Now you need to configure the Smart Project Editor with the MAC addresses of the two XBee devices that were added to this project in Step 7 (above). To do that, simply copy the XBee Extended Address from the ConnectPort X4's web UI (as shown in Figure 30) into the appropriate MAC address field within the Smart Project Editor. a. Copy the Extended Address of your XBee /L/T Sensor from the ConnectPort X4's web UI into the MAC address field of the XBee Sensor device in the Smart Project Editor. b. Then copy the Extended Address of your XBee Smart Plug from the ConnectPort X4's web UI into the MAC address field of the XBee RPM device in the Smart Project Editor (as shown below). Figure 31: Enter MAC Address Note: For non‐US kits, select the “XBee Wall Router [xbr0]” instead of XBee RPM. With the MAC addresses updated in the Smart Project Editor, all configuration errors (missing XBee MAC addresses for your XBee Sensor and XBee Smart Plug) should be cleared. iDigi Gateway Development Kit Getting Started Guide 31 Downloaded from Elcodis.com electronic components distributor...
- Page 32 Note: The XBee Sensor's default sleep interval is one minute. Changing the Sample Rate configuration value to 5000 will set the sleep interval to five seconds, which will provide sensor updates more often. These sensor updates will allow you to see value changes more easily in the steps to follow. However, changing the sleep interval will impact battery life as well. This is something you should take into consideration when deploying your devices. 14. Change the Sample Rate parameter of the XBee Sensor from 60000 to 5000 (as shown below). Figure 32: Change Sleep Interval Sample Rate iDigi Gateway Development Kit Getting Started Guide 32 Downloaded from Elcodis.com electronic components distributor...
- Page 33 15. Save your project by clicking the Save button from the main toolbar, or navigating to File > Save from the menu. Figure 33: Save Project 16. Now that the XBee MAC addresses have been configured your iDigi Dia project is fully configured and ready to be deployed. Click the Run button (on the main toolbar) then select the Remote iDigi Dia option, and click OK to continue. Figure 34: Launch your Project iDigi Gateway Development Kit Getting Started Guide 33 Downloaded from Elcodis.com electronic components distributor...
- Page 34 The Source View at the bottom of the Workbench screen will display status messages as the: iDigi Dia project builds, Downloads files to your ConnectPort X4, Reboots your ConnectPort X4 (in order to start the Dia application), and finally starts running the Dia application on your ConnectPort X4. Figure 35: Workbench Source View Note: This process takes a minute or so, please be patient. iDigi Gateway Development Kit Getting Started Guide 34 Downloaded from Elcodis.com electronic components distributor...
- Page 35 17. The workbench will now display an additional tab, the Dia Web Presentation tab, and your screen will look similar to the following: Figure 36: Dia Web Presentation Tab The Elements section of the Smart Project Editor for iDigi Dia provides several presentations including an RCI Handler, Console Port, and a Web Presentation. For more information on these items, refer to the “Digi ESP for Python” section of Part 2: Learn More, on page 54. iDigi Gateway Development Kit Getting Started Guide 35 Downloaded from Elcodis.com electronic components distributor...
- Page 36 18. After the iDigi Dia project (created throughout “Step 5: Create your first iDigi Dia Project” of this guide) starts running on your ConnectPort X4, you can interact with the XBee devices by accessing the /idigi_dia.html web page directly from the web UI of the ConnectPort X4. To interact with the new web page, open your web browser and enter the IP address of your ConnectPort X4, followed by the “/idigi_dia.html” page (as demonstrated below using the example “http://10.21.6.178/idigi_dia.html”). Figure 37: XBee Smart Plug – Power ON From this page you can turn the XBee Smart Plug off and on, as well as view all the current sensor readings. In order to demonstrate how this web page can control the power to a remote device, connect a lamp, fan, or some other electrical device to the power outlet on the XBee Smart Plug. a. In the example above, the XBee Smart Plug’s power_on state is currently turned “On”. To turn the XBee Smart Plug off, simply replace the “On” with “Off” in the Value column, then click the Apply Changes button. b. The XBee Smart Plug will turn off, and the ConnectPort X4’s web page will be updated to show the current power_on state of the XBee Smart Plug. iDigi Gateway Development Kit Getting Started Guide 36 Downloaded from Elcodis.com electronic components distributor...
- Page 37 Figure 38: XBee Smart Plug – Power OFF c. To turn the XBee Smart Plug on, simply type “On” in the Value field and click the Apply Changes button. d. To update the values displayed by the XBee devices’ sensors, click the Refresh All button. You have just completed Goal #3: Using the Digi ESP for Python IDE to build, download, and launch an iDigi Dia application for your ConnectPort X4 gateway, and then interacting with the application in a realistic setting. iDigi Gateway Development Kit Getting Started Guide 37 Downloaded from Elcodis.com electronic components distributor...
-
Page 38: Step 6: Perform An Idigi Web Services Api™ Request
Step 6: Perform an iDigi Web Services API™ Request The next step in the process of using your iDigi Gateway Development Kit is performing an iDigi Web Services API request using iDigi Manager Pro. The iDigi Web Services Console makes it easy to send web service requests to your iDigi device. This example will demonstrate how to retrieve sensor readings from your XBee Sensor and XBee Smart Plug by making a minor modification to one of the provided examples, and then sending an HTTP Post request to iDigi, which will respond with the current sensor readings from the sensors in your XBee devices. The following steps will walk you through performing this API request. 1. Log in to your iDigi developer account. 2. In the Left Navigation Bar under the Management section, select the Web Services Console link. Figure 39: Digi Manager Pro Web Services Console Page 3. Click on the SCI Targets button within the Web Services Console toolbar. Figure 40: SCI Targets Button iDigi Gateway Development Kit Getting Started Guide 38 Downloaded from Elcodis.com electronic components distributor... - Page 39 4. Clicking this button will bring up the Select devices to be used in examples dialog box. Within this box you will select the target iDigi devices that you would like to send requests to. 5. Click on the Add Targets drop‐down box, and choose the device ID corresponding to your ConnectPort X4. Click the Add button and then click OK. Figure 41: Add Targets Figure 42: Targets Successfully Added iDigi Gateway Development Kit Getting Started Guide 39 Downloaded from Elcodis.com electronic components distributor...
- Page 40 6. iDigi Manager Pro will now send Web Services API examples to the selected device. Within the Web Services Console toolbar click on the Examples drop‐down menu then go to SCI > Python Callback. Figure 43: Python Callback iDigi Gateway Development Kit Getting Started Guide 40 Downloaded from Elcodis.com electronic components distributor...
- Page 41 7. Once you have selected the SCI Python Callback example, iDigi Manager Pro will populate the page with the source code of the example as well as select the HTTP method that will be used (an HTTP Post in this case). In order for you to retrieve the sensor readings from your XBee devices, you will need to modify this example text slightly. a. Locate the following lines of text (highlighted in the screenshot below) <do_command target="rci_callback_example"> ping and replace them with the following: <do_command target="idigi_dia"> <channel_dump/> Note: "idigi_dia" is the Target Name listed in the RCI Handler Presentation (as mentioned on page 35). Figure 44: SCI Python Callback Example iDigi Gateway Development Kit Getting Started Guide 41 Downloaded from Elcodis.com electronic components distributor...
- Page 42 8. Your screen should look similar to the one below. Click the Send button to send this request to iDigi. The first time you send a web services request to iDigi, you will be prompted to enter your iDigi credentials, enter them in the dialog provided. Once authenticated, iDigi will send this request to the ConnectPort X4 on behalf of your web services request and display the response from the ConnectPort X4 in the Web Services Responses panel. Figure 45: Updated SCI Callback Example iDigi Gateway Development Kit Getting Started Guide 42 Downloaded from Elcodis.com electronic components distributor...
- Page 43 9. Observe the output displayed within the Web Services Responses panel. A "POST /ws/sci 200” response indicates that the web services request was successful. Figure 46: Successful Callback Attempt iDigi Gateway Development Kit Getting Started Guide 43 Downloaded from Elcodis.com electronic components distributor...
- Page 44 10. Click on the "POST /ws/sci 200” response text to view the entire response from the ConnectPort X4, as well as the request that was sent to generate this response. The channel_dump response shows the current usage, brightness, power‐on state, and temperature readings from the rpm0 (XBee Smart Plug) device, and the brightness, battery condition, and temperature reading from the sensor0 (XBee Sensor) device. Figure 47: Successful Callback Expanded View You have just completed Goal #4: Using the iDigi Manger Pro Web Services Console to send a web services request to the ConnectPort X4, retrieving the current XBee devices’ sensor readings. iDigi Gateway Development Kit Getting Started Guide 44 Downloaded from Elcodis.com electronic components distributor...
-
Page 45: Step 7: Using The Idigi Gateway Development Kit Demonstration Application
Step 7: Using the iDigi Gateway Development Kit Demonstration ® Application The final step in the process of taking advantage of what this Development Kit offers, is accessing the iDigi Web Services API via the iDigi Gateway Development Kit Demonstration Application. The following steps will walk you through this process. 1. Navigate to http://www.digi.com/gatewaydevelopmentkit and click on the “Link to iDigi Gateway Development Kit Demo Application” link. 2. You will be redirected to the iDigi Gateway Development Kit Demonstration Application login page. Enter your iDigi username and password, as well as the last 6 characters of your Gateway ID, into the appropriate fields and then click the Login button. Figure 48: iDigi Gateway Development Kit Demonstration Application Login Page iDigi Gateway Development Kit Getting Started Guide 45 Downloaded from Elcodis.com electronic components distributor... - Page 46 After logging in, the demonstration application will display a screen similar to the following: Figure 49: iDigi Gateway Development Kit Demo Application Getting familiar with the iDigi Gateway Development Kit Demonstration Application This demonstration application displays the current sensor readings and logged sensor readings for the XBee Sensor and the XBee Smart Plug connected to your ConnectPort X4’s XBee network. Values are updated by clicking the refresh button. Every time the screen is refreshed the application also updates the time‐stamp information at the top of the screen. Logging begins automatically once you log in to the application, and logged data is collected once a minute for 60 minutes. After the 60 samples are collected, logging stops. To collect more samples, simply log out, and then log back in to the demonstration application. iDigi Gateway Development Kit Getting Started Guide 46 Downloaded from Elcodis.com electronic components distributor...
- Page 47 XBee® Sensor: The XBee Sensor has an internal light and temperature sensor. The last reported readings from both internal sensors are reported. Figure 50: XBee Sensor Display In the event that your brightness reading looks similar to the example above, simply cover the light sensor on the front of the XBee Sensor and click the Refresh button, and you should see something similar to the following: Figure 51: XBee Sensor Display Refreshed iDigi Gateway Development Kit Getting Started Guide 47 Downloaded from Elcodis.com electronic components distributor...
- Page 48 XBee Smart Plug (for US kits only): The XBee Smart Plug has an internal light and temperature sensor. It also has the ability to track its current usage and allows the XBee Smart Plug to be turned on or off. This demonstration application displays the current flowing through the XBee Smart Plug and the On/Off state of the XBee Smart Plug. Figure 52: XBee Smart Plug Display ‐ Current Flowing In the event your XBee Smart Plug displays something similar to the output above, simply click the “Off” button, and then click Refresh. Your XBee Smart Plug should display something similar to the following: Figure 53: XBee Smart Plug Display ‐ No Current Flowing iDigi Gateway Development Kit Getting Started Guide 48 Downloaded from Elcodis.com electronic components distributor...
- Page 49 Logged Data: The logged data area displays up to the last 60 sensor readings from all XBee device sensors. Logging will stop automatically after an hour and data will be discarded after 24 hours. In order to update the Telemetry data, click the Refresh button. Figure 54: Logged Data Display – Off When you log in to this demonstration application, Telemetry logging will start automatically and run for an hour. Since the logged data is collected once every 60 seconds and only 60 samples are logged, you may need to wait up to 2 minutes before the Telemetry data is updated (as shown in the example below). Figure 55: Logged Data Display – Begin Logging iDigi Gateway Development Kit Getting Started Guide 49 Downloaded from Elcodis.com electronic components distributor...
- Page 50 By turning off the XBee Smart Plug and covering the light sensor on the XBee Sensor, a subsequent screen refresh should make the Telemetry data look similar to the following Figure 56: Logged Data Display – XBee Smart Plug Off, XBee Sensor Covered Waiting a few moments before turning the XBee back on, and uncovering the light sensor on the XBee Sensor should make the Telemetry data look similar to the following: Figure 57: Logged Data Display – XBee Smart Plug On, XBee Sensor Uncovered iDigi Gateway Development Kit Getting Started Guide 50 Downloaded from Elcodis.com electronic components distributor...
- Page 51 By clicking on one of the gauges or graphs, the application will display a more detailed view as shown below: Figure 58: Graph Expanded View You have just completed Goal #5: Using the iDigi Gateway Development Kit Demonstration Application to understand how a web services enabled Enterprise application interacts with iDigi and monitors the data gathered by the XBee device’ sensors. Congratulations you have completed the process of setting up your iDigi Gateway Development Kit! Please read through the “Part 2: Learn More” section of this guide to learn more about the Digi devices and applications used throughout the process of setting up your iDigi Gateway Development Kit. iDigi Gateway Development Kit Getting Started Guide 51 Downloaded from Elcodis.com electronic components distributor...
-
Page 52: Part 2: Learn More
® ® The iDigi platform is a Machine to Machine (M2M) network operating platform, used by software developers and organizations responsible for supporting the network. It enables secure, reliable M2M delivery from your remote devices to your enterprise application. Going to Market? Many users of the iDigi developer platform are creating M2M applications they intend to launch as commercial applications. Taking advantage of the iDigi production platform with unlimited scalability, high‐availability and industry leading security is easy as 1 ‐ 2 ‐ 3. 1. Contact Digi Business Development and express your desire for an iDigi Production Account at 1‐877‐IDIGI‐EZ or by email at http://www.idigi.com/contactus/#email. 2. A Digi Business Development Representative will send you a copy of the iDigi Terms of Service and review pricing. 3. Sign the Terms of Service and an iDigi production account will be created and log‐in credentials will be emailed to you. Since iDigi is an on‐demand platform as a service, you will only be charged for what you use. Further support can be accessed through our support portal at: http://www.digi.com/support/?kw=idigi. iDigi Dia (Device Integration Application) is software that simplifies connecting devices (sensors, PLCs, etc.) to communication gateways. Dia includes a comprehensive library of plug‐ins that work out‐of‐the‐ box with common device types and can also be extended to include new devices. iDigi Dia's unique architecture allows the user to add ... - Page 53 Further documentation on iDigi Dia and iDigi can be found within the iDigi Manager Pro Resources link. Once logged in to iDigi Manager Pro, click on the Resources link in the Left Navigation Bar and explore the documents listed under the “iDigi Dia Resources” and “iDigi Platform Resources” headings. Figure 59: iDigi Dia and iDigi Documentation Additional documentation can also be found on the product specific section of the Digi website http://www.digi.com/gatewaydevelopmentkit, under the “Support Documentation” heading of the Documentation tab. Figure 60: Support Documentation iDigi Gateway Development Kit Getting Started Guide 53 Downloaded from Elcodis.com electronic components distributor...
-
Page 54: Digi Esp™ For Python
Digi ESP™ for Python Digi ESP for Python is an Integrated Development Environment (IDE) that allows the developer to easily develop applications in Python. Digi ESP for Python is built on Eclipse and the Python Development Environment (Pydev) plug‐in. Eclipse is an open, extensible IDE. It was originally written for Java development. The Pydev is a plug‐in that provides support for developing applications with Python in the Eclipse platform. Digi ESP for Python customizes Eclipse and PyDev to support developing specifically with Digi platforms. Digi ESP for Python documentation can be found within the Digi ESP for Python framework program. To locate this documentation: 1. Navigate to the Digi ESP for Python Welcome page and click on the Overview button. Once the Python overview screen is displayed, click on the “Digi ESP for Python” framework link and browse the documentation contained within this page. Figure 61: Welcome Screen Overview Button Figure 62: Digi ESP for Python Overview iDigi Gateway Development Kit Getting Started Guide 54 Downloaded from Elcodis.com electronic components distributor... - Page 55 2. Additional help documentation can be located by navigating to Help > Help Contents from the Digi ESP for Python framework main menu. Figure 63: Help Contents Path Figure 64: Digi ESP for Python Help Section iDigi Gateway Development Kit Getting Started Guide 55 Downloaded from Elcodis.com electronic components distributor...
- Page 56 The Elements section of the Smart Project Editor for iDigi Dia provides several presentations including an RCI Handler, Console Port, and a Web Presentation. The Web Presentation (iDigi Dia project) described in this guide provides details for a new web page “idigi_dia.html.” Click on the Dia Web Presentation tab to open this new web page. Figure 65: Dia Web Presentations The iDigi Dia project also provides support for a new Console Port (using TCP Port 4146 as detailed below). iDigi Gateway Development Kit Getting Started Guide 56 Downloaded from Elcodis.com electronic components distributor...
- Page 57 Figure 66: New Console Port To use the new Console Port, establish a Telnet connection to your ConnectPort X4 using TCP port 4146, and the iDigi Dia CLI will be presented to you. Figure 67: Establish a Telnet Connection The “?” will provide a list of the supported CLI commands, and the “channel_dump” command will retrieve the current sensor readings from your XBee devices’ sensors. iDigi Gateway Development Kit Getting Started Guide 57 Downloaded from Elcodis.com electronic components distributor...
-
Page 58: Digi's ® Gateway Products
Digi’s Gateway products ® Digi’s ConnectPort X Family of programmable mesh networking gateways provide two fundamental benefits: gateway functionality and programmability. Gateway Functionality The gateways function, as the name implies, as gates between local mesh networks (e.g. ZigBee) and IP‐based networks (e.g. Cellular). The gateways support the following network protocols: PAN Networks: - ZigBee - DigiMesh 2.4 GHz - DigiMesh 900 MHz IP Networks: - Ethernet - WiFi - 2G/3G/4G Cellular - WiMax - Satellite Programmability ConnectPort X Gateways support the Python programming language and offer the memory space for local development. This allows the gateways to function with enough local intelligence to make decisions about which events are worth communicating over the wide area network. This is especially useful when sending traffic over proprietary cellular or satellite networks. iDigi Dia (described above) further enhances the value of custom programming on Digi ... -
Page 59: Xbee ® Sensor
XBee Sensor ® Digi XBee Sensors are compact, battery powered environmental sensors for ZigBee networks. They provide real‐time temperature and light information for a variety of applications. For more information regarding XBee Sensors please go to: http://www.digi.com/products/wirelessdropinnetworking/sensors/xbee‐sensors.jsp XBee Smart Plug™ (or XBee Wall Router in nonUS kits) ® The Digi XBee Smart Plug is an intelligent outlet that has the ability to measure and control electrical devices plugged in via a standard electrical outlet. The XBee Smart Plug and XBee Wall Router have integrated light and temperature sensors. Both devices are XBee routers and extend the range of a ZigBee Network. For more information regarding the XBee Smart Plug go to: http://www.digi.com/products/wirelessdropinnetworking/networkextenders/xbee‐smart‐plug‐ zb.jsp For more information regarding the XBee Wall Router go to: http://www.digi.com/products/wireless/zigbee‐mesh/xbee‐wall‐router.jsp Digi’s ZigBee RF Modules ® The ConnectPort X4, XBee Sensor, and XBee Smart Plug/XBee Wall Router used in this kit each contain a ZigBee RF module built on Digi’s XBee hardware platform. Utilizing the ZigBee wireless standard, these modules are interoperable with other ZigBee devices, including devices from other vendors. Programmable versions of the XBee‐PRO ZB module make customizing ZigBee applications easy, even without wireless design expertise. If you are interested in learning more about Digi’s XBee and XBee‐PRO ZB modules, we encourage you to purchase a Digi ZigBee RF Module Development Kit from www.digi.com or your Digi authorized reseller. iDigi Gateway Development Kit Getting Started Guide 59 ... -
Page 60: Appendix A: Troubleshooting
® Is the ASSC LED solid green? If the ASSC LED is solid green on the XBee Sensor, XBee Smart Plug, or XBee Wall Router, it indicates that the XBee device is waiting to join a network, but has been unable to do so (once it joins it will blink its ASSC LED). This condition may mean one of two things; the ConnectPort X4 is turned off, or the XBee device is out of range of the ConnectPort X4. To troubleshoot this problem, move the XBee device closer to the ConnectPort X4 and/or ensure that the XBee device is turned on. Is the ASSC LED blinking green? The XBee Sensor, XBee Smart Plug, or XBee Wall Router will blink their ASSC LED when they are attached to a ZigBee network. If the XBee device has a blinking ASSC LED, but the device does not appear in the list of XBee devices connected to the ConnectPort X4, then the XBee device has either connected to the wrong ZigBee network, or the ConnectPort X4 simply needs to rediscover the list of its attached XBee devices. To troubleshoot this problem, first try clicking the Discover XBee Devices button on the ConnectPort X4's XBee Network page as described on page 30. If this is unsuccessful, move the XBee device closer to the ConnectPort X4 (and if possible configure the devices on the other XBee network to block network joins). Once the XBee device has been moved closer to the ConnectPort X4, factory reset the XBee device (in order to force the XBee device to go through its XBee network discovery phase again). To factory reset an XBee device, simply press the reset button on the side of the unit 4 times (at a rate of 2 times per second). Once this is done, the XBee device should connect to the ConnectPort X4's XBee network, and then show up in its list of attached XBee devices (as described on page 30). If this fixes the problem, return to the “Step 5: Create your first iDigi Dia Project” section and proceed with Step 12 on page 30. If your devices still are not appearing in the XBee devices list, please contact Digi’s Technical Support (see Contact Information on page 3). iDigi Gateway Development Kit Getting Started Guide 60 Downloaded from Elcodis.com electronic components distributor... - Page 61 iDigi Manager Pro™ does not discover your ConnectPort X4 ® If it is not practical to install JRE 1.6 or newer on your PC in order to allow the auto‐discovery process to properly configure your ConnectPort X4 to communicate with iDigi, you can configure the device manually by following these steps: 1. Add the ConnectPort X4 to your iDigi inventory by clicking the Add Manually button and then entering the MAC address (found on the bottom of the device) into the appropriate field. After the MAC address is entered, click the Add button. 2. After your ConnectPort X4 MAC address entry appears in the list, click the OK button to add the device to your iDigi inventory. Note: When entering a MAC address use the following format XXXXXX:XXXXXX. Figure 68: Manually Adding a Device to your iDigi Inventory iDigi Gateway Development Kit Getting Started Guide 61 Downloaded from Elcodis.com electronic components distributor...
- Page 62 3. At this point in time, the ConnectPort X4 has been added to your iDigi inventory, but the device itself has not yet been configured to establish a connection to iDigi. To configure the ConnectPort X4 to establish a connection to iDigi, follow the steps below. a. If you know the IP address of the ConnectPort X4, connect to its web UI by entering its IP address in your web browser. If you do not know the IP address of the unit, use the Digi Device Discovery tool in the Start Menu, and double‐click on the device to open its web UI. b. Click the iDigi link to configure the device’s remote management configuration options. In the Digi configuration settings page, enter the DNS name of the iDigi platform (developer.idigi.com) into the iDigi Server Address field under the “Enable Device‐Initiated iDigi Connection” section. c. Click the checkbox labeled “Automatically reconnect to iDigi after being disconnected” then click Apply. Figure 69: iDigi Configuration Page The ConnectPort X4 will now attempt to establish a connection with iDigi, if the device is on a network with Internet access, the connection should be established in less than a minute. With the ConnectPort X4 properly configured to communicate with iDigi, and with the device added to your iDigi inventory, return to the “Add the ConnectPort X4 to your iDigi inventory” section and proceed with Step d on page 13. iDigi Gateway Development Kit Getting Started Guide 62 Downloaded from Elcodis.com electronic components distributor...
- Page 63 This condition indicates that the ConnectPort X4 and iDigi are not communicating with one another. This can occur for several reasons: 1. The ConnectPort X4 is not connected to the network, or is on a network that does not have Internet access. 2. The ConnectPort X4 is unable to resolve the DNS address of "developer.idigi.com." 3. If you added the ConnectPort X4 to iDigi inventory manually, the MAC address provided to iDigi may not match the actual MAC address of the ConnectPort X4. 4. The ConnectPort X4 is not configured to establish a connection with iDigi. If you have verified that all four of these scenarios are not occurring please contact Digi’s Technical Support (see Contact Information on page 3). iDigi Gateway Development Kit Getting Started Guide 63 Downloaded from Elcodis.com electronic components distributor...
Need help?
Do you have a question about the X4K-Z1U-00011-A1 and is the answer not in the manual?
Questions and answers